Thrive Comments transforms your WordPress comment section into an engaging, conversion-focused platform. In this guide, you’ll learn how to set up and configure Thrive Comments on your website, from installation through advanced settings.
What You’ll Learn
In this article, you’ll discover how to:
- Install and activate Thrive Comments
- Navigate the Thrive Comments dashboard
- Configure general and advanced settings
- Enable comments on posts, pages, and landing pages
- Translate and localize the comment interface
- Optimize for performance and user experience
Installation & Activation
Before you begin, make sure Thrive Comments is installed and activated on your WordPress site. If you’re part of Thrive Suite, the plugin is already available in your Thrive Dashboard.
Accessing the Thrive Comments Dashboard
- In your WordPress admin panel, hover over Thrive Dashboard in the left sidebar.
- Click Thrive Comments from the submenu that appears.
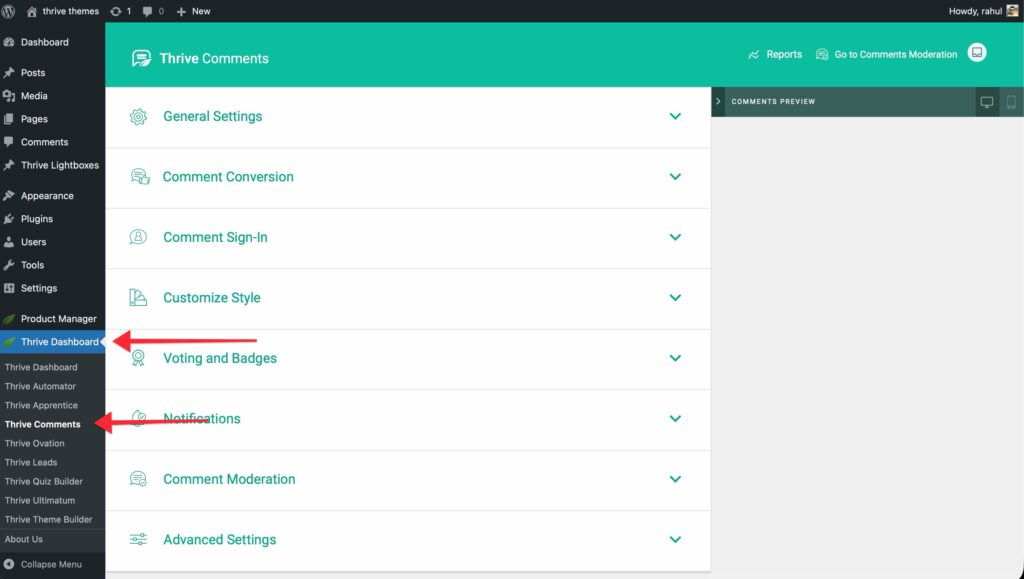
- This opens the main Thrive Comments dashboard where you’ll configure all features.
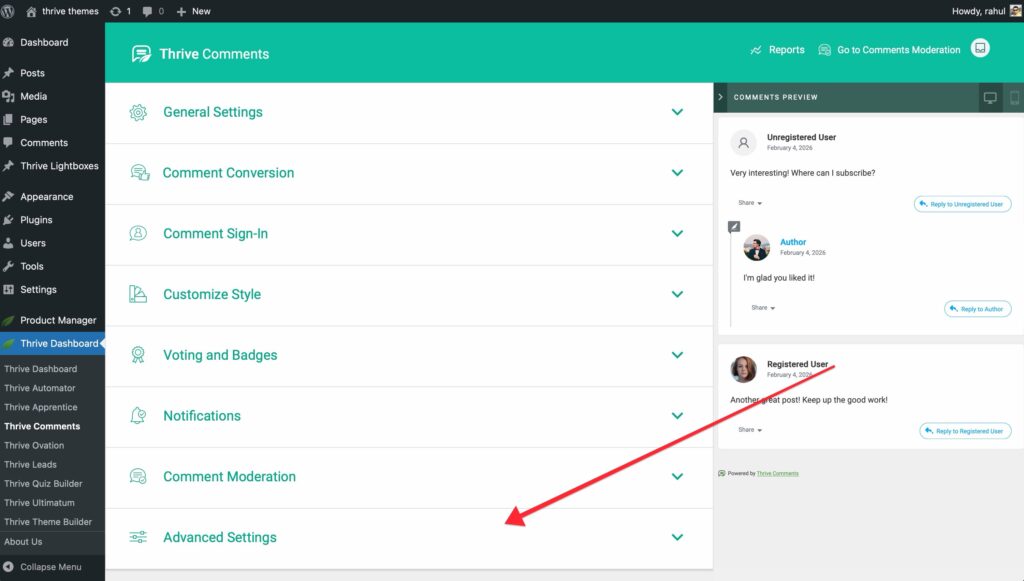
Understanding the Dashboard
The Thrive Comments dashboard is your control center for managing all comment-related features. Here’s an overview of the main sections you’ll use:
Dashboard Sections Overview

1. General Settings
The most basic options you need to set up before using the plugin. This is where you’ll enable Thrive Comments sitewide and configure core behavior.
2. Comment Conversion
Determine what happens after a visitor leaves a comment—show thank you messages, opt-in forms, related posts, or redirect to specific pages.
3. Comment Sign-In
Allow users to comment using their social media accounts (Facebook, Google) or enable guest commenting with website URLs.
4. Customize Style
Make changes to the design of the comments interface, including avatar images, comment date format, and sharing options.
5. Voting and Badges
Add voting options to comments and award badges to users when they reach milestones (e.g., 10 upvotes received, 20 approved comments).
6. Notifications
Set up email notifications for comment replies and new comments on subscribed posts using a third-party email delivery service.
7. Comment Moderation
Configure which user roles can moderate comments and set up approval requirements.
8. Advanced Settings
Configure keyword linking in moderator replies, customize and translate labels, and optimize page speed.
9. Reports
Access analytics showing comment activity, vote engagements, most active commenters, and popular posts.
10. Comments Moderation Dashboard
A separate interface for managing all comments with filtering, search, and bulk actions.
11. Comments Preview
See how your comments look on both desktop and mobile without leaving the dashboard.
Configuring General Settings
The General Settings are the foundation of your Thrive Comments setup. These settings override WordPress’s default comment settings.
Accessing General Settings
From the Thrive Comments dashboard, click on General Settings.

Key Settings Explained
Enable Thrive Comments Sitewide
The first and most important toggle—this activates Thrive Comments across your entire website.
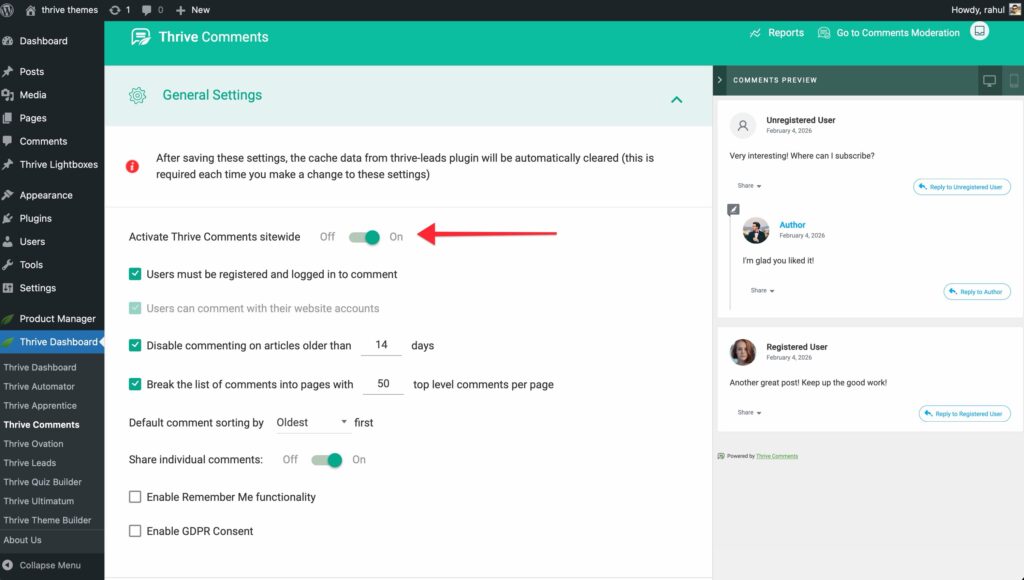
User Registration Requirements
Users must be registered and logged in to comment
- When enabled, only registered users can leave comments
- Automatically enables the “Users can comment with their website accounts” option
Users can comment with their website accounts
- Can be enabled independently if you don’t require registration
- Allows social login options (configured in the Comment Sign-In section)
Comment Age Restrictions
Disable comments on articles older than X days
- Prevents spam on old content
- Set the number of days after which comments are automatically closed
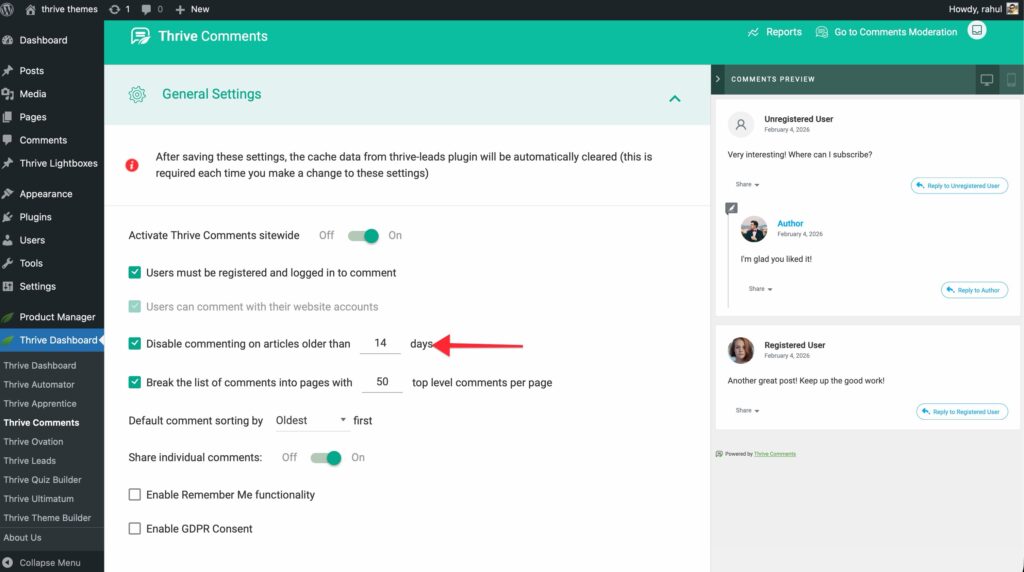
Pagination Settings
Display X comments per page
- Controls how many comments load initially
- Improves page load speed for posts with many comments
- Example: If you have 50 comments, display only 10 at a time
Comment Sorting
Default comment sorting
- Newest first
- Oldest first
- Most upvoted (if voting is enabled)
Remember Me Functionality
Remember Me
- Stores user credentials in the session until they sign off
- Improves user experience for returning commenters
GDPR Compliance
Enable GDPR Consent
- Adds a checkbox asking for permission to store and handle personal data
- Required for GDPR compliance in the EU
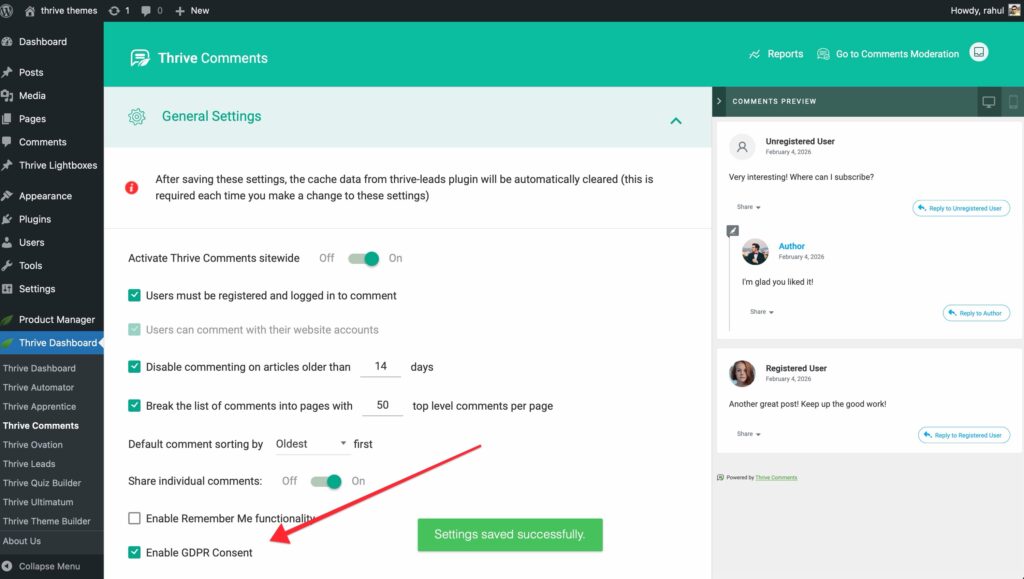
On the front-end, this appears as: “I consent to having this website store my submitted information.”
Important Note About Caching
Configuring Advanced Settings
Advanced Settings give you fine-grained control over Thrive Comments behavior, appearance, and performance.
Accessing Advanced Settings
From the Thrive Comments dashboard, click on Advanced Settings.
The Advanced Settings are organized into three main categories.
1. Automatically Link Keywords in Moderator Replies
This powerful feature allows you to automatically link specific words in moderator responses to URLs or pages on your site.
How to set it up:
- Click Add New.
- In the first field, type the keyword you want to link (e.g., “Google”).
- Press Enter.
- In the second field, enter the URL (e.g.,
https://google.com).
- You can also search for pages or posts from your website.
- Choose whether to:
- Open the link in a new tab
- Make it “no-follow”
- Click Save.

Example: Every time the word “Google” appears in a moderator’s reply, it will automatically link to https://google.com.
You can add as many linked keywords as needed. All keywords are managed from the same dashboard.
Additional Options:
Use Thrive Comments generated meta-tags for social sharing
- Automatically generates meta-tags in the source code for social media share buttons
- Turned off by default
- Note: Other plugins may also generate meta-tags
Load new comments in real time
- New comments appear instantly to admins on the front-end without refreshing
- Comments awaiting moderation show “This comment is awaiting moderation” message
- Improves moderation workflow
2. Customize & Translate Labels
This feature allows you to modify all text labels that appear in the comment interface—perfect for translation or customization.
How to customize labels:
- Click the Customize button.
- A window opens showing all front-end labels.
- Click any field to edit the text.
- Save your changes.
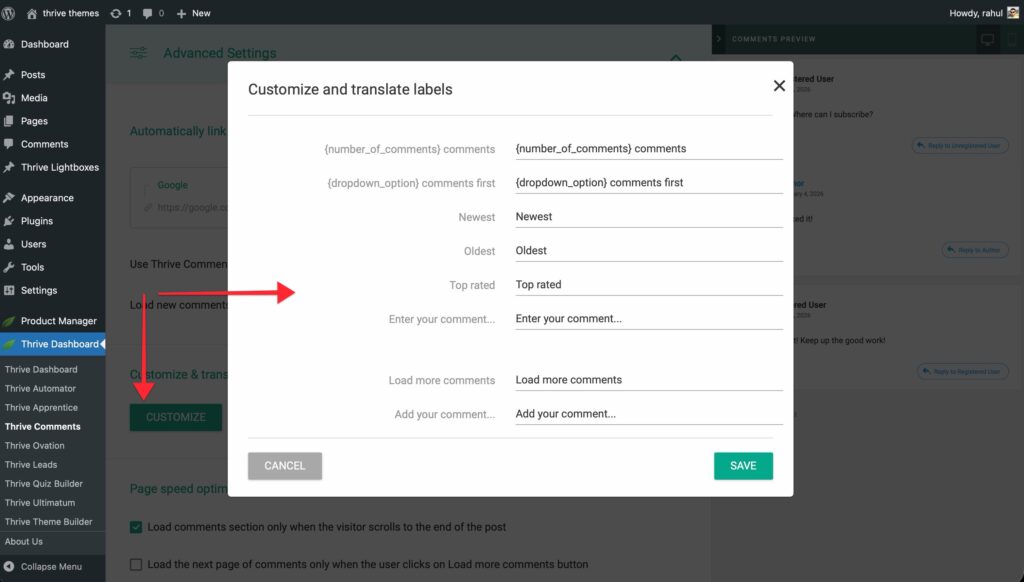
Example labels you can customize:
{number_of_comments} comments—Shows total comment countLeave a Reply—Comment form headingPost Comment—Submit button textReply—Reply button text- And many more…
Translation example:
- English:
{number_of_comments} comments - French:
{number_of_comments} commentaires
All changes apply sitewide to every Thrive Comments section.
3. Page Speed Optimization
These settings significantly improve page load times, especially for posts with many comments.
Lazy load comments
- Comments only load when the user scrolls to the comment section
- Dramatically improves initial page load speed
- Recommended for all sites
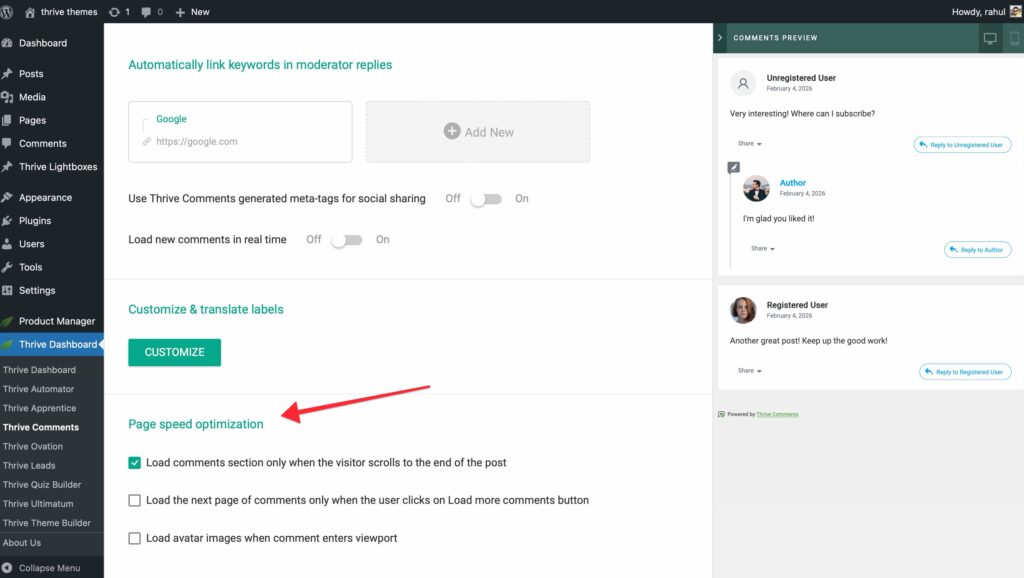
Load more comments behavior
- Manual: User clicks Load more Comments button to see next page
- Automatic: Next page loads automatically when scrolling (if disabled)
- Works with the pagination setting from General Settings
Lazy load avatar images
- Avatar images only load when they enter the viewport
- Further improves page load speed
- Recommended for posts with many comments
Enabling Comments on Posts, Pages & Landing Pages
Thrive Comments works seamlessly across all WordPress content types, including Thrive Architect landing pages.
Regular Posts & Pages
By default, Thrive Comments automatically replaces WordPress comments on all posts and pages where comments are enabled.
To enable or disable comments on specific posts:
- Edit the post or page in WordPress.
- In the sidebar, find the Discussion panel.
- Check or uncheck Allow comments.
Landing Pages (Thrive Architect)
Thrive Comments can be added to Thrive Architect landing pages using a dedicated element.
How to add Thrive Comments to a landing page:
- Open your landing page in Thrive Architect.
- In the right sidebar, find the Thrive Integrations section.
- Locate the Thrive Comments element.
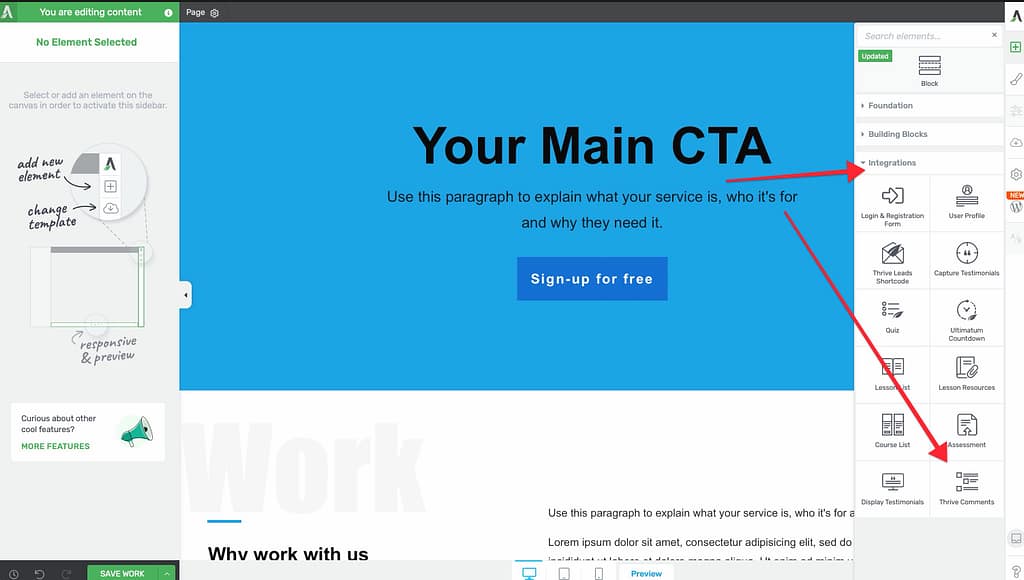
- Drag and drop it onto your canvas where you want comments to appear.
Customizing the landing page comment section:
In the left sidebar, you’ll find Thrive Comments settings:
Accent Color
- Customize the primary color of the comment interface
- Click the color field to open the color picker
- Choose from:
- Color picker (drag to select)
- HEX or RGB code input
- My Colors (saved colors)
- Template Colors (from your template)
- Click Apply to save
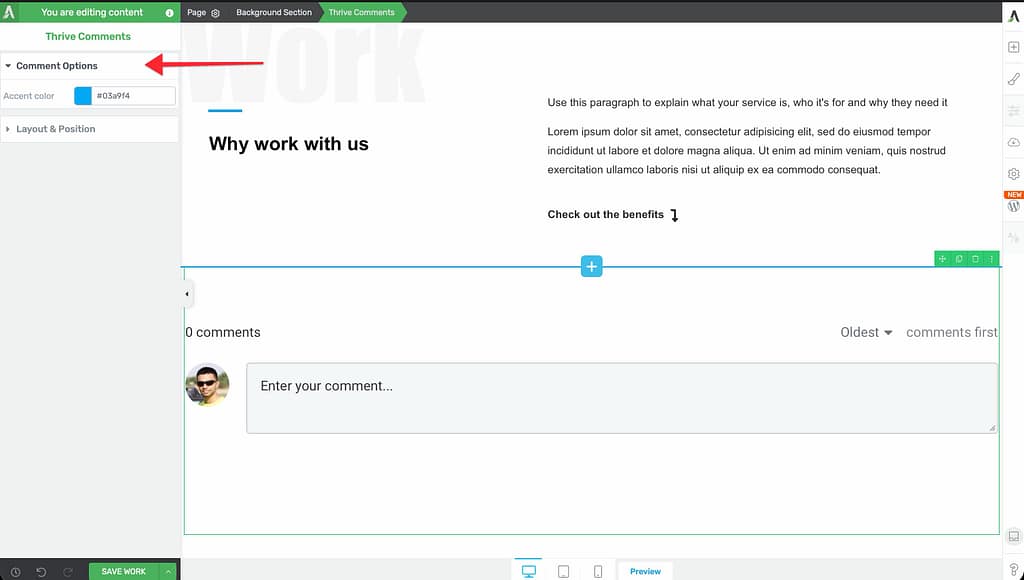
Layout & Position
- Adjust the width of the comment section
- Change the position on the page
- Use standard Thrive Architect layout controls
Important note about comments persistence:
If you remove the Thrive Comments element from a landing page and later add it back, all comments are preserved. Nothing is lost.
Translation & Localization
Thrive Comments makes it easy to translate the entire comment interface into any language.
Why Translate?
If your audience speaks a language other than English, translating the comment interface creates a more welcoming experience and can increase engagement.
Example transformation:
English interface → French interface (or any language you choose)
How to Translate Thrive Comments
Translation is handled through the Advanced Settings label customization feature.
Step-by-step translation process:
- Access the Thrive Comments Dashboard
- Navigate to Thrive Dashboard > Thrive Comments
- Open Advanced Settings
- Click on Advanced Settings in the dashboard
- Access Label Customization
- Scroll to “Customize & translate labels”
- Click the Customize button
- Translate Each Label
- A popup displays all interface labels
- Click any field to edit
- Delete the English text
- Type your translation
Translation tips:
- Dynamic placeholders: Don’t translate
{number_of_comments}or{username}—these are replaced with actual values - Example:
- English:
{number_of_comments} comments - Spanish:
{number_of_comments} comentarios - The
{number_of_comments}stays the same; only translate “comments” - Username placeholders:
- English:
{username} replied to your comment - German:
{username} hat auf deinen Kommentar geantwortet
- Save Your Changes
- Click Save when finished
- All Thrive Comments sections across your site update instantly
Labels You Can Translate
The customization interface includes all visible text:
- Comment count displays
- Form placeholders (“Leave a Reply”, “Your Name”, “Your Email”)
- Button text (“Post Comment”, “Reply”, “Edit”)
- Notification messages
- Voting labels
- Badge names
- And much more…
Summary
That’s it! You’ve successfully learned how to:
- Access and navigate the Thrive Comments dashboard
- Configure general settings for core functionality
- Set up advanced features like keyword linking and label customization
- Enable comments on posts, pages, and landing pages
- Translate the interface into any language
- Optimize for page speed and performance
You now know how to get started with Thrive Comments and transform your comment section into an engagement and conversion powerhouse. Explore the advanced features in our other guides to unlock its full potential!
Frequently Asked Questions
Q: What happens to my existing WordPress comments when I enable Thrive Comments?
A: All existing comments are preserved and displayed through Thrive Comments. Nothing is lost.
Q: Can I use Thrive Comments on some posts but not others?
A: Yes. Thrive Comments respects WordPress’s per-post comment settings. Disable comments on specific posts in the WordPress editor’s Discussion panel.
Q: Do I need to configure WordPress comment settings?
A: No. Thrive Comments General Settings override WordPress comment settings. However, the WordPress Allow comments checkbox still controls whether comments appear on individual posts.
Q: Will Thrive Comments slow down my site?
A: No. With proper configuration of Page Speed Optimization settings (lazy loading), Thrive Comments actually improves page load times compared to default WordPress comments.
Q: Can I revert to WordPress comments?
A: Yes. Simply toggle off Enable Thrive Comments in General Settings, and WordPress comments will display again.
Q: How do I clear cache after making changes?
A: If you use a caching plugin (WP Rocket, W3 Total Cache, etc.), clear the cache from that plugin’s settings after making Thrive Comments changes.
Related Articles
- User Engagement Features in Thrive Comments
- Comment Moderation & Management
- Styling & Customizing Comments
- Sign-in Options & Comment Conversion
- Advanced Usage & Integrations
Thrive Comments Documentation: Explore the full Thrive Comments knowledge base.
Need more help? Visit our support center or contact support.