Thrive Comments gives you full control over how comments are approved, who can moderate them, and how visitors are notified. In this guide, you’ll learn how to configure moderation settings, use the Comments Moderation dashboard, and set up email notifications so your community stays engaged and your comment section stays manageable.
What You’ll Learn
In this article, you’ll discover how to:
- Configure who can moderate comments and how approval works
- Use the Comments Moderation dashboard to review, approve, and manage comments
- Set up automated rules for spam and link-heavy comments
- Enable and customize email notifications for comment replies and new comments
- Apply best practices for moderation and notifications
Introduction to Comment Moderation
Comment moderation in Thrive Comments happens in two places: Comment Moderation (settings that define how comments are handled) and the Comments Moderation dashboard (where you review and act on comments). Notifications run separately and keep commenters informed via email.
Before diving in, make sure Thrive Comments is set up—see How to Get Started with Thrive Comments for installation and general settings.
The Moderation Dashboard
The Comments Moderation dashboard is where you approve, reply to, delegate, and filter all comments on your site.
Accessing the Comments Moderation Dashboard
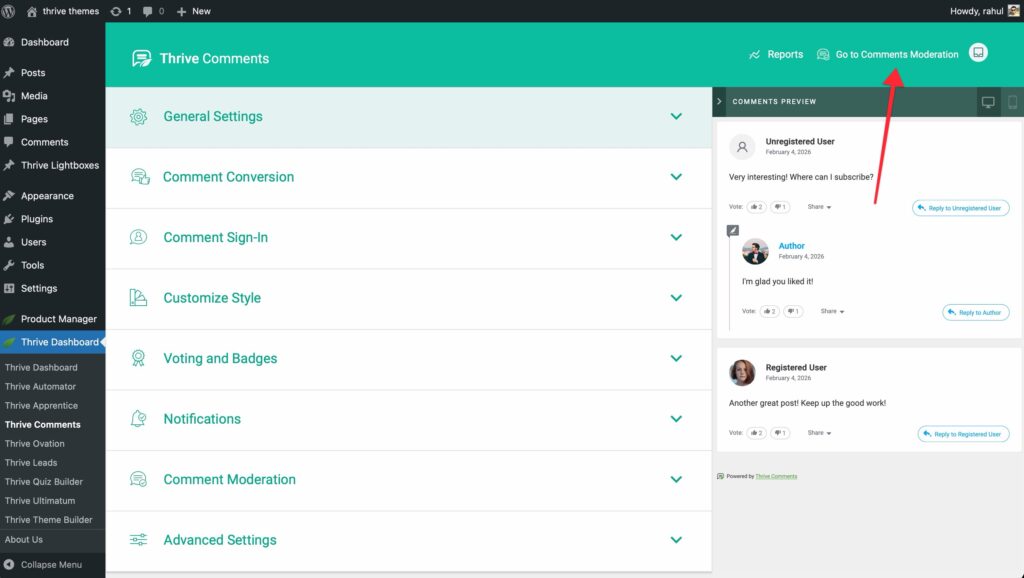
From the Thrive Comments dashboard:
- In your WordPress admin, go to Thrive Dashboard > Thrive Comments.
- In the top right, click Go to Comments Moderation.
From the WordPress admin:
- Hover over Comments in the left sidebar.
- Click Thrive Comments Moderation in the submenu.
Who Can Access the Moderation Dashboard
Only user roles you allow can see and use the Comments Moderation dashboard. You set this in Comment Moderation settings (see Moderation Settings & Rules below). By default, WordPress roles appear there; if you use a membership plugin, its roles are added automatically.
Note: For how comments are held for approval (e.g. first-time commenter), WordPress Settings > Discussion still applies. Configure that as needed so it works with Thrive Comments moderation.
Keyboard Shortcuts
You can moderate faster using keyboard shortcuts:
- In the Comments Moderation dashboard, click Display Keyboard Shortcuts or press Ctrl+K (Windows) or Cmd+K (Mac).
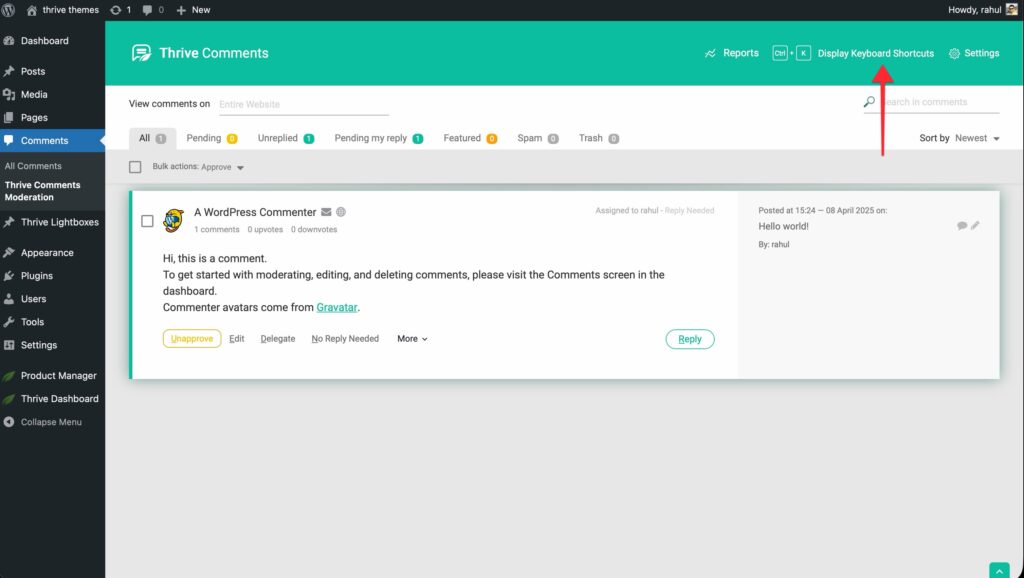
- A lightbox lists all shortcuts. The underlined letter in each action is the key (e.g. U for Unapprove).

Use the shortcut key while a comment is selected to perform that action without using the mouse.
Finding and Filtering Comments
Filter by post or page: Use the search/dropdown at the top to show comments from one post/page or from the whole site.
Search comment content: Use the search bar on the top right to find comments that contain specific words.
Filter tabs: Use the tabs to show only certain types of comments:
- Pending — Comments awaiting moderation (if you use manual approval).
- Unreplied — Comments that haven’t received a reply yet.
- Pending my reply — Comments assigned to you that are waiting for your reply.
- Featured — Comments marked as featured (pinned to the top on the post).
- Spam — Comments marked as spam.
- Trash — Deleted comments.
Sort: Use the Oldest/Newest control on the right to change comment order.
Bulk Actions
You can act on multiple comments at once:
- Select one or more comments using the checkboxes on the left.
- Open the Bulk actions dropdown.
- Choose the action (e.g. Approve, Unapprove, Spam, Trash) and apply it.
Clicking the main checkbox next to Bulk actions selects all comments currently visible in the list.
Comment Information Shown
For each comment you see:
- Commenter name and email (email on hover over the mail icon)
- Avatar (as set in Customize Style)
- Number of comments the user has posted
- Voting status (e.g. upvotes/downvotes) if voting is enabled
- Date, time, and the post/page where the comment was left
- Links to view the post, view comments for that post, or edit the post
- The comment text and, for replies, “In reply to:” with the original comment
Moderation Options for Each Comment
Under each comment you have:
- Approve / Unapprove — Approved comments appear on the site. Unapproving sends the comment back to Pending and marks it as “Awaiting Moderation.”
- Edit — Change the comment text (same idea as WordPress comment editing).
- Delegate — Assign the comment to a specific moderator. It then appears in that person’s Pending my reply list and shows “Assigned to [name].”
- No Reply Needed / Needs Reply — “Needs Reply” puts the comment in Unreplied. When someone replies, it switches to “No Reply Needed.” Moderators’ comments default to “No Reply Needed.”
- More (dropdown):
- Feature — Pin the comment to the top of the comment list on the post.
- Spam — Move to Spam.
- Trash — Move to Trash.
- Save as Testimonial — Turn the comment into a testimonial in Thrive Ovation (if you use it).
- Reply — Write a reply from the dashboard. You can use the keyboard: press R to start replying, then Tab and Enter to submit.
Front-End Moderation
If you’re logged in as a moderator and view a post or page, you can moderate directly on the front end. Find the three dots (•••) next to a comment and use the options there to approve, feature, mark spam, or trash.
Moderation Settings & Rules
These settings define who can moderate and how comments are approved or held. Open them from the main Thrive Comments dashboard by clicking Comment Moderation.
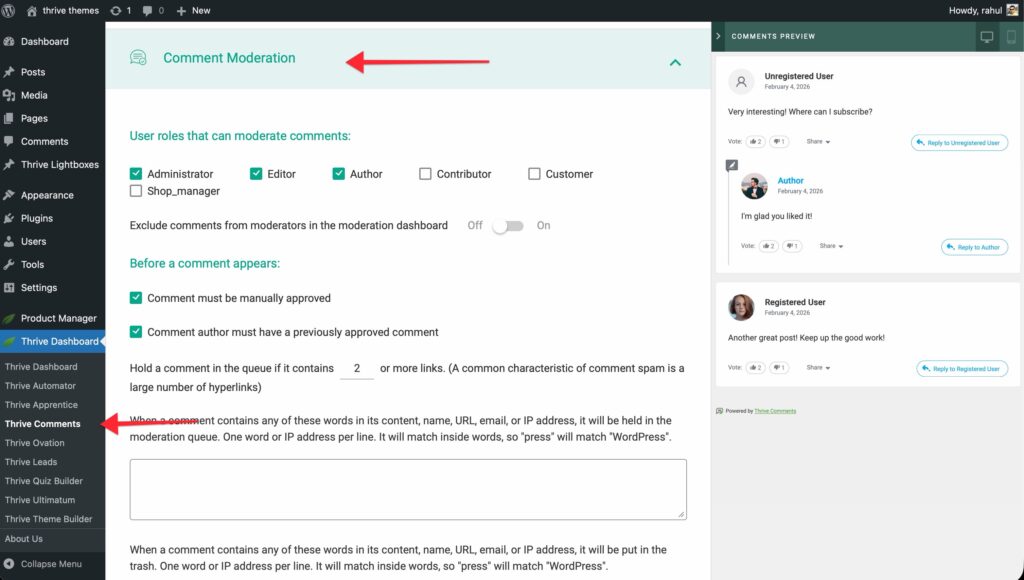
Choosing Who Can Moderate
In the first section, select which user roles can moderate comments by checking the box next to each role. Only those roles will see and use the Comments Moderation dashboard.
Excluding Comments From the Moderation Dashboard
You can limit what appears in the moderation dashboard: only comments from visitors who are not moderators. That way, moderators don’t see each other’s comments in the queue, and you focus on visitor comments.
Requiring Manual Approval
If you enable manual approval, comments stay in Pending until a moderator approves them. They do not appear on the site until approved.
If you disable this, comments are published automatically after submission.
Previously Approved Comment Author
You can allow comments to appear immediately only if the comment author has at least one already-approved comment. First-time commenters go to the moderation queue; returning commenters can post without waiting. This is a common way to reduce spam while keeping the flow smooth for real users.
Holding Comments by Link Count
Spam often contains many links. You can hold comments that contain more than X links in the moderation queue (or send them to trash). Set the number in the field provided; comments above that limit go to Pending or Trash as configured.
Holding or Trashing Comments by Words
Two fields let you define words or phrases that trigger moderation:
- Hold for moderation — Comments containing any of these words go to Pending.
- Send to trash — Comments containing any of these words go to Trash.
Enter one or more words/phrases per field. Any comment matching the link rule or these words will appear in the Pending or Trash section of the Comments Moderation dashboard.
Important: After changing any of these settings, click Save. If you use a caching plugin, clear the cache so changes take effect.
Notification Settings
Thrive Comments can send email notifications when someone replies to a comment or when new comments are posted on a post. To send these emails, you must connect an email delivery service (e.g. SendGrid, Mailgun, Amazon SES) via the Thrive Dashboard.
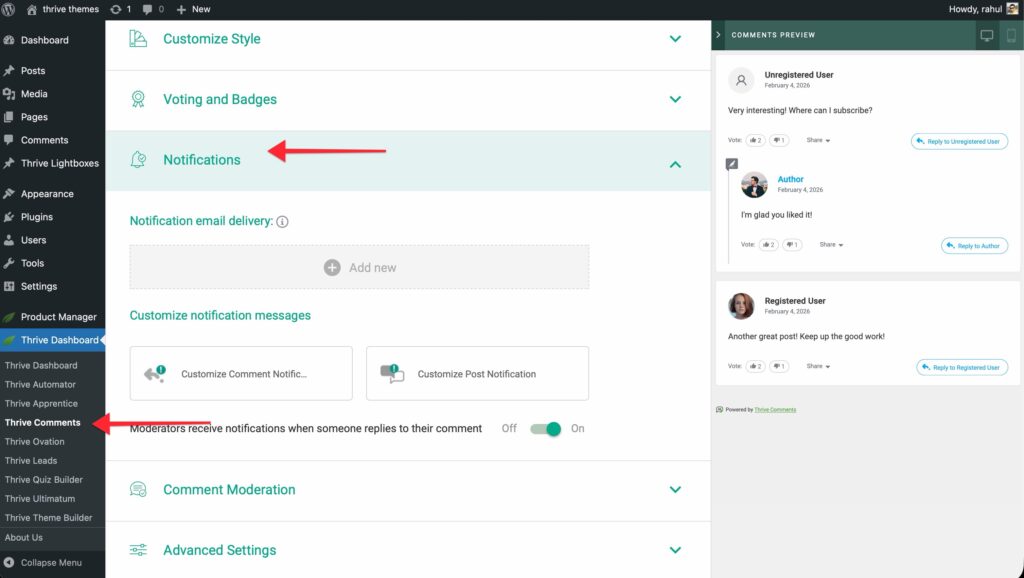
Connecting an Email Delivery Service
- Go to Thrive Dashboard > Thrive Comments and click Notifications.
- Under Notification email delivery, click Add new to create an API connection.
- You’ll be taken to the API Connections list in the Thrive Dashboard. Click Add new Connection.
- Choose an email delivery app from the dropdown (Thrive Comments notifications require an email delivery connection, not a general marketing automation app).
- Complete the setup steps for that service (see Thrive’s docs for each supported API connection).
- Once the connection is created, it appears in the Thrive Comments Notifications section. Use the toggle to turn it on or off. Notifications are only sent when the connection is active.
Two Types of Notifications
Comment notification — When someone replies to a user’s comment, that user receives an email (if they gave a valid email address). This is the “someone replied to you” email.
Post notification — When a user has subscribed to comments on a specific post/page, they receive an email whenever any new comment (or reply) is added to that post. Subscribing is done by the visitor: they click Subscribe to comments in the comment area on that post/page.
Customizing the Comment Reply Notification
You can change the subject line and body of the “reply to your comment” email:
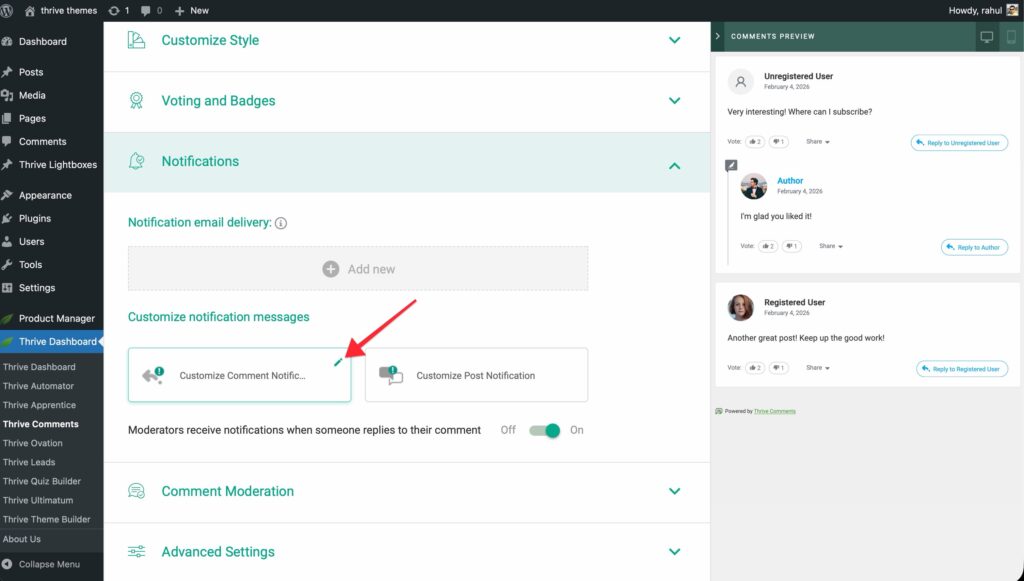
- In Notifications, hover over the Customize Comment Notification card and click the pencil icon.
- In the window that opens you’ll see:
- Shortcodes (right side) — Dynamic placeholders such as
{comment_author},{source_page},{comment_start}, etc. Hover over the “i” icon next to each to see what it does. Use these in the subject and body. - Email Subject — Click the pencil on the subject line to edit it.
- Email Content — Edit the main message, the “Reply to” label, the snippet of the original comment, and the unsubscribe text. Use the pencil icons that appear on hover.
- Unsubscribe link text — This is the text that becomes the link letting users unsubscribe from reply notifications.
- Click Save before closing. Use Click Here to Revert if you want to restore the default text.
Customizing the Post Notification
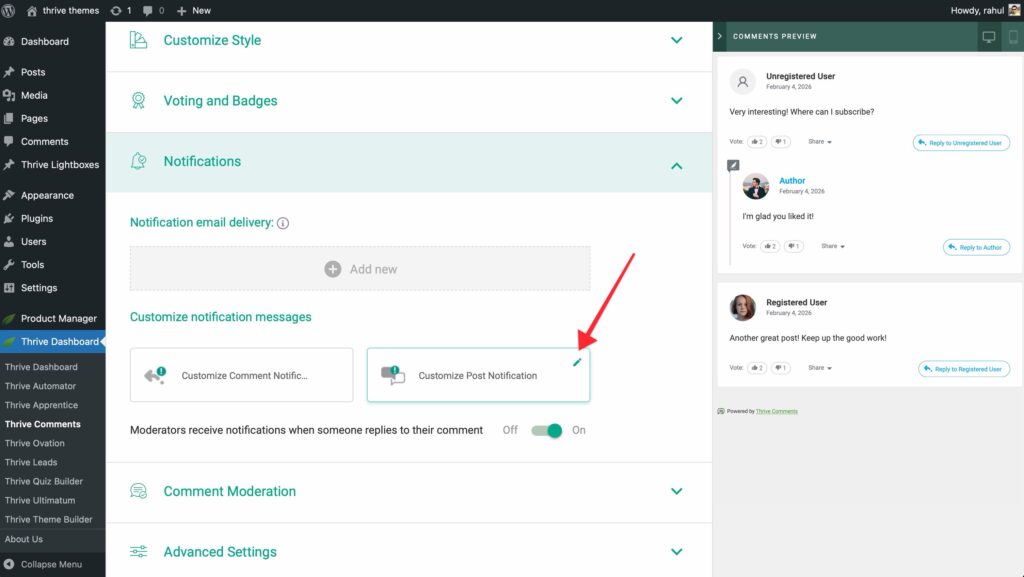
For users who have clicked Subscribe to comments on a post:
- In Notifications, hover over Customize Post Notification and click the pencil icon.
- Customize the subject, content, and shortcodes the same way as for the comment notification.
- Click Save when done.
Best Practices for Moderation
- Use “previously approved” — Allow instant publishing for users who already have an approved comment to cut down on queue noise and improve experience for real readers.
- Set link and word rules — Use the “hold if more than X links” and the word lists to catch obvious spam so it never appears on the site.
- Delegate when useful — Assign comments to specific team members with Delegate so nothing slips through and replies are consistent.
- Review Unreplied — Check the Unreplied filter regularly so visitors get responses and feel heard.
- Use keyboard shortcuts — Ctrl+K / Cmd+K to see shortcuts and speed up approving, replying, and trashing.
- Keep notifications on — A connected, active email delivery service and clear “reply” and “post” emails keep people coming back to the conversation.
Summary
You’ve learned how to:
- Open and use the Comments Moderation dashboard to approve, reply, delegate, and filter comments
- Configure moderation settings: who can moderate, manual approval, first-time vs. returning commenters, and rules for links and words
- Connect an email delivery service and enable Comment and Post notifications
- Customize the reply and post notification emails with shortcodes and your own text
- Apply best practices so moderation stays efficient and commenters stay engaged
You now have a clear path from setup to daily moderation and notifications.
Frequently Asked Questions
Q: Where do I set whether the first comment by a new user needs approval?
A: In Comment Moderation you can enable “Display comment only if the comment author has a previously approved comment.” WordPress Settings > Discussion also has options for holding comments from first-time commenters; use both together for the behavior you want.
Q: Can moderators see each other’s comments in the dashboard?
A: Yes, unless you enable the option to “exclude comments from moderators,” in which case the moderation dashboard only shows comments from visitors who are not moderators.
Q: Why aren’t notification emails sending?
A: Check that an email delivery API connection is set up in Notifications, that the connection is turned on, and that it’s an email delivery service (not only a marketing automation tool). Clear cache if you use a caching plugin.
Q: Can I customize the “Subscribe to comments” label on the front end?
A: The text for buttons and labels can be changed in Advanced Settings > Customize & Translate Labels in Thrive Comments. Look for the subscribe-related label there.
Q: What happens to comments I send to Trash?
A: They move to the Trash filter in the Comments Moderation dashboard. They are not shown on the site. You can restore or permanently delete them from there depending on your workflow.
Q: Does “Feature” work with nested replies?
A: Yes. Featuring a comment pins it to the top of the comment list on that post, regardless of whether it’s a top-level comment or a reply.
Thrive Comments Documentation: Explore the full Thrive Comments knowledge base.