In this article, you’ll learn how to add, configure, and style landing page headers and footers in Thrive Architect. You’ll also learn how to set up the “Switch Headers on Scroll” feature to show different header states as visitors scroll down the page.
Landing page headers and footers are separate from your theme’s header and footer. They are built directly inside the Thrive Architect editor and only appear on the specific landing page where you add them.
Adding a Header to a Landing Page
To add a header to your landing page, follow these steps:
- Open your landing page in the Thrive Architect editor.
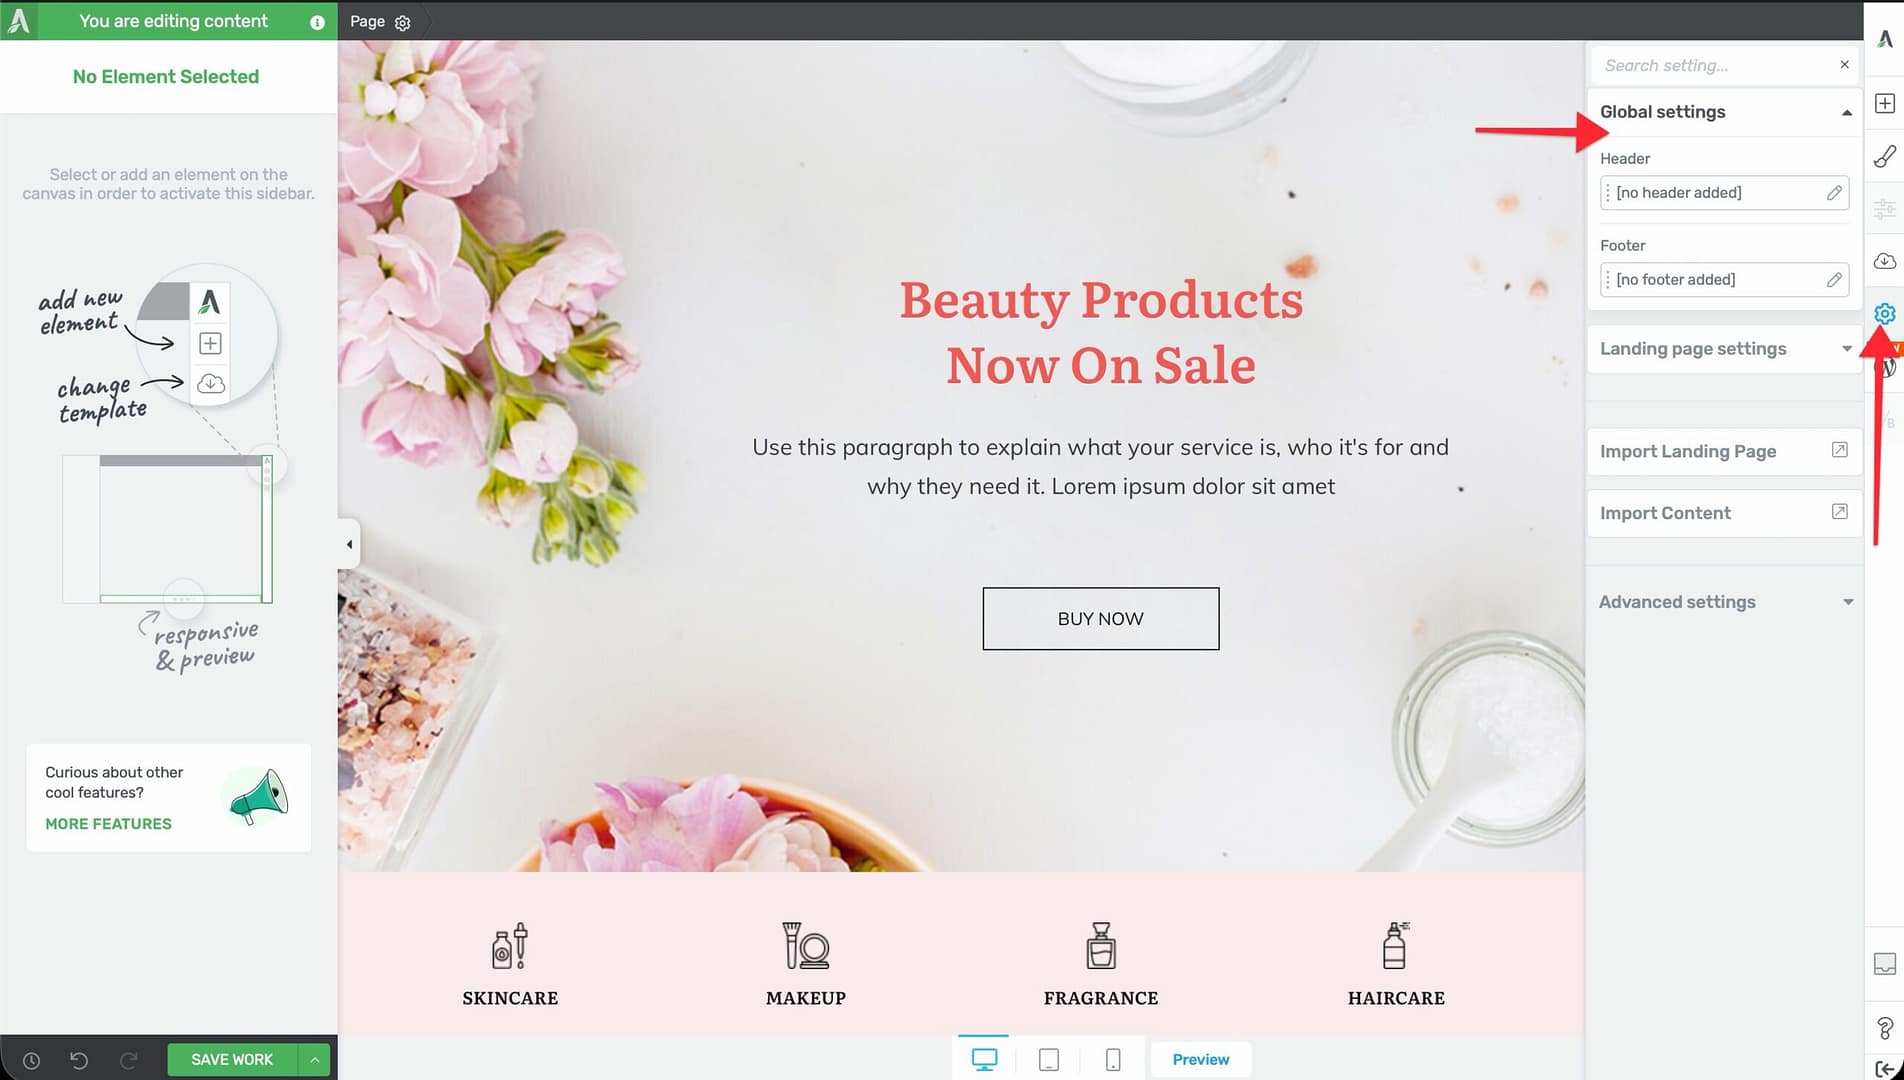
- Click the Settings icon (gear) in the right sidebar.
- In the Global Settings section, locate the Header area.
- Click the Add Section button (plus icon) next to Header.
- A header section appears at the top of your landing page. You can now drag elements (logo, menu, buttons, text) into it.
Configuring Landing Page Headers
After adding a header, select it by clicking on the header section and click edit header. The left sidebar will show the header configuration options.
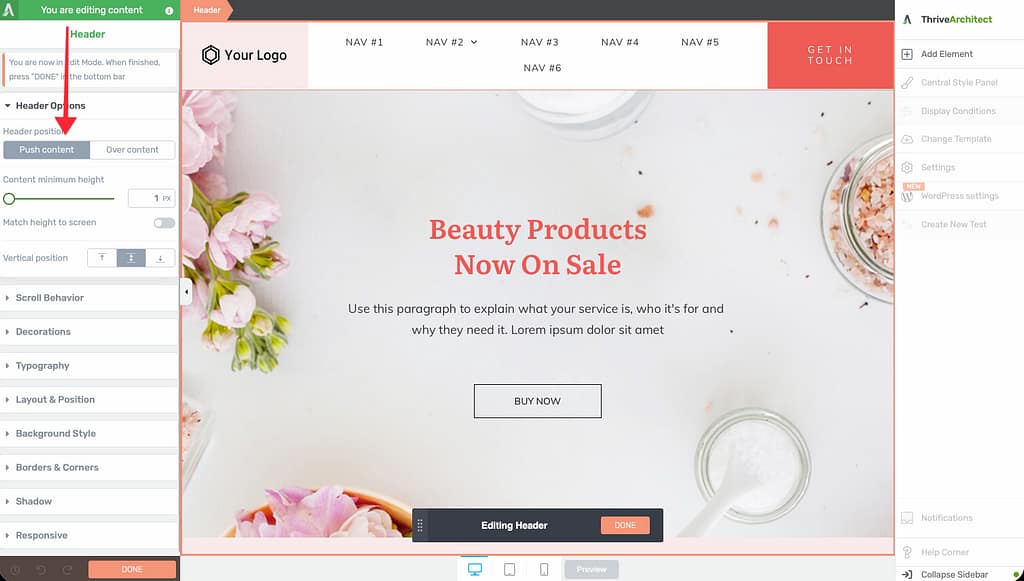
Position
The header position setting controls how the header interacts with the page content:
- Push Content — The header occupies space at the top of the page and pushes the rest of the content down. This is the default behavior.
- Over Content — The header overlays on top of the page content. The content begins at the very top of the page, behind the header. This is useful for transparent or semi-transparent header designs.
Content Width
The content width setting determines how wide the header’s inner content stretches:
- By default, the header content uses the landing page’s Content Maximum Width value.
- You can set a custom width to make the header content narrower or wider than the main page content.
Stretch Background
When enabled, the header’s background color or image extends to the full width of the browser window, even if the content area is narrower. This creates a full-width visual band across the top of the page.
Vertical Position
The vertical position setting controls the header’s scroll behavior:
- Default — The header scrolls with the page and disappears when the user scrolls past it.
- Fixed (Sticky) — The header stays fixed at the top of the viewport as the user scrolls. This keeps your navigation visible at all times.
Switch Headers on Scroll
The “Switch Headers on Scroll” feature lets you display different header designs depending on whether the visitor is at the top of the page or has scrolled down. For example, you can show a tall, branded header when the page first loads, then switch to a compact, sticky header once the user scrolls.
Setting Up Header States
- Select your landing page header by clicking on it.
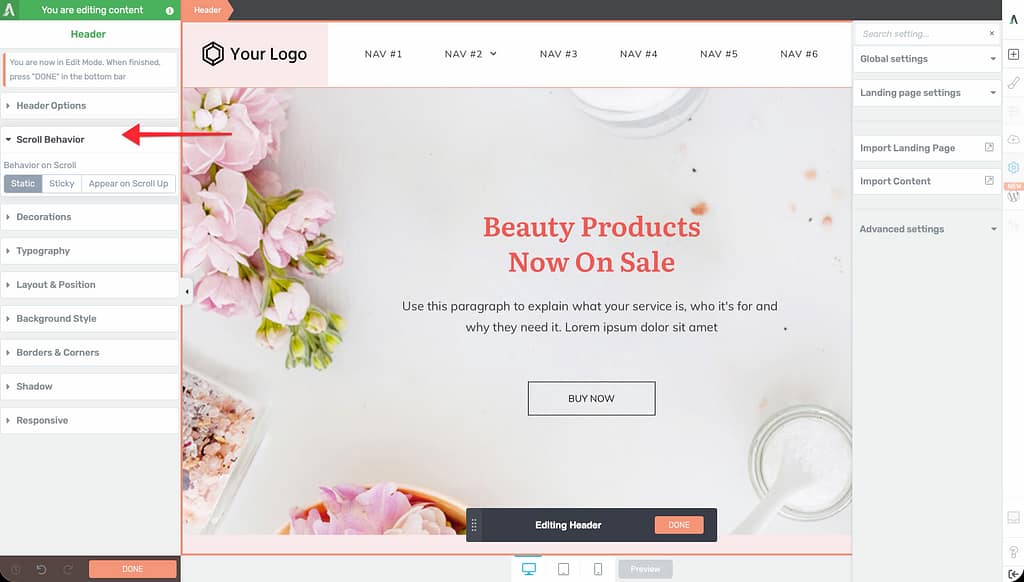
- In the left sidebar, expand the Scroll Behavior section.
- Under Behavior on Scroll, select Sticky. This makes the header fixed at the top of the screen as visitors scroll.
- Once Sticky is enabled, a Header State dropdown appears. You’ll see two states:
- On Load — The header design that appears when the page first loads
- On Scroll — The header design that appears after the visitor scrolls down
- Select On Load and design the initial header appearance (e.g., a larger header with a full logo and tagline).
- Switch to On Scroll and design the scrolled header appearance (e.g., a more compact header with a smaller logo).
How It Works
- When a visitor first arrives on the page, the On Load header is displayed.
- As the visitor scrolls down, the header transitions to the On Scroll state.
- If the visitor scrolls back to the top, the header reverts to the On Load state.
- Each state can have different styling, element visibility, background colors, and sizing.
Tip: Use the On Scroll state to create a slimmer, more compact header that takes up less screen space. This keeps important navigation accessible without blocking too much of the page content.
Adding a Footer to a Landing Page
The process for adding a footer is similar to adding a header:
- Open your landing page in the Thrive Architect editor.
- Click the Settings icon (gear) in the right sidebar.
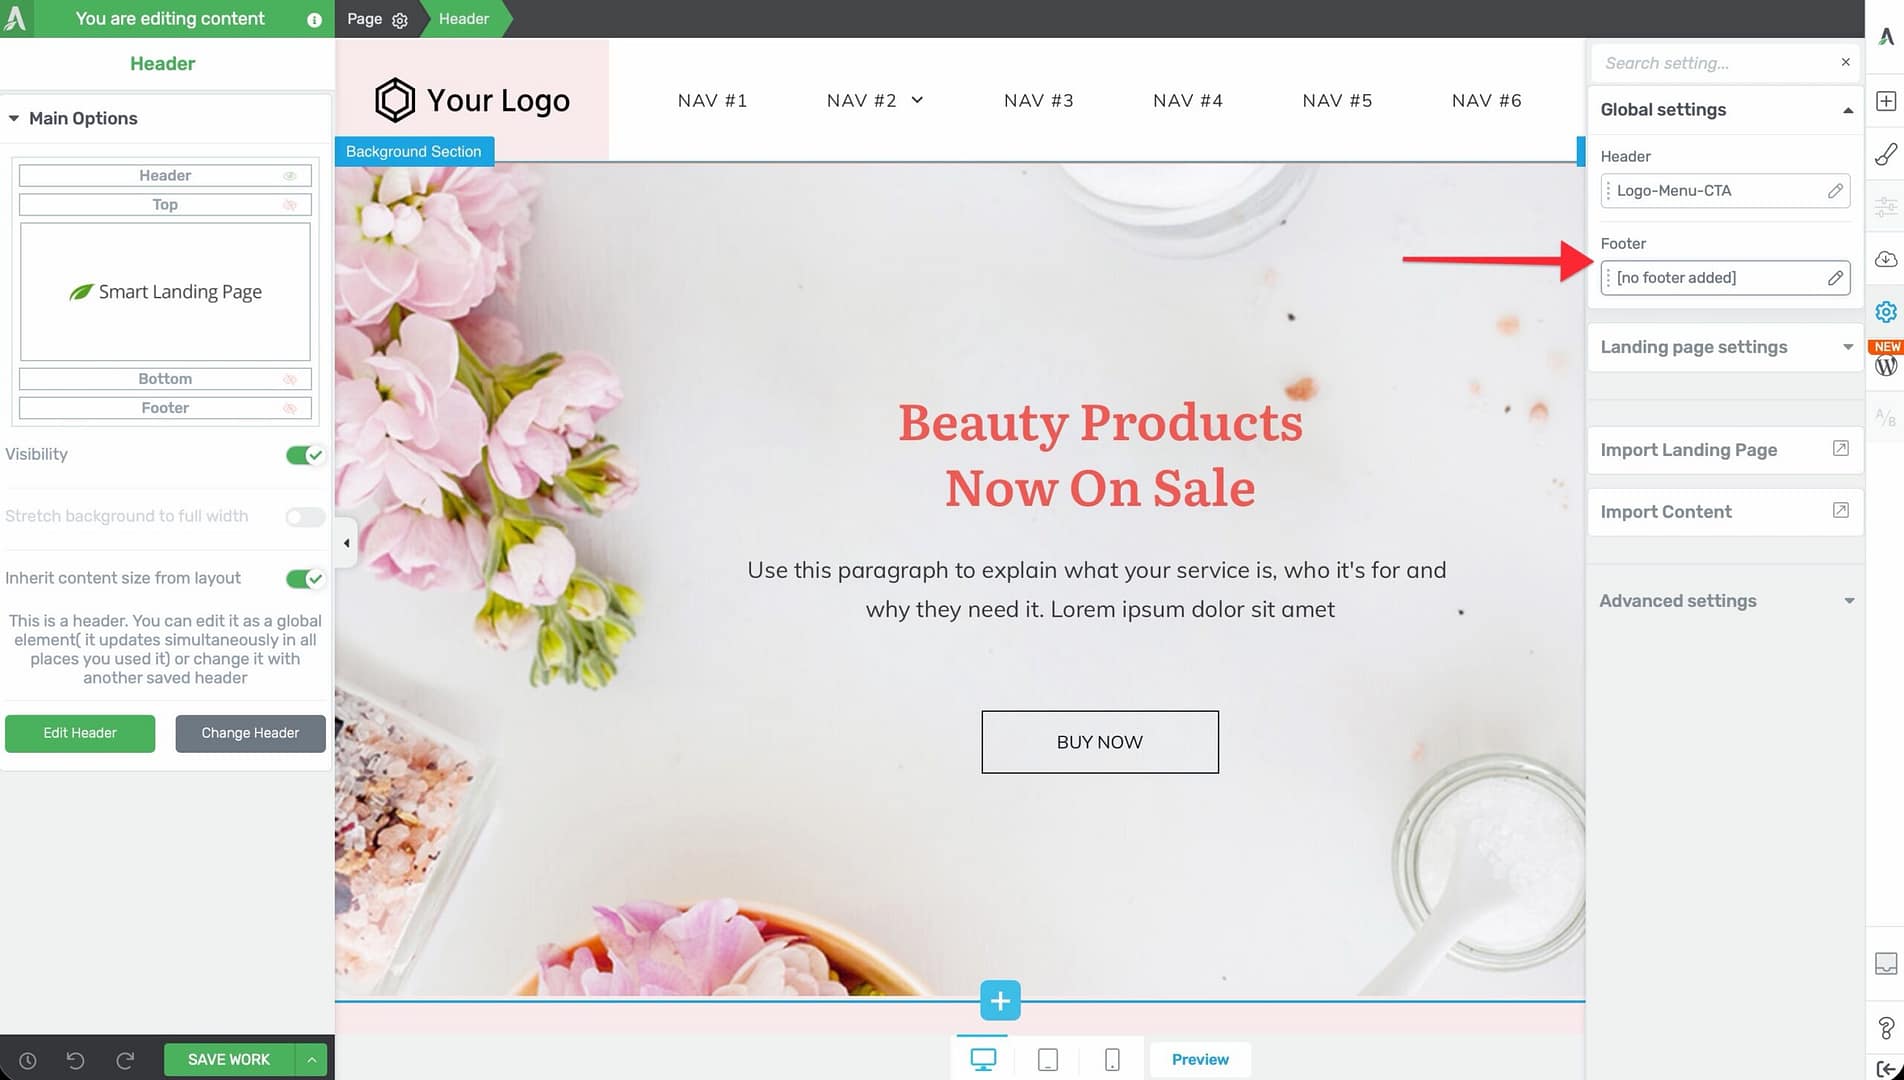
- In the Global Settings section, locate the Footer area.
- Click the Add Section button (plus icon) next to Footer.
- A footer section appears at the bottom of your landing page.
- Drag elements (text, links, social icons, copyright notice) into the footer to build your design.
Configuring Landing Page Footers
Footer configuration options are similar to header options. Select the footer section and use the left sidebar to adjust:
- Content Width — Control how wide the footer content stretches within the page
- Stretch Background — Extend the footer background to the full browser width
- Background Style — Set a background color, gradient, or image for the footer
Note: Footers do not have position or scroll behavior settings. They always appear at the bottom of the page content.
Best Practices for Landing Page Headers and Footers
- Keep landing page headers minimal. A logo, a short menu, and a call-to-action button are usually sufficient.
- Use the Over Content position with a transparent background for hero-style designs where the header overlays a full-width image.
- For long sales pages, use a Fixed (Sticky) header so visitors always have access to navigation or a purchase button.
- Use the Switch Headers on Scroll feature to balance branding (large header on load) with usability (compact header on scroll).
- Keep footer content simple on landing pages. A copyright notice, privacy policy link, and terms link are typically all you need.
Frequently Asked Questions
Can I Use My Theme’s Header and Footer on a Landing Page?
Not directly. Landing pages bypass your theme entirely. However, if you use Thrive Theme Builder, you can select the Blank Page with Header and Footer page type when creating a landing page to include your theme’s header and footer.
Can I Have Different Headers on Different Landing Pages?
Yes. Each landing page has its own independent header and footer. Changes to one landing page’s header do not affect other pages.
Does the On Scroll Header Affect Page Performance?
No. Both header states are loaded with the page. The transition between states is handled with CSS and a small JavaScript event listener, so it has no noticeable performance impact.
Related Resources
- Getting Started with Landing Pages: How to Get Started with Landing Pages in Thrive Architect
- Landing Page Templates: How to Use Landing Page Templates in Thrive Architect
- Scripts and Analytics: How to Add Scripts, Analytics, and Typography to Landing Pages
That’s it! You’ve learned how to add and configure landing page headers and footers, and how to use the Switch Headers on Scroll feature to create dynamic header experiences.