In this article, you’ll learn how to use the Video element in Thrive Architect. This element lets you embed responsive videos from YouTube, Vimeo, Wistia, Vooplayer/Spotlightr, or your own self-hosted files directly onto any page or post.
The Video element is one of the most versatile building blocks in Thrive Architect. Beyond simply embedding a video, it offers decorative frame styles, performance optimizations, custom playback controls, and responsive sizing options that help you deliver a polished viewing experience without any custom code
What Is the Video Element?
The Video element is a responsive media container designed to display video content from a variety of sources. When you add it to your page, you paste a video URL, and Thrive Architect automatically generates a responsive embed that adapts to any screen size.
Key characteristics of the Video element:
- Supports YouTube, Vimeo, Wistia, Vooplayer/Spotlightr, and self-hosted video files
- Includes 15 decorative video styles (frames, monitors, and tablets) to match your page design
- Offers performance optimizations to reduce page load times
- Provides granular playback controls including autoplay, loop, mute, custom start/end times, and lazy loading
- Fully responsive by default, with options for custom aspect ratios and orientations
Adding the Video Element to a Page
Follow these steps to add a Video element to your page:
- Open your page or post in the Thrive Architect editor.
- Click the green plus (+) icon in the right sidebar to open the element panel.
- Type Video in the search field at the top of the panel.
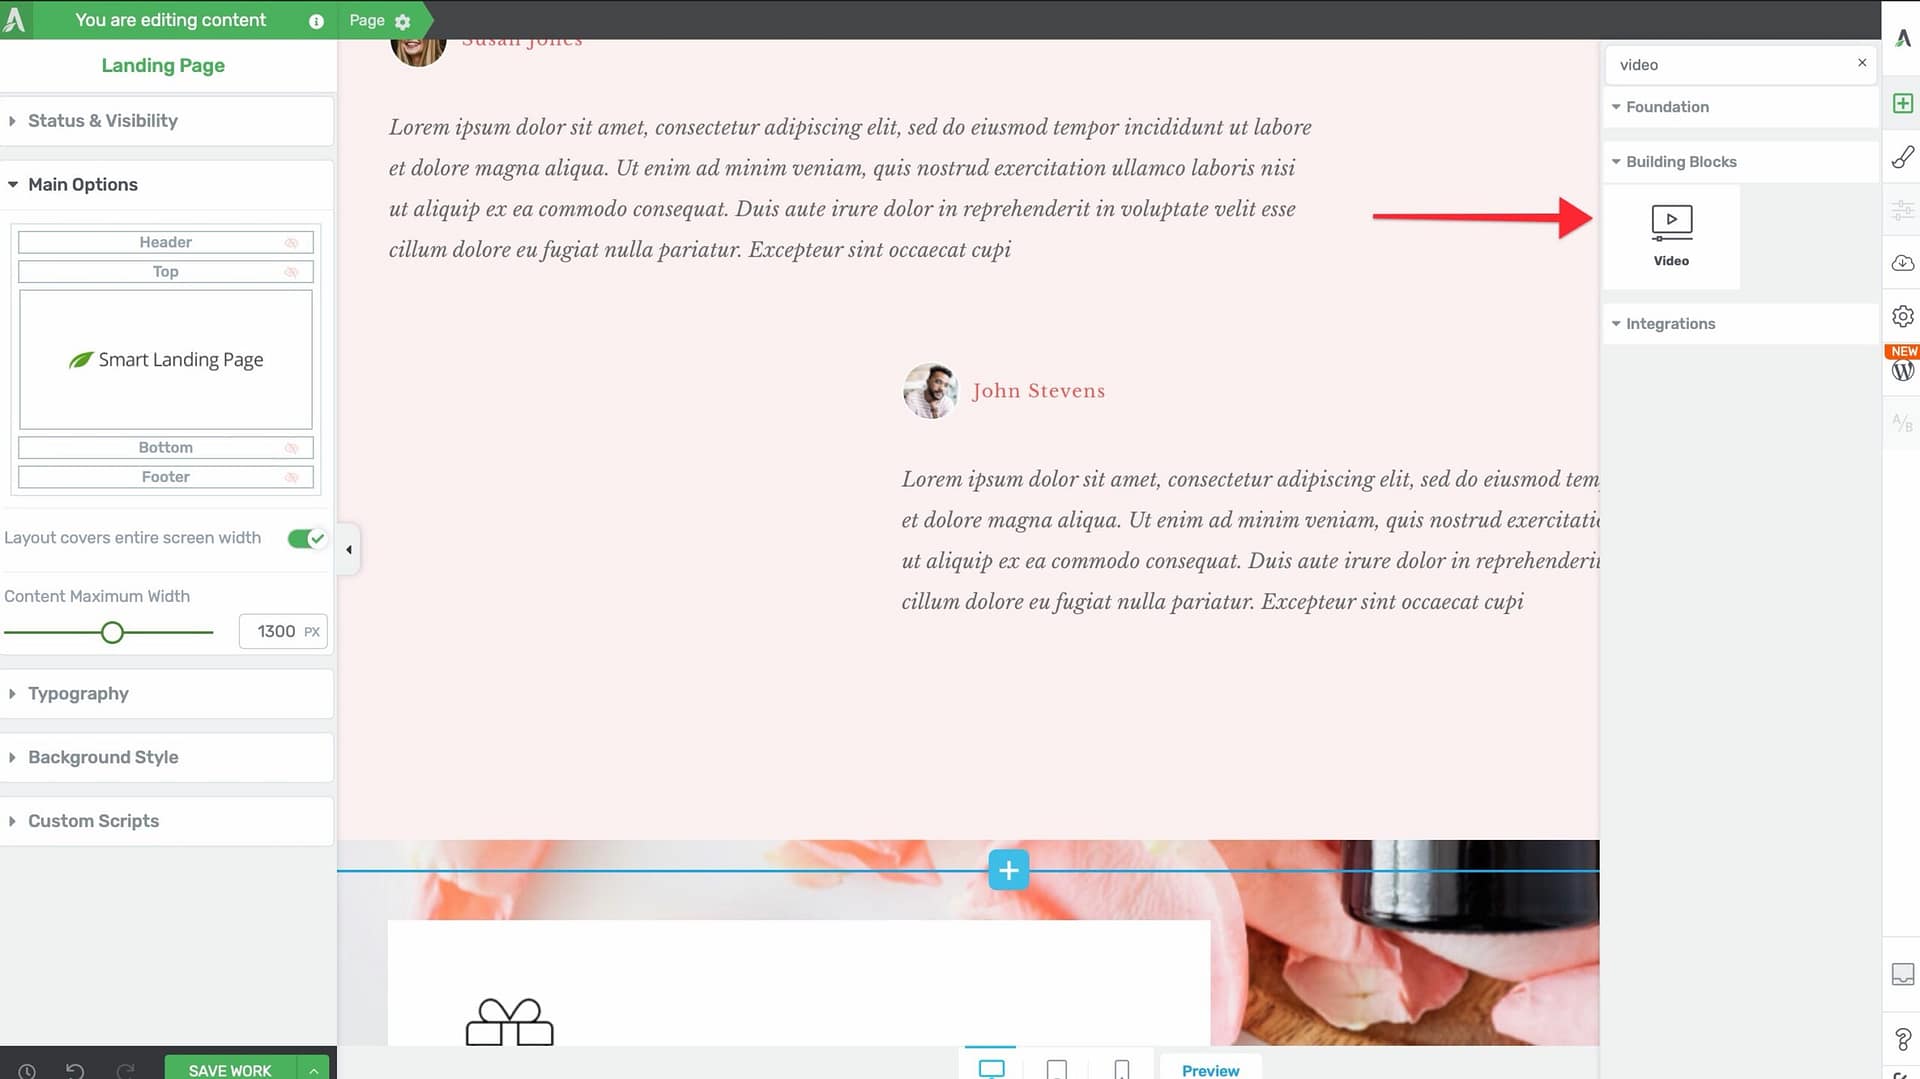
- Alternatively, scroll down to the Building Blocks section in the element list to find the Video element.
- Drag the element from the panel and drop it onto your page canvas.
A video placeholder will appear on the canvas. You’ll need to paste a video URL to display the actual video.
Setting the Video Source
After adding the Video element to your page:
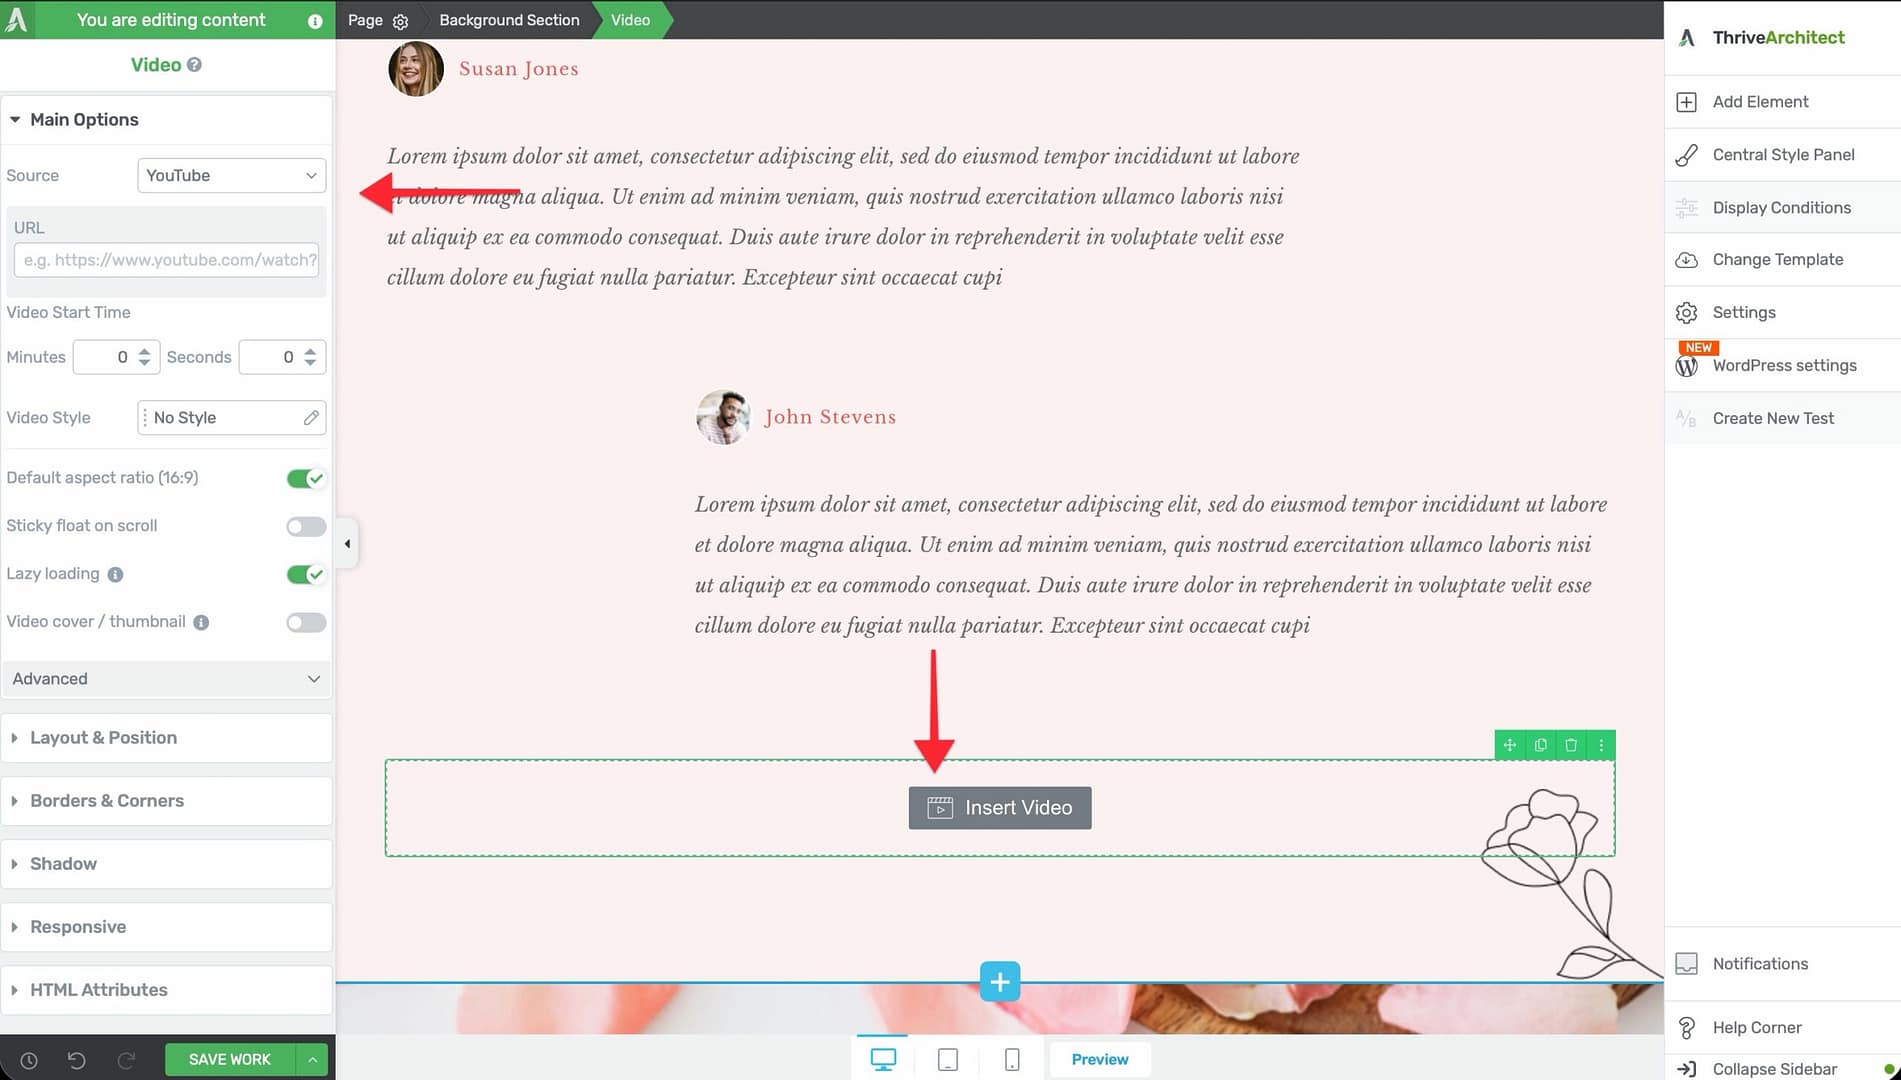
- Click on the Video element on the canvas to select it.
- In the left sidebar, locate the video source input field.
- Paste the full URL of your video into the input field.
Thrive Architect will automatically detect the video platform and generate the appropriate embed. Supported URL formats include:
- YouTube:
https://www.youtube.com/watch?v=VIDEO_IDorhttps://youtu.be/VIDEO_ID - Vimeo:
https://vimeo.com/VIDEO_ID - Wistia: Your Wistia share URL. To get the video URL, open your video in Wistia, click the Embed & Share button, select the embed type (e.g., Inline Embed), and copy the share URL. Paste this URL into the Video element’s source field in Thrive Architect.
- Vooplayer/Spotlightr: Your Vooplayer or Spotlightr embed URL
- Self-hosted: A direct link to an MP4 or other video file hosted on your server or CDN
Configuring the Main Options
After selecting the Video element, the left sidebar displays the following options:
Video Style
A dropdown menu labeled Video Style with 15 decorative frame options:
- No Style (default) — The video displays without any frame or border
- Gray Monitor — A gray desktop monitor frame
- Black Monitor — A black desktop monitor frame
- Black Tablet — A black tablet device frame
- White Tablet — A white tablet device frame
- White Frame — A simple white border frame
- Gray Frame — A simple gray border frame
- Dark Frame — A dark-colored border frame
- Light Frame — A light-colored border frame
- Lifted Style 1 through Lifted Style 6 — Various frames with a subtle lifted shadow effect
Tip: Video styles are purely decorative and do not affect playback behavior. Choose a style that complements your page design, or use No Style for a clean, borderless look.
Resize Control
A drag handle that lets you manually adjust the width of the video on the canvas. Click and drag the resize handle to increase or decrease the video’s display size.
Performance Optimizations
A toggle switch that, when enabled, activates lightweight loading behavior for the video embed. This replaces the full video player with a static thumbnail image on initial page load. The actual video player loads only when the visitor clicks to play, significantly reducing page load time.
Important: Enabling performance optimizations is highly recommended for pages with multiple videos or for pages where Core Web Vitals scores matter.
Adjustable Player Size
A toggle switch that enables manual control over the player dimensions. When enabled, you can set specific width and height values for the video player rather than relying on the default responsive sizing.
Custom Aspect Ratio and Orientation
A toggle switch that lets you override the default 16:9 aspect ratio. When enabled, you can select from different aspect ratio presets or enter a custom ratio, and choose between landscape and portrait orientations.
This is useful for:
- Vertical videos (9:16 aspect ratio for mobile-first content)
- Square videos (1:1 aspect ratio for social media repurposed content)
- Ultrawide or cinematic aspect ratios
Custom Start and End Times
A toggle switch that reveals input fields for setting specific start and end timestamps for the video. When enabled, the video will begin playing from the start time and stop at the end time.
Tip: Use custom start and end times to highlight a specific segment of a longer video without requiring your visitors to scrub through the timeline.
Anonymize Viewing Data
A toggle switch that, when enabled, instructs the video platform to minimize data collection about the viewer. For YouTube videos, this enables the privacy-enhanced mode (youtube-nocookie.com).
Responsive
A toggle switch that ensures the video scales proportionally across all screen sizes. This is enabled by default and should generally be left on.
Autoplay
A toggle switch that makes the video start playing automatically when the page loads. Most modern browsers require the video to also be muted for autoplay to work.
Warning: Autoplay can negatively impact user experience. Many visitors find auto-playing videos disruptive. If you enable autoplay, consider also enabling the Muted toggle to comply with browser autoplay policies.
Preload
A toggle switch that controls whether the browser begins loading video data before the visitor presses play. Enabling preload can reduce the delay when the visitor clicks play but increases initial page load time.
Loop
A toggle switch that makes the video restart automatically from the beginning after it finishes playing.
Muted
A toggle switch that starts the video with the audio muted. This is required by most browsers if you want autoplay to work.
Lazy Load
A toggle switch that defers the loading of the video embed until the visitor scrolls near it. This improves initial page load performance, especially on long pages with multiple videos.
Additional Design Options
The Video element supports the following standard Thrive Architect design controls:
- Layout & Position — Control margins, padding, display settings, and element positioning
- Borders & Corners — Add borders and adjust corner radius around the video container
- Shadow — Apply box shadow effects to the video container (inner shadow and text shadow are not available)
Common Use Cases
Sales Page Video Headers
Place a Video element at the top of a sales or landing page with a compelling pitch video. Use one of the monitor or tablet frame styles to make the video feel more tangible and professional.
Course Lesson Content
Embed lesson videos from YouTube, Vimeo, or Wistia into your course pages. Enable Performance Optimizations and Lazy Load to keep page load times fast, especially on pages with multiple video lessons.
Background or Ambient Video Loops
Use a short, muted, looping video as a visual accent on your page. Enable Autoplay, Loop, and Muted to create an ambient background video effect without disrupting the visitor.
Testimonial Videos
Embed customer testimonial videos throughout your page. Apply a frame style like White Frame or Lifted Style to give each video a polished, consistent appearance.
Privacy-Conscious Embeds
For audiences in regions with strict data privacy requirements, enable Anonymize Viewing Data to use privacy-enhanced embedding and reduce third-party tracking.
Frequently Asked Questions
Which Video Platforms Are Supported?
Thrive Architect supports YouTube, Vimeo, Wistia, Vooplayer/Spotlightr, and self-hosted video files. Paste the video URL into the source field, and the element will detect the platform automatically.
Why Isn’t My Video Autoplaying?
Most modern browsers block autoplay for videos with sound. To ensure autoplay works, enable both the Autoplay and Muted toggles. Visitors can then unmute the video manually after it begins playing.
Can I Embed Multiple Videos on One Page?
Yes. You can add as many Video elements as you need. For best performance on pages with multiple videos, enable Performance Optimizations and Lazy Load on each video to minimize the impact on page load time.
How Do I Change the Video Thumbnail?
The thumbnail is determined by the video platform (YouTube, Vimeo, etc.). To change it, update the thumbnail on the platform itself. When Performance Optimizations is enabled, Thrive Architect displays the platform’s thumbnail as a placeholder image.
Can I Use a Custom Aspect Ratio for Vertical Videos?
Yes. Enable the Custom Aspect Ratio & Orientation toggle and set the ratio to 9:16 for vertical video or 1:1 for square video.
Leftover Video Code After Removing a Video
If you remove a Video element from a page but notice that video-related code is still running in the background (which can conflict with lazy-loading or GDPR plugins), try saving the page, then clearing your browser cache. If the issue persists, check the page source for any remaining video scripts and remove them via Settings > Advanced Settings > View Page Source (HTML).
Related Resources
- Audio Element: How to Use the Audio Element — Embed audio files and podcasts on your pages
- Page Events: How to Set Up Page Events and Lightboxes — Trigger lightboxes and actions based on video playback
- Content Reveal: How to Use the Content Reveal Element — Reveal content after a time delay to pair with video viewing
- Getting Started: Getting Started with Thrive Architect — Overview of the editor and element panel
That’s it! You’ve successfully learned how to use the Video element in Thrive Architect. With support for multiple platforms, decorative frame styles, performance optimizations, and granular playback controls, you can deliver a polished video experience on any page.