In this article, you’ll learn how to use typography settings, Google Fonts, custom fonts, and text styling options in Thrive Architect. Typography is one of the most important elements of your page design — it affects readability, visual hierarchy, brand consistency, and overall user experience. Thrive Architect gives you comprehensive control over every aspect of your text appearance, from font family and size to letter spacing, line height, and text color gradients.
You will also learn how to import and use custom fonts and Google Fonts on your website, how to manage font display settings for performance, and how to leverage the styling hierarchy to create a consistent, professional typographic system across your entire site.
Understanding the Typography Panel
The Typography panel (also called Font settings or Main Options for text) is where you control how text looks in Thrive Architect. Whenever you select a Text element, a Heading element, or any element that contains text (such as a Button, Call to Action, or Testimonial), the typography options appear in the left sidebar.
Accessing Typography Options

- Click on the text content within any element to select it, or click on the element itself to access its options.
- In the left sidebar, look for the Main Options section (for text-based elements) or the specific Font options area.
- The typography controls will be displayed, allowing you to modify all aspects of the text appearance.
Typography Settings Overview
The following typography properties are available in Thrive Architect:
Font Family
The Font Family dropdown lets you select which typeface is used for your text. Thrive Architect provides access to multiple font sources:
- Google Fonts — A large library of free, open-source fonts hosted by Google. These fonts are loaded directly from the Google server by default, but can also be hosted locally for GDPR compliance and performance (see the Custom Fonts section below).
- System Fonts (Web Safe Fonts) — Fonts that are pre-installed on most computers and devices, such as Arial, Georgia, Times New Roman, and Verdana. These do not require any external loading and render instantly.
- Custom Fonts — Fonts that you have uploaded to your website through the Thrive Dashboard or a custom fonts plugin. These can be any font file you own or have licensed.
To change the font family:
- Click on the Font Family dropdown in the typography panel.
- Browse or search for the font you want.
- Click on the font name to apply it to the selected text.
Font Size
The Font Size control lets you set the size of your text in pixels. You can:
- Drag the size slider left or right to adjust the size visually
- Enter a specific pixel value directly in the input field
Font sizes typically range from 12px to 16px for body text, 18px to 24px for subheadings, and 28px to 48px (or larger) for main headings. Choose sizes that create clear visual hierarchy and maintain readability.
Font Weight
The Font Weight setting controls how bold or light the text appears. Available weights depend on the font family you have selected, but common options include:
- 100 (Thin) — The lightest available weight
- 200 (Extra Light) — Very light
- 300 (Light) — Lighter than regular
- 400 (Regular/Normal) — The standard, default weight
- 500 (Medium) — Slightly bolder than regular
- 600 (Semi Bold) — Between regular and bold
- 700 (Bold) — The standard bold weight
- 800 (Extra Bold) — Heavier than bold
- 900 (Black) — The heaviest available weight
Font Style
The Font Style option lets you apply italic formatting to your text. The available options are:
- Normal — Standard upright text
- Italic — Slanted text, typically used for emphasis, quotes, or stylistic contrast
Line Height
Line Height (also called leading) controls the vertical spacing between lines of text. This is one of the most important readability settings.
- Use the slider or enter a value to set the line height
- Values are typically expressed as a unitless number (e.g., 1.5 means the line height is 1.5 times the font size) or in pixels
Letter Spacing
Letter Spacing (also called tracking) controls the horizontal space between individual characters. You can:
- Enter a positive value (e.g., 1px, 2px) to increase the space between letters, creating a more open, airy feel
- Enter a negative value (e.g., -0.5px) to tighten the space between letters for a more compact look
Letter spacing is frequently used on:
- Uppercase text — Adding 1–3px of letter spacing to all-caps text improves readability significantly
- Headings — Slightly tighter letter spacing on large headings can create a more polished, professional look
- Small text labels — Adding spacing to small, uppercase labels (like category tags or navigation items) enhances legibility
Text Transform
The Text Transform option lets you change the capitalization of your text without manually editing the content:
- None — Text appears exactly as typed
- Uppercase — All characters are displayed in uppercase (ALL CAPS)
- Lowercase — All characters are displayed in lowercase
- Capitalize — The first letter of each word is capitalized (Title Case)
Text Alignment
The Text Alignment options control how text is positioned horizontally within its container:
- Left — Text is aligned to the left edge (the default for most languages)
- Center — Text is centered within the element
- Right — Text is aligned to the right edge
- Justify — Text is stretched so that each line has equal width, aligning both the left and right edges
Font Color
The Font Color option lets you set the color of your text. Thrive Architect offers two color modes for text:
- Solid Color — A single, flat color applied uniformly to all text. Click the color swatch to open the color picker, where you can choose a color using the spectrum, enter a hex or RGB code, adjust opacity, or select a saved global color.
- Gradient Color — A color gradient applied across your text, where the text characters display a smooth transition between two or more colors. Switch to the Gradient tab in the color picker to configure gradient text.
Text Decorations
The Text Decoration options let you add decorative lines to your text:
- Underline — Adds a line below the text
- Overline — Adds a line above the text
- Line-through (Strikethrough) — Adds a line through the middle of the text, commonly used to indicate deleted or outdated content (e.g., showing original prices alongside sale prices)
Using Google Fonts
Google Fonts is a library of free, open-source fonts that you can use on your website. Thrive Architect includes built-in access to Google Fonts, making it easy to browse and apply them to any text element.
Selecting a Google Font
- Select a text element on your page.
- In the left sidebar, click on the Font Family dropdown.
- Browse or search for the Google Font you want to use.
- Click on the font name to apply it.
The font will be loaded from Google’s servers and applied to the selected text immediately.
GDPR Considerations with Google Fonts
When Google Fonts are loaded from Google’s servers, the visitor’s browser sends a request to Google, which includes the visitor’s IP address. Under GDPR regulations, this may constitute a transfer of personal data to a third-party server.
To ensure GDPR compliance, you can load Google Fonts locally from your own server instead. There are two approaches to accomplish this:
- Using the WordPress Font Library in Thrive Dashboard — Thrive Themes now includes a native WordPress font library within the Thrive Dashboard that lets you manage fonts locally without installing additional plugins.
- Using a Custom Fonts plugin — Install and use a third-party plugin (such as the free “Custom Fonts” plugin) to download Google Fonts and serve them from your own server.
Disabling Google Fonts Connection
If you have loaded your Google Fonts locally, you should disable the direct connection to Google’s servers to prevent unnecessary external requests and ensure GDPR compliance.
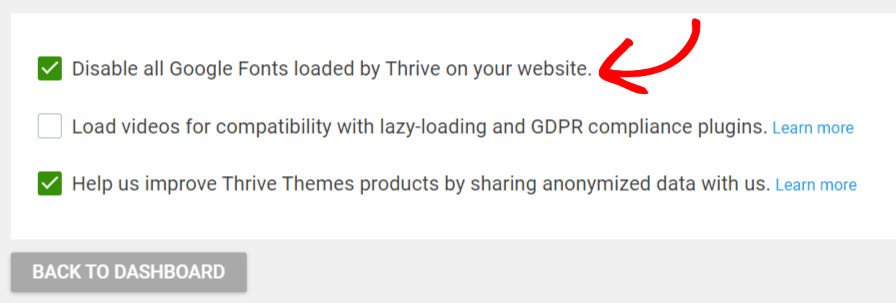
Method 1: Through Thrive Dashboard General Settings
- Log into your WordPress admin dashboard.
- Navigate to Thrive Dashboard > Thrive Dashboard.
- Scroll down to General Settings and click Manage Settings.
- Check the box labeled Disable all Google Fonts loaded by Thrive on your website.
- Click Back to Dashboard to save your changes.
Method 2: Through Project Lightspeed Settings
- Log into your WordPress admin dashboard.
- Navigate to Thrive Dashboard > Thrive Dashboard.
- Locate the Project Lightspeed section and click Speed Settings.
- Click Font Settings.
- Check the box labeled Disable all Google Fonts loaded by Thrive on your website.
You can enable or disable this setting at any time by checking or unchecking the respective checkbox.
Using Custom Fonts
Custom fonts are fonts that are not part of the Google Fonts library — they may be commercial fonts you have purchased, free fonts from sources like FontSpace, DaFont, or 1001Fonts, or proprietary brand fonts designed specifically for your business.
Sources for Custom Fonts
You can download custom fonts from various sources, including:
- FontSpace (fontspace.com) — A large collection of free custom fonts
- DaFont (dafont.com) — A popular resource for free decorative and specialty fonts
- 1001Fonts (1001fonts.com) — A curated collection of free fonts organized by category
Using the WordPress Font Library in Thrive Dashboard
The recommended approach for managing custom fonts in Thrive Themes is to use the native WordPress font library accessible through the Thrive Dashboard. This method does not require any additional plugins and ensures that fonts are loaded locally for both performance and GDPR compliance.
Using the Custom Fonts Plugin
Alternatively, you can use the free “Custom Fonts” plugin to upload and manage your fonts:
Installing the Custom Fonts Plugin
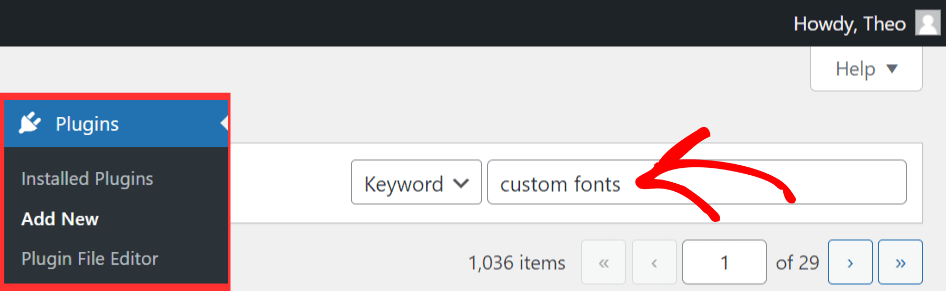
- Log into your WordPress admin dashboard.
- Navigate to Plugins > Add New.
- Search for Custom Fonts in the search field.
- Click Install Now on the Custom Fonts plugin.
- After installation completes, click Activate to enable the plugin.
Adding Google Fonts via the Custom Fonts Plugin
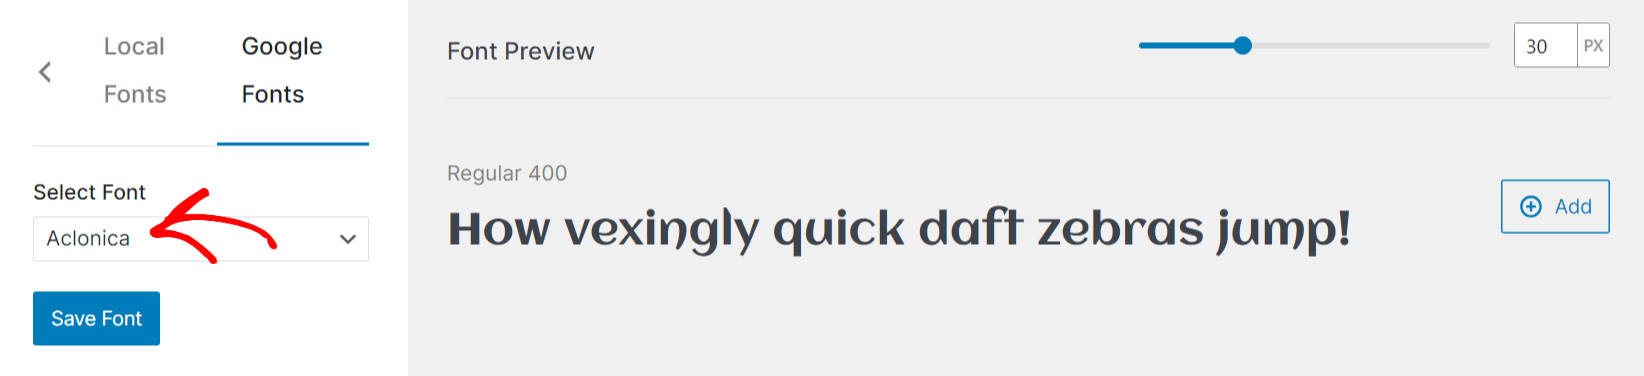
- Navigate to Appearance > Custom Fonts.
- Click the Add New Font button.
- Select the Google Fonts tab in the left panel.
- Choose the font family from the dropdown — a preview will appear on the right side.
- Click the Add button next to the font preview.
- Click Save Font in the left panel to save the font to your website.
The font will now appear on the Custom Fonts page and will be loaded from your server instead of Google’s servers.
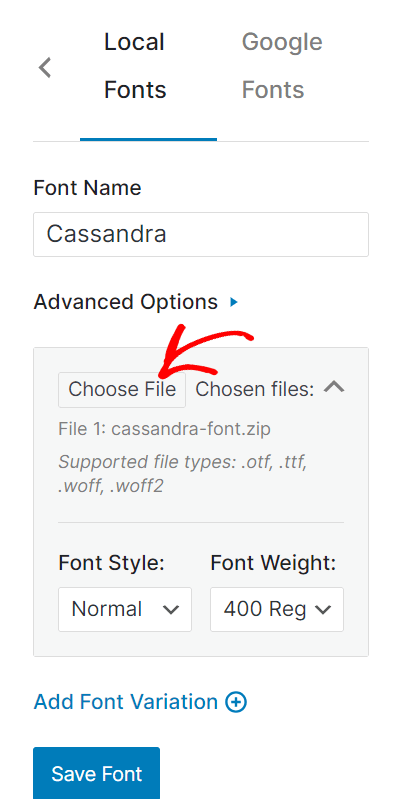
Adding Local Custom Fonts via the Custom Fonts Plugin
- Navigate to Appearance > Custom Fonts.
- Click the Add New Font button.
- Select the Local Fonts tab in the left panel.
- Enter the font name and click Choose File to upload the font file.
- Optionally, expand Advanced Settings to configure:
- Font Fallback — Choose a fallback category (Serif, Sans-serif, Monospace, Cursive, or Fantasy) in case the custom font fails to load
- Font Display — Set how the browser handles font loading: – Auto (default) — The browser uses its default loading behavior – Block — The browser hides text until the font fully loads – Swap — The browser shows text in the fallback font and swaps to the custom font once loaded – Fallback — The browser briefly hides text (about 100ms), then uses the fallback if the font has not loaded – Optional — The browser briefly hides text, then uses the fallback while the custom font loads in the background
- If you want to add additional font variations (such as bold or italic versions), click Add Font Variation.
- Click Save Font when finished.
Applying Custom Fonts in Thrive Architect
- Open the page or post in Thrive Architect (click Edit with Thrive Architect).
- Select the text you want to apply the font to.
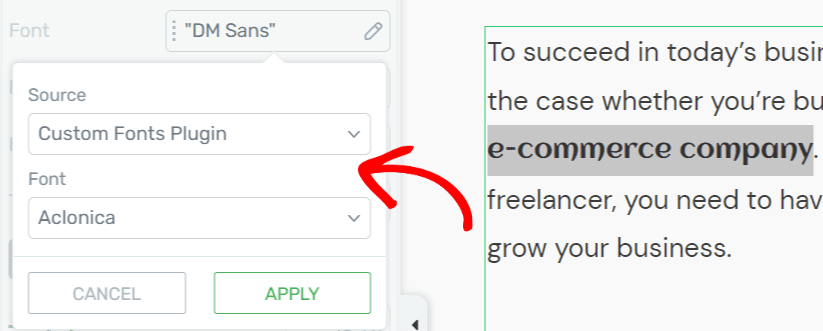
- In the left sidebar, click Font settings under Main Options.
- In the popup, set the Source to Custom Fonts plugin.
- Select your font from the second dropdown.
- Click Apply.
The custom font is now applied to the selected text. Click Save Work to preserve your changes.
Understanding the Styling Hierarchy
Thrive Architect uses a styling hierarchy that determines how typography styles are applied and inherited. Understanding this hierarchy helps you style text efficiently and maintain consistency.
Element-Level vs. Global Styles
- Default (theme) styles — The base typography styles defined by your WordPress theme. These apply to all text unless overridden.
- Global styles (Saved Styles) — Reusable style presets that you create and save for specific elements. For example, you can create a global button style with a specific font, size, and color, then apply it across your entire site.
- Element-level styles — Styles applied directly to a specific element instance on the page. These override both theme defaults and global styles.
Working with Saved (Global) Styles
Several elements in Thrive Architect support Saved Styles (also called Global Styles), including Button, Background Section, and Content Box elements. The Style Options panel lets you manage these styles.
Choosing a Predefined Style
- Select the element on your page.
- At the top of the left sidebar, click the Template Button (or Style Options — the name varies by element).
- In the Default Styles tab, scroll through the available pre-designed templates and click one to apply it.
- Alternatively, switch to the Saved Styles tab to see previously saved global styles.
Saving a Custom Style as Global
- Customize the element’s appearance using the Main Options (change color, shape, size, shadows, gradients, typography, etc.).
- Click the Save as Global Style icon at the top of the left sidebar.
- Enter a descriptive name for the style (e.g., “Primary CTA Button”, “Featured Content Box”).
- Click Apply to save.
The style is now saved globally and available in the Saved Styles tab for all instances of that element type across your site.
Editing a Saved Style
- Select an element that has a Saved Style applied.
- Click the pencil icon in the style section of the left sidebar.
- A message at the top of the sidebar confirms you are editing a global style — any changes will propagate to all elements using this style.
- Make your changes to the element’s appearance.
- Click Done to save and apply the changes globally.
Unlinking a Global Style
If you want to customize a single element instance without affecting all other elements that share the same global style:
- Select the element on the page.
- Click the Unlink Global Style button in the style section of the left sidebar.
- The element’s Style Options panel will unlock, and you can now customize this specific element independently.
Changes made after unlinking will only apply to this individual element.
Renaming or Deleting a Saved Style
- Rename — Click the three dots icon next to the saved style, select Rename, enter the new name, and click Apply.
- Delete — Click the three dots icon, select Delete, and confirm. Note that all elements currently using this style will revert to their default style.
Loading the Styles Library
Click the downward-pointing arrow in the style section to open the full Default Styles and Saved Styles library, where you can browse and apply any available style.
Typography Best Practices
- Limit font families — Use no more than two to three font families on a single page. Typically, one font for headings and one for body text is sufficient. Too many fonts create visual clutter and slow down page loading.
- Establish clear hierarchy — Use consistent font sizes, weights, and colors to create a clear visual hierarchy. Headings should be larger and bolder than body text, and subheadings should fall between the two.
- Optimize line height for readability — Body text should have a line height of 1.4 to 1.8. Tighter line heights work for headings, but body text needs breathing room.
- Use letter spacing on uppercase text — When using all-caps text, add 1–3px of letter spacing to improve readability and visual appearance.
- Load fonts locally when possible — For better performance and GDPR compliance, serve Google Fonts from your own server using the WordPress font library or a custom fonts plugin.
- Choose web-optimized fonts — Stick with fonts that are designed for screen display and offer a range of weights to give you flexibility in creating visual hierarchy.
That’s it! You’ve successfully learned how to use typography settings, Google Fonts, custom fonts, and text styling options in Thrive Architect. With these tools, you can create beautiful, readable, and brand-consistent text throughout your entire website — from body paragraphs and headings to buttons, testimonials, and call-to-action elements.
Related Resources
- Global Colors and Styles: How to Use Global Colors, Gradients, and Styles
- Borders and Shadows: How to Use Borders, Shadows, and Decorations
- Animations and Effects: How to Use Animations, Hover, and Scroll Effects
- Text Element: How to Use the Text Element
- Headings: How to Use Headings in Thrive Architect
- Button Element: How to Use the Button Element
- Hyperlink Text Effects: Using Hyperlink Text Effects in Thrive Architect
- WordPress Font Library: Using the Native WordPress Font Library in Thrive Themes
- Disabling Google Fonts: Disabling Google Fonts Loaded by Thrive Products