The Thrive Apprentice plugin allows you to display a custom menu on your courses and lessons. A menu that is different from the one that you are using on the rest of your site.
If you want to find out more about how to set up a WordPress navigation menu, don’t forget to check out this tutorial article.
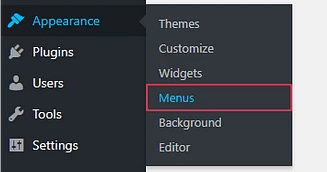
Moving forward, we’re going to set up a custom Thrive Apprentice menu. So, you will need to access the WP Admin Dashboard > Appearance > Menus:

On the next step, our recommendation is that you create a new menu from scratch, and then add certain items to it. So, you will need to select “create a new menu”:

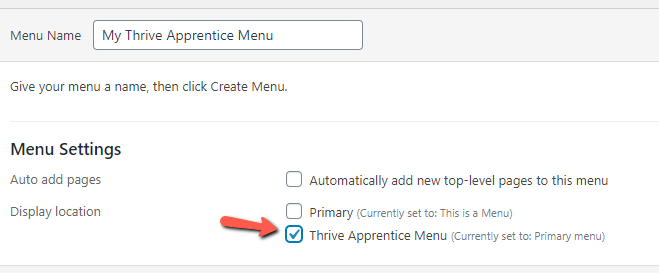
Give your new menu a name:

After you have created the menu, you need to make sure that you select the “Thrive Apprentice Menu” checkbox – this being the location where you will display your menu:

Once you do this, click on the “Create Menu” button, to move on to the next step:
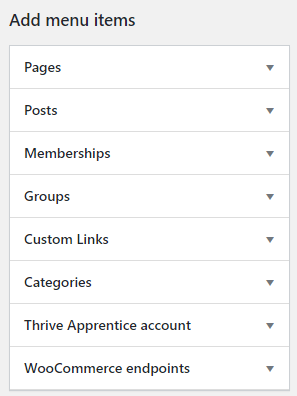
You can go on and add the items you want to be displayed. In order to do that, look for this area on the left-hand side of the page:

And, as you can see, depending on the setup of your plugins and themes, the items from your menu can be things such as Pages, Posts, Custom Links, or Categories:
- Pages – Using this option, you will be able to display one or more of the pages from your site in the menu;
- Posts – The same as the “Pages” option – In this case, you can select one or more of your blog posts;
- Custom Links – This option allows you to display links to custom web pages – You can set the name of the link that will be displayed on the menu, as well as the redirect URL;
- Categories – This option allows you to display certain page categories from your site in the menu.
- Thrive Apprentice Account – This will let you add a “Log in”, “Log out” or “Register” button to your menu. You can find out more about this in this article.
However, you can also have extra options here, depending on the plugins that you have installed on your site (such as WooCommerce endpoints, or Membership).
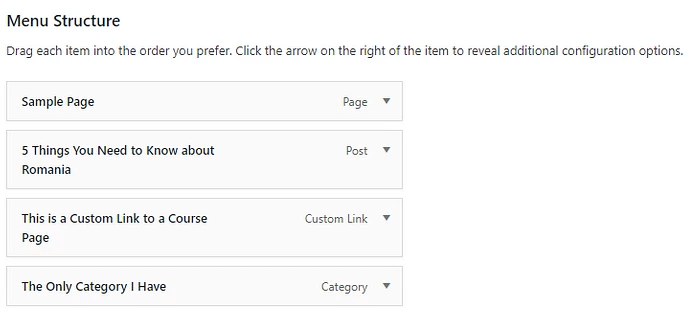
As you start adding items to your Thrive Apprentice menu, they will be placed in the center of the page, in the Menu Structure.
For example, after adding some items to my menu, it will show up like this:

The items can be arranged, using the drag & drop functionality. In this way, you can prioritize some items, by placing them in a specific order.
You can add as many items as you want, however, be careful not to overcrowd the menu and distract your users from the actual content of the page.
After you have set up your menu structure, you can go on and save the menu. Once you go on the Apprentice page, the menu will show up like this:

The font from the navigation menu can be changed from the Template Settings, however, that will affect the font from your entire Thrive Apprentice page.
If you have any further questions, don’t hesitate to open a support conversation.