Setting up an API Connection with Mailchimp

The following two questions are often asked, concerning MailChimp:

  • Does Thrive Leads support MailChimp?
  • How can I set a custom Thank You Page in MailChimp?

Both of these questions are answered with the MailChimp API connection to Thrive Leads or to a “Lead Generation” element from Thrive Architect. Here’s how to set it up:

Get the Mailchimp API keys

In order to connect MailChimp, you will need an API key.

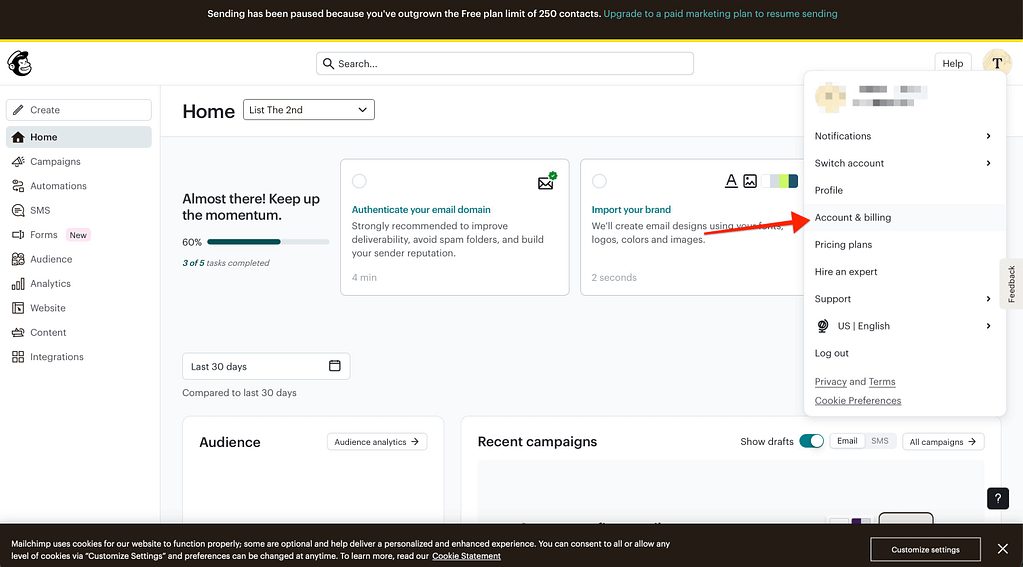
You can get this key by logging in to your MailChimp account and clicking on your account icon. Then, select “Account & billing” from the submenu that opens:

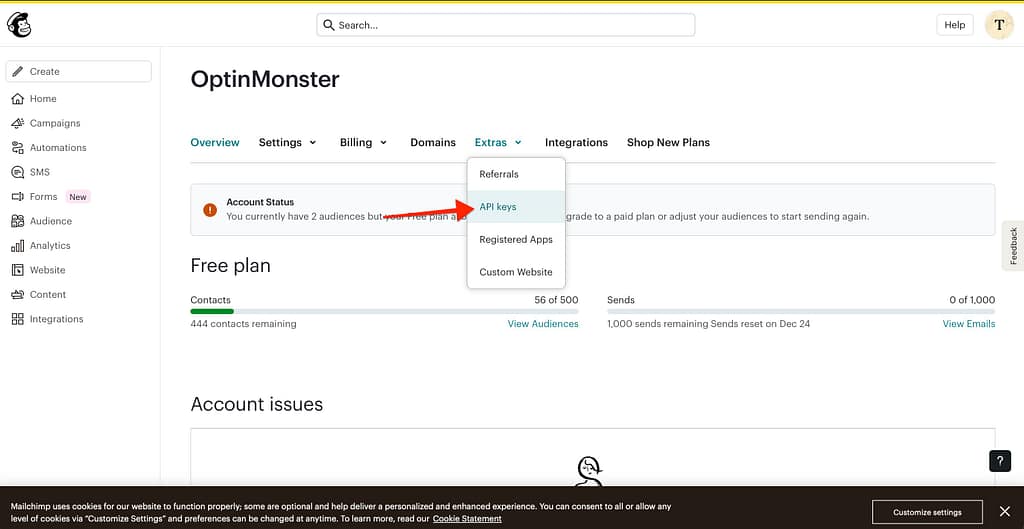
On the account page, click on the “Extras” option and select “API keys” from the drop-down menu:

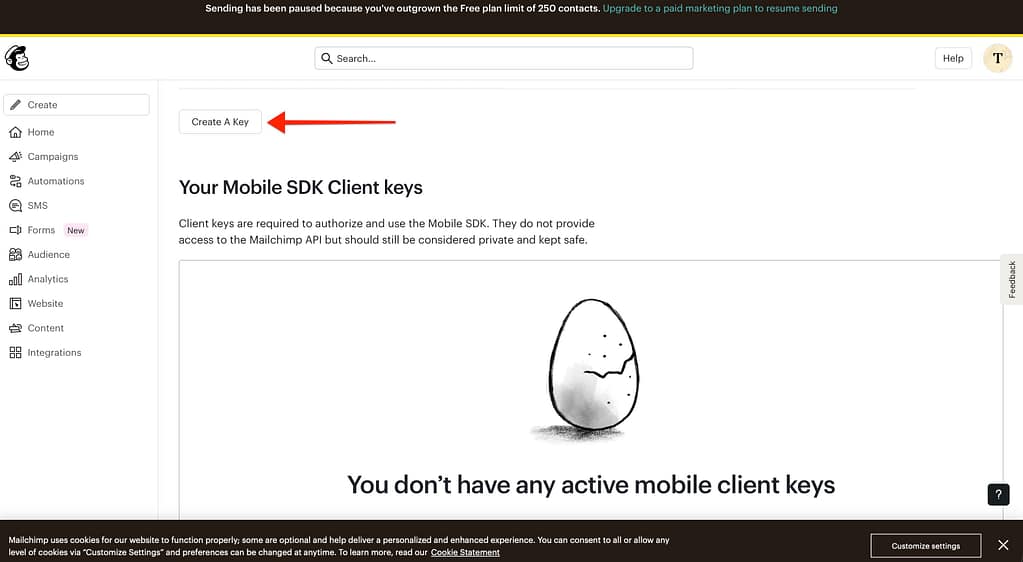
Locate the “Create A Key” button and click on it. A notification message will appear, letting you know that you have successfully generated an API key. This will be visible on the list and you will have to copy the newly created API key:

Add the keys to your Thrive Dashboard

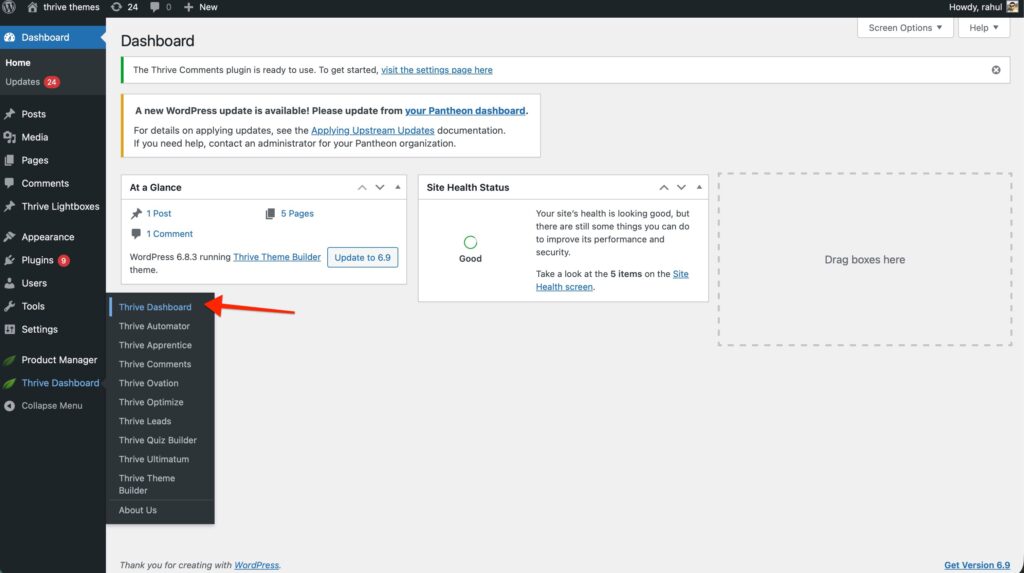
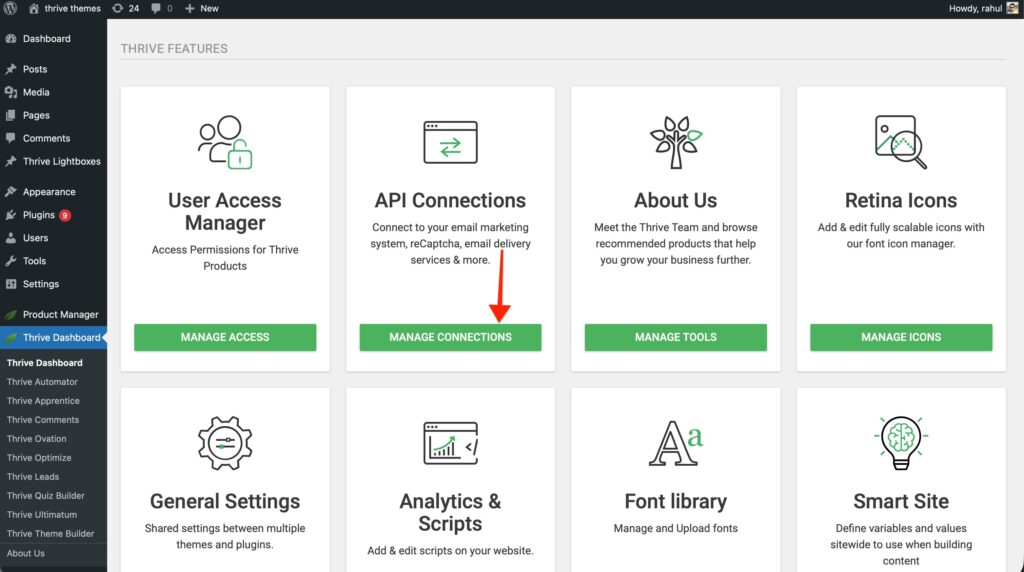
After you have copied the API key head on over to your WordPress admin dashboard. Once there, click on Thrive Dashboard from the left-side menu:

Then, scroll down a bit to see the “API Connections” card and click on the “Manage Connections” button from it:

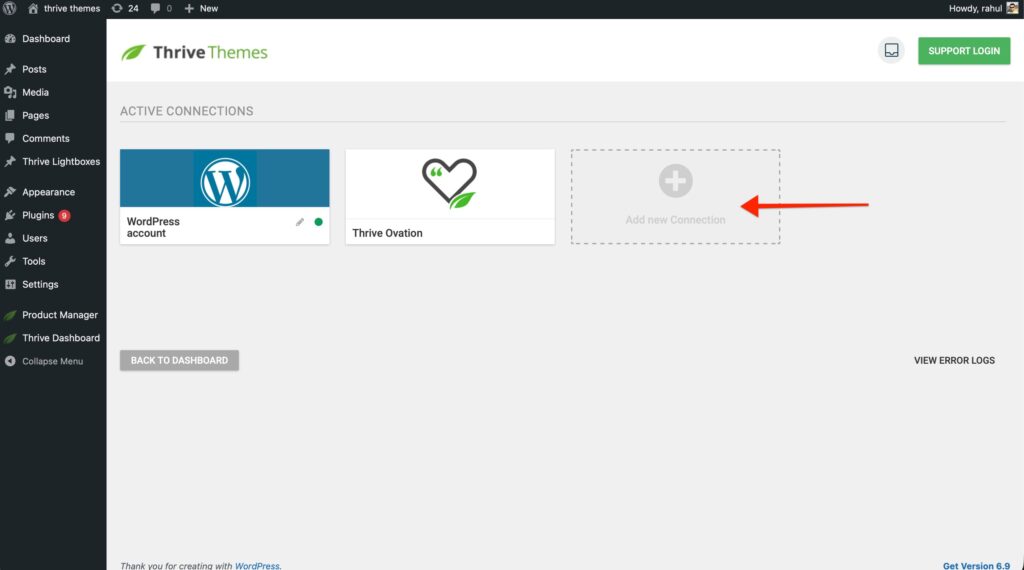
You will see a list with the active connections that you have already set up. Look for the “Add new Connection” section and click on it:

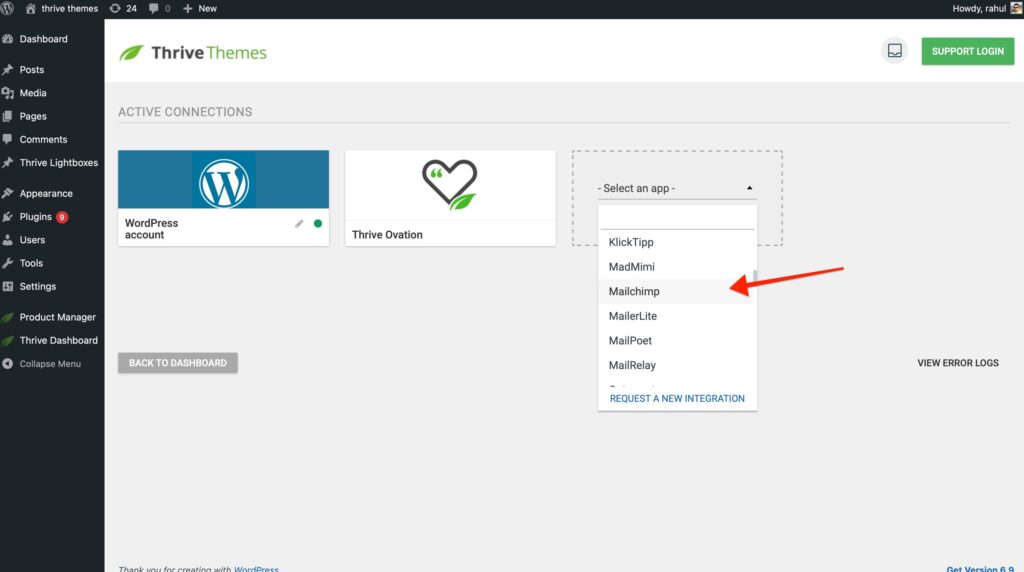
Then, click on the down arrow to open the “Select an app” drop-down:

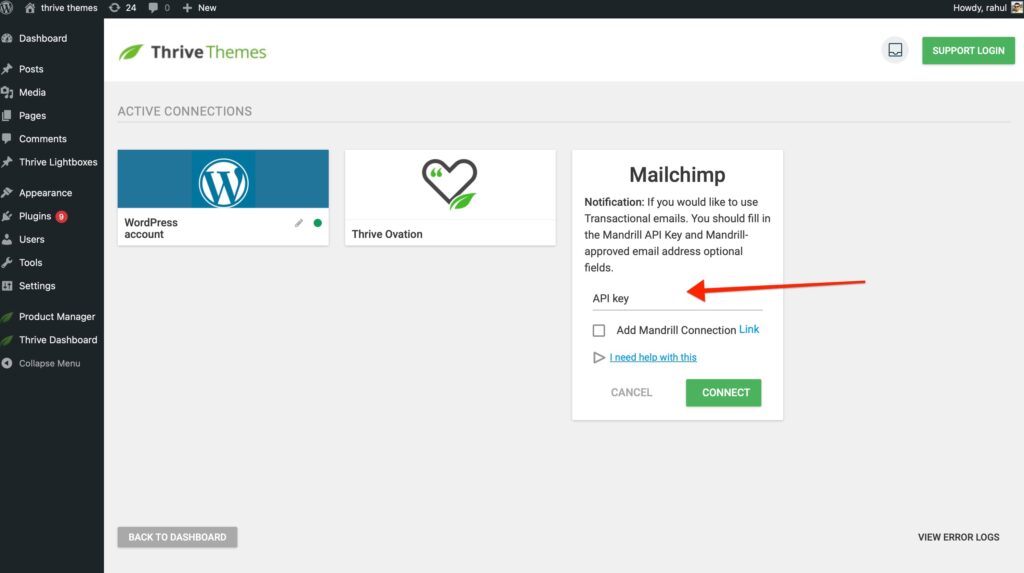
Start typing “MailChimp” or scroll down to see “MailChimp” in the drop-down and once you found it, click on it. Then, paste the API key you have previously copied from your Mailchimp account and click on “Connect”:

You will get a success message if the connection has been set up successfully:

You can always come back to the API Connections dashboard and further test (1), edit (2), or remove (3) the connection:

Connecting Mailchimp to a “Lead Generation” element

Once the API connection with Mailchimp has been successfully created, you will be able to connect a “Lead Generation” form to your account.

The first thing you need to do is open a Thrive Architect page or post, and then, in the right sidebar, look for the “Lead Generation” element:

Drag and drop the element to your page, and select a template from the library:

After you choose the template, you will notice that the “Main Options” become available in the left sidebar:

1. Add Connection

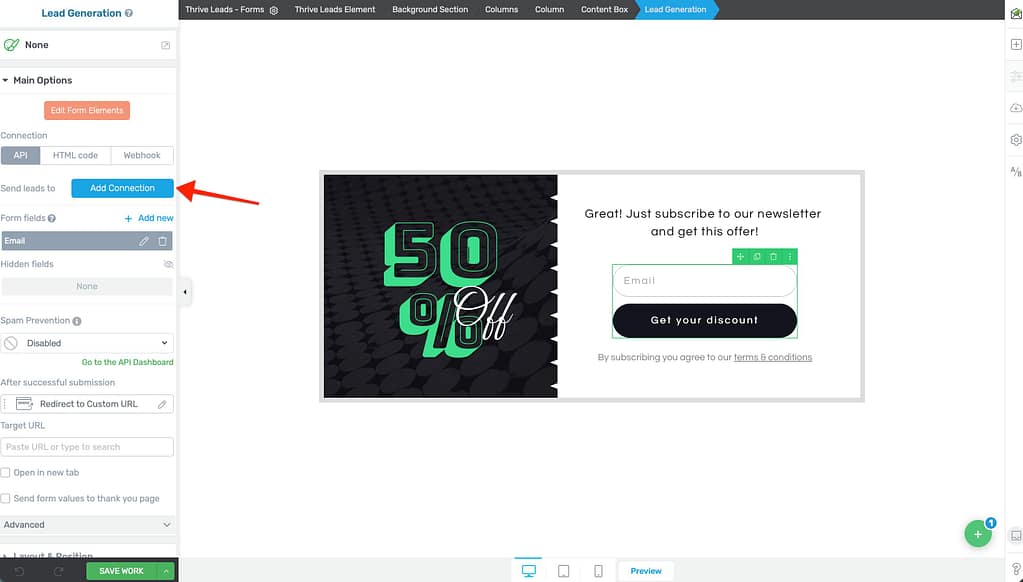
The first thing you need to do when setting up the integration is to check that the API connection is selected:

You can next proceed by clicking on the “Add Connection” button:

Connection

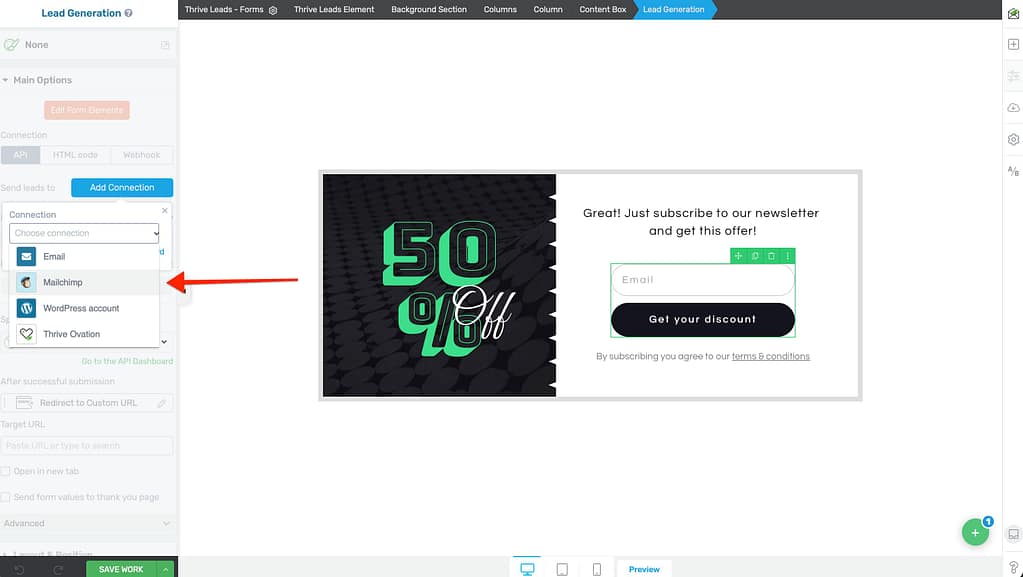
This will trigger a drop-down list, so click on it to open it:

Look for Mailchimp in the list and select it:

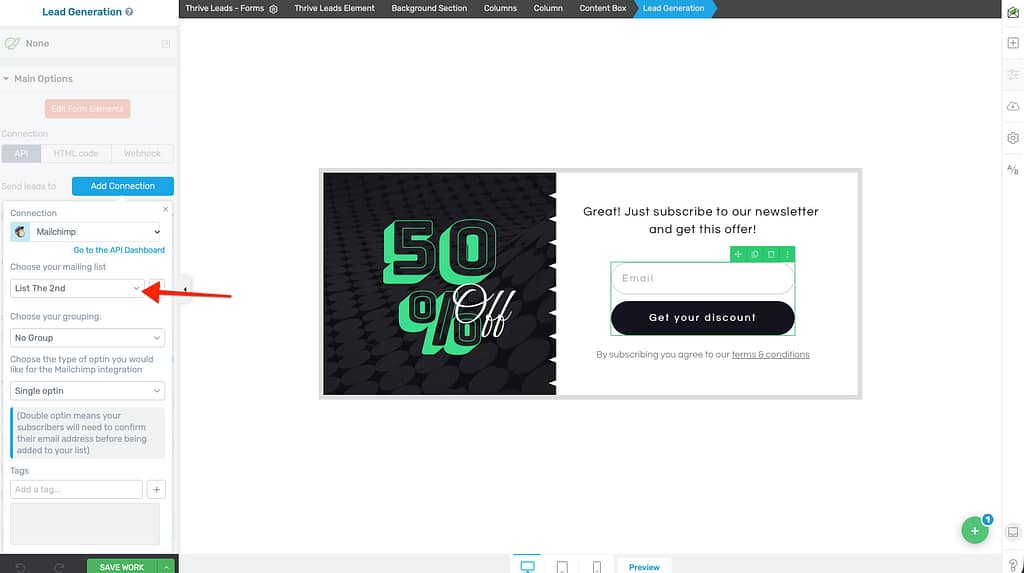
You will next have to set up several additional details, from the same pop-up.

Mailing List

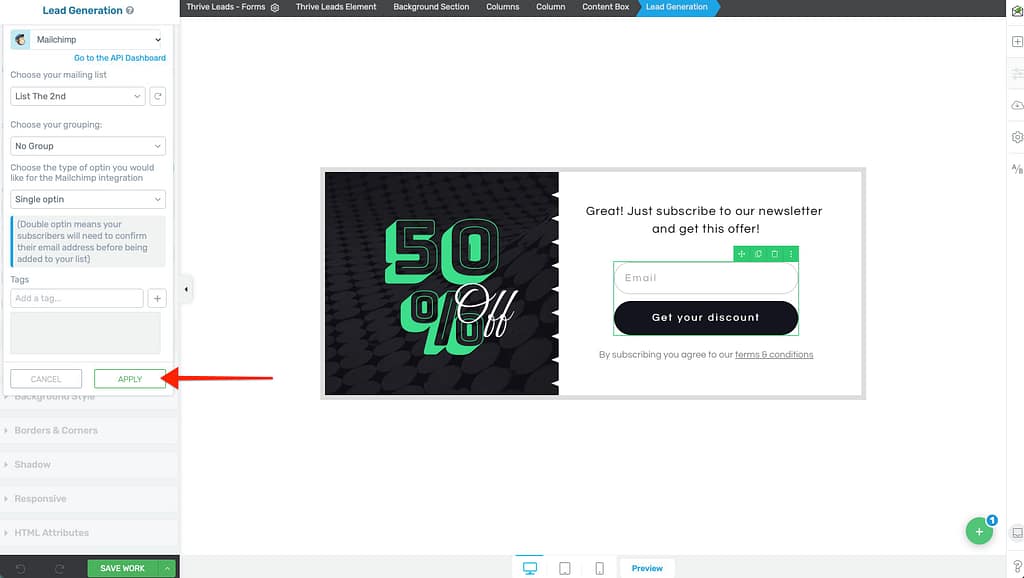
First off, you need to select a mailing list from the next available drop-down, and this is a mailing list that you’ve already set up in your Mailchimp account:

Grouping

Just like in the case of the mailing list, click on the field below the “Choose your grouping” option, in order to select the group that you want to use if you have created any:

Opt-in type

Furthermore, you will also have to select whether you want your element to contain a “Single optin” or a “Double optin”:

The difference between the two is that with the “Double Optin” the users will have to confirm their email address before being added to the list/group. Select that one field that best suits your needs.

If you want to learn more about how these two features work, make sure to check out this dedicated article we have available in your knowledge base.

Tags

The last option here is the “Tags” field. Since MailChimp is a tag-based email service provider, you have the option of adding tags in this field, separated by commas.

Simply write the tags inside this field, and either use a comma, or the plus sign, in order to add the next one:

The tags you enter here will be displayed in MailChimp along with the other information about the visitor who will sign up through this form.

Don’t forget to click on “Apply” when you’ve finished setting up the options for the connection:

2. Set Form Fields

The next step consists of establishing the fields of your form. You will notice that, by default, you already have some fields set:

Edit Fields

All the fields can be customized. If you want to edit a field, the way to do that is to click on the pencil icon next to it:

When you do that, a small pop-up opens allowing you to bring the changes you want to your form field:

  • Field Type

Firstly, you can modify the type of the field. To do that, click on the field next to the “Field Type” option:

This will open a list with all the available types of fields, and you can choose the one you want to use:

If you want to find out how to manage each field type, make sure to read this article, which goes over each type of field that you can use here.

  • Name

The next field allows you to set a filed name which helps you identify what that field is for. If you hover over the information icon next to “Name” you will find a detailed explanation about what is the purpose of this field:

  • Placeholder

Then, you can change the placeholder of the fields, as well. To do that, simply delete the current text from the “Placeholder” field, and write in your own:

There are a few more options here, depending on which type of field you choose, such as “Required”, or “Autofill Settings”. You can find out more information about these options in the same article mentioned above, here.

Delete fields

Besides editing a field, you can also delete it. The “Email” field is mandatory of course, hence the reason why it can not be deleted, but you can delete any other field. The way to do that is to simply click on the trash can icon next to it:

Note: The reason why the “Email” field can not be deleted is because there is no actual purpose in using a “Lead Generation” element without asking the user for an email. Providing their email is the way they subscribe to the mailing list.

Add new

If you want to add new fields to the “Lead Generation” element, click on “+Add new”:

A pop-up will open, where you can customize the new field using the options described above:

Note: Depending on which type of field you have selected, the options that appear below it can be different. You can find the options for each type of field here:

3. After Successful Submission

Next, after setting up the fields, you will have to choose what happens after someone signs up using your form:

There are two possibilities you can choose from. You can choose to redirect the user to a custom URL (this is where the users will be redirected to after they sign up) or show a success notification (you can display whatever message you want for the users, letting them know the process was successful).

Click on the action that you prefer, and then click on “Apply” to use it:

Note: If you are trying to connect Mailchimp to a form from Thrive Leads, you will have one additional option here – the “Switch State” one:

You can learn more about how to use the “States” feature in Thrive Leads in the article linked here.

4. Advanced Options

After all of the options presented above had been set up, you can also use the “Advanced Options”:

You can find a more in-depth description of these options here.

After using all the options to set up the connection, make sure to save all the changes, so that the API connection to be saved as well. To do that, click on the green “Save Work” button from the bottom left side of the screen:

Connecting a Thrive Leads form to MailChimp

After you have created the API connection with MailChimp, you will be able to connect your Thrive Leads forms as well with your MailChimp account.

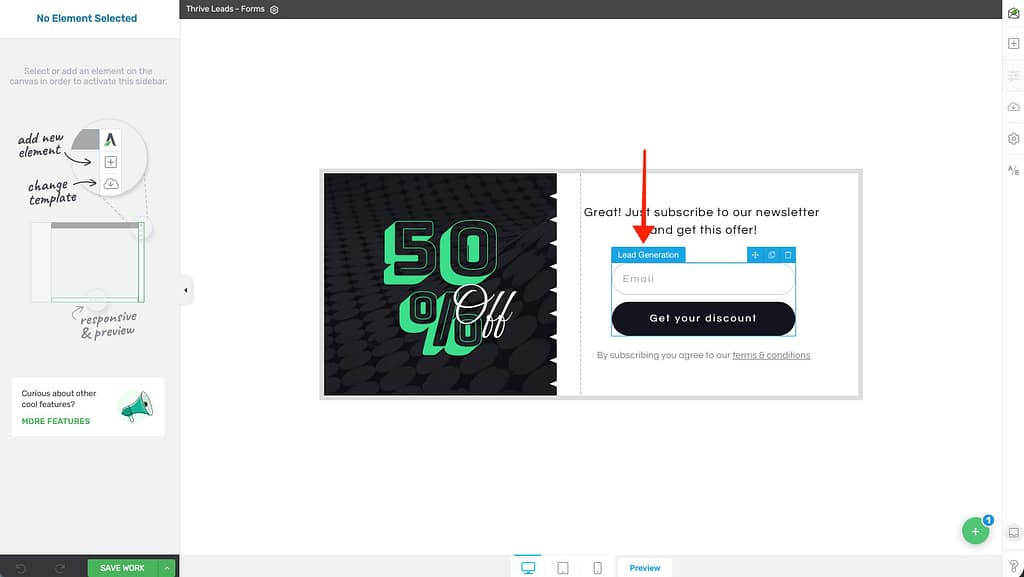
In order to do that, you first have to access the Thrive Leads section, from your Thrive Dashboard:

The choose a Lead Group which has the opt-in form you want to connect:

Click on “Edit” next to the form you want to access (in this example a “Lightbox”):

This will open a list with all the “Lightbox” types of forms. Look for the one that you want to add the connection to, and click on “Edit Design”:

Then, depending on the template that you have chosen you will either already have a “Lead Generation” element on one of the states of your form or you can drag & drop one to the place you wish on the form:

Once you have the “Lead Generation” element, click on it. This will open its options in the left sidebar:

You will notice that the process from here for connecting a Thrive Leads opt-in form is exactly as described above for the “Lead Generation” element.

Now, whenever someone fills in one of these forms, you should be able to find them in the “Audience” section of your Mailchimp account:

These are the ways in which you can connect your Mailchimp account to one of your Thrive forms, through an API connection.

If you need more information about various aspects of Thrive Leads, please check out this Knowledge Base section.

Was this article helpful?

Related Articles

>