1. Home
  2. Knowledge Base
  3. Thrive Ultimatum
  4. Getting Started
  5. Understanding Display Settings in a Thrive Ultimatum Campaign

Understanding Display Settings in a Thrive Ultimatum Campaign

Thrive Ultimatum allows you to specify where on your site you want the campaign to be displayed, namely to choose exactly which posts or pages display it.

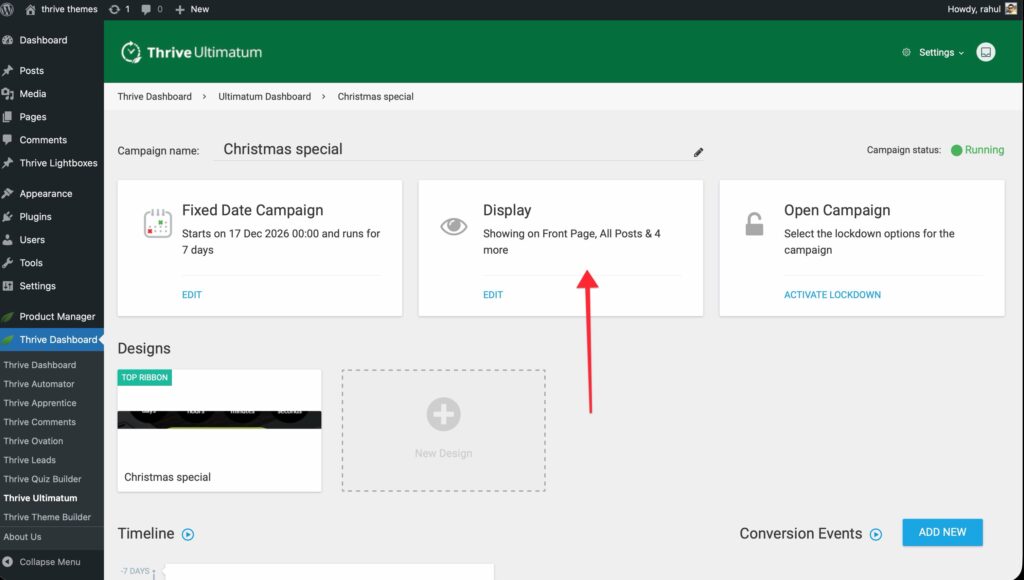
In your Thrive dashboard, choose Thrive Ultimatum, select the campaign you wish to edit, then click “Edit” on the “Display” card:

Note: For those who are familiar with Thrive Leads: the display settings in Thrive Ultimatum work exactly the same way and follow the same rules.

Display Logic

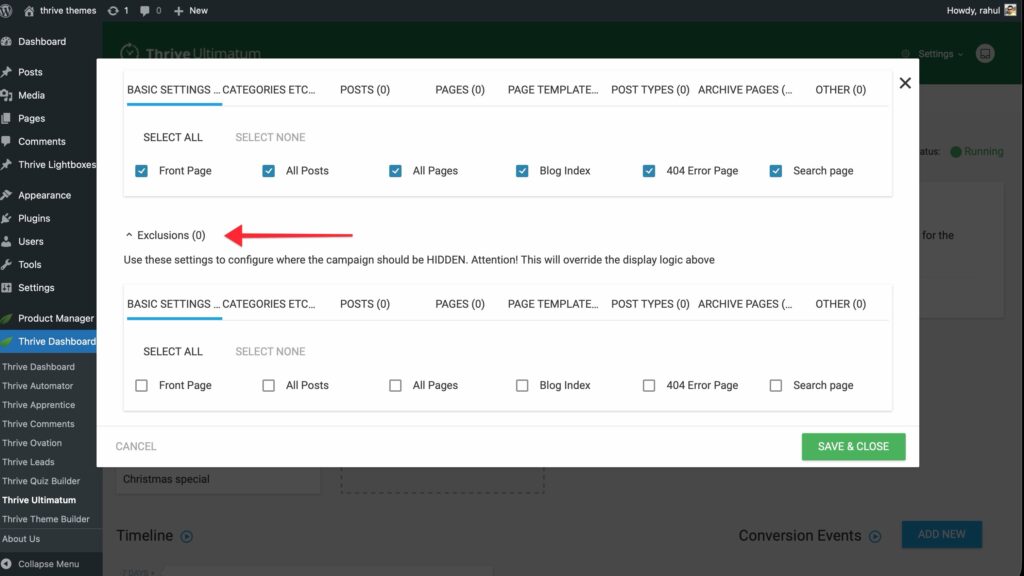
In the window that opens ,you can define where to show your campaign​:

The options in the different tabs are the following:

Basic Settings: here you can set some general settings that would cover most of the site. There’s a fixed set of options: Front Page, All Pages, All Posts, Blog Index, 404 Error Page, Search page​.

Basically, when you select all of these, you set the campaign to display site-wide (except for custom post types, we’ll cover that in the next section).

Categories: you will see a list of your existing categories, and you can also choose from tags. When choosing something here, you set the campaign to display on posts from the chosen category.

It’s important to note that this refers to the single posts only, there’s a different setting to display the campaign on category archive pages.​

Posts: you can choose specific posts you want to display the campaign on. ​Start typing in the search field and a list of posts will show up.

Pages: you can choose specific pages you want to display the campaign on.​

Page Templates​: if your theme has different page templates, like a full-width template, or a narrow one, you can set the campaign to display only on pages that use a specific template.

Post Types:​ if you have custom post types on your site, this is the tab where you can set the campaign to display on those as well. For example, if you have WooCommerce products, those would be custom post types.

Archive Pages: here you can choose to display your campaign on category archive pages, tag archive pages, etc.​

Other:​ you can choose to display the campaign only for logged in or logged out users. You can also set a specific URL from your site where you want the campaign to run.

This option is useful when you want to enable the campaign somewhere but it’s not possible to do that from the filtering options in the other tabs.

Exclusions

A useful feature of the display settings window is the possibility to exclude some posts/pages from showing the campaign:

For example, if the campaign were to display on all pages, except for the checkout page, it would work like this:

In the basic settings tab, check the “All Pages” option:

Then, set an exclusion for the “Checkout” page:

The exclusion overrides the display logic and will hide the campaign on the pages you choose.

These are the steps for setting up the “Display Settings” for your campaigns. If you need more information about Thrive Ultimatum, ​ make sure to check out our dedicated knowledge base section.

Was this article helpful?

Related Articles

Need Support?

Can't find the answer you're looking for?
Contact Support
>