What’s Cache and Why Do You Need to Clear it?
According to Wikipedia: A cache is a hardware or software component that stores data so that future requests for that data can be served faster; the data stored in a cache might be the result of an earlier computation or a copy of data stored elsewhere.
And the last part of that definition is important to understand because it’s the reason you need to clear cache regularly.
When you browse to a site, certain elements are stored in cache, this helps to avoid having to download the same elements each time you visit a website. For example the logo of the website.
But this also means that when you visit that website again, you will see the logo that was stored in cache rather than the “real” logo on the site.
That’s why, when you see something in the back-end of your site and it looks different on the front-end of your site, it’s almost always a caching issue (= you’re still loading an older version of the content).
There are different layers of cache and in this article, we’ll explain how to clear the cache for these different options.
1. Browser Cache
Hard reload method
The fastest and easiest way to load an un-cached version of your website is to hard reload your page, by using the following key combinations:
- For a desktop PC: hold down CTRL + F5
- For a Mac: hold down command+shift+r
When using this option, the page will reload and none of the cached data will be used to show the website in your browser. This will force the browser to re-download all of the data needed to display the website.
Empty Cache
The best way to clear your browser’s cache is to manually delete it all. If the page you are browsing makes any after-the-fact downloads via JavaScript that weren’t part of the page load, then a hard reload might still use the cache.
In this case, you will need to empty the cache of your browser. Depending on the browser you are using, you need to follow certain instructions to accomplish this.
Click below, to see how to empty your browser’s cache:
What is browser cache?
The browser cache is a temporary storage location on your computer for files downloaded by your browser to display websites. Files that are cached locally include any documents that make up a website, such as HTML files, CSS style sheets, JavaScript scripts, as well as graphic images, and other multimedia content.
In short, browsers typically cache what is known as “static assets” – parts of a website that do not change from visit to visit. The main reason why this is done is so that websites load faster, web designers can create high-quality websites while the visitors enjoy a fast and comfortable browsing experience.
Why do you need to clear/empty your browser’s cache?
When developing your website, the browser cache can create a discrepancy between what you see and have set up in the back end and what you see on the live website.
In order to make sure that the discrepancy that you are experiencing is something you should worry about, or that you are simply seeing a cached (older) version of your website, you need to clear the browser cache.
2. Caching Plugins
On your site, you might have a caching plugin installed. This will help the speed load of your site for users. But it might cause discrepancies between what you see when working in Thrive products and what you see on your live website.
W3 Total Cache
When you install W3 Total Cache, it will add a “Performance” option to the top admin bar. You can select “Purge All Caches” from there.
WP Fastest Cache
You will see a Delete Cache option in the top admin bar. Clicking on “Clear All Cache” will usually solve any caching glitch, if the issue persists, you can also try the second option to “Delete Cache and Minified CSS/JS”:
WP Rocket
You can clear the cache from the WP Rocket section in the top admin bar:
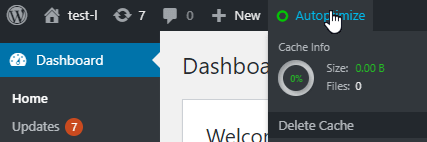
Autoptimize
Autoptimize isn’t a full-page caching solution, it only caches the optimized files it generates. You can clear the cache from the top admin bar:
3. Server Cache
Depending on your hosting solution, you might also have some caching that happens on a server level.
To find how to empty the cache of your hosting, please search in the knowledge base of your hosting solution.
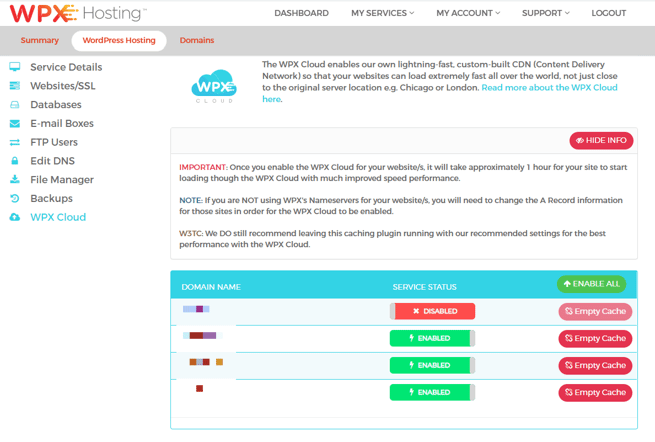
WPX Server Caching
Our recommended hosting provider, WPX Hosting, only caches your site if you have their WPX Cloud CDN option enabled.
You can empty the cache by going to your WPX Hosting dashboard and clicking on the WPX Cloud section.
You will see a list of your sites, the status of WPX Cloud for each (enabled/disabled), and the option to empty the cache.
The method to clear server cache can differ for each host. Server side cache is usually included on hosting packages advertised as “managed”, so if you’re using a standard “shared” package, chances are that you don’t have server side caching enabled.
To make sure, you can ask your host about this. If you have server cache, usually there will be an option in the top admin bar to allow you to clear it. For example, this is how it works on GoDaddy’s Managed WordPress plans.
4. CDN Cache
CDNs like Cloudflare also provide caching. In case you are using a CDN, you’d need to check their documentation about how to clear it.
If you’re using Cloudflare, you can follow the steps from this article.
However, you might be using other CDNs, for which the process may be different. We have created this article, in which we’ve linked instructions on how you can clear CDN cache for some of the most popular services, so please check it out, as well.