In this article, you’ll learn how to add hyperlinks to text and buttons in Thrive Architect, configure hyperlink settings, apply custom styles and hover effects to individual links, create phone and email links, and build anchor links that jump to specific elements on the same page or a different page.
Hyperlinks are the foundation of web navigation. Thrive Architect gives you full control over how links look, behave, and where they point — including standard URLs, phone numbers, email addresses, SMS messages, file downloads, lightboxes, and anchor targets.
Adding a Hyperlink to Text
To add a hyperlink to any text on your page:
- Open your page or post in the Thrive Architect editor.
- Click on a Text element to select it.
- Highlight the text you want to turn into a link by clicking and dragging over it.
- In the top floating toolbar that appears above the text, click the link icon (chain link).
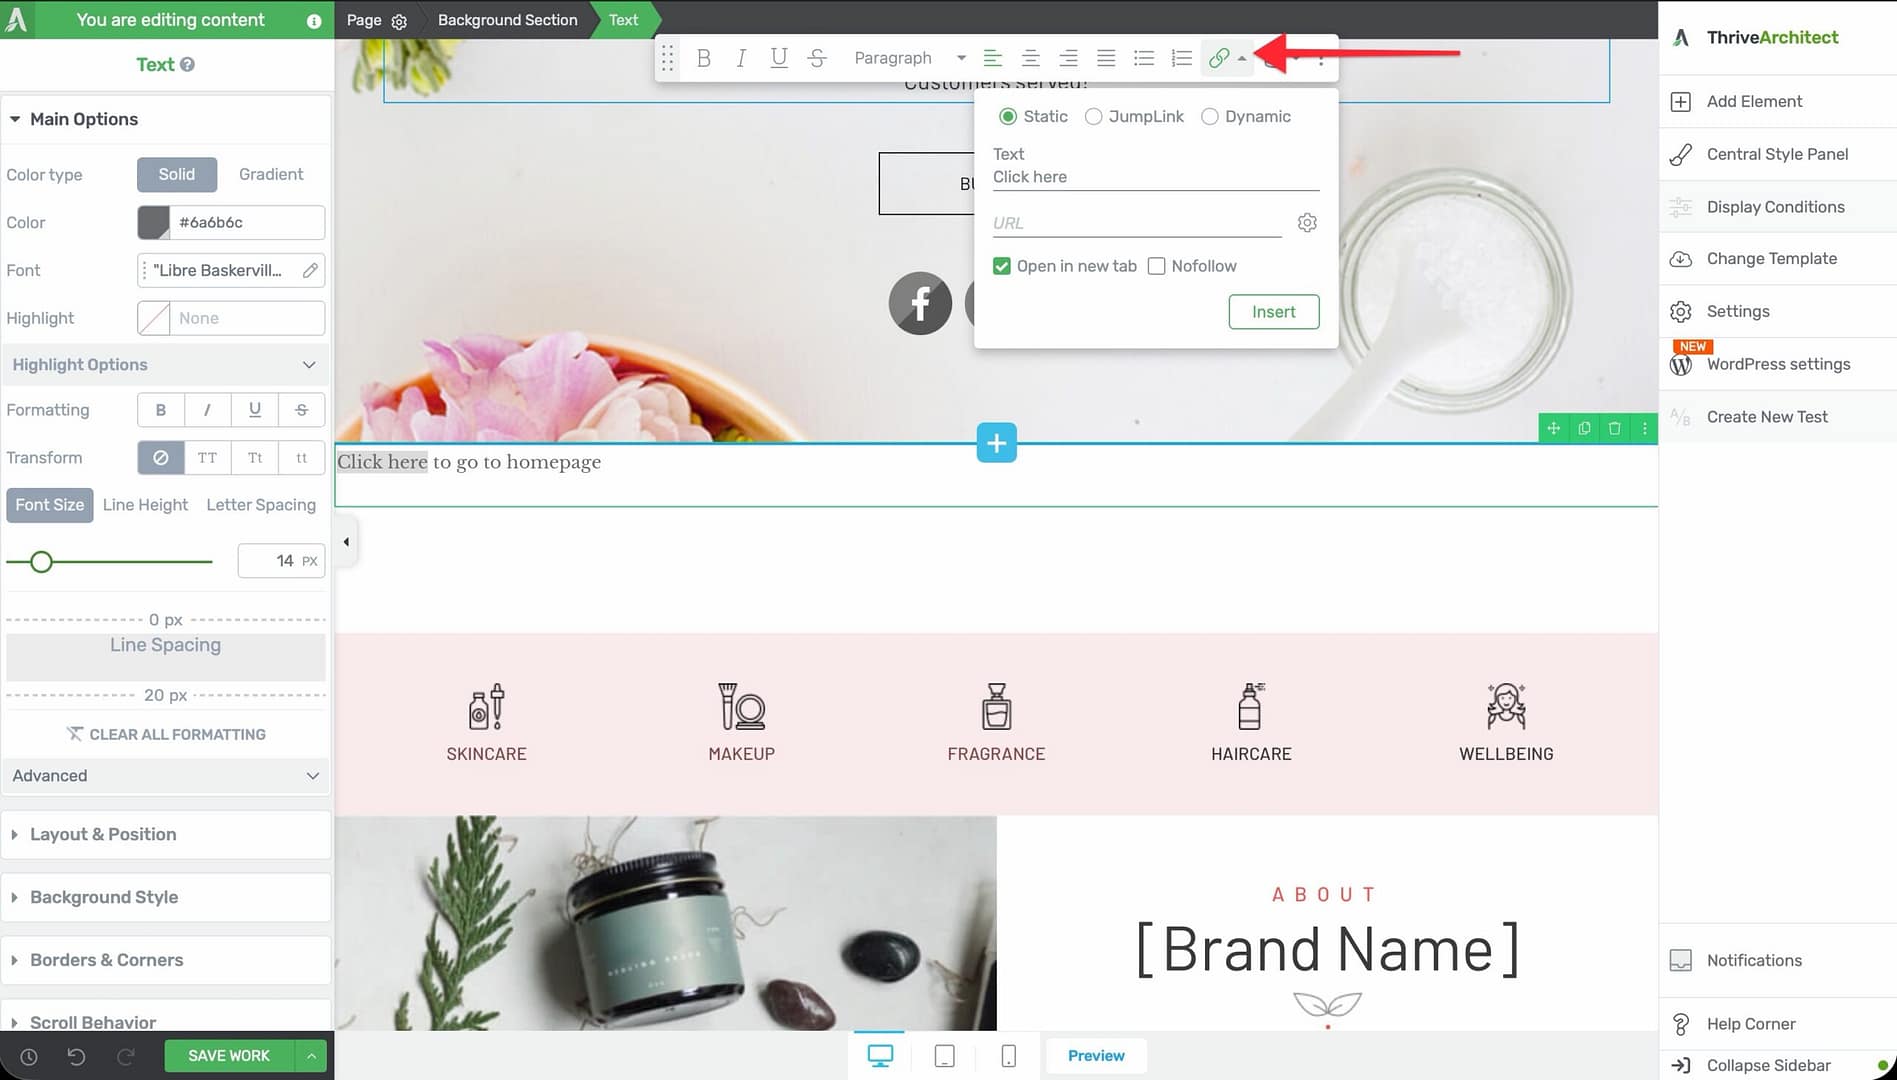
- A link input field will appear. Enter the destination URL or start typing to search for an existing page or post on your site.
- Press Enter or click the Apply button to create the link.
The selected text will now appear as a clickable hyperlink. By default, it inherits your theme’s link color and styling.
Configuring Hyperlink Settings
After adding a hyperlink, you can access additional settings by clicking the gear icon next to the link field in the top toolbar. The following options are available:
Open in New Tab
Enable the Open in new tab toggle to make the link open in a new browser tab instead of navigating away from the current page. This is recommended for external links so visitors do not leave your site.
Nofollow
Enable the Nofollow toggle to add a rel="nofollow" attribute to the link. This tells search engines not to pass link authority (PageRank) to the linked page. Use this for:
- Affiliate links
- Sponsored content links
- Links to untrusted external sites
- Paid advertisement links
Open in Lightbox
Enable the Open in Lightbox option to open the linked content inside a lightbox popup overlay on the current page, rather than navigating to a new page. This works with:
- Thrive Architect lightbox content
- Image URLs (opens the image in a lightbox viewer)
- Video URLs (opens the video in a lightbox player)
Download
Enable the Download option to prompt visitors to download the linked file rather than opening it in the browser. This is useful for PDFs, documents, spreadsheets, and other files you want visitors to save to their device.
CSS Class
The CSS Class field allows you to add a custom CSS class to the link element. This is useful for developers or advanced users who want to target specific links with custom CSS rules or JavaScript.
Note: You can combine multiple settings on a single link. For example, a link can open in a new tab, have nofollow enabled, and include a custom CSS class all at the same time.
Hyperlink Text Effects
Thrive Architect provides full control over how hyperlinked text appears in both its normal and hover states.
Styling Links in Normal State
To change how a hyperlink looks by default:
- Select the Text element containing the hyperlink.
- Highlight the linked text.
- Use the Typography options in the left sidebar or the top floating toolbar to adjust:
- Font color — Change the link text color
- Underline — Add or remove the underline decoration
- Font weight — Make the link bold or light
- Font style — Apply italic styling
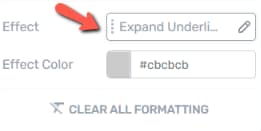
Styling Links in Hover State
To define a different appearance when visitors hover over the link:
- Select the Text element containing the hyperlink.
- In the left sidebar, click the State dropdown at the top.
- Select Hover from the dropdown menu.
- Highlight the linked text on the canvas.
- Apply your desired hover styles — such as a different color, underline removal, or bold effect.
- Switch back to Normal state when finished editing.
Tip: A common and effective hover effect is changing the link color and removing the underline on hover, or vice versa — adding an underline only on hover.
Applying Custom Styles to Individual Links
When you have multiple hyperlinks within the same Text element, you may want each link to have a unique style. Thrive Architect allows you to apply specific styles to individual links without affecting the others.

Styling a Single Link Differently
- Select the Text element containing your hyperlinks.
- Highlight only the specific link text you want to style differently.
- Use the font color picker in the top toolbar to change that link’s color.
- Adjust any other typography options (bold, italic, underline) as needed.
- Repeat for other links in the same text block if desired.
Each hyperlink within a Text element can have its own independent color, font weight, underline style, and hover effect. Changes made to one link do not affect other links in the same element.
Using Background Highlights on Links
You can also make individual links stand out by applying a background color:
- Highlight the link text.
- In the top toolbar, click the text highlight color option (background color for text).
- Choose a background color to create a highlighted link effect.
This technique is useful for drawing attention to important links, such as calls to action embedded within body text.
Creating Phone Links
Phone links allow mobile visitors to tap a link and immediately initiate a phone call. You can also create links that open an SMS message with pre-filled text.
Basic Phone Link
- Select the text or button you want to use as a phone link.
- Open the link settings (click the link icon in the top toolbar for text, or use the Button Link option in the left sidebar for buttons).
- In the URL field, enter the phone number using the
tel:format:tel:+12025551234
- Press Enter or click Apply.
Important: Always include the full international phone number with the country code (e.g., +1 for the United States, +44 for the United Kingdom). This ensures the link works for visitors in any country.
Phone Link with Pre-Filled SMS Message
To create a link that opens the visitor’s SMS messaging app with a pre-filled text message:
- Follow the same steps as above, but use the
sms:protocol instead oftel::sms:+12025551234— Opens the SMS app with the number pre-filledsms:+12025551234?body=Hello%20I%20am%20interested— Opens the SMS app with both the number and a pre-filled message
Creating Email Links
Email links open the visitor’s default email client with a new message pre-addressed to your specified email address.
Basic Email Link
- Select the text or button you want to use as an email link.
- Open the link settings.
- In the URL field, enter the email address using the
mailto:format:mailto:[email protected]
- Press Enter or click Apply.
Email Link with Pre-Filled Subject and Body
You can pre-fill the subject line and message body of the email:
- Subject only:
mailto:[email protected]?subject=Question%20About%20Your%20Product - Subject and body:
mailto:[email protected]?subject=Support%20Request&body=Hello%2C%20I%20need%20help%20with...
Creating Anchor Links
Anchor links allow you to create links that jump to a specific section on the same page or on a different page. This is commonly used for tables of contents, “back to top” buttons, and navigation within long-form content.
Step 1: Set the Anchor Target (Destination)
First, you need to assign an ID to the element you want to link to:
- Click on the element that should be the anchor destination (e.g., a Background Section, Content Box, Text element, or Heading).
- In the left sidebar, scroll down to the HTML Attributes section and expand it.
- In the ID field, enter a unique identifier — for example,
pricing-sectionorcontact-form.
Step 2: Create the Anchor Link (Same Page)
To link to the anchor target on the same page:
- Select the text or button that will serve as the anchor link.
- Open the link settings.
- In the URL field, enter a
#followed by the ID you assigned to the target element:#pricing-section
- Press Enter or click Apply.
When visitors click this link, the page will smoothly scroll to the element with the matching ID.
Step 3: Create the Anchor Link (Different Page)
To link to a specific element on a different page:
- Select the text or button that will serve as the anchor link.
- Open the link settings.
- In the URL field, enter the full URL of the destination page followed by
#and the target element’s ID:https://yoursite.com/pricing-page/#pricing-section
- Press Enter or click Apply.
When visitors click this link, they will navigate to the specified page and the browser will automatically scroll to the targeted element.
Removing a Hyperlink
To remove a hyperlink from text:
- Click on the Text element containing the link.
- Place your cursor inside the linked text (you do not need to highlight the entire link).
- In the top floating toolbar, click the unlink icon (broken chain link) to remove the hyperlink.
The text will remain on the page, but it will no longer be clickable.
Frequently Asked Questions
Can I Add a Link to an Image?
Yes. Click on the Image element to select it, then use the link option in the left sidebar to enter a URL. Images support the same link settings as text, including open in new tab, nofollow, and lightbox.
How Do I Make a Link Open a Lightbox?
Select the linked text or button, open the hyperlink settings, and enable the Open in Lightbox option. If you are linking to an image or video URL, the content will automatically display in a lightbox overlay.
Can I Use Phone or Email Links on Desktop?
Phone links (tel:) will attempt to open a phone application on desktop (such as Skype or FaceTime if configured). Email links (mailto:) will open the default desktop email client. Both link types work across all devices, though phone links are most useful on mobile.
Why Is My Anchor Link Not Working?
Check the following:
- The target element has an ID set in the HTML Attributes section (not the CSS class field).
- The link URL starts with
#followed by the exact ID (case-sensitive, no spaces). - There are no duplicate IDs on the page.
- The ID does not contain spaces or special characters other than hyphens.
Related Resources
- Button Element: How to Use the Button Element — Adding links to button elements
- Text Element: How to Use the Text Element — Working with text formatting and inline links
- Page Events and Lightboxes: How to Set Up Page Events and Lightboxes — Creating lightbox popups triggered by links
- Dynamic Links: How to Use Dynamic Links and Dynamic Text — Context-aware links that change based on post data, custom fields, and more
That’s it! You’ve successfully learned how to use hyperlinks and link styling in Thrive Architect. From basic text links and custom hover effects to phone calls, email messages, SMS links, and anchor navigation, you now have full control over every link on your pages.