When creating an A/B test in Thrive Optimize, one of the most critical steps is defining what counts as a “win.” This is done by setting a Test Goal.
The goal is the specific action you want your visitors to take—such as buying a product, signing up for a newsletter, or visiting a specific page. Thrive Optimize tracks these actions to calculate the conversion rate for each variation and help you choose a winner.
This guide covers the three goal types: Revenue, Visit Goal Page, and Subscriptions.
Note: Setting up a goal happens in the second step of the “Set up and Start A/B test” flow, after you’ve cloned a page and created your test. If you haven’t done that yet, see Getting Started with Thrive Optimize first.
Important: Exclude your A/B test pages (including the control) from caching—e.g., cache plugins, server-side cache, or CDN—so conversions are tracked correctly.
In the second step of the “Set up and Start A/B test” popup, you’ll see the three goal types to choose from:
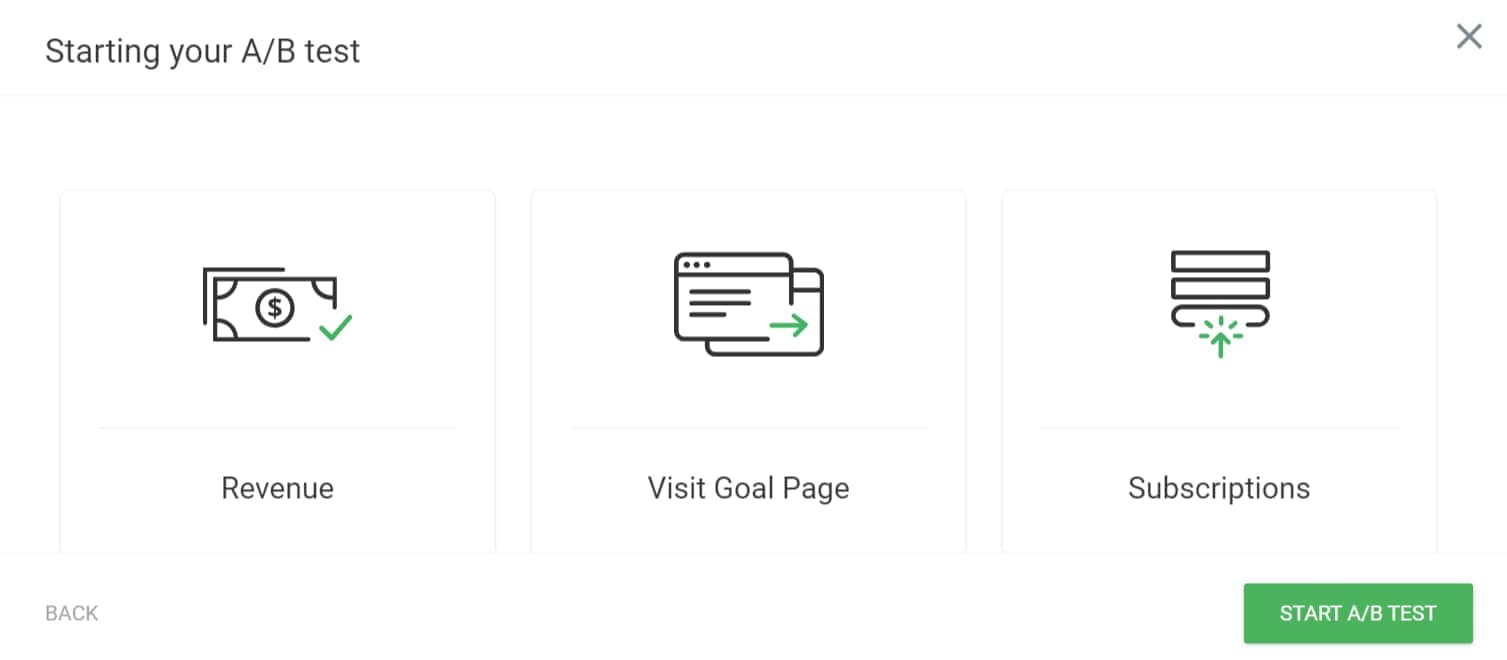
1. Revenue
The Revenue goal is ideal if your main objective is to generate sales (or measurable value) directly from the page being tested. This goal tracks not just how many conversions happened, but the monetary value of those conversions, so you can see which variation drives more revenue.
There are two ways to set up a Revenue goal:
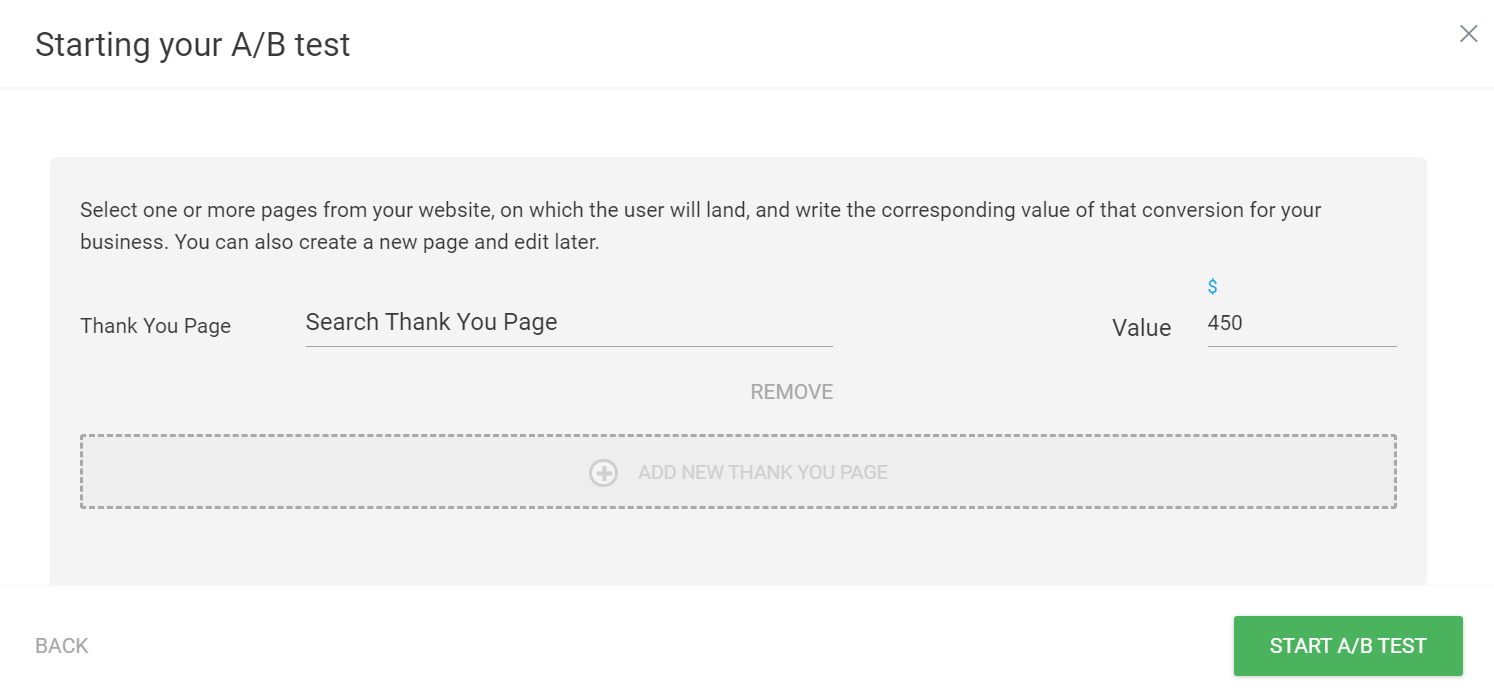
Option A: When a customer visits a specific page
Use this option if you redirect users to a specific confirmation or thank-you page after they purchase or complete an action (e.g., /checkout/thank-you/).
- In the “Set up and Start A/B test” popup, go to the second step and select Revenue as your goal type.
- Choose the option that measures revenue when a customer visits certain pages on your site.
- On your variation page(s), make sure you have at least one link or button that sends visitors to the page you want to count as a conversion.
- In the Thank You Page field, search for and select the page (or pages) users land on after that action. You can add multiple thank-you pages if you have multiple links or products.
- In the Value field, enter the monetary value of a single conversion in your currency (e.g.,
27for a $27 product, or average value per lead). - Below each thank-you page you’ll see options to Edit (Thrive Architect), Preview, or Remove the page.
- Click Start A/B Test when you’re done.
Note: If you have multiple buttons leading to different products, add multiple goal pages with their respective values.
Option B: SendOwl integration
If you use SendOwl to sell products, you can track revenue automatically without a dedicated thank-you page.
- In the goal step, select Revenue as your goal type.
- Choose “When a customer purchases a product through SendOwl.”
- Read the on-screen instructions for how revenue is collected. SendOwl must already be set up for your products.
- If you still need to configure SendOwl, use the setup steps link in the popup to open the setup page.
- Complete the goal setup and click Start A/B Test.
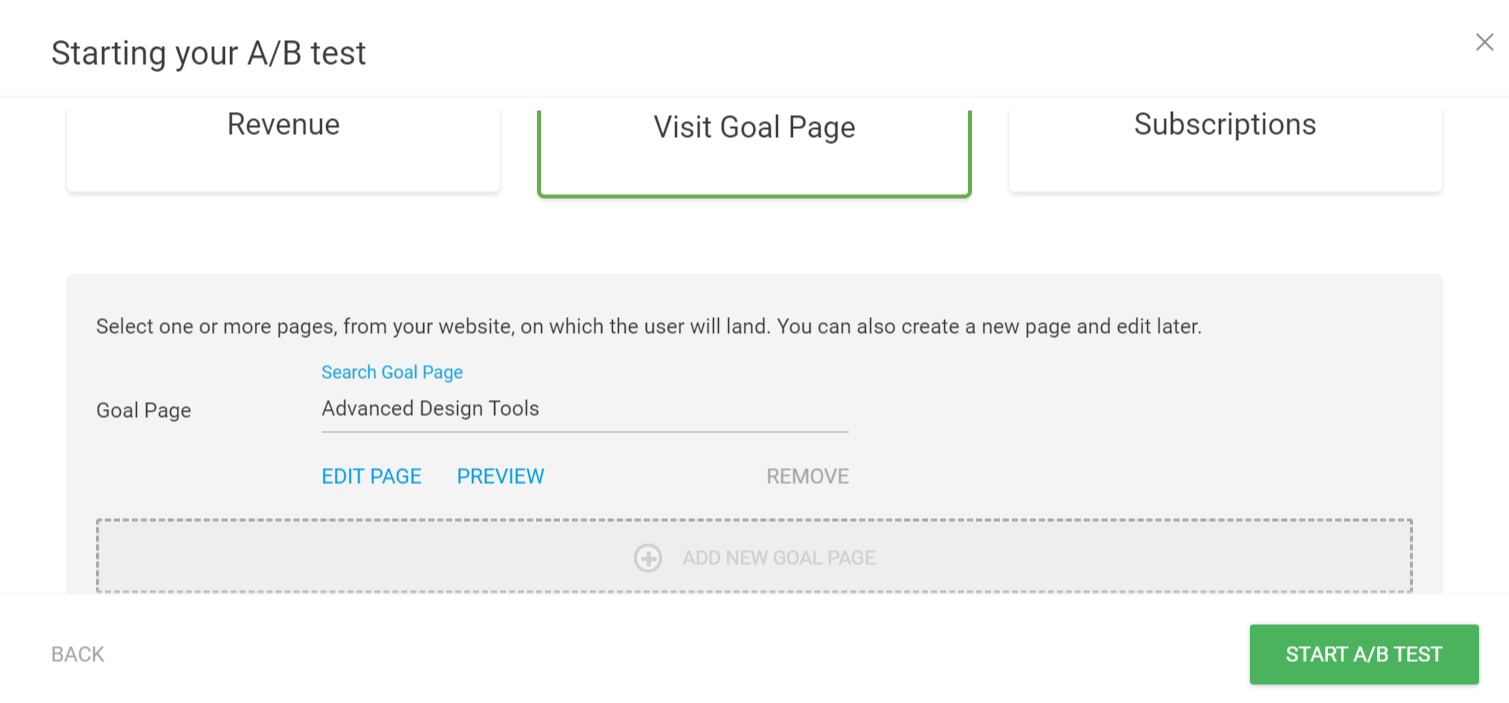
2. Visit Goal Page
The Visit Goal Page goal is similar to Revenue but is used when you want to track traffic flow without assigning a monetary value. The variation that sends the most visitors to the goal page can be treated as the winner.
Use this goal if:
- You want to see which variation gets more people to click through to your “Pricing,” “Contact,” or another key page.
- You have a multi-step funnel and want to optimize the first step (e.g., getting visitors from Landing Page → Sales Page).
How it works
- Impressions = visits to each variation (the pages you’re testing).
- Conversions = visitors who click through from a variation and land on the goal page you set.
Example: If you’re testing Page A and Page B, impressions for Page A are everyone who visited Page A; conversions for Page A are everyone who then reached the goal page from Page A.
How to set it up
- In the “Set up and Start A/B test” popup, go to the second step and select Visit Goal Page as your goal type.
- In the Goal Page field, type the name of the page you want users to reach and select it from the list.
- To add more than one goal page (e.g., multiple links on your variations), click Add New Goal Page and search for the page.
- When you’re done, click Start A/B Test.
Once the test starts, any visitor who clicks a link on a test variation and lands on the selected goal page is counted as a conversion.
Editing, previewing, or removing a goal page
After you’ve added one or more goal pages, you’ll see options under each page:
- Edit Page — Opens the page in the Thrive Architect editor.
- Preview — Opens the page in a new tab so you can confirm it’s the right one.
- Remove — Removes that page from the goal list.
3. Subscriptions
The Subscriptions goal is designed for lead generation. Use it when you’re testing opt-in pages or lead magnets and want to see which variation gets more signups.
Requirement: Your variations must contain a Lead Generation element (in Thrive Architect) or a Thrive Leads opt-in form. You need the same opt-in form (or equivalent) on both the Control and every Variation—the form is what records the conversion when someone subscribes.
How it works
- Thrive Optimize detects when a user successfully submits the form on your page.
- Every successful submission counts as one conversion for that variation.
- This works with both API connections (e.g., Mailchimp, ActiveCampaign) and “HTML Custom” form integrations, as long as the form is inside a Lead Generation element.
You can also use a button (or other element) that opens a Thrive Lightbox or Thrive Leads ThriveBox containing the form. The conversion is still tracked when the user submits the form inside the lightbox—the goal tracks the submission, not just the button click.
Important: If you use a Thrive Lightbox or ThriveBox, it must contain an opt-in form that is connected to a service (e.g., an email provider). Otherwise, subscriptions won’t be recorded.

For more on building lead forms, see How to use the Lead Generation element.
Summary
| Goal type | Best for | What counts as a conversion |
|---|---|---|
| Revenue | Comparing which variation drives more sales or value | Visitor reaches thank-you page or SendOwl purchase |
| Visit Goal Page | Comparing which variation sends more people to a page | Visitor reaches the goal page you selected |
| Subscriptions | Comparing which variation gets more signups | Visitor subscribes via your opt-in form |
After you’ve set your goal and started the test, you can track results in the Thrive Optimize dashboard and in AB Test Overview and Test Details.
Need more help?
- Getting Started with Thrive Optimize
- Creating Your First A/B Test Using Thrive Optimize
- AB Test Overview and Test Details
- Thrive Optimize: Frequently Asked Questions
Thrive Optimize documentation: Thrive Optimize knowledge base