If you add a progress bar to your quiz, quiz takers will have the possibility to see their progress while taking the quiz. The progress bar will display how many questions are still left from a quiz.
Adding such a progress bar to your quiz can improve user engagement and it can also increase the chances of users completing/finishing the quiz. Here is how to do that:
Access the Quiz Settings
Naturally, you will have to create a quiz first, or edit an already existing one, to add a progress bar to it. If you require in-depth information about how to create a quiz, check out this tutorial.
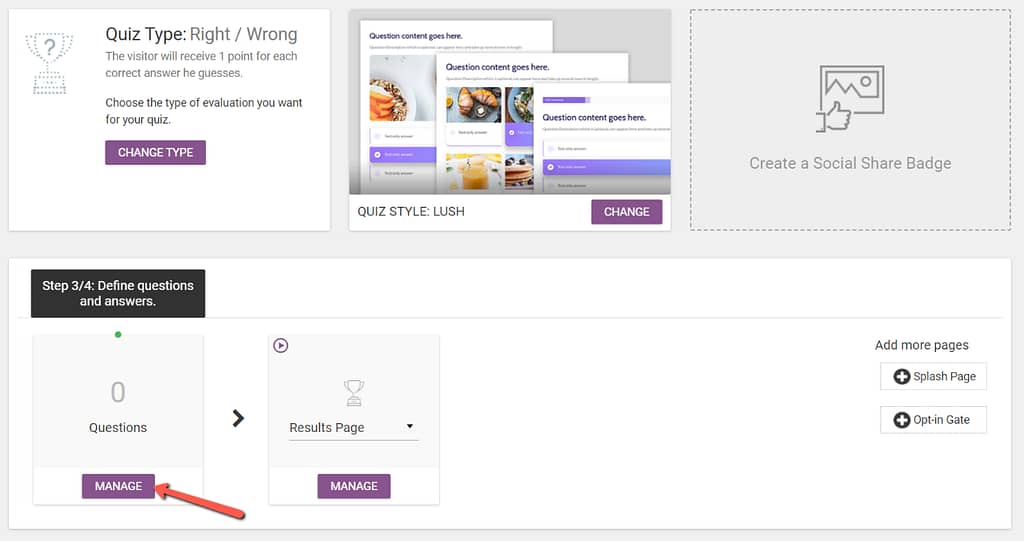
While setting up the new quiz, or editing an already existing one, you will have to define questions and answers for it at the “Quiz Structure” part of the setup. Click on the “Manage” button, from the “Questions” card:
The questions editor will open. This is also where you will be able to add a progress bar to your quiz. In order to do that, you will need to open the “Quiz Settings” section.
To do that, click on the gear icon from the upper right corner of the questions editor:
This will display the current status of the progress bar in a drop-down. Since your quiz does not have a progress bar yet, the “Don’t display” status will appear here. Click on this:
Activate/Display the progress bar
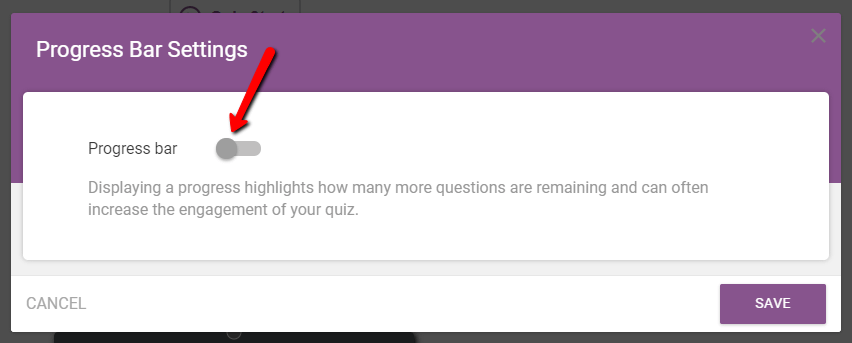
After you click on the progress bar status, a pop-up window will appear with the “Progress Bar Settings”. This is where you can activate the progress bar.
Click on the switch next to the “Progress bar” section to activate it:
Customize the progress bar
Once the progress bar is activated, you will see the options you can use to customize it, in the same pop-up window:
Font size
With this option, you can select the size in pixels of the font that is used on the progress bar.
By default, the size is 10 pixels. If you want to change this, simply click in the field with the default number from the “Font size” section. Then, use the up and down arrows that appeared to enter the number you want the font size to be:
Type
Here, you can choose what type should your progress bar be. By default, the “Percentage completed” type is selected, but you can change this if you click on the down arrow next to this type:
This will open a drop-down with the two available progress bar types:
- The “Percentage completed” type will show how much has the user already completed from the quiz.
- The “Percentage remaining” type will show how much more of the quiz has the user still left to complete.
In order to select either of these, simply click on one of them and that one will be selected.
Position
Next, you have to option to choose the position of the progress bar. To do that, click on the arrow below the option:
A small drop-down will open, with the two options which you can choose from:
- If you choose the “Above Question” option, the progress bar will be placed above the question that is currently being shown;
- The second option “Below Question”, will place the progress bar underneath the question.
Select the option you prefer by clicking on one of them in the dropdown.
Label
The “Label” option represents the label that will be displayed on the progress bar. By default, next to the percentage on the progress bar, the “Completed” word will appear.
If you want to change this, just click on the field where the “Completed” text appears, delete it and replace it with the text you want to show on the progress bar:
Progress bar colors
Furthermore, you have the option of adjusting the colors of the progress bar. Below the above-mentioned options in the pop-up window, you will see the default colors for the following parts of the progress bar:
- Fill: this is the color that signals how much of the quiz has been completed so far
- Next step: this is the color that is used to show the next step on the progress bar
- Background: this is the background color of the progress bar
- Label: this is the color of the label that is displayed on the progress bar
In order to change either of these four colors, click on the box with the color below them. This will open the color picker that you can use to choose another color. Alternatively, you can also enter a new color code in the field with the current color in it:
After you have chosen the new color, click on the “Choose” button and it will be applied to your progress bar.
Reset to Default
If you do not feel happy with the modifications that you have made, there is a “Reset to Default” button that will give the progress bar its initial customization, inherited from the style you’ve previously chosen. If you want that, simply click on the “Reset to Default” button:
Preview & Save
After you have finished customizing the progress bar, you can preview it in the same pop-up window below the color options:
If you still want to make adjustments to the way the progress bar looks, use the same options presented above, from the pop-up, for further customization.
However, if you like the way the progress bar looks, you can proceed and save it, by clicking on the “Save” button from the bottom right corner of the pop-up:
Once you have saved the “Progress Bar Settings”, you will see that the status of the progress bar will be changed to “Display” in the right sidebar of the questions editor:
This means that the progress bar is now saved and will be displayed whenever someone will take your quiz.
You can continue with adding questions and answers to your quiz if you haven’t already, and once you have set up everything in the questions editor, click on the “Save & Exit” button, from its bottom right corner to save your changes:
If you want to find out more about how to use various options of Thrive Quiz Builder, take a look at our knowledge base section here.