Do you want to create stylish and engaging quiz sets on your website? With the Thrive Quiz Builder you can create a customized quiz, choose a template, style it as you want to manage the look and feel of it.
In this article, we’ll show you how you can create your first quiz, select a template, style it further, and display it the way you want in the frontend.
- Adding a New Quiz in the Thrive Quiz Builder
- Picking a Quiz Template
- Selecting a Quiz Type
- Selecting a Quiz Style
- Defining Questions and Answers in a Quiz
- Creating a Results Page
- Adding a Redirect URL for a Quiz
- Optional Items for a Quiz
- Displaying the Quiz
Adding a New Quiz in the Thrive Quiz Builder
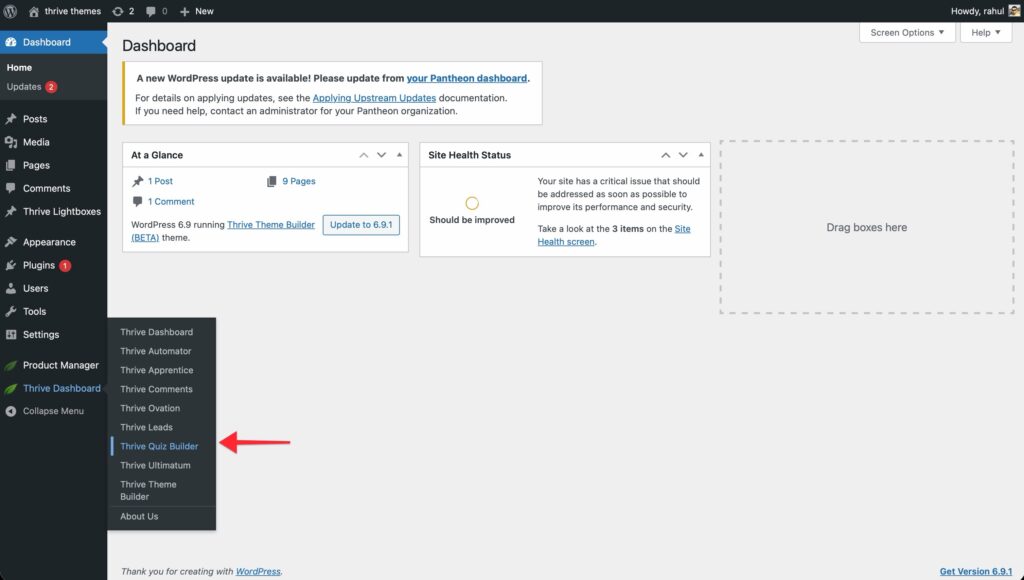
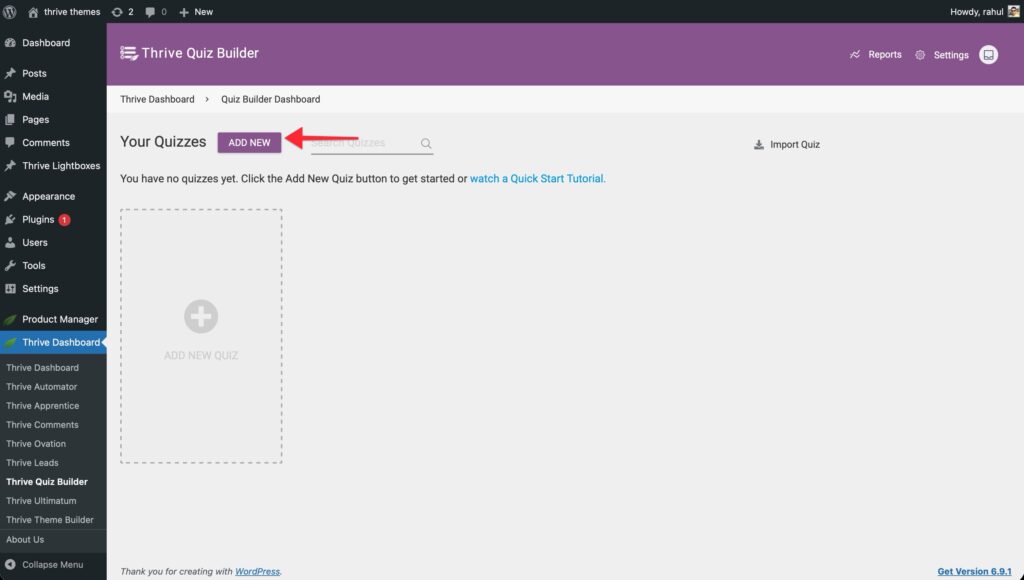
To add a new quiz in the Thrive Quiz Builder, open your WordPress admin area, navigate to Thrive Dashboard >> Thrive Quiz Builder, and click the Add new button.

A quiz can also be created by clicking the block saying Add New Quiz.

Picking a Quiz Template
After clicking to add a new quiz, the next step is to choose a template from the popup.

In this article, we’ll build a quiz from scratch. If you want to build your quiz from scratch too, select Build from scratch in the popup.
You can also choose to build a quiz using the other available templates. To do so, refer to the documents listed below.
- Using the List Building Template for Quiz Building
- Using the Social Share Template for Quiz Building
- Using the Gain Customer Insights Template for Quiz Building
When you select the Quiz template, click the Continue button.

After selecting the Quiz template, the next step is to enter a name for the quiz you are creating. To continue, enter a quiz name in the given field and click the Continue button.

Once you select the quiz template and give it a name, you’ll see that added as a new quiz on the Quiz Builder Dashboard.

Selecting a Quiz Type
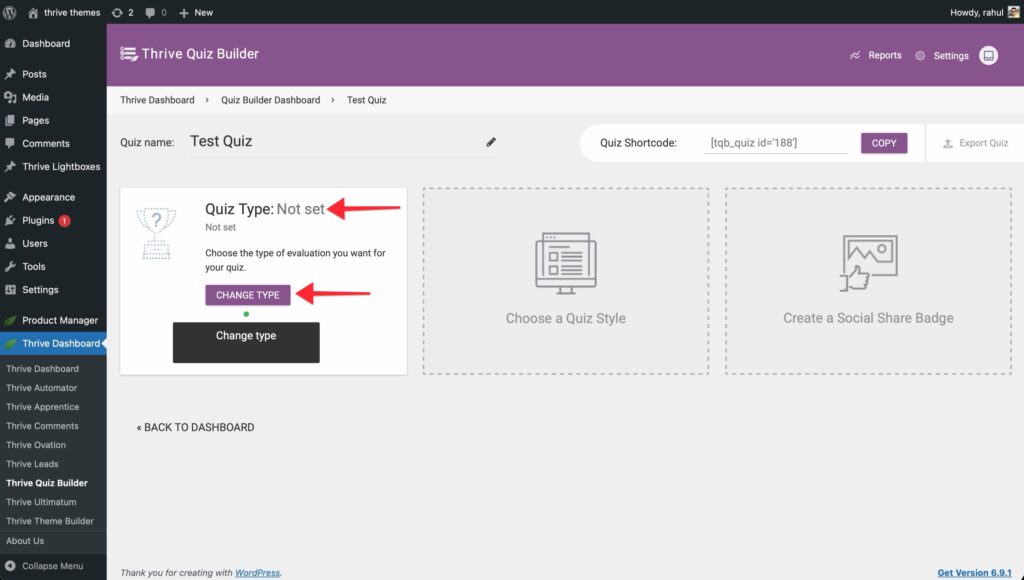
After creating a quiz, the next step is to select the type. This is the way you want the quiz to be evaluated.
To select a quiz type, click the Change type button on the quiz block.

Clicking the button to change type will open a popup where you select the type of quiz you want to create from the following.
- Number: This will ensure the quiz is evaluated based on the scores.
- Percentage: This lets you evaluate a user’s performance based on percentage.
- Category: This lets you categorize user results based on the number of answers, score or percentage.
- Right/Wrong: This evaluates the quiz on the basis of terms like Right or wrong, pass and fail, etc.
- Survey: This helps you collect user survey in the form of a quiz.
In this article, we select the Number Quiz type.

When you select a quiz type, click the Continue button to proceed.

After you click Continue, you’ll be taken to the next step to set up the selected quiz type. These steps are different for each type. You can refer to the following documents to build each of these quiz types.
- Setting Up the Number Quiz Type
- Setting Up the Percentage Quiz Type
- Setting Up the Category Quiz Type
- Setting Up the Right/Wrong Quiz Type
- Setting Up the Survey Quiz Type
Selecting a Quiz Style
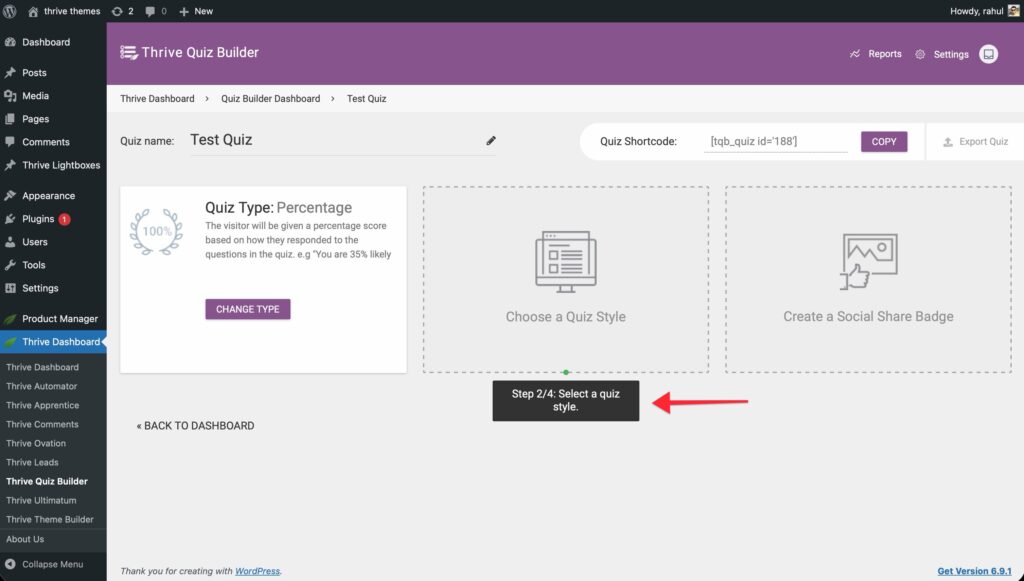
When you finish creating a quiz and selecting the evaluation type, the next step is to select a Quiz Style.
To set up a quiz style for a quiz, open the quiz in the Quiz Builder dashboard and click the block that says Choose a Quiz Style.

The Thrive Quiz Builder offers multiple quiz styles that you can select from.
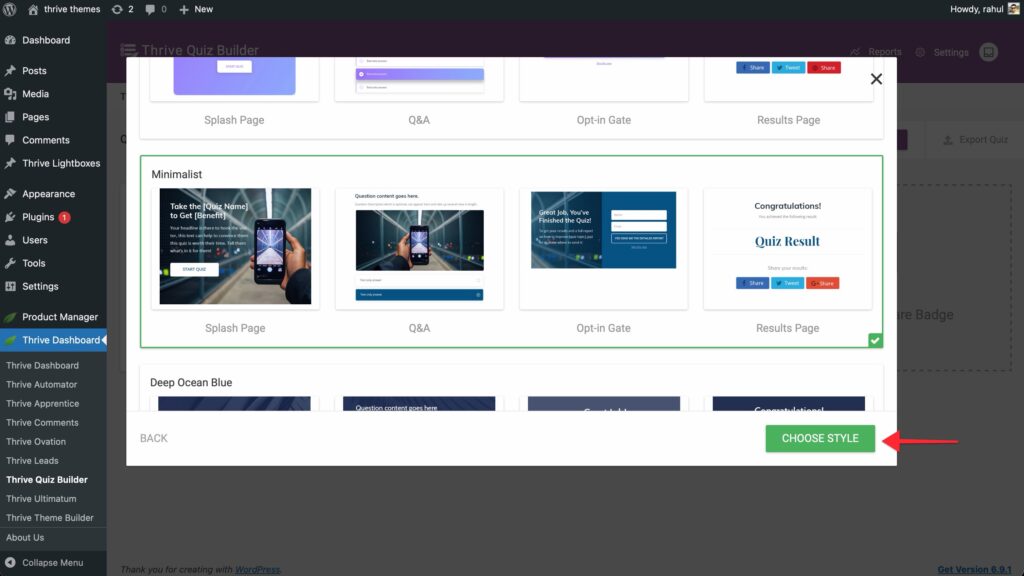
After clicking to choose a quiz style, you’ll see a popup with different available quiz styles.
On this popup, select the quiz style and click the Choose Style button.

Need help selecting the right quiz style for your website? You can refer to our document here to learn more.
Defining Questions and Answers in a Quiz
Now, when the quiz is created, the next step is to add questions and answers to it.
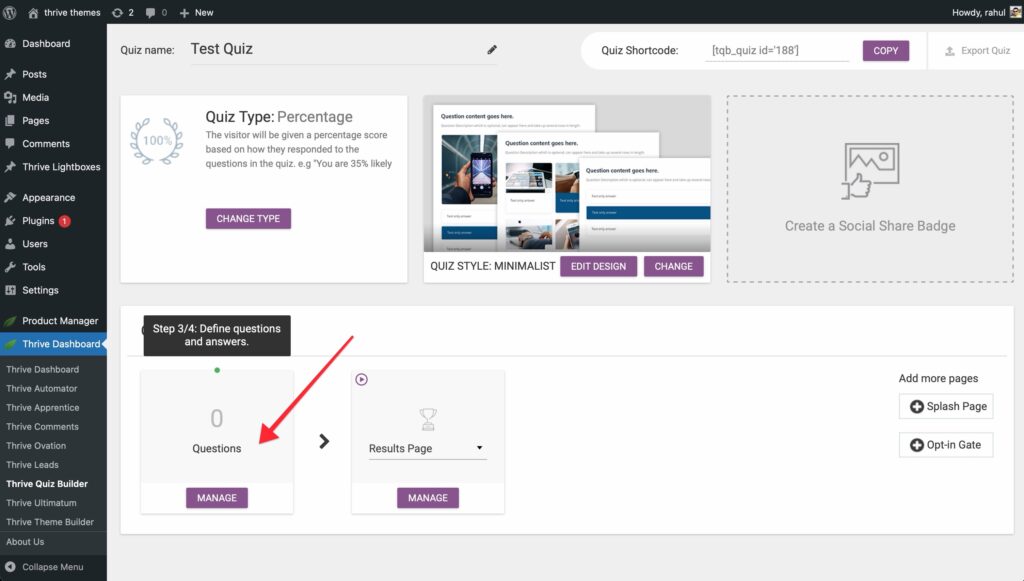
After selecting the style, you’ll see a new section added to the New Quiz dashboard that will allow you to manage questions and the result page for the quiz.
To add and manage questions, click Manage on the Questions block.

Clicking on manage will take you to a Live Questions Editor where you can add questions and their answers and manage the quiz flow by building a flowchart.
To understand the process of adding questions in a quiz, refer to our document here.
Creating a Results Page
The Results page in a Thrive Quiz Builder is the page users will see after completing a quiz. As the name suggests, this page will display the result.
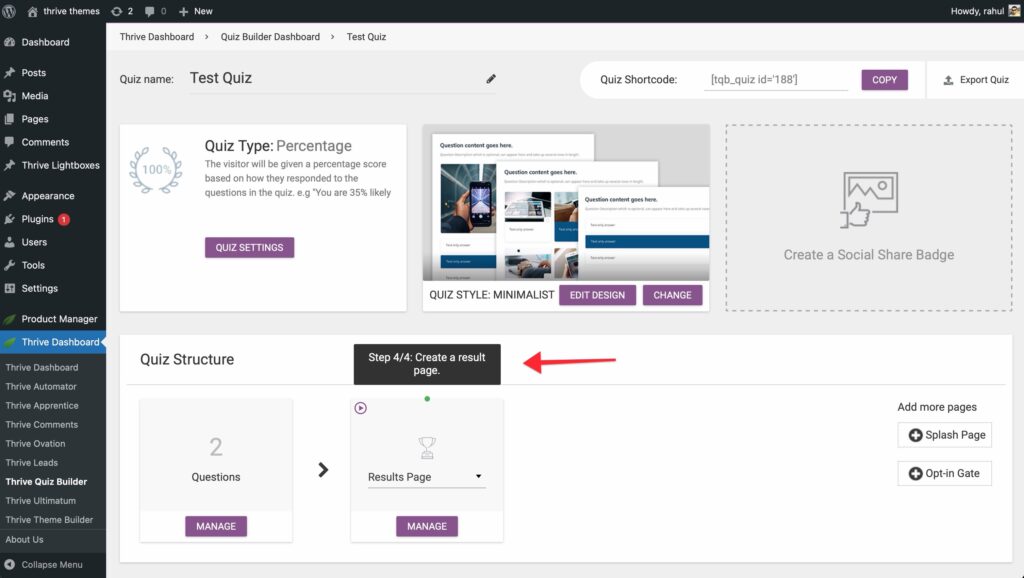
To add and manage the result page for a quiz, click the Manage button on the Results page block.

When you click to manage a result page, it will take you to another page where you see the first default result page added. To edit this results page, click the pen icon beside it.

The results page you create for a quiz will have dynamic content depending on the result of the quiz. Therefore, here’s a document that will help you use dynamic content on a Quiz Results page.
Adding a Redirect URL for a Quiz
With the Thrive Quiz Builder, you can redirect the people who take your quiz to one of your pages/posts, or to a custom URL (an external URL), depending on the result they obtain in the quiz.
To add a redirect URL, click the arrow on the Results page and select URL Redirect.

After you select URL Redirect, click the Manage button on the block.

When you click manage, you’ll be taken to the Redirect Settings dashboard for you to manage it further.

To learn more about Redirect Settings in a Quiz, refer to our document here.
Optional Items for a Quiz
Alongside the above steps that you must follow to build a quiz, there are some optional settings that you can use too.
These settings allow you to:
- Create a Social Share Badge for the Quiz
- Add a Splash Page for the Quiz
- Add an Opt-in Gate for the Quiz
Create a Social Share Badge for the Quiz
With the Thrive Quiz Builder you can add social share badges to the quizzes on your website.
To add a social share badge, open the quiz dashboard and click the Create Social Share Badge block.

After clicking to create a social share badge, you’ll see a popup where you select the template you want to use and click Choose Template.

When you select a template, it will open in the editor where you can edit the Social Share Badge by referring to our document here.
Add a Splash Page for the Quiz
When you create a quiz and add it to a page or post, it’s seen there and discovered only when a user arrives on that particular page. But, if you want most of your website users to take the quiz it is a good idea to advertise or introduce the quiz on other pages as well.
A Splash page allows you to create an advertisement of your quiz that can be placed anywhere on the website to ensure you have maximum website visitors taking your quiz.
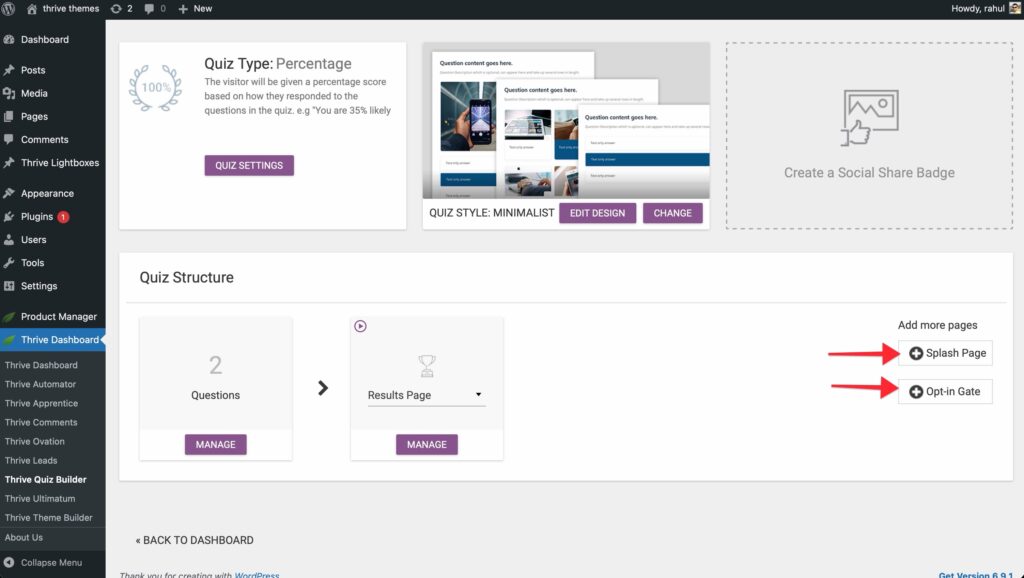
To add a Splash page for a quiz, open the quiz dashboard and click the Splash page button on the right.

To add and edit the splash page further, we’d recommend you to read our document here.
Add an Opt-in Gate for the Quiz
The Thrive Quiz Builder allows you to add an opt-in gate to help you capture lead data after a user has submitted a quiz.
You can use this opt-in gate to encourage users to sign up for your newsletter, offer promotional offers, etc.
The process goes like this: the visitors take your quiz and answer the questions. Before being redirected to the results page, they will be first prompted with a form (the opt-in gate), where they can sign up for your newsletter.
After this, they will be redirected to the results page, just as in the case of any other quiz created with Thrive Quiz Builder.
To add an opt-in gate to a quiz, open the Quiz dashboard and click the Opt-in Gate button on the right.

To add and edit the opt-in gate, we’d recommend you to read our document here.
Displaying the Quiz
After setting up your quiz in the Thrive Quiz Builder, there are two ways you can choose to display it on the page.
- Using the Quiz Element in Thrive Architect
- Using the Quiz Shortcode
Using the Quiz Element in Thrive Architect
To display a quiz on a page created using Thrive Architect, first open your WordPress admin area, navigate to Pages >> All Pages, hover on the page you want to edit and click Edit with Thrive Architect.

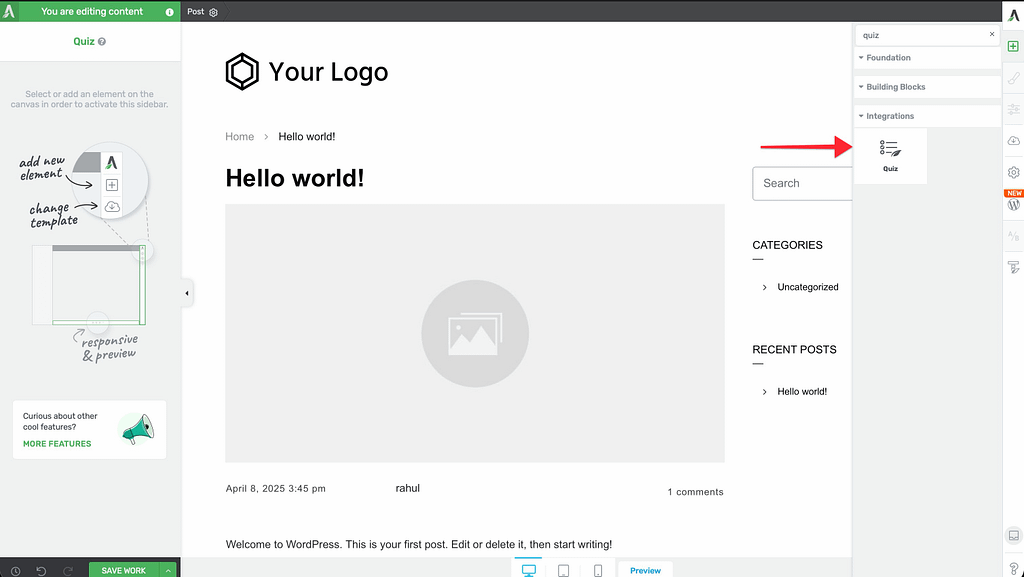
In the Thrive Architect editor, go to the right panel and click the plus icon to add a new element on the page.

From the elements that appear, drag and drop the Quiz element on the page.

After dragging and dropping the Quiz element, select the Quiz you want to add on the page. If you don’t see it listed there, use the search field to search the quiz by name.

When the quiz is added to the page, like any other Thrive Architect element, you can manage the following settings in the left column.
- Change quiz: Change and choose to display another quiz in place of the current one.
- Enable quiz scroll: Enable scroll to top on a single click.
- Save user’s quiz progress: Save the progress of logged-in users so they can continue from where they left whenever they return to the page.
- Responsiveness: Control how your quiz will look on different screen sizes.
Using the Quiz Shortcode
The second method to add a quiz built using Thrive Quiz Builder on a WordPress page is by using the shortcode.
Every quiz has a unique shortcode that you can copy and paste on the page you want to display it on.
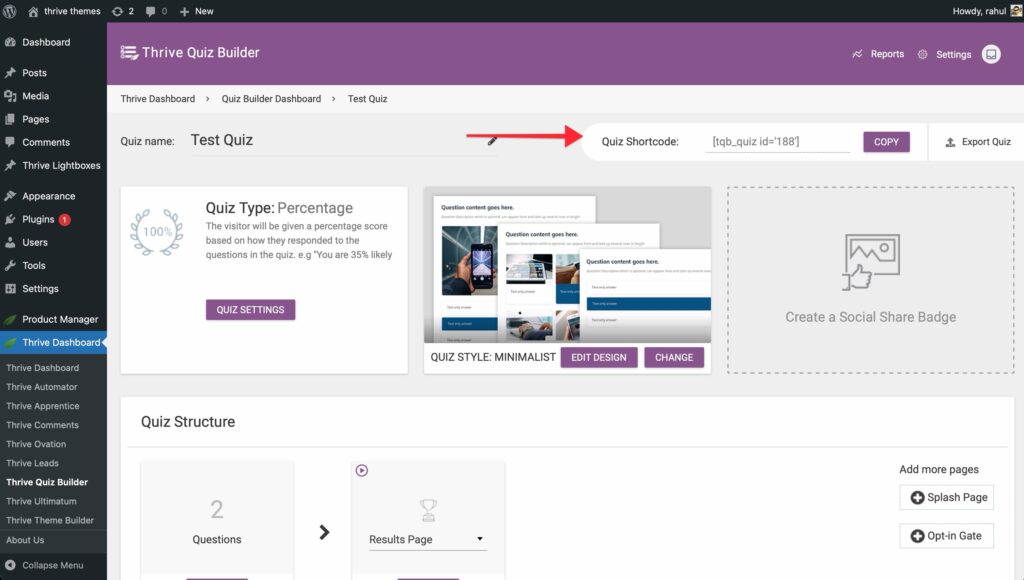
To copy the shortcode, open the Thrive Quiz Builder dashboard and click Edit Quiz on the Quiz you want to use.

On the Quiz dashboard, click the Copy button beside the Quiz shortcode.

You can now paste this shortcode in the WordPress editor to display this quiz on the page.
If you’ve built the page using Thrive Architect, you can use the WordPress Content element to add the shortcode to that page.
Enabling Quiz Scroll for a Quiz
Next, if you want to enable scroll to top in a quiz so a user can scroll to the top of the quiz on a single click, you can use the Quiz scroll feature in Thrive Quiz Builder.
To enable Quiz scroll start by opening your WordPress admin area, navigate to Thrive Dashboard >> Thrive Quiz Builder, and click the Edit Quiz button on the quiz you want to edit.
After you click edit, it’ll open the quiz dashboard. On this page, scroll down to the Quiz Structure box and click the Manage button under Questions.

Once you click Manage, the questions will open in a new tab. On the questions page, click the Quiz Settings icon in the top right corner.
When you click the settings icon, you’ll see the Quiz Settings open in the column. This is where you click on the slider beside Quiz Scroll.

Enabling Quiz Scroll here will ensure this setting is enabled for the quiz irrespective of how you’ve chosen to display it on a page.
We’ve just seen how you can create your first quiz using the Thrive Quiz Builder, pick a template, style it and manage the other settings for it.
To get a virtual tour of the process we explained above, you can watch the video below.
Next, do you want to send your Quiz results to an autoresponder using a custom field? Here’s our document that will help you set that up.