Thrive Optimize is a plugin that works with Thrive Architect so you can A/B test different versions of a page and see which one performs best with your audience. In this guide, you’ll learn how to install and access it, create an A/B test, set a goal, and use the Thrive Optimize dashboard.
Note: Before using Thrive Optimize, make sure you’ve created a version of your page using Thrive Architect.
Install and Use Thrive Optimize on Your Website
Install and Activate the Plugin
If you’re not a Thrive member and you’ve bought Thrive Optimize on its own, you need to install and activate it on your site. If you’re not sure how, follow this tutorial: How to Install a Thrive Plugin on Your Website (it uses Thrive Leads as an example but applies to any Thrive product).
What You Need to Start
You need Thrive Architect installed and active. Thrive Optimize runs on top of Thrive Architect so you can build and edit the pages you test.
Once both plugins are active:
- Create a new page or open an existing one that you want to A/B test.
- Edit it with Thrive Architect (use Edit with Thrive Architect from Pages » All Pages, or the Thrive Architect button in the WordPress editor).
- In the Thrive Architect editor, open the right sidebar and look for A/B or Create New Test. That’s where you’ll start your first test.
From there, follow the steps below to clone a page, set up the test, choose a goal, and view results. For a focused walkthrough of creating one test from start to finish, see Creating Your First A/B Test Using Thrive Optimize.
Contents
- Cloning a Page for A/B Testing
- Understanding the A/B Test Dashboard
- Setting Up a Goal for an A/B Test
- Understanding the Thrive Optimize Dashboard
- Viewing Particular Test Results
- Stopping an A/B Test and Choosing a Winner Manually
- Frequently Asked Questions
Cloning a Page for A/B Testing
An A/B test compares two or more versions of a page to see which one works best. With Thrive Optimize, you clone a page built in Thrive Architect and then create variations to test.
Before you start, have the page designed and ready in Thrive Architect.
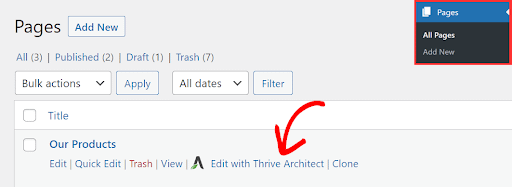
- In your WordPress admin, go to Pages » All Pages.
- Hover over the page you want to test and click Edit with Thrive Architect.
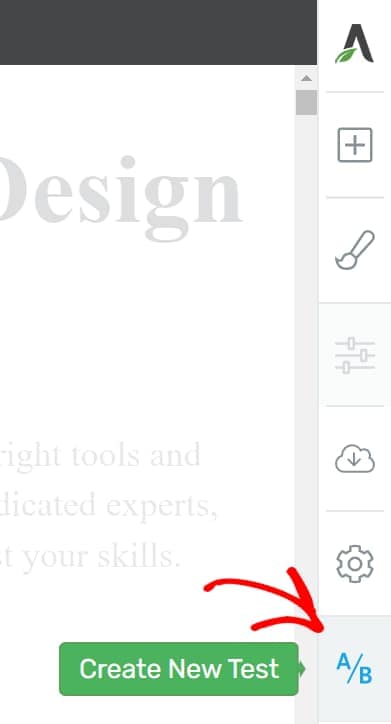
- In the Thrive Architect editor, click A/B in the right panel.
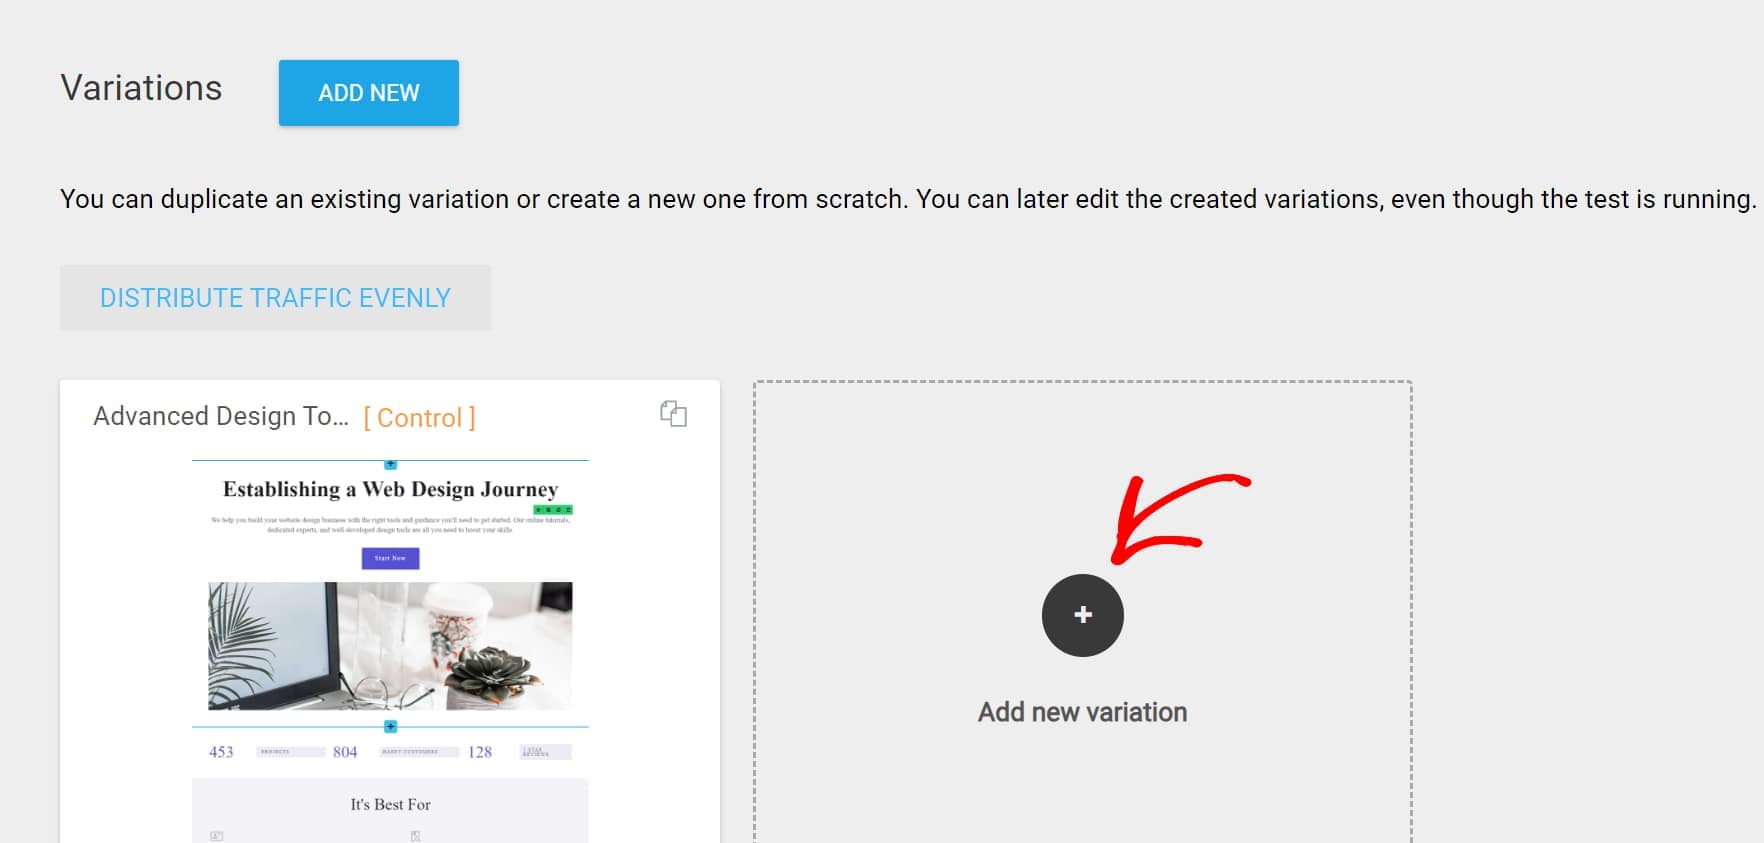
- Click to create a new test. You’ll be taken to a dashboard where you manage all pages in the test.
- On the dashboard you can:
- Click Add new Variation to add a new page to compare with the original.
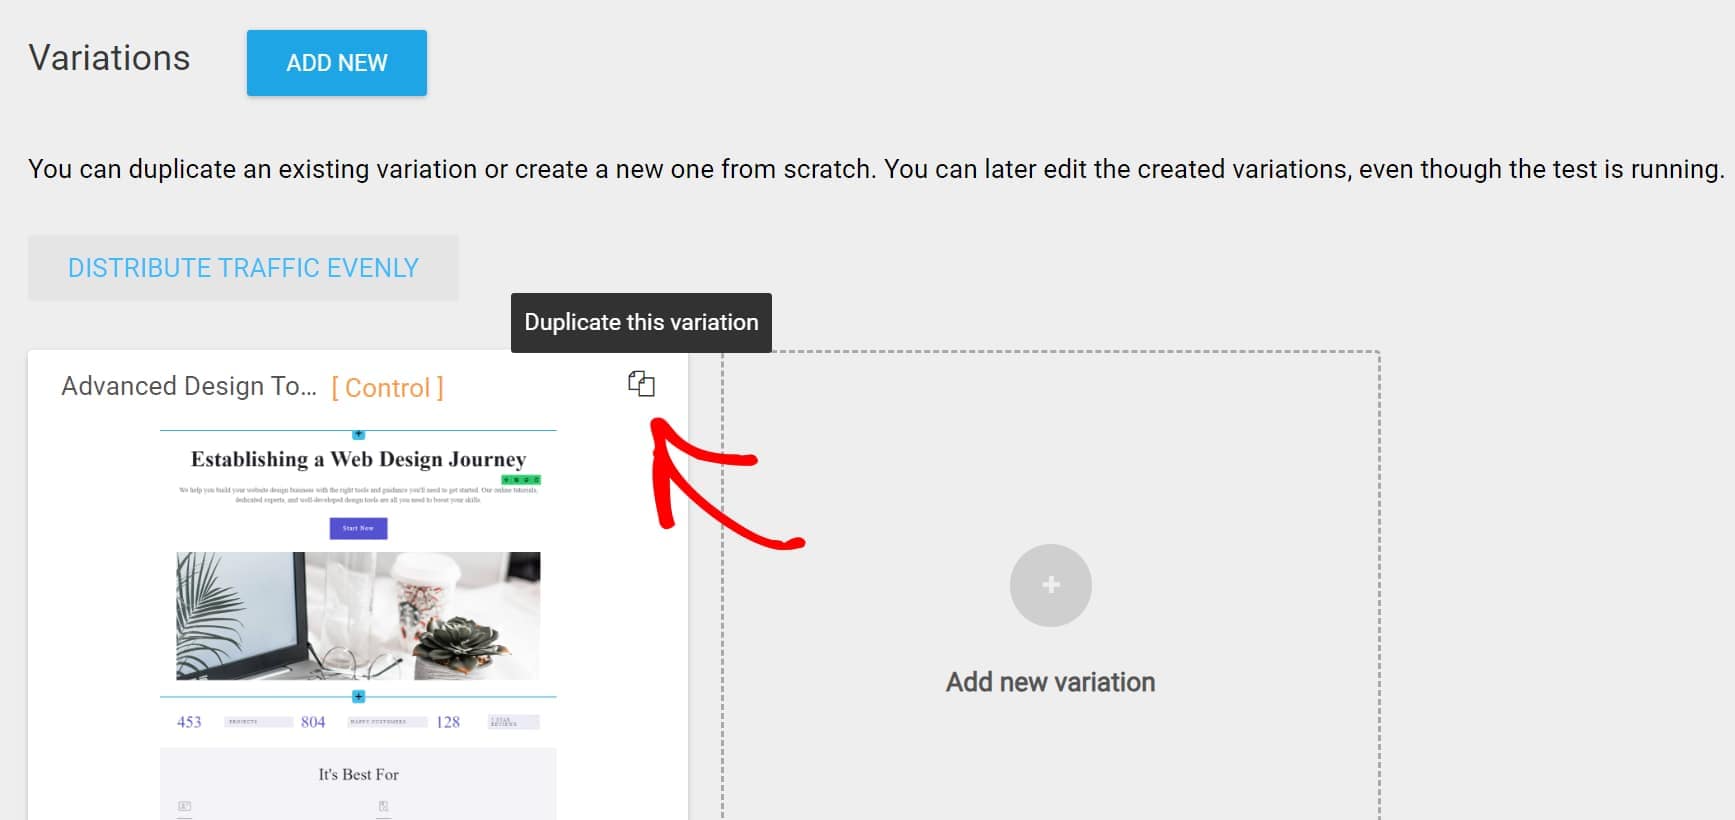
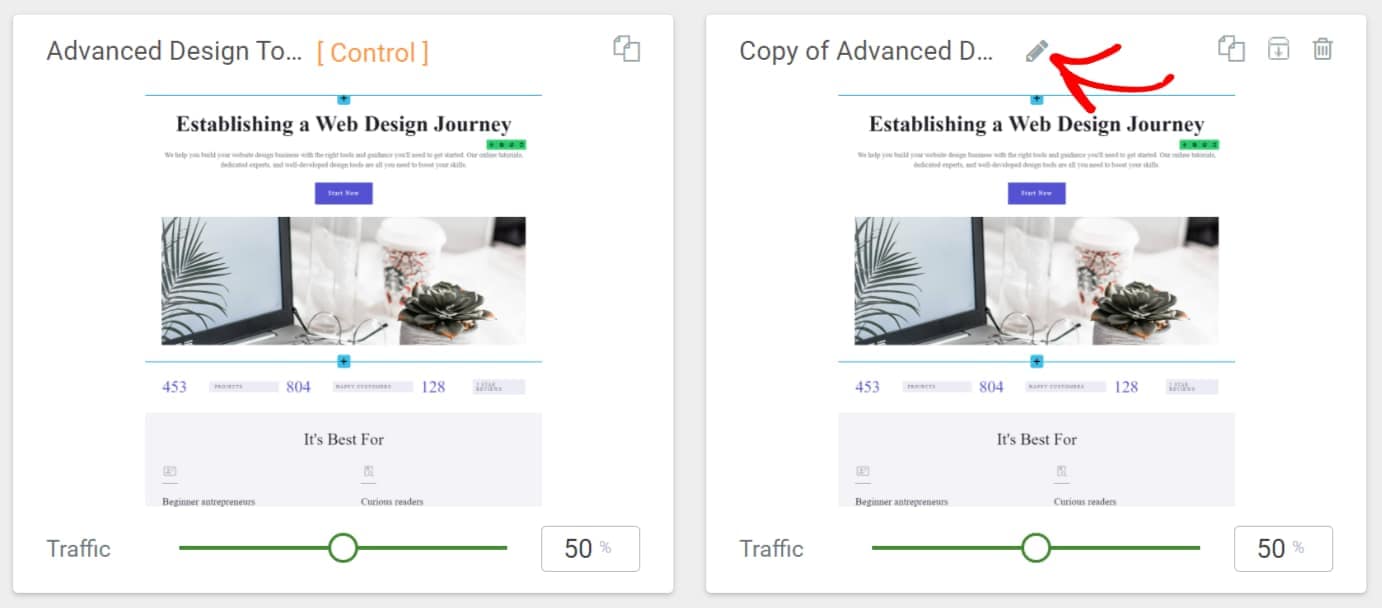
- Click the copy (duplicate) icon to duplicate the current page so you can change it slightly.
- After duplicating, you’ll see the new variation in the dashboard. Click the pen icon next to its name to rename it.
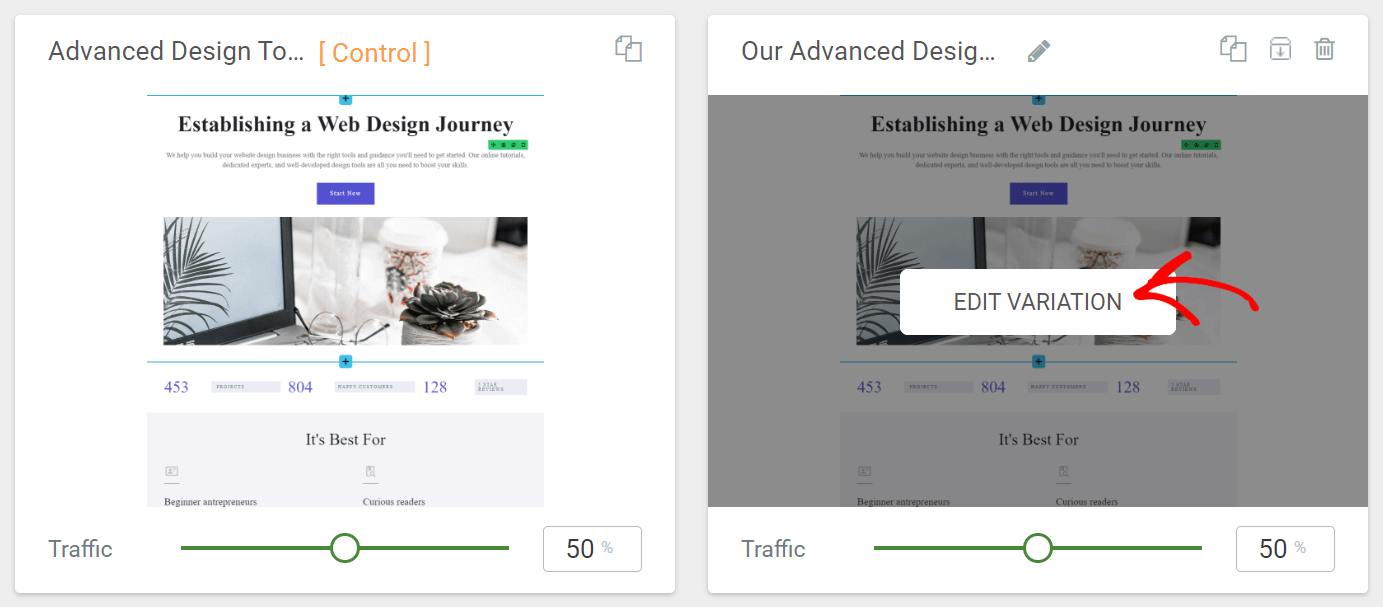
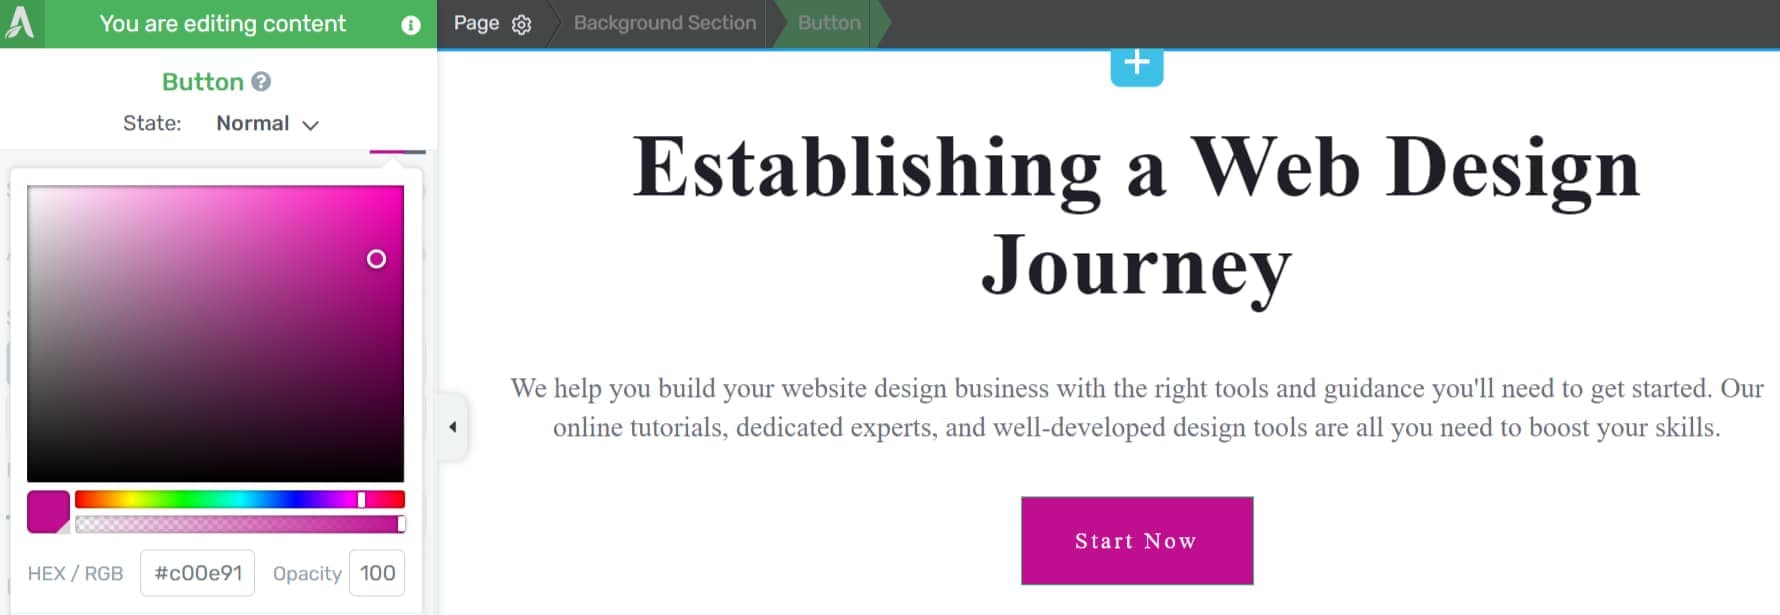
- Hover over the variation and click Edit Variation to open it in Thrive Architect and make your changes (e.g., different CTA colors or layout).
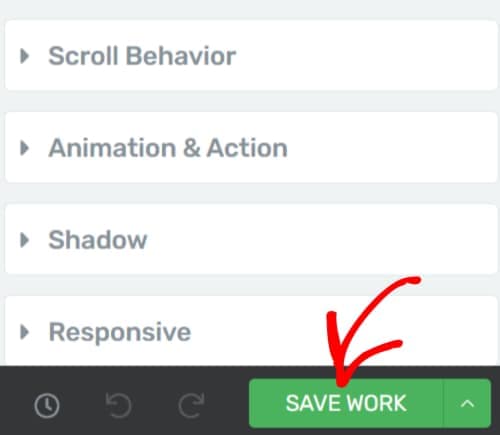
- When you’re done editing, click Save Work at the bottom left.
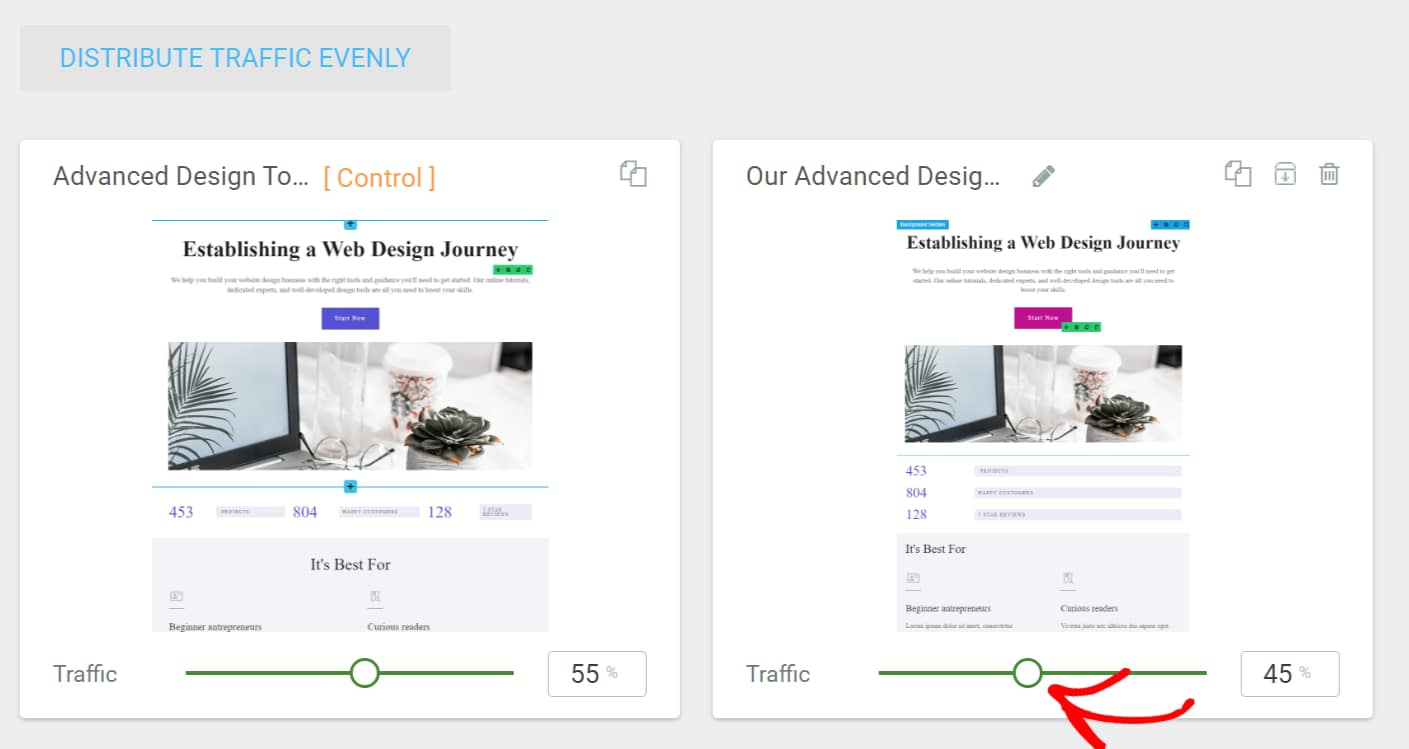
Understanding the A/B Test Dashboard
After you’ve created at least one variation, click A/B in the right panel in Thrive Architect to return to the A/B test dashboard. Here you can split traffic between variations and start the test.
Distributing Traffic Among Variations
Use the slider on each variation to set what percentage of traffic it receives. The total across all variations should add up to 100%.
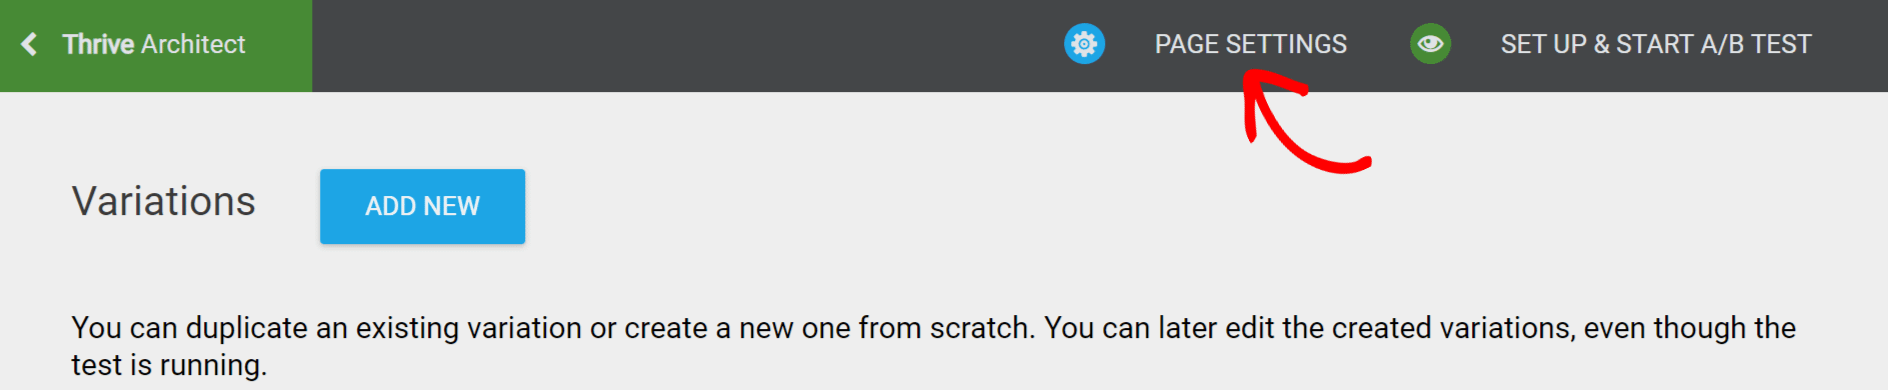
Accessing Parent Page Settings
Click Page Settings in the top bar of the A/B test dashboard to open the parent (control) page in the WordPress page editor.
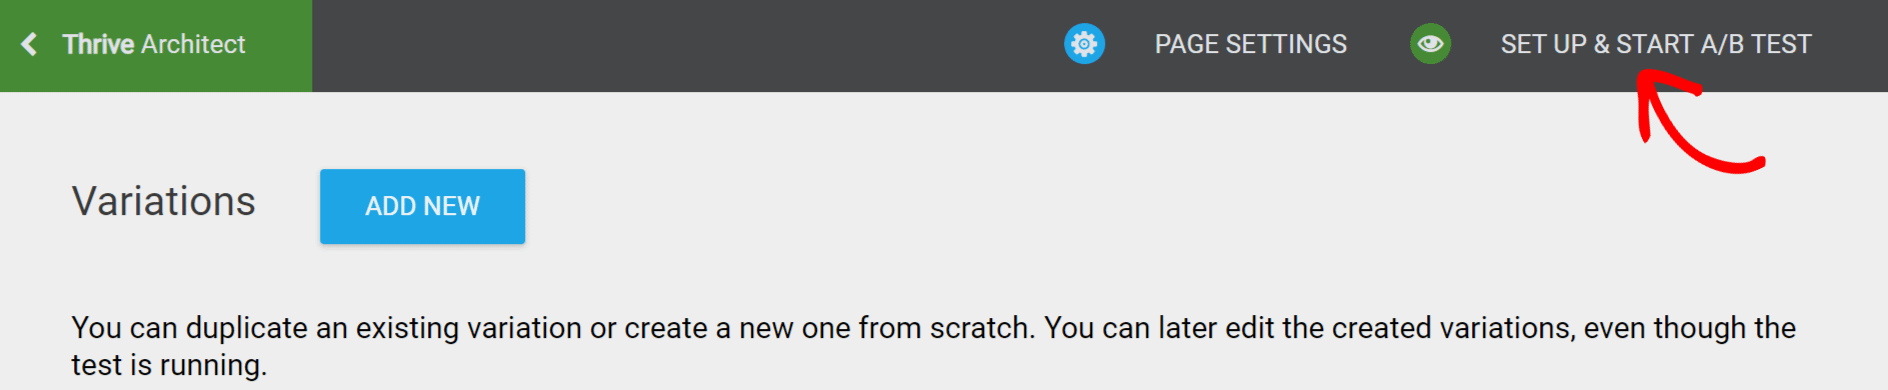
Setting Up and Starting the A/B Test
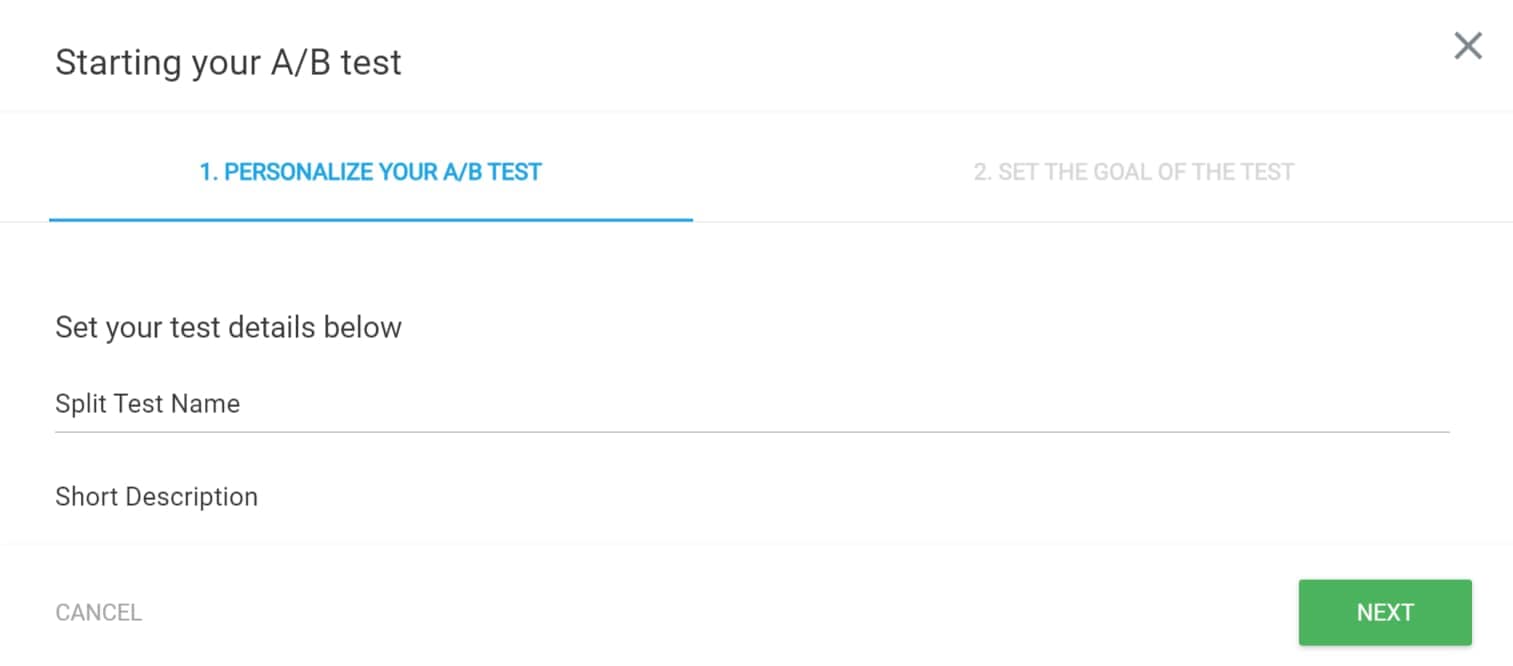
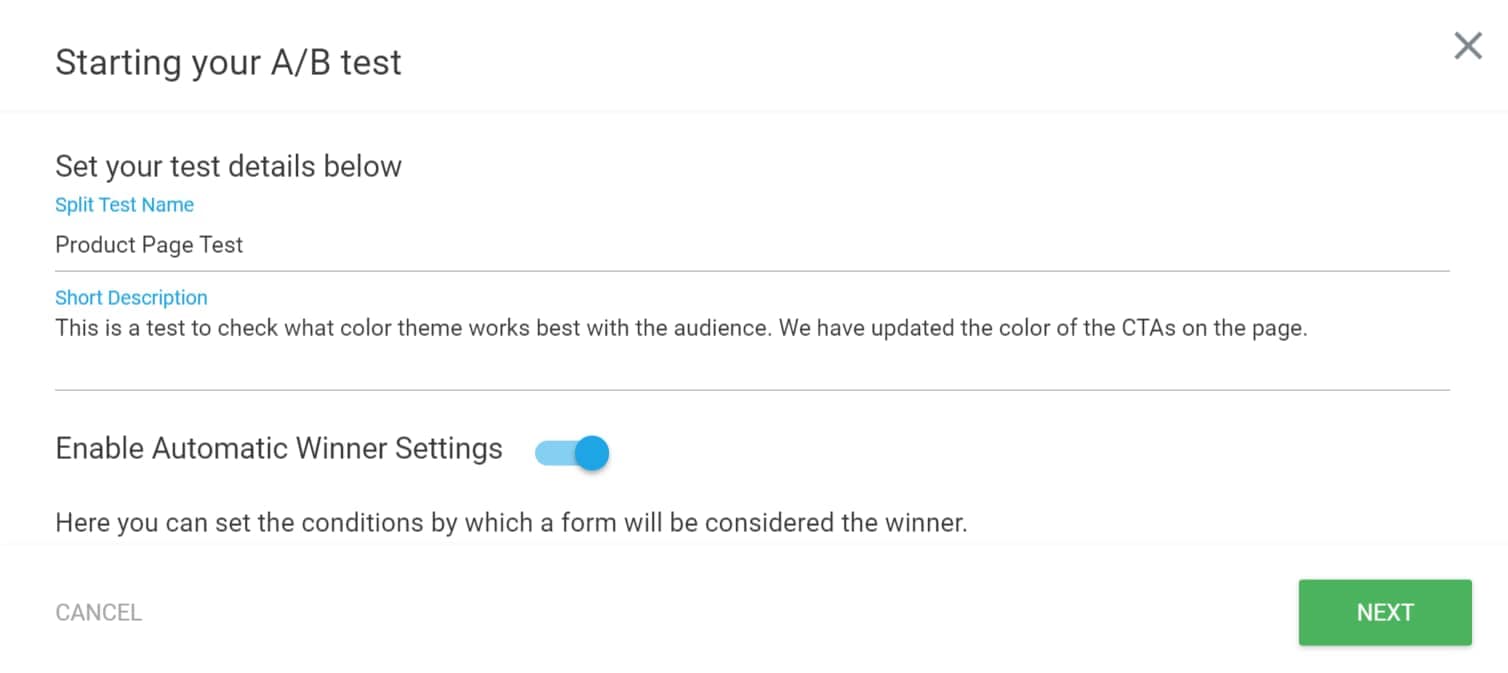
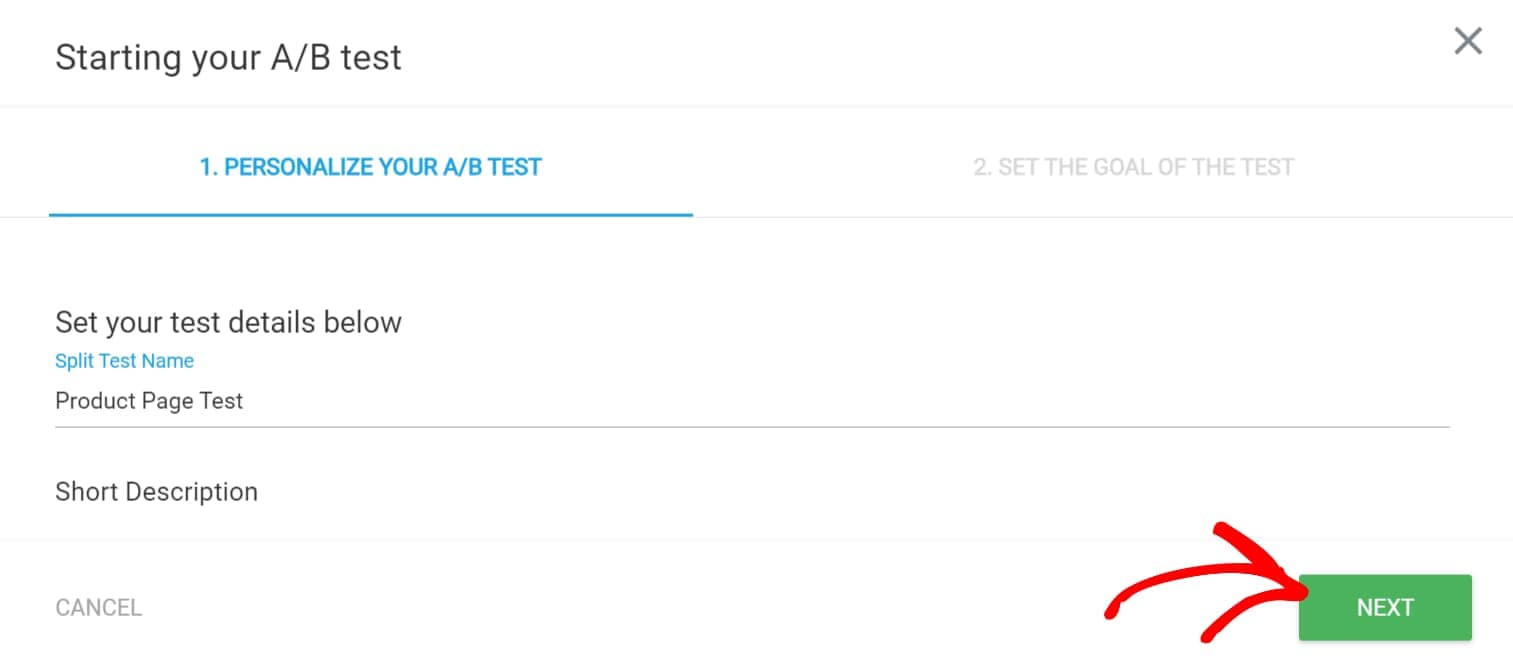
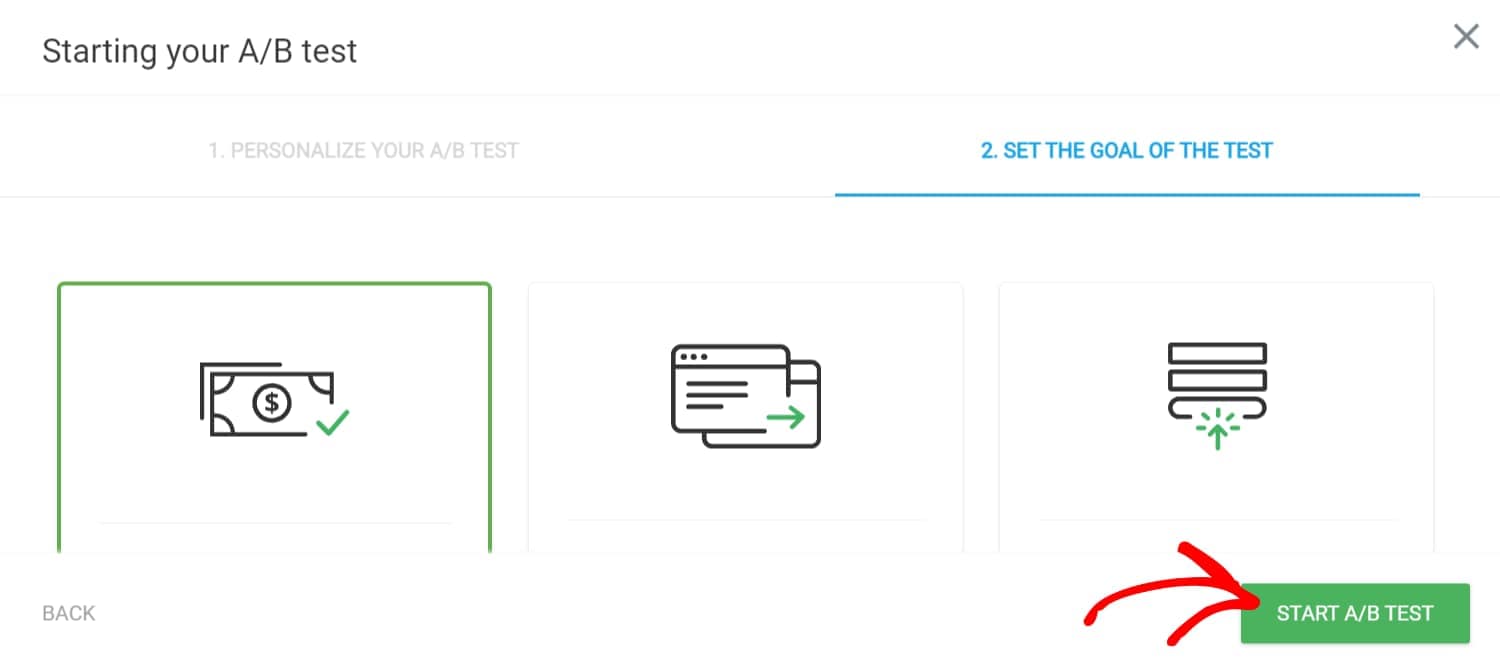
Click Set up and Start A/B test in the top-right of the dashboard. A popup opens with two tabs:
- Personalize your A/B test — Name and description, and optional automatic winner settings (minimum conversions, minimum duration, chance to beat original).
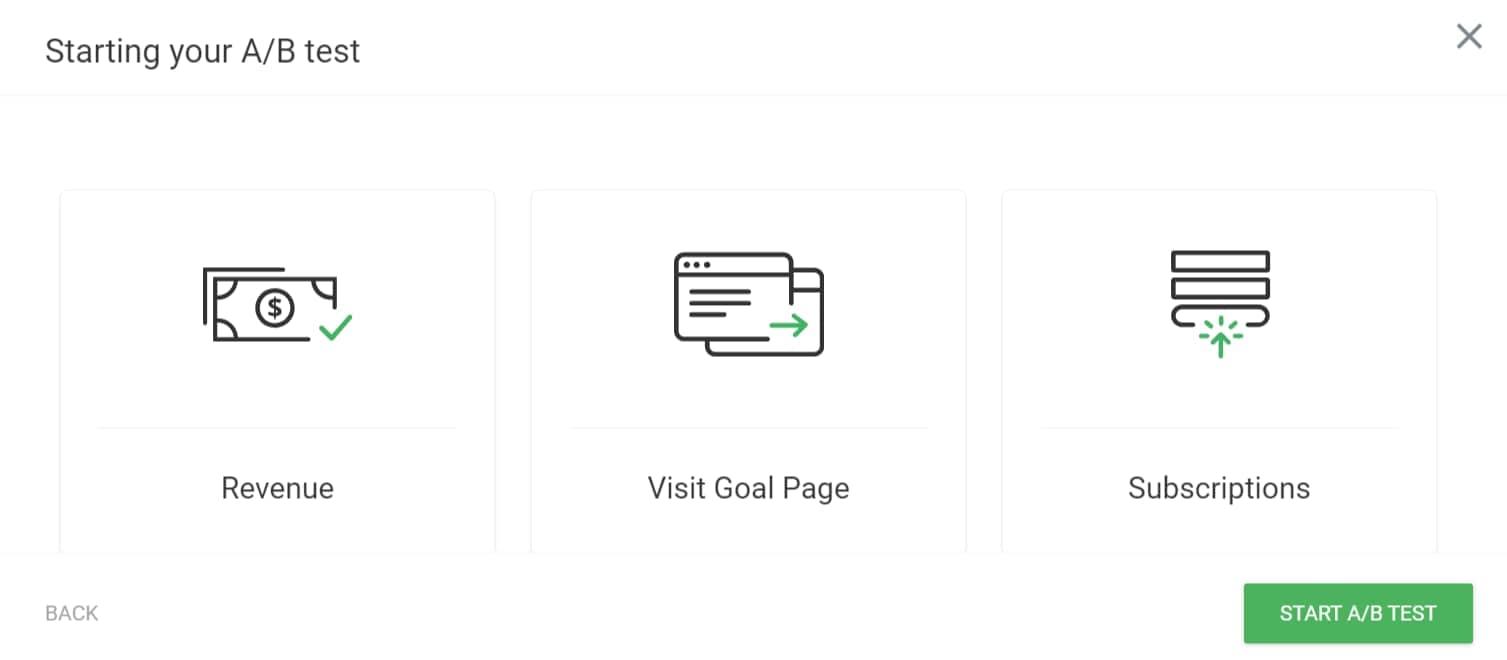
- Set the test goal — Choose how you want to measure success (Visit Goal Page, Revenue, or Subscriptions).
After personalizing the test, click Next, then set your goal and click Start A/B Test. For details on each goal type, see A/B Test Goal Types in Thrive Optimize.
Setting Up a Goal for an A/B Test
A goal is the result you want from visitors (e.g., reaching a thank-you page, making a purchase, or subscribing). Thrive Optimize uses the goal you choose to compare variations and determine a winner.
You set the goal in the second tab of the Set up and Start A/B test popup (after Understanding the A/B Test Dashboard). There are three options:
- Visit Goal Page — Count when visitors reach a specific page you choose. Best for comparing which variation sends more people to that page.
- Revenue — Count conversions with a value (e.g., thank-you page visit or SendOwl purchase). Best for comparing which variation drives more revenue.
- Subscriptions — Count signups via an opt-in form on your variations. Best for comparing which variation gets more subscribers.
For step-by-step setup for each goal type, see A/B Test Goal Types in Thrive Optimize.
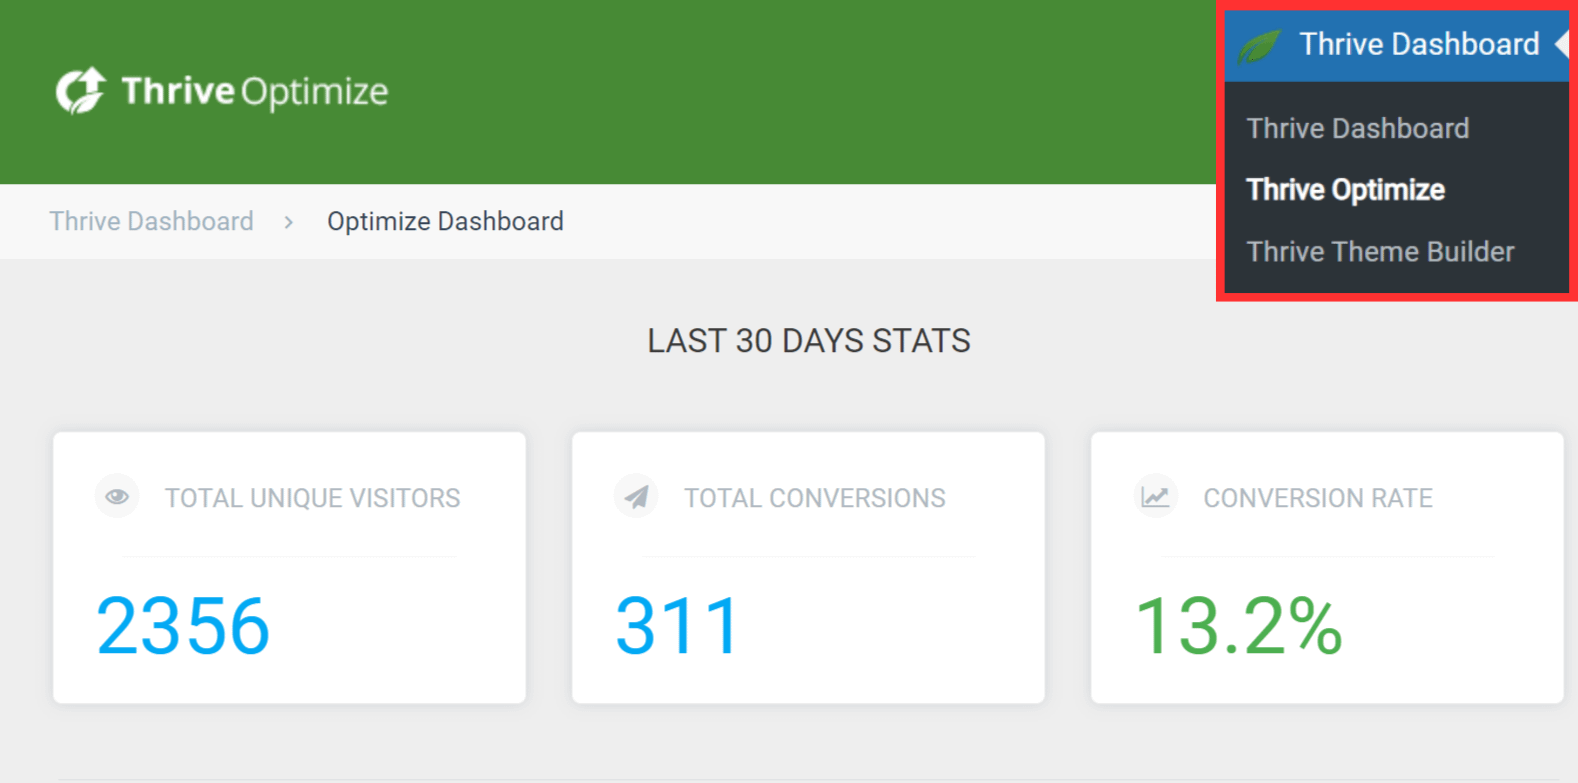
Understanding the Thrive Optimize Dashboard
The Thrive Optimize dashboard shows overall stats and lists running and completed tests.
To open it: in WordPress admin go to Thrive Dashboard » Thrive Optimize.
At the top you’ll see totals for the past 30 days: Total unique visitors, Total conversions, and Conversion rate. Below that are two tables:
Running A/B tests
- Test Name — Name you gave the test
- Date Started — When the test went live
- On Page — Control (original) page
- Test Goal — Goal type
- Unique Visitors — Unique visitors across the test variations
- Conversions — Total conversions for this test
- Actions — Link to view test details
Completed A/B tests
- Same columns where relevant, plus End Date and Actions to view details.


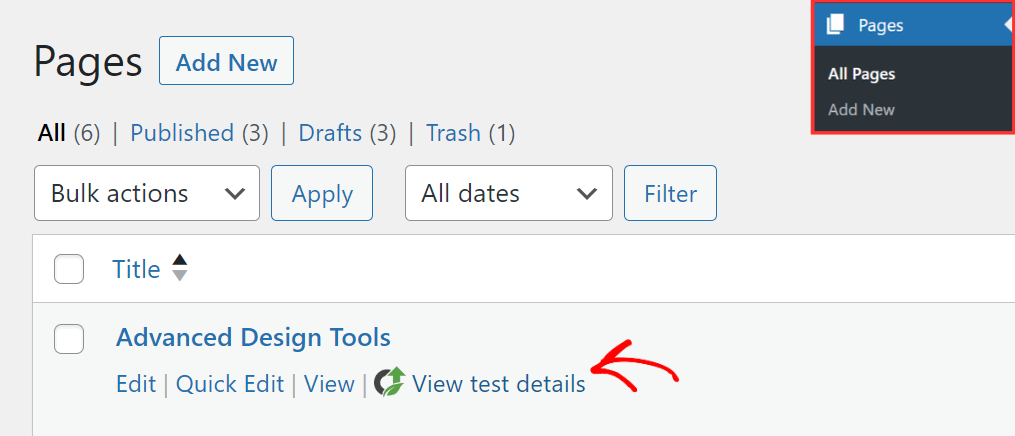
Viewing Particular Test Results
To see results for a single test:
- Go to Pages » All Pages.
- Hover over the control page for that test and click View Test Details.
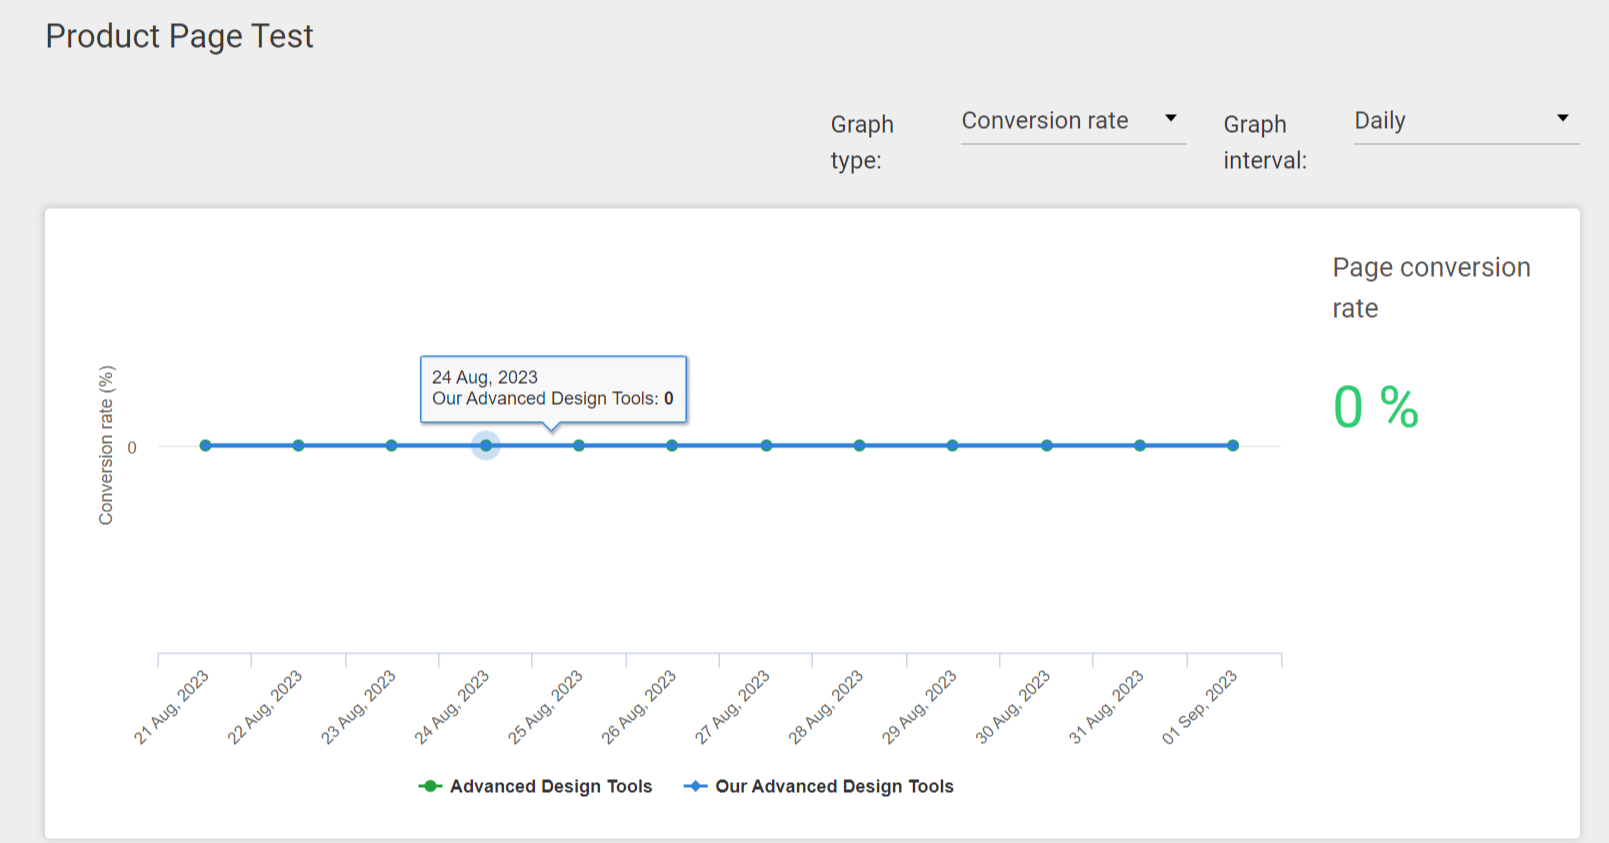
You’ll see a graph of conversion rate or conversions over time, and you can change the graph type and interval (daily, weekly, monthly). Below the graph is a table with each variation, traffic split, visitors, unique visitors, goal type, and related stats. For more on this screen, see AB Test Overview and Test Details.
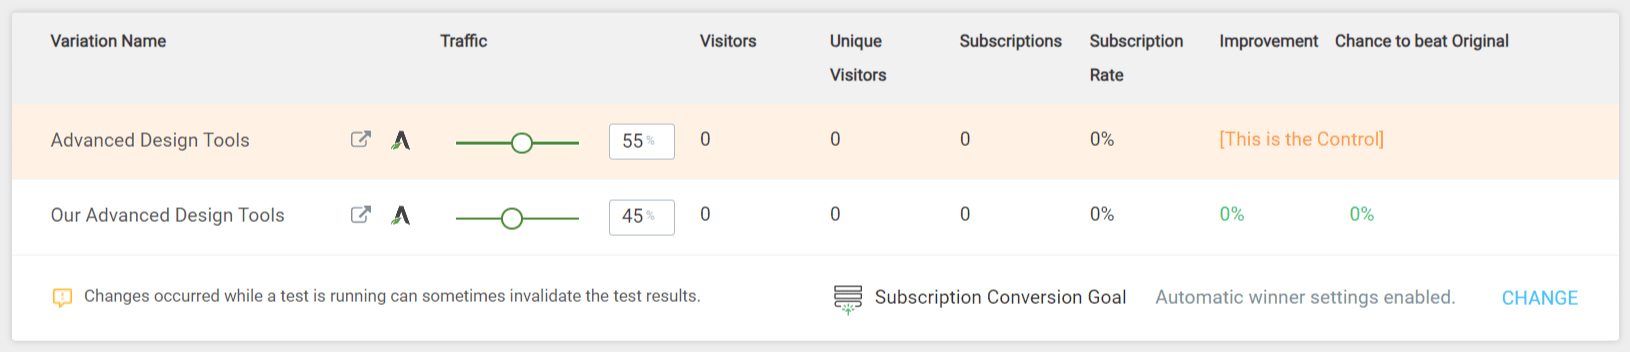
Stopping an A/B Test and Choosing a Winner Manually
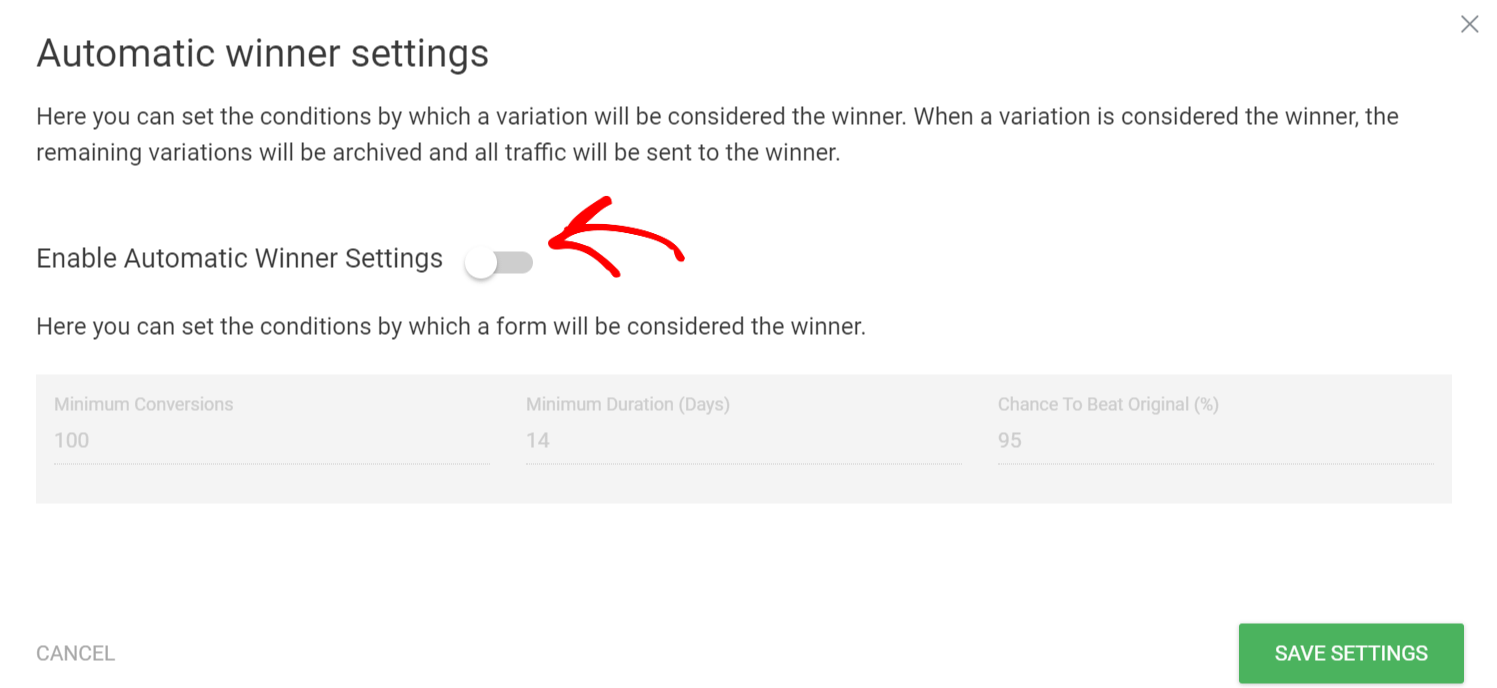
To choose a winner yourself, automatic winner settings must be off. If you turned them on when creating the test, you can disable them from the test details page (see below). For more on automatic winner settings, see Automatic Winner Settings: What They Are and How They Work.
- Go to Pages » All Pages, hover over the control page, and click View Test Details.
- On the test details page:
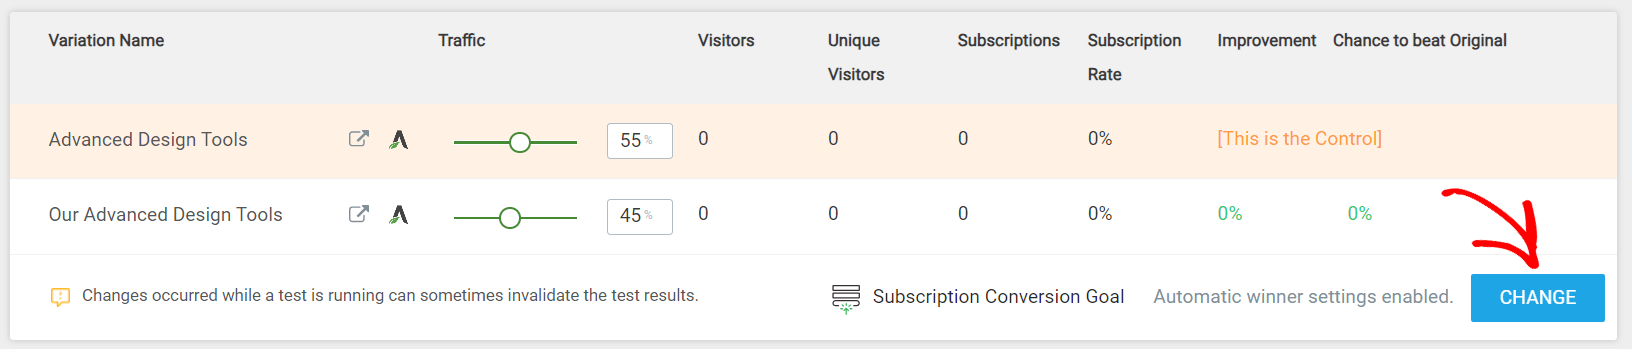
- If Automatic Winner Settings are enabled: scroll to the table, click Change next to Automatic Winner Settings Enabled, and disable them in the popup.
- If they’re already disabled: scroll down and click Stop Test and Choose Winner.
- In the popup, review the stats for each variation and click Set as Winner next to the one you want to keep.
Once you set a winner, the other variations are removed and the winning version stays on your site. The winning variation’s URL is the same as the control page.


Frequently Asked Questions
For answers to common questions about Thrive Optimize (performance, themes, cookies, traffic split, caching, and more), see Thrive Optimize: Frequently Asked Questions.
Next Steps
You’ve seen how to clone pages, run A/B tests, set goals, use the Thrive Optimize dashboard, and choose a winner. To test two forms against each other, see How to Test Two Forms Against Each Other.
Related articles
- Creating Your First A/B Test Using Thrive Optimize
- A/B Test Goal Types in Thrive Optimize
- AB Test Overview and Test Details
- Thrive Optimize: Frequently Asked Questions
Thrive Optimize documentation: Thrive Optimize knowledge base
Thrive Optimize is a plugin that works with Thrive Architect so you can A/B test different versions of a page and see which one performs best with your audience. In this guide, you’ll learn how to install and access it, create an A/B test, set a goal, and use the Thrive Optimize dashboard.
Note: Before using Thrive Optimize, make sure you’ve created a version of your page using Thrive Architect.
Install and Use Thrive Optimize on Your Website
Install and Activate the Plugin
If you’re not a Thrive member and you’ve bought Thrive Optimize on its own, you need to install and activate it on your site. If you’re not sure how, follow this tutorial: How to Install a Thrive Plugin on Your Website (it uses Thrive Leads as an example but applies to any Thrive product).
What You Need to Start
You need Thrive Architect installed and active. Thrive Optimize runs on top of Thrive Architect so you can build and edit the pages you test.
Once both plugins are active:
- Create a new page or open an existing one that you want to A/B test.
- Edit it with Thrive Architect (use Edit with Thrive Architect from Pages » All Pages, or the Thrive Architect button in the WordPress editor).
- In the Thrive Architect editor, open the right sidebar and look for A/B or Create New Test. That’s where you’ll start your first test.
From there, follow the steps below to clone a page, set up the test, choose a goal, and view results. For a focused walkthrough of creating one test from start to finish, see Creating Your First A/B Test Using Thrive Optimize.
Contents
- Cloning a Page for A/B Testing
- Understanding the A/B Test Dashboard
- Setting Up a Goal for an A/B Test
- Understanding the Thrive Optimize Dashboard
- Viewing Particular Test Results
- Stopping an A/B Test and Choosing a Winner Manually
- Frequently Asked Questions
Cloning a Page for A/B Testing
An A/B test compares two or more versions of a page to see which one works best. With Thrive Optimize, you clone a page built in Thrive Architect and then create variations to test.
Before you start, have the page designed and ready in Thrive Architect.
- In your WordPress admin, go to Pages » All Pages.
- Hover over the page you want to test and click Edit with Thrive Architect.
- In the Thrive Architect editor, click A/B in the right panel.
- Click to create a new test. You’ll be taken to a dashboard where you manage all pages in the test.
- On the dashboard you can:
- Click Add new Variation to add a new page to compare with the original.
- Click the copy (duplicate) icon to duplicate the current page so you can change it slightly.
- After duplicating, you’ll see the new variation in the dashboard. Click the pen icon next to its name to rename it.
- Hover over the variation and click Edit Variation to open it in Thrive Architect and make your changes (e.g., different CTA colors or layout).
- When you’re done editing, click Save Work at the bottom left.
Understanding the A/B Test Dashboard
After you’ve created at least one variation, click A/B in the right panel in Thrive Architect to return to the A/B test dashboard. Here you can split traffic between variations and start the test.
Distributing Traffic Among Variations
Use the slider on each variation to set what percentage of traffic it receives. The total across all variations should add up to 100%.
Accessing Parent Page Settings
Click Page Settings in the top bar of the A/B test dashboard to open the parent (control) page in the WordPress page editor.
Setting Up and Starting the A/B Test
Click Set up and Start A/B test in the top-right of the dashboard. A popup opens with two tabs:
- Personalize your A/B test — Name and description, and optional automatic winner settings (minimum conversions, minimum duration, chance to beat original).
- Set the test goal — Choose how you want to measure success (Visit Goal Page, Revenue, or Subscriptions).
After personalizing the test, click Next, then set your goal and click Start A/B Test. For details on each goal type, see A/B Test Goal Types in Thrive Optimize.
Setting Up a Goal for an A/B Test
A goal is the result you want from visitors (e.g., reaching a thank-you page, making a purchase, or subscribing). Thrive Optimize uses the goal you choose to compare variations and determine a winner.
You set the goal in the second tab of the Set up and Start A/B test popup (after Understanding the A/B Test Dashboard). There are three options:
- Visit Goal Page — Count when visitors reach a specific page you choose. Best for comparing which variation sends more people to that page.
- Revenue — Count conversions with a value (e.g., thank-you page visit or SendOwl purchase). Best for comparing which variation drives more revenue.
- Subscriptions — Count signups via an opt-in form on your variations. Best for comparing which variation gets more subscribers.
For step-by-step setup for each goal type, see A/B Test Goal Types in Thrive Optimize.
Understanding the Thrive Optimize Dashboard
The Thrive Optimize dashboard shows overall stats and lists running and completed tests.
To open it: in WordPress admin go to Thrive Dashboard » Thrive Optimize.
At the top you’ll see totals for the past 30 days: Total unique visitors, Total conversions, and Conversion rate. Below that are two tables:
Running A/B tests
- Test Name — Name you gave the test
- Date Started — When the test went live
- On Page — Control (original) page
- Test Goal — Goal type
- Unique Visitors — Unique visitors across the test variations
- Conversions — Total conversions for this test
- Actions — Link to view test details
Completed A/B tests
- Same columns where relevant, plus End Date and Actions to view details.
Viewing Particular Test Results
To see results for a single test:
- Go to Pages » All Pages.
- Hover over the control page for that test and click View Test Details.
You’ll see a graph of conversion rate or conversions over time, and you can change the graph type and interval (daily, weekly, monthly). Below the graph is a table with each variation, traffic split, visitors, unique visitors, goal type, and related stats. For more on this screen, see AB Test Overview and Test Details.
Stopping an A/B Test and Choosing a Winner Manually
To choose a winner yourself, automatic winner settings must be off. If you turned them on when creating the test, you can disable them from the test details page (see below). For more on automatic winner settings, see Automatic Winner Settings: What They Are and How They Work.
- Go to Pages » All Pages, hover over the control page, and click View Test Details.
- On the test details page:
- If Automatic Winner Settings are enabled: scroll to the table, click Change next to Automatic Winner Settings Enabled, and disable them in the popup.
- If they’re already disabled: scroll down and click Stop Test and Choose Winner.
- In the popup, review the stats for each variation and click Set as Winner next to the one you want to keep.
Once you set a winner, the other variations are removed and the winning version stays on your site. The winning variation’s URL is the same as the control page.
Frequently Asked Questions
For answers to common questions about Thrive Optimize (performance, themes, cookies, traffic split, caching, and more), see Thrive Optimize: Frequently Asked Questions.
Next Steps
You’ve seen how to clone pages, run A/B tests, set goals, use the Thrive Optimize dashboard, and choose a winner. To test two forms against each other, see How to Test Two Forms Against Each Other.
Related articles
- Creating Your First A/B Test Using Thrive Optimize
- A/B Test Goal Types in Thrive Optimize
- AB Test Overview and Test Details
- Thrive Optimize: Frequently Asked Questions
Thrive Optimize documentation: Thrive Optimize knowledge base