Do you want to switch your online course website from LearnDash to Thrive Apprentice? You can pull in all your students from LearnDash to Thrive Apprentice and rebuild the courses easily.
In this article, we’ll show you steps on how you can switch your online learning website from LearnDash to Thrive Apprentice.
- Creating the Content in Thrive Apprentice
- Creating Your Online School Design
- Creating a Thrive Apprentice Product with the Course / Course Package
- Setting Up Access Requirements and Access Restriction Rules
- Setting Up a Drip Schedule
- Setting Up the Login Process
- Importing Old Students to Thrive Apprentice
Creating the Content in Thrive Apprentice
Thrive Apprentice is a feature-rich tool that not only helps you add and display courses, but also design your online school so it looks good to engage your students in the courses they’ve taken.
Before you start designing, it is important that you add the content.
Here are a few documents that’ll help you add and frame your course content well into Thrive Apprentice.
- Get started with Thrive Apprentice to understand the dashboard, working, etc.
- Creating a course in Thrive Apprentice where you can club multiple lessons and other content you want to offer.
- Creating and managing lessons in a course.
- Using the Product section in Thrive Apprentice to club multiple courses that you want to sell.
- Organizing Lessons in Courses so you can keep your students engaged and wanting for more.
- Organizing Lessons and Chapters in Modules to club similar topics together.
- Attaching downloadable files to lesson content in Thrive Apprentice.
- Setting up a menu for your courses and lessons.
- Structuring and managing your courses using bulk actions
After you’ve created the course in Thrive Apprentice and managed them with useful features like the ones linked above, the next step is to ensure your online school is set just right for the students to understand and navigate easily.
Creating Your Online School Design
After you’ve created the course and added the content you are offering, it’s time to ensure it is displayed well on the website.
Thrive Apprentice gives you different design options so you can customize your online school. It also offers you inbuilt templates that you can use directly or customize as required.
To use Thrive Apprentice templates, design courses, lessons and content, and different settings within, we’d recommend you to refer to our set of documents listed here.
Creating a Thrive Apprentice Product with the Course / Course Package
Creating products is necessary if you’re planning on creating paid courses or courses available for users with certain roles or if you want to create a dripping schedule for them.
A Thrive Apprentice product can contain a single course, multiple courses, and other content types like posts, pages, custom post types, etc.
For in-depth understanding of Products in Thrive Apprentice, we’d recommend you to refer to our document here.
Setting Up Access Requirements and Access Restriction Rules
After creating a product, Thrive Apprentice has settings where you can manage the access requirements and the access restriction rules for products. This is one reason you can protect your courses within a product.
The Access Requirements section under a Thrive Apprentice product asks you to mention how users purchase the product. This is where you’ll select tools like Stripe, PayPal, SendOwl, or a custom purchase link to be used to purchase the product.
The Access Restriction Rules are a set of rules that’ll help control what happens when a user with no access tries to access a course. You can manage access restriction rules for un-registered or logged out users, non buyers, etc.
- Managing Login and Access Restriction Rules for all Thrive Apprentice Products on a Website
- Managing Access Restriction Rules at Product Level in Thrive Apprentice
Setting Up a Drip Schedule
Setting up a drip schedule is important when you want to unlock your course lessons one by one depending on the condition you set.
Thrive Apprentice allows you to sell courses in the form of dripped content if you want.
Setting Up the Login Process
In the next section of this article, we’ll be seeing how you can pull in existing students from LearnDash to Thrive Apprentice. But, how about new registrations?
With Thrive Apprentice, you can add a registration form that’ll let users sign up and register themselves as students on your website.
Furthermore, to control the access requirements on your website, you can also configure the Login settings in Thrive Apprentice here.
Importing Old Students to Thrive Apprentice
To export the list of students from your LearnDash website, you can use an external plugin. In this example, we’ll be using the Export and Import Users and Customers plugin.
Exporting Your Students from LearnDash
Before you begin, please ensure you’ve installed an Export Import User plugin on your website.
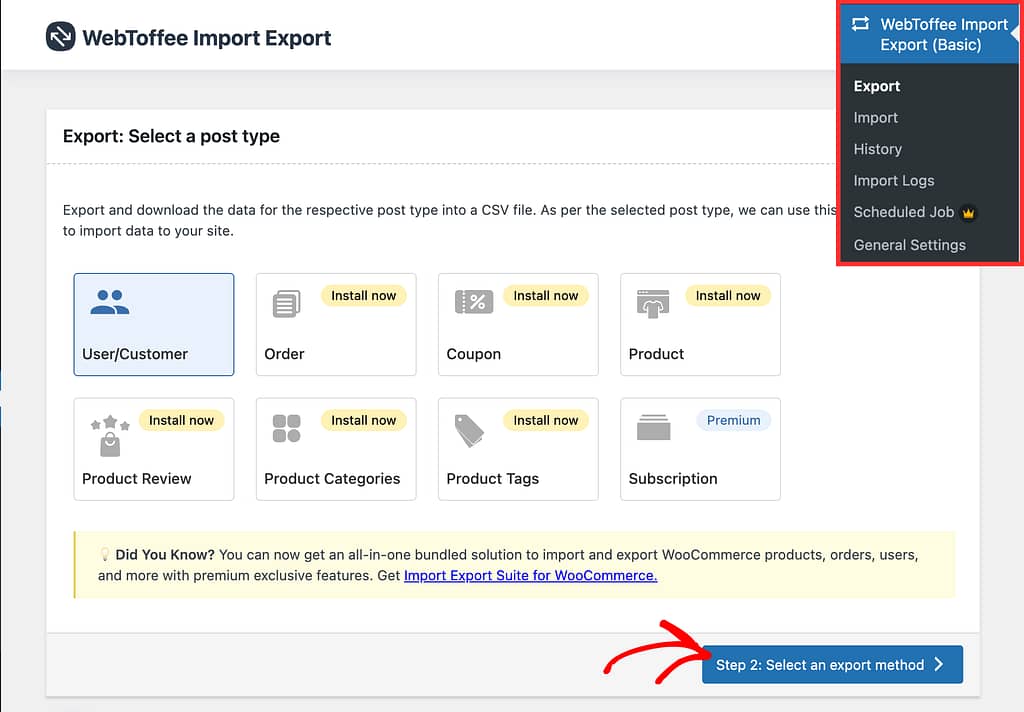
After installing and activating the plugin, open your WordPress admin area, navigate to WebToffee Import Export >> Export, select the post type User/Customer, and click Select an export method.
After clicking to move to step 2, you’ll see a page where you have to select the export type you want. Here, select the export type and click Export.
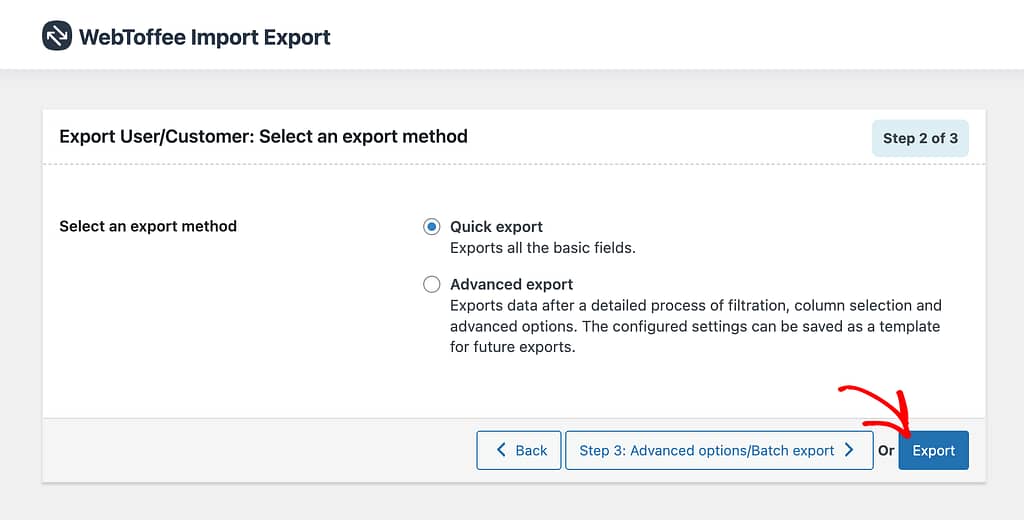
Clicking Export will display a small popup where you click Download. This will download the list of users from your website in a .csv file.
Importing a Student List in Thrive Apprentice
Thrive Apprentice allows you to import a list of students from its members area.
To do so, start by opening your WordPress admin area, navigating to Thrive Dashboard >> Thrive Apprentice and click on Members in the left panel.
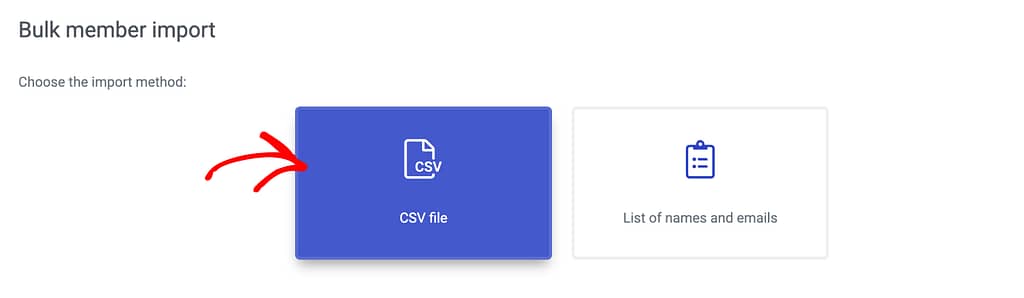
On the Members page, click on the Import member button.

Clicking to import members will open a popup where you can select the import method. Since we’ve got a .csv file while exporting the list above, select CSV file as the import method in the popup.
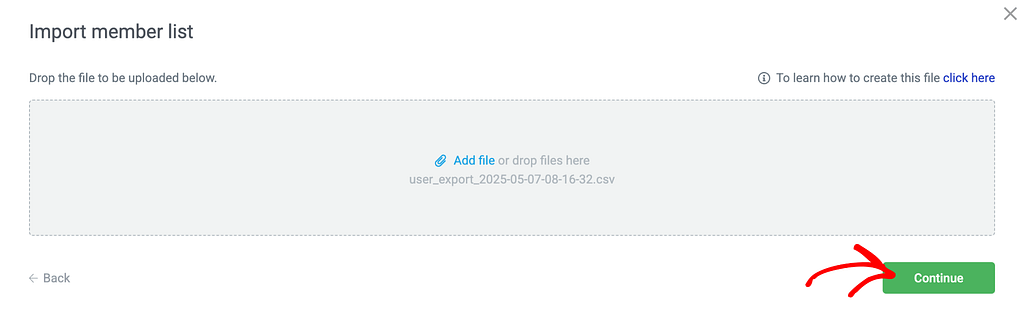
After selecting the CSV file as the import method, in the next step click on Add file to upload the file with the user list.
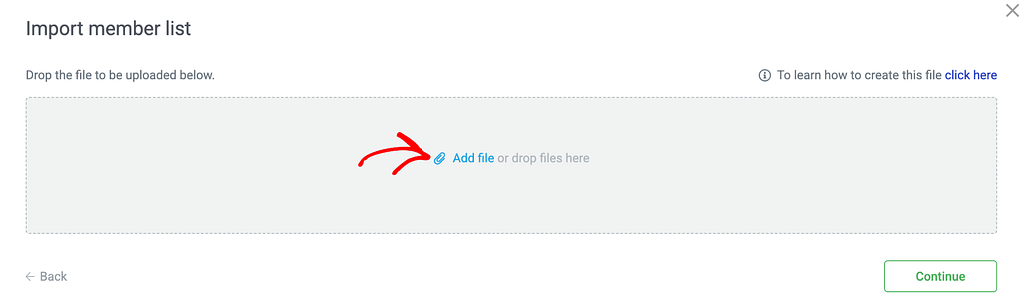
Clicking Add file will allow you to upload the .csv file you’ve exported before. After uploading, click Continue.
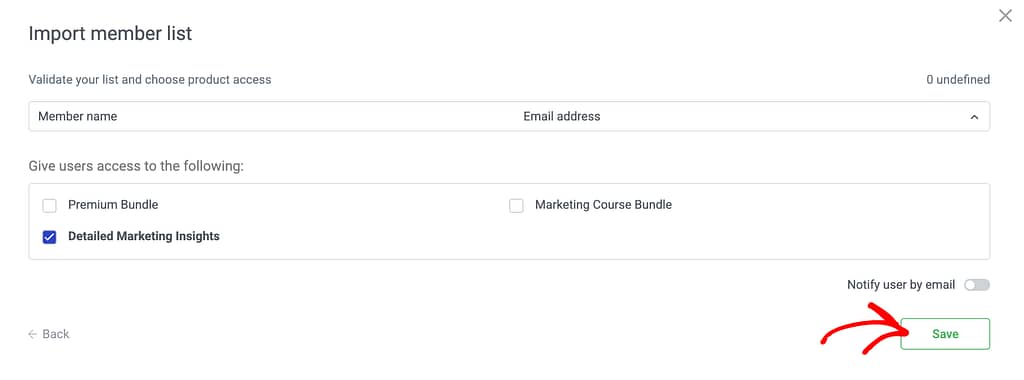
When you click Continue, the next step will ask you to select the product/products you want the users to have access to. Select the product by clicking on the checkbox.
This step also allows you to decide whether you want to send the user an email. To do so, click the slider to Notify user by email.
Once you are done, click Save.
This will import the list of students from your LearnDash website to that in Thrive Apprentice.
We’ve just seen how you can create your courses in Thrive Apprentice, design and manage the online school with options like access requirements, restrictions, and drip campaigns and finally how to import students list from LearnDash to Thrive Apprentice.
Next, do you want to let your students upload assessments in Thrive Apprentice? Here’s our document that will help.