This article will explain the way in which you can translate your Thrive Theme Builder Theme.
The process consists of two main steps.
Firstly, you should use the WordPress settings and change the language from there. Then, move over to Thrive Theme Builder, and translate everything that has not been translated after changing the WordPress language settings.
This can be easily done since every element of a Thrive Theme Builder theme is visually editable. This means that you can edit, rename, thus translate any aspect of your theme or content.
Note: Please be advised that, even if you translate every aspect of a Thrive Theme Builder template, you still have to make sure that the content of your posts and pages has been translated, as well.
Change the language from the WordPress settings
To begin with, the first thing that you can do is access the WordPress settings and change the language.
In your WordPress admin dashboard, in the left sidebar, hover over “Settings”:

A small list of options will appear, from which you can choose “General”:

Here, scroll down until you find the “Site Language” option. In order to change the language, click on the field next to the option, to open a drop-down with all the available languages:

From this drop-down, select the preferred language by clicking on it:

After that, scroll down to the bottom of the page, and click on “Save Changes”:

The WordPress interface will then be translated into the language of choice.
Next, you can go ahead and translate the Thrive Theme Builder templates.
Access Thrive Theme Builder and Translate the Templates
In order to access Thrive Theme Builder, in your WordPress admin dashboard, hover over “Thrive Dashboard” and choose “Thrive Theme Builder” from the list of options that appear:
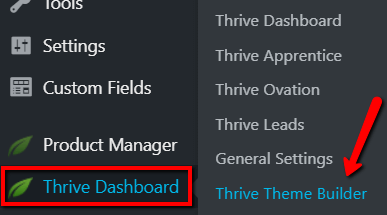
As you might have noticed, the Thrive Theme Builder dashboard is still in English, even though you have modified the language, with the exception of some elements (these are imported from WordPress, therefore they have been affected by the language change).
This is because the translation only affects the WordPress related options and items, as well as your website, but not the Thrive Theme Builder product.
As mentioned before, everything inside a Thrive Theme Builder template is visually editable. Thus, in order to translate your site, you have to translate every element from your default templates.
In order to access the templates, click on the “Templates” section from the left sidebar:

This will open a list with all the available templates. Locate the template that you want to translate, and hover over it. Then, click on “Edit” in order to access the Thrive Theme Builder editor and start translating:

Note: As an example, in this article, we will translate the “Default Page” Template, but keep in mind that the translation process is exactly the same as this one, for any other template.
The template has now been opened in the Thrive Theme Builder editor.
Note: When translating a template, you should remember a few things:
- For most of the sections of the template, you will have to enter the “Edit Mode” in order to modify the elements inside them and write the translations.
- Some of the Thrive Theme Builder elements are more complex and are built out of more elements. For example, inside the “About the Author” element, you can find “Text” elements, “Author Image” elements, “Author Social Links” elements, etc. (depending on the “About the Author” element template).
For these complex elements, you will have to manually edit each of the items and translate them one by one.
- The “Dynamic” information will automatically be translated after you change the WordPress language. This means that information such as the date, author role, etc. will be translated as well.
However, the “Dynamic” information that you had to write in WordPress settings fields (such as “Biographical Info”, etc.), you will have to go back and translate, as well.
In order to translate the elements that have not already been translated, you can simply manually write the translation into all of the “Text” elements.
Remember that, to access some of them, you will have to enter the “Edit Mode”. Here are a few examples of some elements that you can translate:
“Text” elements
In order to translate any “Text” element, simply click on it in order to select it. Then, select everything and write the translation over the existing text. Here is an example of that:

Note: The “Text” elements can be found either on their own, in which case you can simply remove the existing text and re-write the translated one instead, or you can find them inside other composed elements.
As previously mentioned, in order to edit those “Text” elements, you will first have to access the “Edit Mode” of the respective element, so that you are able to edit each element inside it, one by one.
“Button” elements
If you want to translate a “Button” element, all you have to do is select the text inside the button, and write your own translation of the text instead. Here is an example of a translated “Button” element:


Note: Just like in the case of the “Text” elements, the “Button” elements can either be found on their own or encapsulated into more complex elements or sections (eg. “Call to Action” element/ “Header” section, etc.). In that case, in order to translate them, you first have to access the “Edit Mode” of the respective element/section.
For example, if a “Button” element is placed inside a “Header” section, you have to click on “Edit” here, in order to be able to edit anything inside that section:

After that, simply select the text from the button and translate it.
Grouped elements (“Call to Action”, “About the Author”, etc)
Some of the grouped elements require for you to access the “Edit Mode”, and others you can simply modify without doing that.
- For example, if you have a “Call to Action” element, that can be edited right away. Simply select each item inside it and translate it as advised above.
You can see how the translated element looks like before and after the translation:


- As a second example, let’s take the “About the Author” element.
If you want to translate it, you first have to select it and click on “Edit Design”, in the left sidebar:

After doing this, you will be able to edit, therefore translate each item inside the “About the Author” element. Here is an example of what the element looks like before and after the translation:

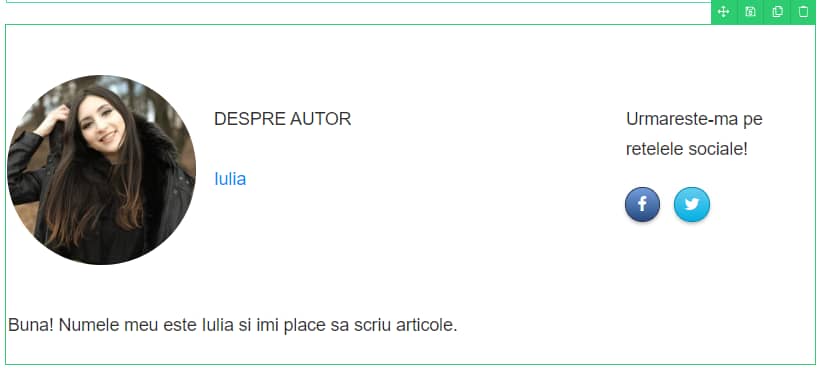
Note: In the case of this element, in order to change the “Author Bio”, you have to go to the “Users” settings from your WordPress admin dashboard, and change the “Biographical Info” field from there. This is because this part of the “About the Author” element contains dynamic information.
You can find out how to change the author’s information in the first part of this article.
“Custom Menu” element
In order to translate “Custom Menu” items, first select the menu. Then, from the options that appear in the left sidebar, click on the down arrow icon next to “Menu Items”:
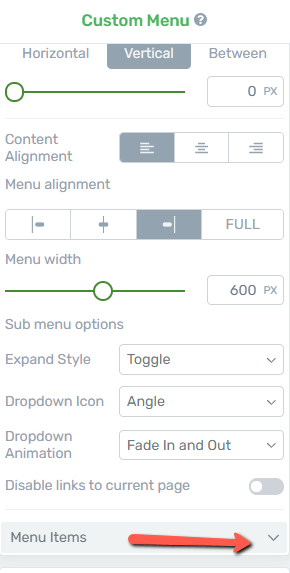
Then, for each menu item, click on the pencil icon. This will allow you to edit the items:

When you click on the pencil icon, a small pop-up will appear, where you can edit various options for each menu item. You can write the translation of the items in the first field of the pop-up, and then click on “Apply”:
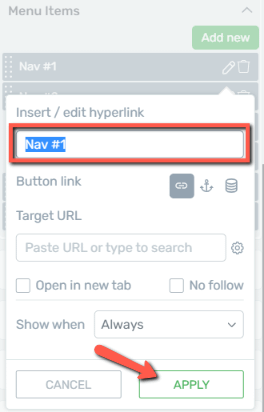
Do that for each of the menu items of your “Custom Menu” element. After you are done, the element should be completely translated, just like in this example:


“Comment Section” element
When translating this element, you will notice that some WordPress-related elements have already been translated. Everything else besides that can easily be translated.
Just remember that, for this element, as well, you have to enter the “Edit Mode”. To do that, click on “Edit Elements”, in the left sidebar:

After that, you will have access to editing all of the items of the “Comment Section” element. Remember to do the translation for all of the available states of the “Comment Section”:

For more information about how you can edit various parts of this element, you can check out this article.
“Dynamic Styled List” Element
The “Dynamic Styled List” element allows you to create a list, which will consist of dynamic information such as categories, tags, etc.
In order to translate these items, you will have to go to the WordPress admin dashboard and translate each category name/ tag names/ etc.
As an example, if you want to display a “Pages List”, you have to make sure that the titles of those pages have already been written in the desired language:

“Breadcrumbs” Element
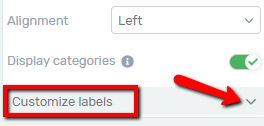
For this element, in the left sidebar, where the “Breadcrumbs” element options are, you can access the “Customize Labels” section by clicking on the down arrow next to the option:
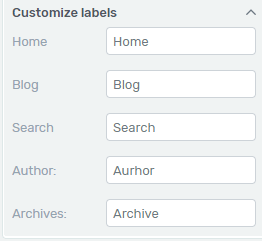
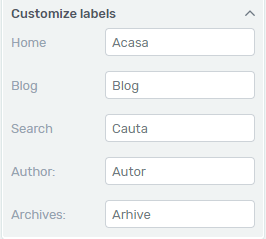
Once you click on that, a section will open, with all of the labels of this element. You can change them and write the translated version of each label, by deleting the default label names and inserting the translations instead:
These were just some examples of elements that you can translate, but keep in mind that every aspect of Thrive Theme Builder is editable, therefore translated.
If you want to find out more information about various Thrive Theme Builder features or elements, make sure to check out this knowledge base section.