In this article, you’ll learn how to create custom conditional display rules in Thrive Architect. These rules allow you to control when and where content appears based on specific conditions you define.
Important: Creating custom rules requires technical knowledge and should be performed by developers or tech-savvy users familiar with PHP and WordPress development.
What You’ll Learn
- Understanding the Basics
- Defining the Entity Class
- Registering Your Entity
- Creating Entity Fields
- Registering Your Field
- Complete Code Examples
Understanding the Basics
Conditional display rules in Thrive Architect consist of two main components:
- Entities: The subject or data source (e.g., User, Post, Page)
- Fields: Specific properties of the entity that you want to test (e.g., Username, Post Status, Number of Comments)
Real-World Examples
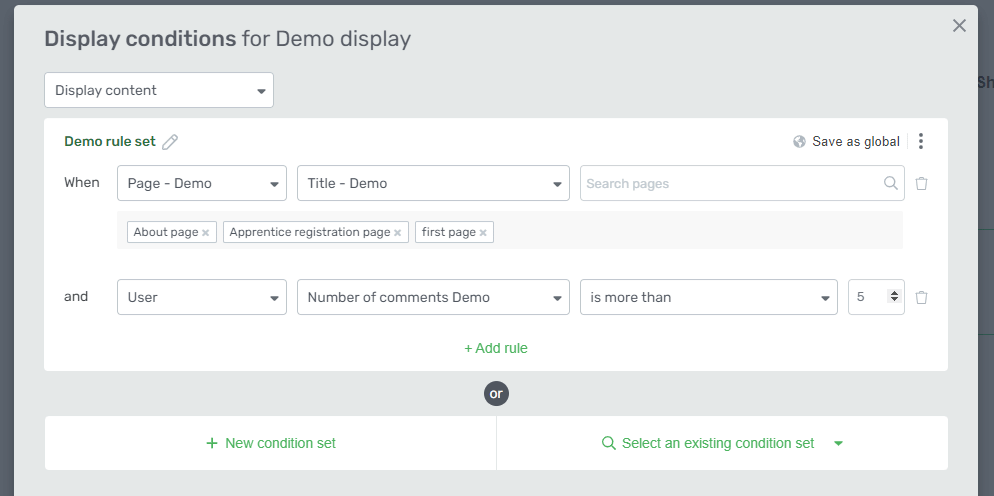
Example 1: Create a new field called “Page – Demo” with a subfield “Title – Demo”, plus add a “Number of comments – Demo” field to the existing “User” entity.
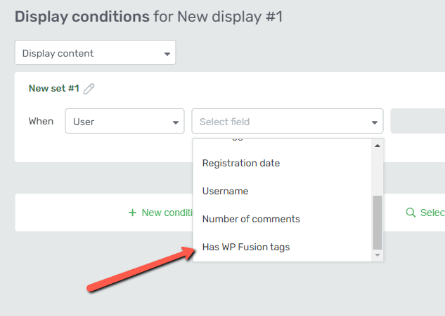
Example 2: Create a rule that checks whether a user has specific WP Fusion tags assigned to them.
Note: You can find a complete demo example on GitHub: Conditional Display API Demo
Once activated, your custom fields will appear in the conditional display popup in Thrive Architect:
Defining the Entity Class
The first step is to define an entity class that describes your subject and its properties.
Step 1: Extend the Base Entity Class
Create a class that extends TCBConditionalDisplayEntity:
class User extends TCBConditionalDisplayEntity {
    /**
     * @return string
     */
}
Step 2: Define the Unique Key
The get_key() function defines a unique identification key for your entity:
public static function get_key() {
    return 'user_data';
}
Step 3: Set the Display Label
The get_label() function defines the name that will be visible to users in the visual editor:
public static function get_label() {
    return esc_html__( 'User', 'thrive-cb' );
}
This label will appear inside the Thrive Architect editor.

Step 4: Create the Object Method
The create_object() property creates the entity object containing all the data for individual fields when the condition logic runs:
public function create_object( $param ) {
    $user_id = get_current_user_id();
    return get_userdata( $user_id );
}
Step 5: Set Display Order (Optional)
Determine the display order in the modal entity select:
/**
 * Determines the display order in the modal entity select
 *
 * @return int
 */
public static function get_display_order() {
    return 0;
}
Registering Your Entity
After defining your entity class, you need to register it using the tve_register_condition_entity function.
Registration Function
function tve_register_condition_entity( $entity ) {
    TCBConditionalDisplayEntity::register( $entity );
}
Use your entity class as the parameter when calling this function.
Complete Entity Class Example
Here’s what your complete entity class looks like when everything is put together:
class User extends TCBConditionalDisplayEntity {
    /**
     * @return string
     */
    public static function get_key() {
        return 'user_data';
    }

    public static function get_label() {
        return esc_html__( 'User', 'thrive-cb' );
    }

    public function create_object( $param ) {
        $user_id = get_current_user_id();
        return get_userdata( $user_id );
    }

    /**
     * Determines the display order in the modal entity select
     *
     * @return int
     */
    public static function get_display_order() {
        return 0;
    }
}
Creating Entity Fields
Entity fields fetch the specific data that your condition will be tested against.
Example in the Visual Editor
Step 1: Extend the Field Class
Create a class that extends TCBConditionalDisplayField:
class User_Wpfusion_Tags extends TCBConditionalDisplayField {
    /**
     * @return string
     */
}
Step 2: Define the Field Key
The get_key() function defines a unique identification key for the field:
public static function get_key() {
    return 'user_wpfusion_tags';
}
Step 3: Set the Field Label
The get_label() function defines the name that will be visible to users:
public static function get_label() {
    return __( 'Has WP Fusion tags', TVE_DASH_TRANSLATE_DOMAIN );
}
This label appears inside the visual editor.
Step 4: Define Condition Types
The get_conditions() property describes the type of condition that the field data represents:
public static function get_conditions() {
    return [ 'autocomplete' ];
}
Available Condition Types
Here are the possible operator/condition keys you can use:
| Condition Type | Use Case | Example |
|---|---|---|
autocomplete | Text search with suggestions | User → Username |
autocomplete_hidden | Hidden autocomplete field | User → Product Access |
checkbox | Multiple selection | User → Role |
date | Date only | Time → Current date |
date_and_time | Date and time without intervals | Custom date/time fields |
date_and_time_with_intervals | Date/time with relative periods | User → Last logged in |
dropdown | Single selection | Post → Post status |
number_comparison | Numeric comparisons | Post → Number of comments |
number_equals | Exact number match | Time → Day of month |
string_comparison | Text comparison | Request → Cookie |
time | Time only | Time → Time field |
url_comparison | URL matching | Referral → URL |
Step 5: Link to Entity
Specify which entity this field belongs to:
/**
 * @return string
 */
public static function get_entity() {
    return 'user_data';
}
Step 6: Define the Get Value Method
The get_value() property fetches the value from the entity when the condition logic runs:
public function get_value( $user_data ) {
    $tags = wp_fusion()->user->get_tags( $user_data->ID );
    return empty( $tags ) ? '' : $tags;
}
The $user_data parameter contains the entity data object.
Step 7: Add Options for Multiple-Choice Fields
For fields with multiple choices (like dropdowns or autocomplete), define the get_options() method:
public static function get_options( $selected_values = [], $searched_keyword = '' ) {
    $levels = [];

    foreach ( wp_fusion()->settings->get_available_tags_flat() as $tag ) {
        if ( static::filter_options( $tag, $tag, $selected_values, $searched_keyword ) ) {
            $levels[] = [
                'value' => (string) $tag,
                'label' => $tag,
            ];
        }
    }

    return $levels;
}
Parameters:
$selected_values– Contains the values already chosen$searched_keyword– Used to filter dropdown results
Complete Field Class Example
Here’s the complete field class when everything is assembled:
class User_Wpfusion_Tags extends TCBConditionalDisplayField {
    /**
     * @return string
     */
    public static function get_key() {
        return 'user_wpfusion_tags';
    }

    public static function get_label() {
        return __( 'Has WP Fusion tags', TVE_DASH_TRANSLATE_DOMAIN );
    }

    public static function get_conditions() {
        return [ 'autocomplete' ];
    }

    /**
     * @return string
     */
    public static function get_entity() {
        return 'user_data';
    }

    public function get_value( $user_data ) {
        $tags = wp_fusion()->user->get_tags( $user_data->ID );
        return empty( $tags ) ? '' : $tags;
    }

    public static function get_options( $selected_values = [], $searched_keyword = '' ) {
        $levels = [];

        foreach ( wp_fusion()->settings->get_available_tags_flat() as $tag ) {
            if ( static::filter_options( $tag, $tag, $selected_values, $searched_keyword ) ) {
                $levels[] = [
                    'value' => (string) $tag,
                    'label' => $tag,
                ];
            }
        }

        return $levels;
    }

    public static function get_autocomplete_placeholder() {
        return __( 'Search tags', TVE_DASH_TRANSLATE_DOMAIN );
    }
}
Registering Your Field
After creating your field class, register it using the tve_register_condition_field function:
/**
 * Register a new condition field
 *
 * @param TCBConditionalDisplayField|string $field
 */
function tve_register_condition_field( $field ) {
    TCBConditionalDisplayField::register( $field );
}
Use your field class as the parameter when calling this function.
Complete Code Examples
Creating Custom Condition Types (Advanced)
If the built-in condition types don’t meet your needs, you can create your own and register it using tve_register_condition:
/**
 * Register a new condition
 *
 * @param TCBConditionalDisplayCondition|string $condition
 */
function tve_register_condition( $condition ) {
    TCBConditionalDisplayCondition::register( $condition );
}
Use your custom condition class as the parameter.
Implementation Workflow
- Define your entity class (extends
TCBConditionalDisplayEntity) - Register the entity using
tve_register_condition_entity() - Create field classes (extends
TCBConditionalDisplayField) - Register each field using
tve_register_condition_field() - Test in Thrive Architect to ensure fields appear correctly
That’s it! You now know how to create custom conditional display rules in Thrive Architect. Your custom entities and fields will appear in the conditional display settings, allowing you to build powerful, dynamic content displays.
Related Resources
- Thrive Themes Action Hooks & Custom Functions: Learn about available hooks and filters for extending Thrive Themes.
- Using Webhooks to Add Custom Integrations in Thrive Architect: Connect Thrive Architect forms with external services.
- Extending Thrive Themes Capabilities as a Developer: Explore developer resources for advanced customization.
- Thrive Architect Knowledge Base: Explore the full Thrive Architect documentation.