In this article, you’ll learn how to integrate Thrive Quiz Builder quizzes into your Thrive Apprentice courses. You’ll cover the “Mark as Complete” feature, gating lesson progression behind quiz results, enrolling students after quiz completion, unlocking content after a final exam, and customizing the completion notification message.
Why Use Quizzes in Your Courses?
Adding quizzes to your Thrive Apprentice courses lets you verify that students understand the material before they move on. Quizzes can serve as knowledge checks within lessons, gates that control progression, or even entry requirements for course enrollment. Thrive Quiz Builder provides the quiz functionality, and Thrive Apprentice handles the course progression logic.
Using the “Mark as Complete” Feature on a Quiz
The Mark as Complete feature lets students indicate they’ve finished a lesson. When you add a quiz to a lesson, you can tie this button directly to quiz completion—so students can only mark the lesson as done after they’ve taken the quiz.
Here’s how to set it up:
- Navigate to Thrive Dashboard > Thrive Apprentice and open the course you want to edit.
- Select the lesson that contains your quiz.
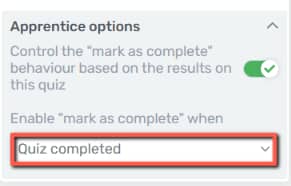
- Open the lesson settings and locate the Completion section.
- Set the Mark as Complete behavior to require quiz completion.

- Save your changes.
Once configured, the Mark Lesson as Complete button will remain inactive until the student finishes the quiz. This keeps your progress tracking accurate and ensures students engage with the assessment before continuing.
Enabling “Mark as Complete” Only After the User Passes the Quiz
You can take the previous setup one step further by requiring students to not just complete the quiz, but actually pass it with a minimum score. This prevents students who fail from advancing to the next lesson.
- Navigate to Thrive Dashboard > Thrive Apprentice and open your course.
- Select the lesson with the quiz.
- In the lesson’s Completion settings, set the behavior to Quiz must be passed.
- Define the passing score threshold in Thrive Quiz Builder (e.g., 70% or higher).
- Save your settings.
Now, only students who meet or exceed the passing score will see the Mark Lesson as Complete button become active. Students who score below the threshold can retake the quiz until they pass.
Tip: Set a clear passing threshold that reflects the difficulty of the material. A score between 70% and 80% is common for most educational courses.
Unlocking the Next Lesson Only After a Student Passes the Quiz
Beyond controlling the Mark as Complete button, you can lock subsequent lessons behind quiz results using Thrive Apprentice’s drip and scheduling features. This ensures students truly master each section before accessing the next one.
- Navigate to Thrive Dashboard > Thrive Apprentice and open your course.
- Go to Courses in the sidebar and select your course.
- Add your quiz to the lesson content using Thrive Quiz Builder.
- Open the Drip settings for the course.
- Create a new Drip Schedule and set the unlock condition to After previous lesson is completed.
- Link the drip schedule to your course’s product under the Access Restrictions settings.
- Save and publish.
With this configuration, the next lesson in the sequence only becomes available after the student completes (and passes, if required) the current lesson’s quiz. This creates a linear, mastery-based learning path.
Enrolling Users in a Course After They Complete a Quiz
You can use a standalone quiz as a gateway to course enrollment. For example, you might offer a free assessment on your website and automatically enroll anyone who completes it into a course. This workflow uses Thrive Automator to connect Thrive Quiz Builder with Thrive Apprentice.
- Create your quiz in Thrive Quiz Builder and add a WordPress account connection to the quiz’s opt-in gate. This ensures quiz takers are registered as WordPress users.
- Go to Thrive Dashboard > Thrive Automator and click + Add New.
- Set the Start Trigger to User completes quiz.
- Select the specific quiz from the dropdown.
- Add an Action and select Grant access to product.
- Choose the Thrive Apprentice product that contains the course you want to enroll them in.
Important: The quiz must have an active WordPress account connection in its opt-in gate. Without this, quiz takers won’t have WordPress accounts, and the automation won’t be able to grant them course access.
Unlocking Lesson Content After Students Pass the Final Exam
If your course includes a final exam, you can unlock bonus content, certificates, or additional resources only after a student passes it. This uses a combination of Thrive Automator and Thrive Apprentice’s drip feature.
- Create the final exam quiz in Thrive Quiz Builder with a defined passing score.
- In Thrive Apprentice, add the bonus content as a separate lesson or module that is initially locked.
- Set up a Drip Schedule with an unlock condition tied to quiz completion.
- Go to Thrive Dashboard > Thrive Automator and create an automation where:
Start Trigger: User completes quiz (select your final exam)
Filter: Score meets the passing threshold
Action: Grant access to the locked content or update the student’s progress - Save and activate the automation.
This approach rewards students who complete the entire course and pass the final assessment, motivating them to engage thoroughly with your material.
Changing the “Mark Lesson as Complete” Notification Message
When students interact with the Mark Lesson as Complete button—especially when it’s tied to a quiz—they see a notification message. You can customize this message to match your brand voice or provide specific instructions.
- Navigate to Thrive Dashboard > Thrive Apprentice.
- Open the course and select the lesson whose notification you want to change.
- Go to the lesson’s Completion settings.
- Locate the Notification Message field.
- Edit the text to display your preferred message. For example, you might change it from the default to something like “Great job! You’ve passed the quiz. Click below to continue to the next lesson.”
- Save your changes.
You can set different messages depending on the quiz outcome:
- Passed: A congratulatory message with instructions to proceed.
- Failed: An encouraging message prompting the student to review the material and retake the quiz.
- Completed (no pass/fail): A neutral confirmation message.
Tip: Keep notification messages short, positive, and actionable. Students should immediately understand what to do next.
Conclusion
That’s it! You’ve successfully learned how to integrate quizzes into your Thrive Apprentice courses using Thrive Quiz Builder. From simple completion tracking to advanced enrollment automations, quizzes give you powerful tools to create structured, mastery-based learning experiences for your students.
Related Resources
- Thrive Quiz Builder basics: Getting Started with Thrive Quiz Builder
- Automator recipes for courses: How to Use Thrive Automator Recipes with Thrive Apprentice
- Drip content setup: Setting Up Drip Schedules in Thrive Apprentice
- Enabling assessments: How to Enable Assessments in Thrive Apprentice