In this article, you’ll learn how to connect WooCommerce to Thrive Apprentice so you can sell your online courses through WooCommerce’s e-commerce platform. By the end, you’ll have a WooCommerce product linked to a Thrive Apprentice course with proper access restrictions in place.
Prerequisites
Before you begin, make sure you have the following ready:
- WooCommerce plugin installed and activated on your WordPress site
- Thrive Apprentice installed and activated
- At least one payment method configured in WooCommerce (e.g., Stripe, PayPal)
- A course created in Thrive Apprentice that you want to sell
Step 1: Create a Product in Thrive Apprentice
First, you need a Thrive Apprentice product that contains the course you want to sell.
- Go to Thrive Dashboard > Thrive Apprentice.
- Click Products in the left sidebar.
- Click Add New to create a new product.

- Name your product and add a description.
- Assign the course(s) you want to include in this product.
- Save your product.
Step 2: Create a Product in WooCommerce
Next, create a corresponding product in WooCommerce that your customers will purchase.
- In your WordPress admin, go to WooCommerce > Products > Add New.
- Enter a product name and description that matches your course.
- Set the product type. For a one-time purchase, use Simple product. For recurring payments, use Subscription (requires the WooCommerce Subscriptions extension).
- Set your price in the Product data section.
- Under the General tab, configure any additional pricing options as needed.
- Publish the product.
Step 3: Configure Access Restrictions in Thrive Apprentice
Now, connect the WooCommerce product to your Thrive Apprentice product so that purchasing grants course access.
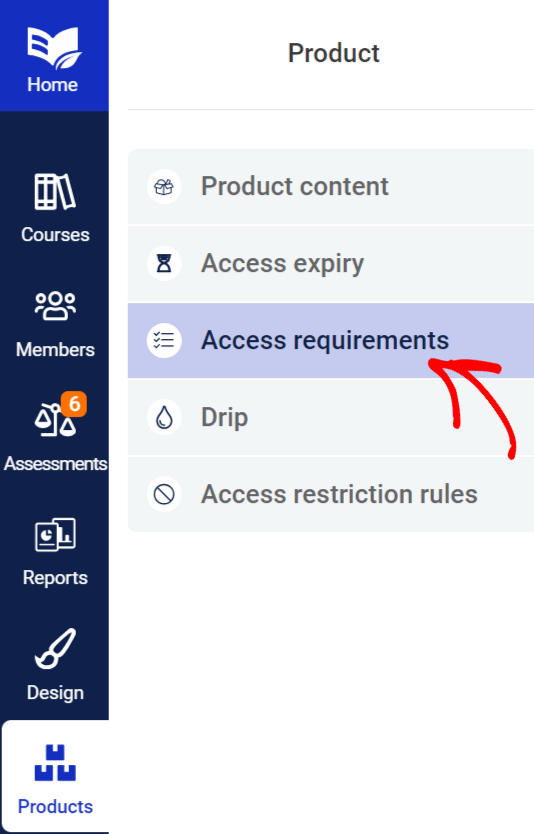
- Go to Thrive Dashboard > Thrive Apprentice.
- Click Products in the left sidebar.
- Select the product you created in Step 1.
- Click the Access requirements tab.
- In the access requirements panel, look for the WooCommerce protection options.
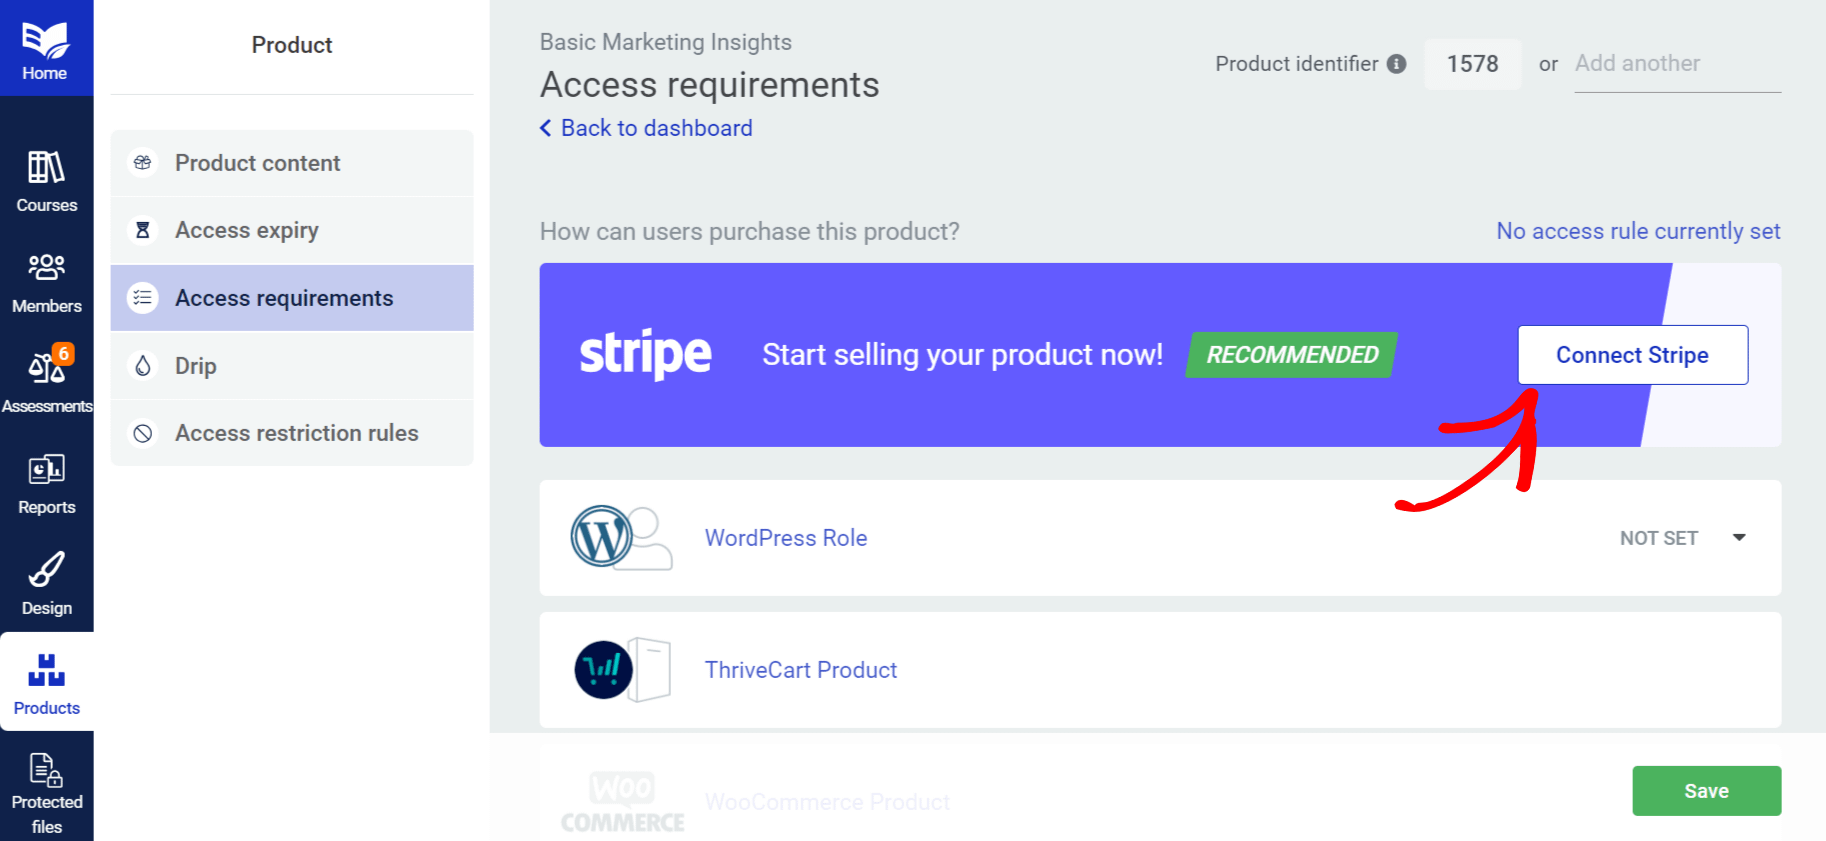
- Select the WooCommerce product you created in Step 2.
- Save your changes.
This tells Thrive Apprentice that only users who have purchased the linked WooCommerce product should get access to the course content.
Step 4: Redirect Users to Course Pages After Purchase
For a smooth customer experience, redirect buyers to their course after completing a WooCommerce purchase.
- In WooCommerce, consider adding a custom thank-you page or redirect that points to the course page in Thrive Apprentice.
- You can use WooCommerce’s built-in order confirmation page to include a link to the course.
- Alternatively, set up an automated email through WooCommerce that includes the direct course URL.
Tip: Test the full purchase flow yourself by placing a test order to make sure customers are directed to the right place after checkout.
How Access Works
Once everything is connected, the workflow looks like this:
- A customer visits your WooCommerce product page and completes a purchase.
- WooCommerce processes the payment and creates a customer account.
- Thrive Apprentice detects the completed purchase and grants the customer access to the linked course(s).
- The customer logs in and sees the course in their Thrive Apprentice dashboard.
Access is managed automatically—you don’t need to manually enroll students after each purchase.
Troubleshooting
- Customer can’t access the course after purchasing: Make sure the WooCommerce order status is set to Completed or Processing. Pending or failed orders won’t grant access.
- WooCommerce product not appearing in access settings: Verify that WooCommerce is active and that the product is published. Refresh the Thrive Apprentice settings page.
- Subscription access lost: If you use WooCommerce Subscriptions, access is tied to the subscription status. Expired or cancelled subscriptions will revoke course access.
That’s it! You’ve successfully connected WooCommerce to Thrive Apprentice and created a product that grants course access upon purchase.
Related Resources
- Choosing an integration: How to Choose the Right Integration for Thrive Apprentice
- Stripe setup: How to Set Up Stripe in Thrive Apprentice
- ThriveCart connection: How to Connect ThriveCart to Thrive Apprentice
- Membership plugins: How to Integrate Membership Plugins with Thrive Apprentice