Thrive Comments lets you control how visitors sign in to comment (guest with name/email/URL or social login) and what they see after submitting a comment—thank you messages, social sharing, related posts, redirects, or opt-in forms. In this guide, you’ll learn how to set up Comment Sign-In and Comment Conversion so you balance engagement with lead capture and a smooth experience.
What You’ll Learn
In this article, you’ll discover how to:
- Allow guests to comment with a website URL or with social accounts (Facebook, Google)
- Set up API connections for social sign-in
- Choose what happens after a visitor’s first comment vs. when they comment again
- Use thank you messages, social share, related posts, redirects, and opt-in forms
- Apply best practices for engagement and lead generation
Overview: Controlling the Comment Experience
Two areas in the Thrive Comments dashboard shape the comment experience:
- Comment Sign-In — Who can comment and how: guests can enter name, email, and optional website URL, or sign in with Facebook, Google, or other connected social accounts. You control which options are available and manage API connections.
- Comment Conversion — What happens after someone submits a comment: a custom thank you message, social share buttons, related posts, a redirect to a URL, or (if you use Thrive Leads) an opt-in form. You can set different actions for first-time commenters and returning commenters.
Together, sign-in and conversion let you reduce friction for commenting while turning commenters into subscribers or guiding them to the next step.
If Thrive Comments isn’t set up yet, see How to Get Started with Thrive Comments first.
Sign-in Options
Access sign-in settings from the Thrive Comments dashboard: go to Thrive Dashboard > Thrive Comments and expand the Comment Sign-In section.
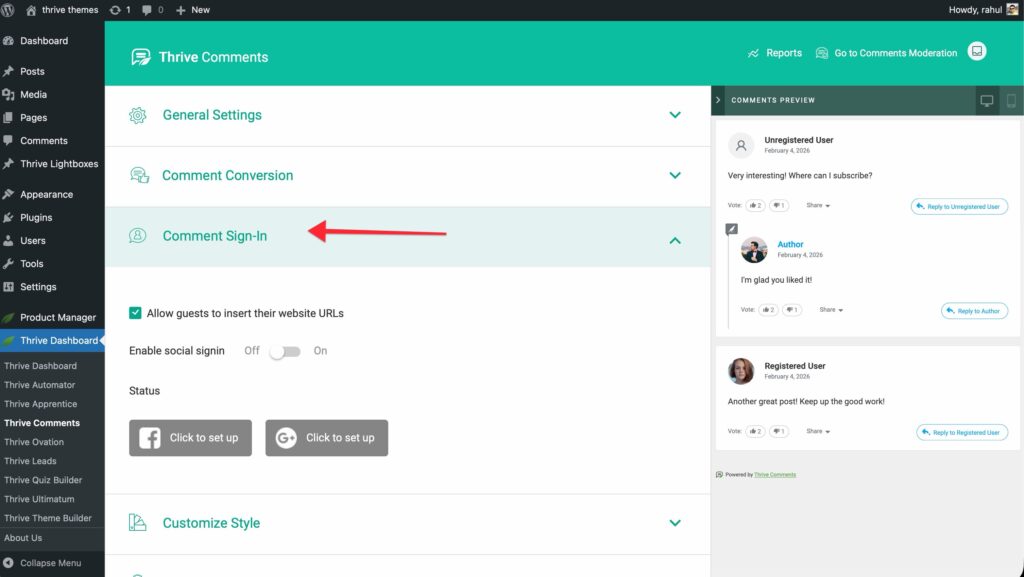
Guest Commenting with Name, Email, and Website URL
You can allow guests to comment without logging in by entering their name, email, and optionally their website URL.
- In Comment Sign-In, find the option that lets guests add their website URL when commenting (e.g. “Users can comment with their website accounts” or similar).
- Enable it so the comment form on the front end includes a website field alongside name and email.
- Save your changes.
On the front end, visitors will see fields for name, email, and website (if enabled). They can submit a comment without creating an account or using social login. This works well for blogs that want low-friction commenting while still capturing basic info.
Social Sign-In (Facebook, Google, etc.)
Social sign-in lets visitors comment by logging in with a social account (e.g. Facebook or Google). One click opens the provider’s popup; after they authorize, they’re identified and can comment.
Enabling Social Sign-In
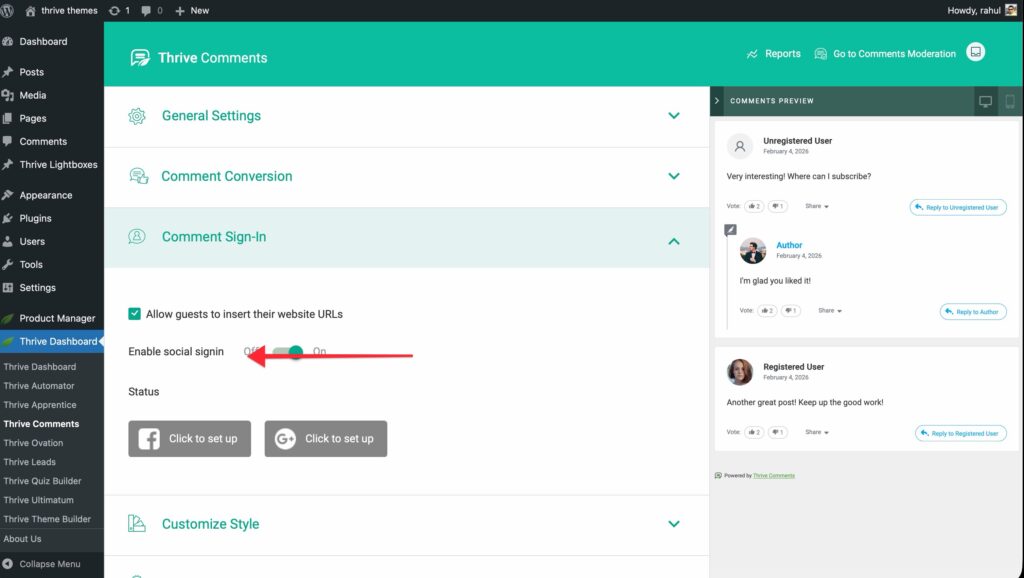
- In Comment Sign-In, find the social sign-in toggle.
- Turn it on to show social login buttons on the comment form.
- Save your changes.
Until you add at least one API connection (see below), the social buttons may not work or may not appear. The dashboard will show the status of your connections.
Setting Up API Connections for Social Sign-In
Thrive Comments uses the same API connections as the rest of the Thrive Dashboard. You need to create a connection for each social network you want to offer (e.g. Facebook, Google).

- In Comment Sign-In, under the social sign-in toggle, you’ll see the status of each available network (e.g. “Click to set up” or a connection name).
- Click Click to set up (or the equivalent) for the network you want. You’ll be taken to the API Connections list in the Thrive Dashboard.
- Click Add new Connection and choose the app (e.g. Facebook, Google).
- Complete the steps for that app (app ID, secret, etc.). See Thrive’s guides for each:
- How to Set Up & Use an API Connection with Facebook
- How to Set Up & Use an API Connection with Google
- Once the connection is created, it appears in the Comment Sign-In section. Use the toggle next to it to enable or disable that network for comment sign-in.
- Save in the Comment Sign-In section.
When a connection is enabled, visitors will see that social option on the comment form (e.g. “Comment with Facebook”). Clicking it opens the provider’s popup; after they log in, they can comment. You can enable both guest commenting and social sign-in so visitors choose what they prefer.
Comment Conversion: What Happens After Someone Comments
The Comment Conversion feature lets you choose what the visitor sees or where they go immediately after submitting a comment. You can set one behavior for first-time commenters and another for returning commenters (e.g. show an opt-in form to first-timers and a simple thank you to returning visitors).
Accessing Comment Conversion

- Go to Thrive Dashboard > Thrive Comments.
- Click Comment Conversion (or expand that section).
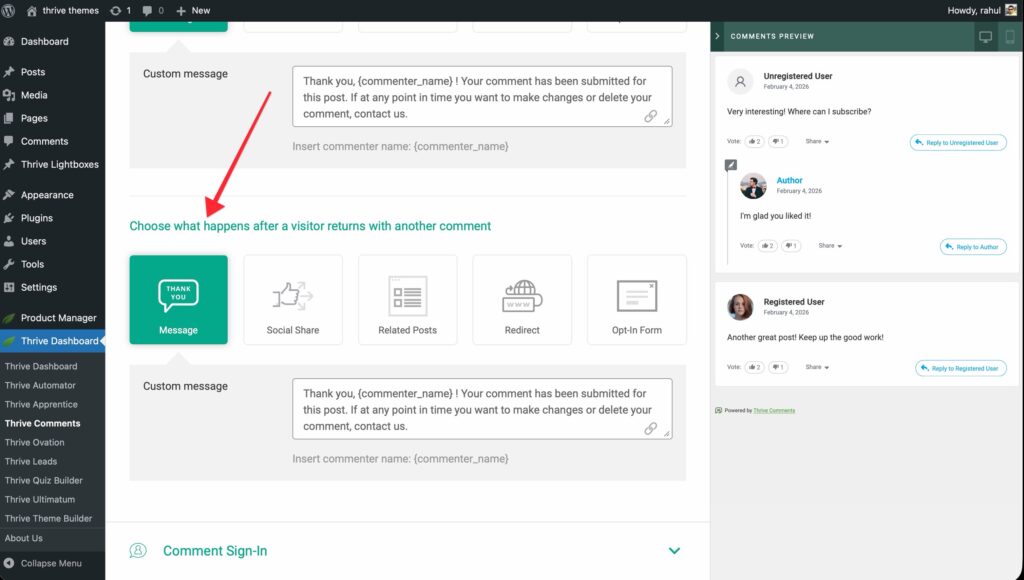
You’ll see two main areas: what happens after the first comment and what happens after subsequent comments. For each, you pick one of the actions below.
Available Actions
Regardless of first-time or returning, you can choose from these actions:
- Thank You Message — Show a custom message after the comment is submitted.
- Social Share — Show a message plus social sharing buttons so they can share the post.
- Related Posts — Show a message plus a set of related posts from your site.
- Redirect — Send the visitor to a specific URL (e.g. a thank you page or a lead magnet).
- Opt-in Form — Show a Thrive Leads opt-in form (ThriveBox). Requires Thrive Leads.
If you don’t select an action (or if a selected action isn’t available—e.g. no ThriveBox for Opt-in), the default Thank You message is used.
Thank You Message
Display a custom message right after the comment is submitted.
- For first comment or returning comment, select Thank You Message.
- In the text area, type the message you want. You can use the {commenter_name} placeholder; it will be replaced with the name the visitor used when commenting.
- Save your changes.
On the front end, the visitor will see your message (with their name inserted) after they submit the comment. This is the simplest way to acknowledge their comment and encourage further engagement.
Social Share
Show a short message and social sharing buttons so visitors can share the post.
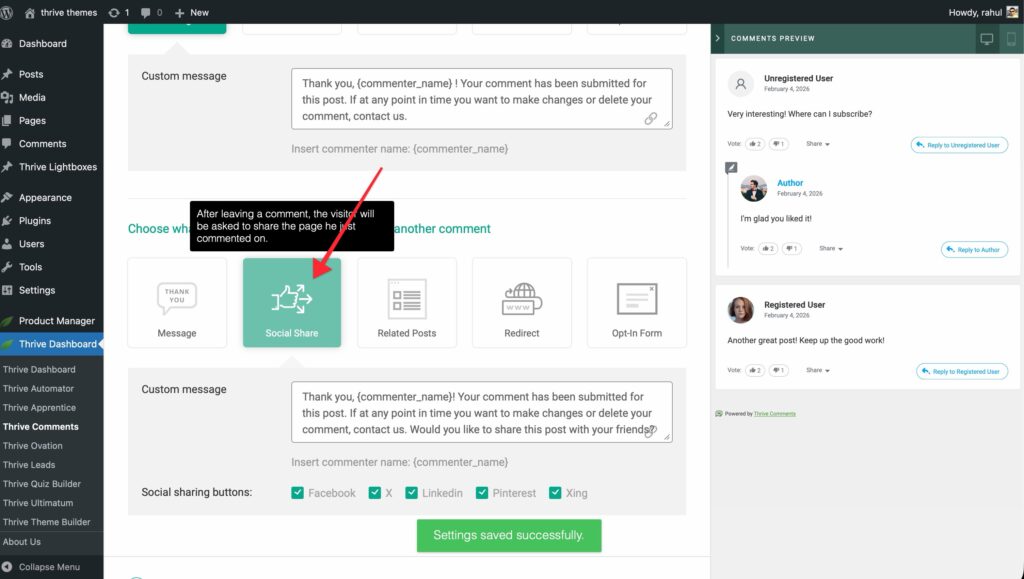
- For the relevant scenario (first or returning), select Social Share.
- Edit the message text if you like (the default is oriented around sharing).
- Choose which social networks to show (e.g. Facebook, Twitter/X, LinkedIn). Only the ones you enable appear on the front end.
- Save your changes.
After commenting, the visitor sees your message and the selected share buttons. This can increase reach and engagement without asking for an email.
Related Posts
Show a message plus a block of related posts from your site.
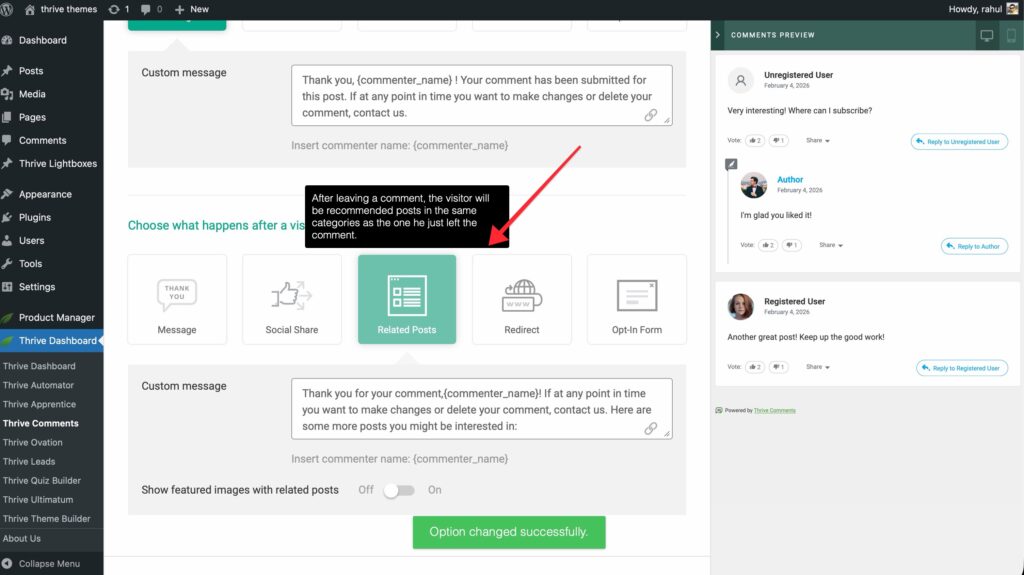
- For the relevant scenario, select Related Posts.
- Optionally enable featured images for the related posts. If you enable this, make sure the posts have featured images set; otherwise the layout may look uneven.
- Save your changes.
The visitor sees your message and a list of related posts (usually based on your site’s logic). This keeps them on your site and can improve page views. If you don’t use featured images, the list still displays with a clean layout.
Redirect
Send the visitor to a specific URL after they comment (e.g. a thank you page, a download, or a signup page).
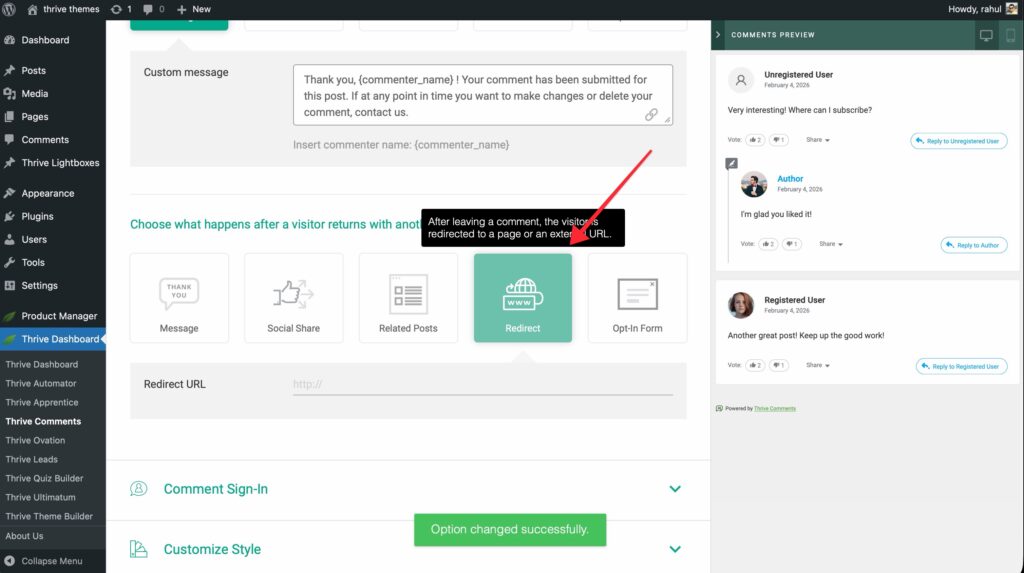
- For the relevant scenario, select Redirect.
- In the URL field, enter the full URL (e.g.
https://yoursite.com/thank-you). The field often doubles as a search: you can search for a post or page on your site and select it to use its URL. - Save your changes.
Everyone who leaves a comment in that scenario will be redirected to the URL you set. Use this when you want a dedicated thank you or conversion page instead of an inline message.
Opt-in Form (Thrive Leads)
Show a Thrive Leads opt-in form (ThriveBox) after the comment. This option only appears if Thrive Leads is installed and active.
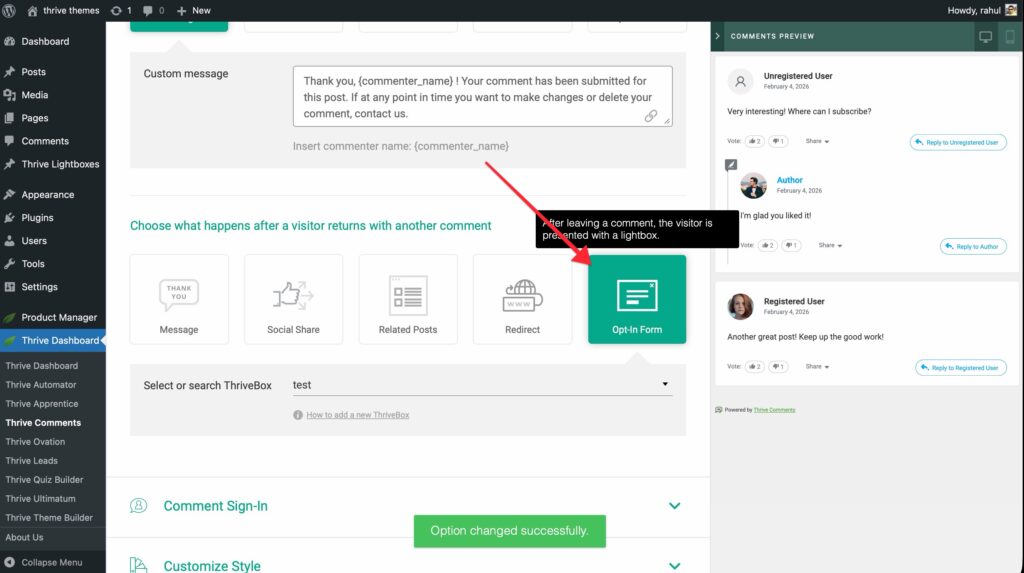
- For the relevant scenario, select Opt-in Form (or ThriveBox).
- Choose the ThriveBox you want to display from the dropdown. If none are available, create one in Thrive Leads first; see how to create and use a ThriveBox.
- Save your changes.
After the visitor submits their comment, they’ll see the ThriveBox with the display animation you configured in Thrive Leads. This is a strong option for turning first-time commenters into email subscribers. If you leave no selection, the default thank you message is shown instead.
Best Practices for Balancing Engagement & Lead Capture
- First-time vs. returning — Use Comment Conversion to show a lead-focused action (e.g. opt-in or redirect to a lead magnet) after the first comment, and a lighter touch (thank you or related posts) for returning commenters so they don’t feel over-promoted.
- Keep sign-in simple — Offering both guest (name/email/URL) and social sign-in gives visitors a choice and can increase comments. Enable only the social networks you’re prepared to maintain (API connections).
- Thank you + social share — For engagement-focused sites, a thank you message plus social share keeps the experience positive and can widen reach without asking for an email.
- Test the flow — Submit a test comment and go through the conversion flow (thank you, redirect, or opt-in) to ensure the right message or page appears and links work.
- Cache — If you use a caching plugin, clear the cache after changing Comment Sign-In or Comment Conversion so the updated behavior appears on the front end.
Summary
You’ve learned how to:
- Enable guest commenting with name, email, and optional website URL
- Turn on social sign-in and set up API connections for Facebook, Google, or other networks
- Use Comment Conversion to define what happens after a visitor’s first comment and after returning comments
- Configure Thank You messages, Social Share, Related Posts, Redirect, and Opt-in Form (Thrive Leads)
- Apply best practices to balance engagement and lead capture
You can now shape who comments and what they see next. For moderation and notifications, see How to Moderate Comments and Manage Notifications. For styling the comment area, see How to Style and Customize Comments.
Frequently Asked Questions
Q: Can I use both guest commenting and social sign-in?
A: Yes. You can enable “comment with website accounts” (name/email/URL) and social sign-in at the same time. Visitors will see both options on the comment form.
Q: Why don’t I see the Opt-in Form option in Comment Conversion?
A: The Opt-in Form option only appears when Thrive Leads is installed and active. If it’s missing, check that Thrive Leads is activated and that you have at least one ThriveBox created.
Q: Does the {commenter_name} placeholder work with social sign-in?
A: Yes. Thrive Comments uses the name from the comment (whether the user entered it as a guest or it came from their social profile) for the placeholder.
Q: Can I redirect first-time commenters to one page and returning commenters to another?
A: Yes. Comment Conversion has separate settings for “after first comment” and “after returning comment.” Set Redirect (or any action) for each scenario independently.
Q: What happens if I disable a social API connection after enabling it?
A: The toggle in Comment Sign-In turns that network off for new comments. Visitors will no longer see that sign-in option. Existing comments from that network are unchanged.
Thrive Comments Documentation: Explore the full Thrive Comments knowledge base.