Would you like to check what happened each time someone completed your quiz, and why an action did or didn’t run?
In this guide, we’ll walk you through the Execution Log for Quiz Triggers in Thrive Quiz Builder. We’ll cover what each status means and how to narrow the log down. All you need is a quiz on the Quiz Triggers dashboard and an administrator account.
- Opening the Execution Log
- Reading a Log Entry
- Understanding Each Status
- Filtering the Log
- Frequently Asked Questions
Before you get started, make sure Thrive Quiz Builder is installed and activated on your WordPress site.
Requirements: Quiz Triggers need Thrive Quiz Builder 11.4 or newer. Only administrators can open the Execution Log, because it shows visitors’ email addresses.
Opening the Execution Log
To get started, we’ll open the log for one quiz. Every quiz on the Quiz Triggers dashboard keeps its own log. In your WordPress admin sidebar, go to Thrive Dashboard » Thrive Quiz Builder and click Triggers in the top menu.
On the quiz’s row, click the menu icon on the far right, then click View log.

You can also open it from the quiz’s setup screen. There, click View log next to the status label at the top.

The Execution Log window opens with the quiz’s name in its title. It lists every trigger run for this quiz, newest first.
Reading a Log Entry
Each row is one action for one quiz completion. A completion with 2 actions writes 2 rows. Each row shows when it happened, who completed the quiz, the action, their result, and a status label.
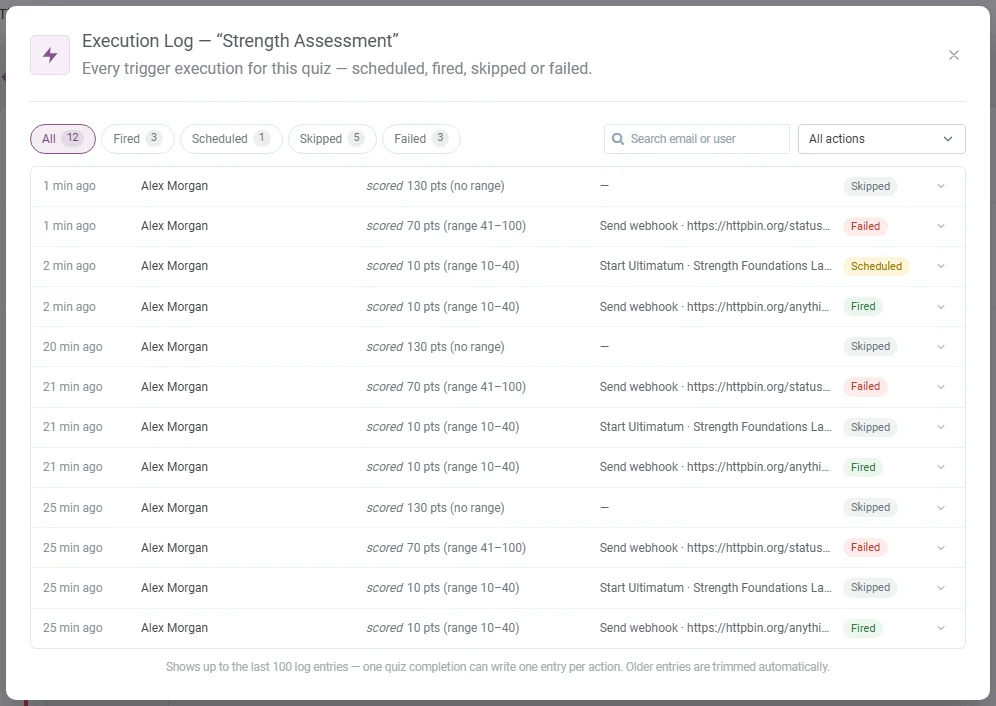
The result reads like “scored 70 pts (range 41–100)” or names the Category result. A guest without an email shows as “Anonymous submission.”
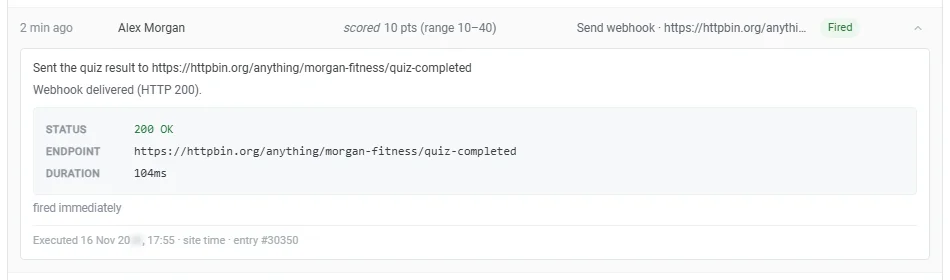
Times in the list are relative, such as “8 min ago.” To see the full details, click any row to expand it. The expanded row shows the exact time in your site’s time zone, labeled “site time.”
The time line can also show an entry number, such as “entry #42.” It’s the number of that quiz completion in the quiz’s results table.
The log keeps the last 100 entries. Older entries are trimmed automatically.
Understanding Each Status
Every row has one of 4 statuses. Expanding a row explains what happened.
Fired Entries
A Fired entry ran. The expanded row says what the action did, such as “Granted access to” a product or “Sent the quiz result to” your URL. It also says whether it fired right away or after a delay.
Scheduled Entries
A Scheduled entry is waiting to run, because the action has a time delay. The expanded row reads “Queued” and shows when it’s due.

Once it runs, the entry changes to Fired or Failed. Its expanded row then shows when the action actually ran, not when the quiz was completed.
For more on delays, see adding a delay and a condition.
Actions without a delay can also show as Scheduled for a moment. They run right after the person sees their results. If one never reports back, its entry changes to “Did not finish” and counts as Failed.
Skipped Entries
A Skipped entry didn’t run, and the expanded row says why. The most common reasons are:
- Condition not met. The row shows your rule after IF and the person’s value after GOT.
- No range matched. The score fell outside every range, so nothing ran for that completion. The row shows the uncovered band.
- Not a confirmed person. Apprentice and Ultimatum actions skip guests who only typed an email address.
- Cancelled before firing. A delayed run was cancelled before it was due.

A “No range matched” entry means your ranges have a gap. To fix it, see covering every score with ranges.
A cancelled run gives the reason. For example, it reads “The quiz’s triggers were turned off before this run fired.”
Failed Entries
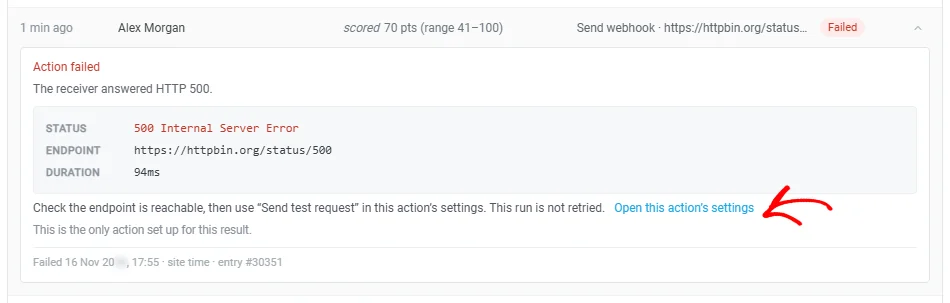
A Failed entry tried to run but hit an error. The expanded row is headed “Action failed” and shows the error, plus a suggested next step. For a webhook, it also shows the status, endpoint, duration, and response.
The row also says whether the other actions for that result fired normally. To fix the action, click Open this action’s settings. Failed runs aren’t retried automatically.
Filtering the Log
Once the log grows, you can narrow it to the entries you care about. The status buttons at the top show how many entries have each status. To show only one kind, click its button, such as Skipped.
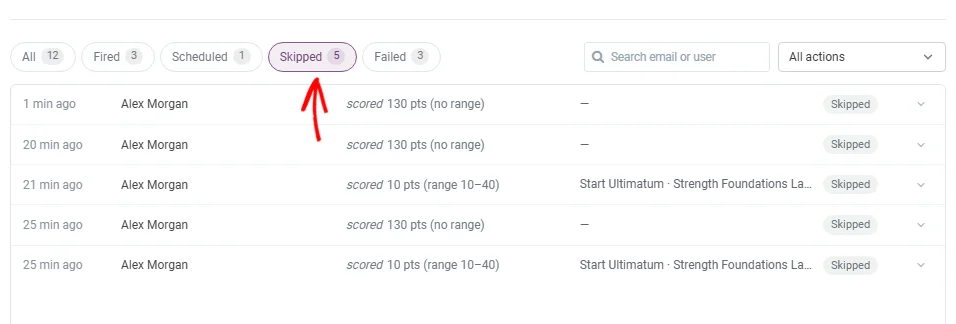
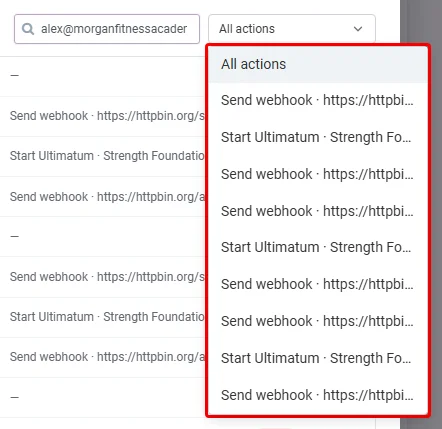
The status buttons only appear when the log has more than one status. Next to them, the search box finds entries by email or user. The actions menu shows the entries of a single action, including actions you’ve since removed.
When 2 actions have the same name, the menu adds the range or result each one belongs to. If they still read the same, it numbers them, such as #1 and #2.
That’s it! You now know how to open the Execution Log, read each status, and find the entries you need. Next, learn how to add a delay and a condition, the settings behind Scheduled and Skipped entries.
Frequently Asked Questions
Below, we’ve answered some of the most common questions about the Execution Log.
Why don’t I see the View log option?
Only administrators see it, because the log holds visitors’ email addresses. It’s also hidden when Thrive Dashboard needs updating. To update it, update your Thrive products in Thrive Product Manager.
Why is my log empty?
Nobody has completed the quiz since it was added, or its triggers are deactivated. Nothing runs while triggers are off, so no entries are written. See turning a quiz’s triggers on or off.
What does “(removed)” or “(since edited)” next to an action mean?
The entry belongs to an action you’ve removed or changed since it ran. The entry keeps the details it was written with.
Can I erase a visitor’s entries from the log?
Yes. The log takes part in the WordPress personal data tools. When you run Erase Personal Data for an email address, its log entries are anonymized. See exporting or erasing personal data with Thrive products.