Whenever you add redirect settings to one of the quizzes that you build using Thrive Quiz Builder, you will have an additional option: the “Forward Results to URL” option.
With the help of it, you can forward specific query-string parameters into the URL/the link of the page/post, or external page, that you set up as the redirect for the quiz (the place where users will be redirected after they finish the quiz).
The way this works is:
-
You set up an opt-in gate for your quiz, where you ask your quiz participants to complete their name and email address;
-
Then, you add the redirect settings to the quiz, also activating the “Forward Results to URL” option;
-
Finally, you use the “Dynamic Text” option on the page/post that you set up as the redirect for the quiz.
Once all of this is done, whenever someone will take your quiz and complete the form on the opt-in gate, they will be redirected to the page/post you have defined, and their name, email address, and quiz result will appear automatically.
Here is how you can set this up and use the “Forward Results to URL” option:
1. Set up an Opt-in Gate
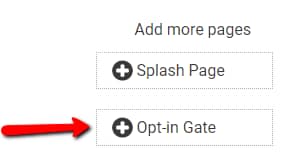
First, you need to add and set up an opt-in gate for your quiz. In order to do this, while editing the quiz in the Thrive Quiz Builder dashboard, click on the add “Opt-in Gate” option from the bottom-right part of the page:
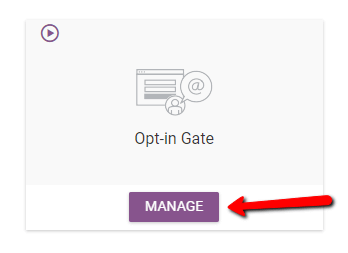
Once the opt-in gate is added, you will see it in the “Quiz Structure” section. Click on the “Manage” button from it:
Then, the page with the options for the opt-in gate will open. Click on the “Edit design” option (pencil icon) from it:

The editor will open and you can start customizing the opt-in gate in it. Make sure you set up the “Lead Generation” element, according to your preferences, on this opt-in gate. Add an API connection, the fields you want in it, etc.
You can also use the “Lead Generation” element to send a confirmation email, with the quiz results and the quiz answers, to your quiz participants. If you need details on this, read this article.
For details on how to use the “Lead Generation” element in general, check out this tutorial.
2. Add Redirect Settings
Next, go back to editing the quiz, in the Thrive Quiz Builder dashboard, and add redirect settings to it. The redirect settings define where your quiz participants will be taken after completing the quiz and filling in the form from the opt-in gate.
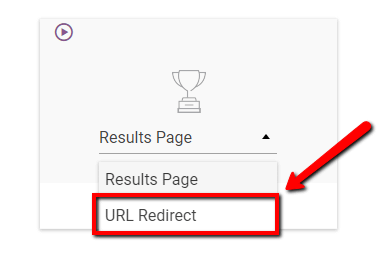
Look for the redirect settings in the “Quiz Structure”, next to the opt-in gate you just added. Open its drop-down and then choose to use the “URL Redirect” option from the drop-down:
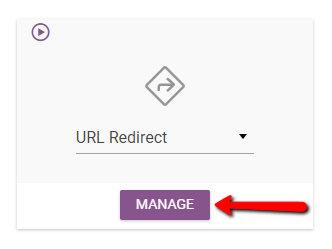
Then, click on the “Manage” button below the “URL Redirect” option:
Next, define the redirect settings, based on where you want to redirect your quiz participants. Either redirect them to one of your pages/posts or to a custom URL.
Define redirect settings for every possible result. This article is a step-by-step tutorial on how you can do this for the various quiz types.
3. Activate the “Forward Results to URL”
After the redirect settings are defined, you will have to activate the “Forward Results to URL” option. All you have to do to activate the option is to check the checkbox next to it (still in the “Redirect Settings” page”:
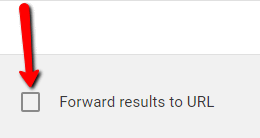
After the option is activated, a new section will be displayed, showing the query-string parameters that will be forwarded into the URL of the redirect page/post:
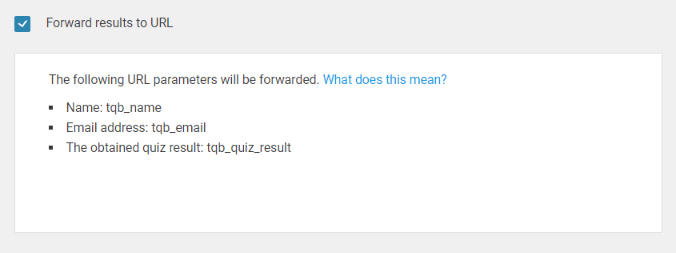
These are the name, the email, and the quiz result parameters. When forwarded, these query-string parameters will also contain the values associated with them, based on the information provided by the quiz participants.
Where will the parameters be collected?
After you set up the redirect settings for your quiz and activate the “Forward Results to URL” option, the above mentioned three parameters and their values, will be collected and they will appear in the link of the page/post, or of the external page, that you set up as the redirect for the quiz.
Note: You will be able to see this if you preview the page, where you have placed the quiz. When you preview the page, take the quiz to be redirected to the redirect page/post that you have applied to the quiz.
Once you have reached the redirect page/post, you will see the query-string parameters and their values in its link/its URL, displayed in the browser’s address bar. The “name”, the “email” and the “quiz result” parameters will be preceded by “tqb”, which naturally stands for “Thrive Quiz Builder”.
Here is an example of how this looks like:https://examplewebsite.com/example-page/[email protected]&tqb_name=chrissy&tqb_quiz_result=introvert
For the next step, you will need these variable forms (that were also explained in the note above):
-
tqb_name
-
tqb_email
-
tqb_quiz_result
4. Display the values with the ‘Dynamic Text’ feature on the Redirect pages
Besides collecting the query parameters in the link of the redirect pages for the different results, you can also display them directly on the defined redirect pages.
To do this, go and edit each of the redirect pages one by one. When you edit them, add a “Text” element to them and use the “Dynamic Text” feature, in order to display the values of the query parameters.
The “Dynamic Text” feature will make it possible to display, on the redirect page, the collected values, meaning the name and the email address that the quiz participants complete in the form, from the opt-in gate, as well as the quiz result they achieve.
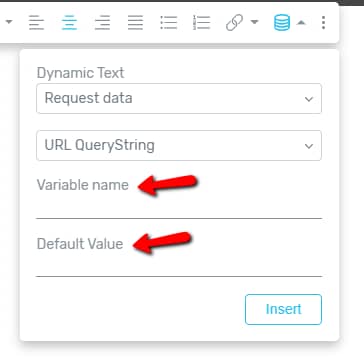
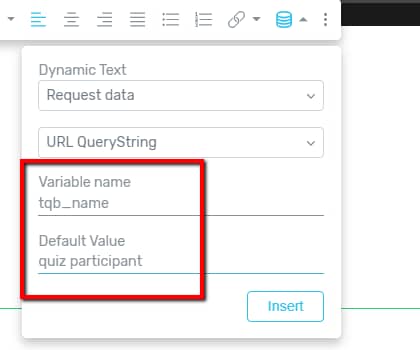
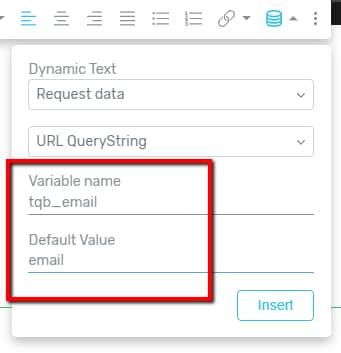
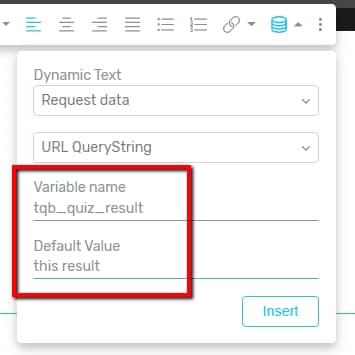
While setting up the dynamic text, choose the “Request Data → URL QueryString” option for it, and then complete the “Variable name” and the “Default Value”:
-
the “Variable name” should be one of the ones shown above as the Thrive Quiz Builder variables;
-
and the “Default Value” should be a general value. This will be displayed, if no corresponding value was completed in the form on the opt-in gate.
After you complete the two fields, click on the “Insert” button from the “Dynamic Text” pop-up to insert the text:
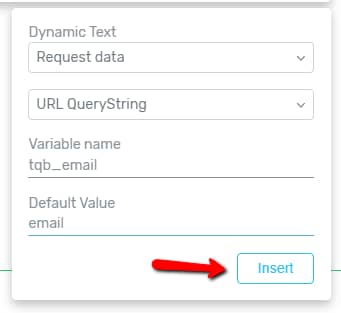
Make sure to add three dynamic texts this way, one for each piece of information you want to be displayed (the name, the email, the quiz result):
This tutorial details how to use the “Dynamic Text” feature, in case you need further information.
Repeat these steps, to set up the dynamic texts for the values on each of your redirect pages. After you have finished, always use the “Save work” button, from the bottom-left part of the editor to save the changes on each of the redirect pages:

After you set all of this up, with the help of the “Forward Results to URL” option and that of the “Dynamic Text” feature, whenever someone will complete your quiz and your form from the opt-in gate, they will be redirected to the redirect page you have defined and the values they completed will be displayed for them automatically.
-
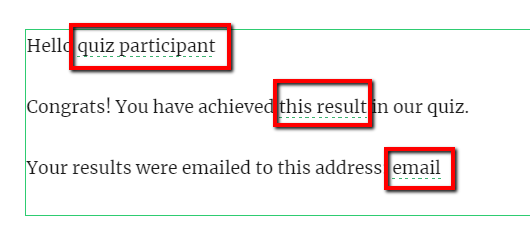
Here is an example of how this will look in the editor when you add the texts with the “Dynamic Text” feature. Observe the default values added:
-
And here is how this will look like when someone completes the quiz and the data is collected (with the “Forward Results to URL” option + the “Dynamic Texts”) and displayed automatically for the quiz participant:

If you want to find out more about Thrive Quiz Builder features and options, don’t forget to check out our knowledge base here.
Hopefully, this article was useful to you. If so, please give us a smile below 🙂