FREE VIDEO SERIES
How to Launch an Online Business From Scratch >>
How to Launch an Online Business From Scratch >>
The Beginners Guide to Starting an Online Business
Chapter 3:
How to Create an Online Course – that Makes Money in 2026

Guide Contents:
Since you’ve read this far on how to start an online business, I'll assume you've decided to learn how to create an online course as your first entrepreneurial venture.
If that’s the case, then I need you to promise me something before you go any further…
I need you to swear that you’ll follow through on the business strategy you’re about to learn to product launch — giving up on your online business shiny object syndrome for good.
That means I don’t want to see you chasing after new “business opportunities” or marketing schemes whenever things get hard. And believe me, it’s going to get tough, very soon.
So heed this warning that building an online course business is NOT a “business opportunity” or get rich quick scheme.
However, it is a valuable problem finding, problem solving and teaching skill set you can develop to provide customers with learning outcomes and transformations they will gladly pay you for.
So… if you’re on board with seeing this thing through to a successful end, then get pumped inside and yell — “I’m going to launch my first online course!” (assuming there aren’t any sleeping babies in your vicinity...).
Glad to hear it!
Now that we’ve got that crucial piece of business out of the way, let's get started showing you how to create a high-value online course that people actually want to buy.
That’s what we’re going to cover in this chapter.
But first, you’ll need to grab your original business idea validation research from Chapter 1 to get started. Specifically, take a look at the niche you selected for yourself as well as any opportunities you think you identified.
In this chapter, you’ll be using that homework to craft an outcome oriented course as the product your ICP desperately needs.
Ready to get this show on the road? Alright then, let’s go...
Step 1: Set Your Online Course Price Point First
Say what?!
Yup, you read that right. The reason you should set your course price first is because the actual price point can make or break your business.
Want to know why? Then listen up...
The price of your online course sets two important expectations for both you and your customers:
Price Sets Your Customer's Expectations:
The price you sell your course for determines the amount of value your customers expect in exchange for the money they spend. If you underdeliver on that value, you'll see the refund requests pour in...
Price Sets Your Own Course Creation Expectations:
The price you sell your course for also determines how much time and effort you'll need to invest in order to overdeliver for your customers.
If you price your course too low, of course the time & effort required to build it will be less, but the profit margins just won't make sense for you. Price your course too high and you risk taking too long to launch, poor sales and a stream of unhappy customers — especially as a newbie course creator.
But before you freak out wondering how the hell you should price your course, it turns out there’s actually a pricing sweet spot for online courses you should aim for.
If you can create a course that delivers on that predetermined price point, you’ll have a real chance at generating a tangible profit without investing years of effort to get it launched.
Setting your product pricing first is mission-critical to the success of your new business. Did you already establish your online course price point?
Great.
Then let’s now move on to figuring out what you’ll actually be teaching in your course. But to get there, you'll need to get your hands dirty in some data. Onwards...
So after going through that video series, your online course price point is now established, right? Do you finally understand just how mission critical setting your product pricing first is to the success of your new business?
Great.
Let’s now move on to figuring out what you’ll actually be teaching in your course. But to get there, you'll need to get your hands dirty in some data. Onwards...
Step 2: Find the Perfect Online Course Idea for Your Market
To figure out what you should teach, it’s best to go out into the world (virtually or in-person) and talk to real people involved in the niche you want to pursue.
We call this stage of your product creation journey customer development and it’s essential to crafting successful online training courses.
So put your customer development research cap on and let’s start digging!
Customer Development: Your Course Creation Secret Weapon
At its core, customer development has just one main principle you need to follow:
Learn what people’s problems are and then design solutions for them.
But how do you even go about doing that?
Well, your first task is to figure out where your niche customers actually are.
That means you’ll need to ask yourself the following questions to locate your tribe:
Get started by finding good answers to each of these questions. Remember that if you can’t actually point to a group of people in your niche to serve, you’ll have to pivot to a different niche where such an audience already exists.
And once you identify a potential customer base, you’ll need to reach out and interact with them using a set of Customer Development Tools that will help you identify a big problem your course will solve.
The following are 5 Customer Development Tools you should use to gather information on the problems your target customers experience:
Customer Development Tool # 1: Comments
If you already have a blog audience, make sure to encourage readers to leave comments or questions on your posts. Paying attention to what your audience is already asking questions around is a great problem identification tool.
However, if you don’t have your own audience yet, you can mine data from other people's audiences too.
Read through the comments left on other blogs or social media accounts scattered across your niche. These could include discussion groups, Facebook groups, online forums and subreddits. These are great places to gain insights about potential customer problems, especially when you don’t have an audience of your own yet.
Customer Development Tool # 2: Surveys
If you already have an existing email list (of any size), you can send out an email requesting readers complete a Google Forms survey with the purpose of improving your content. Include questions probing for the problems your subscribers are currently struggling with.
To help you create a useful survey for your online training course, make sure to follow these guidelines:
- Aim to keep your survey relatively short. 5 or less questions is ideal, so as not to burden people.
- Within a 5 question survey, aim to have 3 or 4 multiple choice questions and just 1 or 2 free response questions. Make the multiple choice questions appear first to warm your survey takers up before they have to answer your open ended questions.
- When you do ask multiple choice questions, design them around topics where you already have some insight. For example, if you’re sending out a survey with a question about health & fitness goals, multiple choice answers could be: a) weight loss, b) muscle gain, c) improve mobility, etc. From the results, you’ll have a strong idea about which category your audience is most interested in learning more about.
- Finally, at the end of your survey, invite people to leave their name and email address if they're willing to get on a call with you (either a coaching call or a customer development call. Don’t worry, we’ll explain the difference between those two things next!).
Customer Development Tool # 3: Coaching Calls
A coaching session is a one-on-one (virtual or in-person) meeting where you ask questions about your client’s biggest problems in order to help them achieve a desirable outcome.
It’s an especially great customer development opportunity for online course creators because coaching involves teaching.
In your coaching sessions, your goal is to identify what a customer’s problems are, understand where they’re getting stuck, and then offer actionable strategies to help them while measuring how they respond to your suggestions.
Coaching sessions are also a great solopreneur business strategy because you can charge for your time right away. And if clients are willing to pay for your coaching, potential online course customers are likely to do the same.
Customer Development Tool # 4: Customer Development Calls
A customer development call is different from a coaching session in that it only aims to talk to current or potential customers to help build or improve your product.
Typically, customer development calls work best with your existing audience.
Just ask your email list if they would be willing to jump on a short Skype call with you to have a conversation about a future product or service you’re planning to create. If you don’t have an email list yet, you can reach out to people in online forums or social media groups via direct messages to see if they’re interested in doing the same.
If you need help preparing for your customer development call, check out this resource on Thrive Themes co-founder Shane Melaugh's blog for call scripts and question templates you can use to get on the phone — fast:
Customer Development Tool # 5: Group coaching sessions
Group coaching sessions include any kind of live call, webinar or in-person workshop you can host to have a one-to-many interaction with people.
Here you can teach something valuable in the hopes of getting questions and feedback from your attendees. If you already have a website with an online audience, you can quickly invite your email list to attend a webinar to host this type of event online.
And if you don’t have an audience yet, look for local opportunities where you can host an in-person workshop at clever locations like co-working spaces, meetup.com events or community centers.
Now that you have a suite of investigative tools to help you find and understand potential customer problems, it’s time to start using them.
But your research and brainstorming won't be complete after that because potential customers aren’t the only source of feedback you can use to learn where opportunities exist in your market.
Now it’s time to start looking at competitor products in order to take your online course brainstorming to the next level.
Analyze Your Competition for Existing Opportunities
If there’s existing competition in your niche, don’t freak out… that’s actually a great thing!
An active market with lots of customers and businesses is exactly where you want to be. Remember that opportunities to create new products always exist!
And the good news doesn’t stop there — the competition research method you’re about to learn will actually help you design a more valuable course for your customers.
That’s because clever analysis of your competition will show you:
- 1What’s working in your market,
- 2What isn’t working, and...
- 3Where gaps exist to deliver unique new products.
If you start thinking about competitor research like a secret weapon for online course success, your new business has the potential to crush it!
Competition Judo for Creating an Online Course
In the Japanese martial art Judo, grapplers redirect an opponent's energy and power to gain a competitive advantage. You can use competition research do the same in your own online business niche.
To do this, you’ll comb through lots of publicly available data about your competitors' products to find what they’re selling, how they’re advertising and what their customers are saying about their products.
And when it comes to doing Competition Judo for online courses, it’s best to start with the other online course platforms out there including Udemy, Skillshare and Lynda.
Online Course Platform Research (Udemy, Skillshare and Lynda)
First, you can leverage the search tool provided by each of these online course platforms to find course topics that fall within your realm of expertise.
To do this, just load the homepages for each of the mainstream course platforms (Udemy, Skillshare and Lynda) and then type an online course topic related to your niche of expertise:
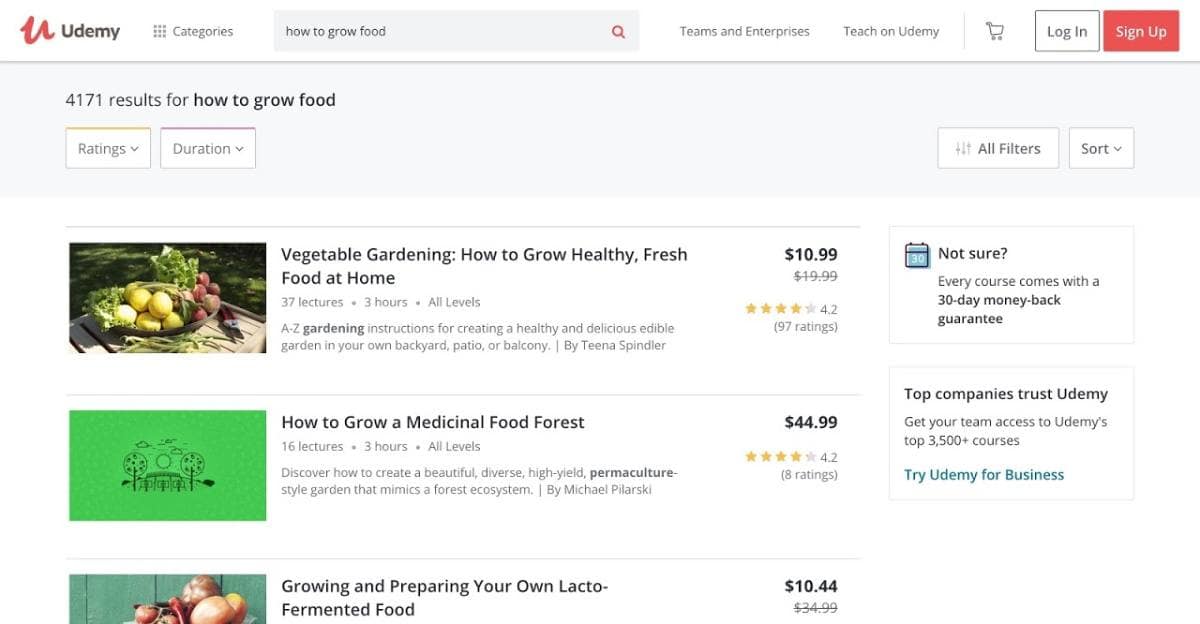
Udemy Search Console:

Udemy's online learning platform course search console.
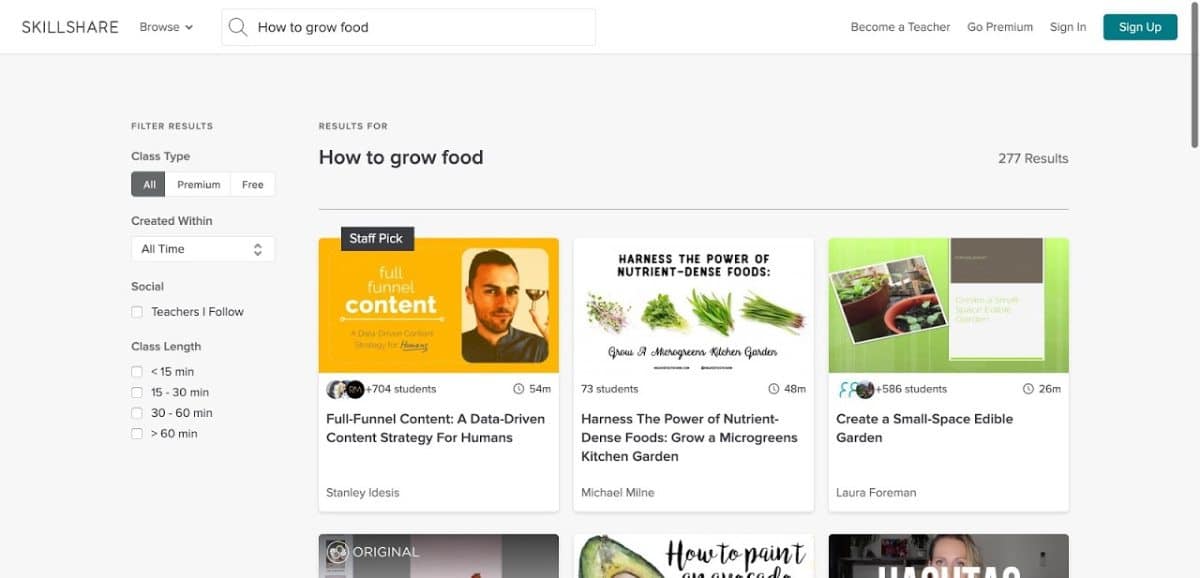
Skillshare Search Console:

Skillshare's online learning platform course search console.
Lynda — now LinkedIn Learning — Search Console:

Lynda's (recently acquired by LinkedIn) online learning platform course search console.
Next, browse through the results and record important insights from course offerings like:
It’s also important to read BOTH the popular and unpopular course reviews to see if you can identify what customers like and dislike.
Counterintuitively, pay special attention to the 2, 3 and 4 star reviews for courses (since 5 star reviews tend to be all praise and 1 star reviews tend to be all hate). These middle-star reviews are usually gold mines of honest feedback pointing out gaps as well as strengths in competitor products that you can address when creating your own course.
It’s important to look for patterns that emerge from your competition research. You’ll likely notice that generic sounding courses tend to be much less popular compared to more outcome focused courses.
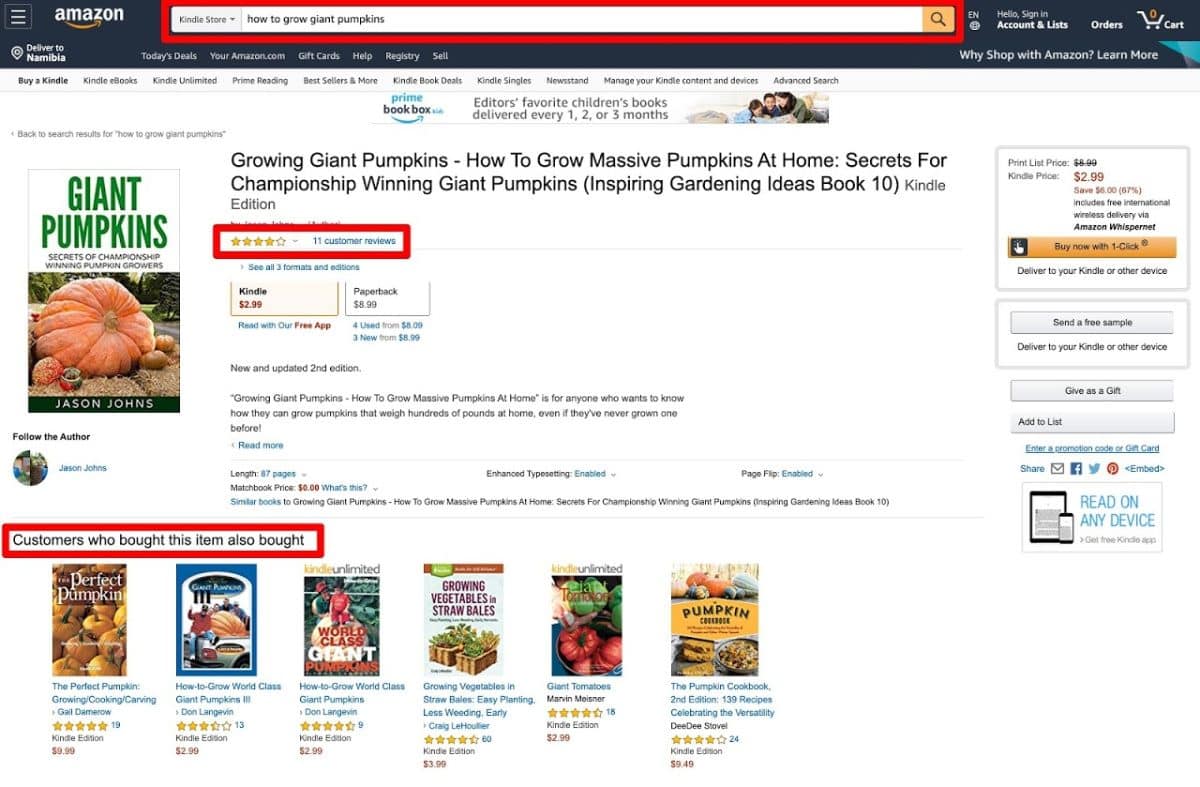
How To Mine Online Marketplaces (Amazon, Kickstarter and Patreon)
Your competition research shouldn’t stop at the online course platforms either. Your next research hotspots will be the online marketplaces like Amazon, Kickstarter and Patreon.
")
Use online marketplaces like Amazon's Kindle store to search for books (or even products within the general store) in your niche. Check out the "Customers who bought this item also bought" section to find related products and read through the reviews to identify gaps customers are complaining about. Your course can swoop in and address these as a unique new product.
Since your own online course will fall within the info-product space, your main Amazon competitors include books written about topics in your niche. Your job here is to first identify relevant competitor books in the Amazon Kindle store, then pull as much useful info from their listings and reviews as possible.
When you identify competitor books on Amazon, record the following information:
Mining Information from Blogs, Gurus and Competitor Brands
Finally, you can start mining information from all the websites, forums and blogs where your target customers hang out online.
Harvest the following information from your competitor sites:
If you can collect this competitor data within an organized spreadsheet, it will be easy for you to spot the patterns and gaps within currently existing products. You can then use those insights to craft a uniquely valuable online course that solves a pressing problem in your market.
A word of warning: If you’re a serious procrastinator, limit your competition research to just a few hours. This limitation will keep you focused and moving towards actual course creation with momentum. Don’t allow your research phase to drag on longer than a day as it can become an excuse from actually creating your online course!
After completing your research, you should have what you need to pick a course topic that solves a problem that people will actually pay for.
If a particular online course idea hasn’t jumped out at you yet, do another round of the research phase to see if you can get that clarity.
Otherwise, if you’ve got a promising idea already, it’s now time to craft your very first online course. Keep reading as the next section will show you how to begin...
Step 3: Structure Your Online Course
In order to deliver a high-value info-product, you should aim to create a 3-module online course with each module providing a specific outcome oriented milestone. Together, those three module milestones should culminate in producing the overarching course outcome you promised.
And to help customers achieve each module milestone, it’s important to weave a series of little bite-sized benchmarks throughout your course.
You can also think about each of these benchmarks as being individual selling points for your course. This way, you can work backwards from the final transformative course outcome, to arrive at 3 separate module milestones, which each milestone containing 3 or 4 benchmarks.
When you plan out your course in this way, you quickly end up with an Online Course Roadmap that outlines most of the major points you’ll need to cover to complete your course:

Create a course roadmap like this one where each module delivers a specific milestone or goal, and each chapter helps students attain a more tangible intra-module benchmark. If you structure your course this way, then the lessons you create will naturally deliver the outcomes you promise while each chapter will offer multiple, marketable selling points for your course.
Fill in each of the blanks in the above course map structure and you’ve got your online course laid out and ready to plan lessons around!
Draft Your Online Course Outline
Once your course roadmap is fleshed out, you can start framing your course into a topical outline that includes the individual lessons you’ll create. You can use a free tool like Google Docs to do this.
At this stage, just try to outline the topic of each lesson with bullet points covering what you’ll discuss and teach. If you decide to outline your course using Google Docs, use Headings to create a visual hierarchy for your different course modules, benchmarks and lessons:
")
Use H1, H2, and H3 headings to quickly draft your course outline in Google Docs. This will help create a visual hierarchy to identify the course milestones, benchmarks and individual lessons you want to offer.
Think about this outlining process as course sculpting rather than final polishing. You can use the following heading hierarchy to frame your course and get all of your thoughts down into a logical structure:
Module Title (Milestones)
Chapter Title (Benchmarks)
Lesson Title (Individual lessons)
After all your headings are laid out, write down a series of bullet points to fill out what each lesson will cover. Before you know it, you’ll have a detailed online course ordered in a useful way that will deliver your promised outcomes.
Pro Tip:
When using Google Docs to create your course outline, make sure to insert a Table of Contents at the top of your document. It’s also recommended to make your outline visible in the sidebar to further help you visualize your online course structure as you’re creating it.
See the Google Doc screenshot above to understand exactly what this useful setup will look like for you when drafting your course outline.
Following this sort of organization process will help you keep your course ideas clear and easy to work with instead of messy and hard to understand as you get going.
Stick with me to learn how to create an important part of your course outline — the learning outcomes.
Formulate Learning Outcomes
Creating an online course requires that you write down the course's learning outcomes. They set the expectations for the skills, knowledge, and behavior your students will develop throughout the course.
In other words, when writing your learning outcomes, think of the knowledge your students will acquire. Then, think of how they will apply it to enhance their lives and contribute to their communities. The same goes for the skills they will develop during the course and how their behavior will change because of your lessons.
Learning outcomes are all about the context of knowledge, skills, and behavior application in real life. Now, how do you write learning outcome statements?
Focus on action verbs — each learning outcome starts with an action verb. Here are a couple of examples of learning outcomes for an online course about creating an online course:
Each learning outcome should be measurable. These will help you assess the learning, evaluate the teaching, and improve the course. Keep this in mind when selecting the action verbs for your learning outcome statements.
Be clear, objective, and concise when writing your course's learning outcomes. Also, if you want a successful online course, set realistic learning outcomes that your students can achieve.
Finally, don't forget to add the learning outcomes to your course outline. Your students should know what you expect from them right from the beginning!
So now that you’ve done your research, decided on your topic and outlined your course, it’s time to start creating your lessons, right?
Wrong.
Before you get started creating any lessons for your online course, you actually need to take a step back and create your Sales Page First.
“Wait… WHAT?!” Why write the sales page before creating the actual course?
That’s exactly what we're going to cover next...
Step 4: Create Your Online Course with a Sales Page First Approach
Although creating your sales page first might sound counterintuitive, it’s an essential part of our rapid implementation method that we’re teaching you in this guide.
Why do it this way? Because it will force you to think about and then communicate what makes your online course uniquely marketable for customers before creating lessons.
This sales page first approach will also help you discover important issues you might have missed when outlining your course roadmap. Discovering such gaps before crafting your lessons will end up saving you time and effort instead of having to redo things after most of the course creation work has been completed.
That means it’s now time to write your course sales page as fast as possible with the goal of promoting the major learning outcomes you outlined in your 3 modules and 9 to 12 intra-module benchmarks. But it’s likely you’ve never written a sales page before and will need some help knocking this out.
If that’s the case, don’t worry. The next section is going to walk you through an online course specific sales page template that you’ll be modifying to fit the unique needs of your own product.
Get the sales page copy fleshed out in a Google Doc for now and then we’ll teach you how to transfer it to a real life page on your upcoming website in the next chapter. But for now, get ready to learn how to write a sales page!
How To Structure Your Sales Page
Whether it’s someone knocking on your door to try and sell you a product, a sales person with a convincing spiel in a store, an infomercial on late night TV or your online course sales page, the structure of sales content matters.
Can you imagine if a salesman in a store started their conversation with “You should buy this!” How quickly would you reply with, “I’m fine thanks, just browsing…” and swiftly leave?
And yet so many online marketers try to sell with “Buy my course!!!” and wonder why no-one does.
Remember: People don’t want courses... they want solutions to their problems.
As a company that creates conversion-focused website plugins, we take this issue very seriously. We’ve published two in-depth studies on sales page structures specifically for online course creators.
For Selling Courses Over $500: Online Course Sales Page Teardown
For Selling Courses Under $500: The Perfect Low-Priced Online Course Sales Page
With the discoveries we've made, we came up with two structural blueprints for your online course sales page.
But we didn’t stop there. We took those blueprints and turned them into a complete plug-and-play template that you can load onto your website instantly with our WordPress page building tool Thrive Architect.
With Thrive Architect, every single image, color, button, text and design element is customizable. Once you’ve customized this template to suit your branding, you’ll be ready to go!
But more on the benefits of using this tool to help build your website in the next chapter...
In this section, we want to dig even deeper into the psychology of your sales page to make sure that you are going to write one that converts from day 1.
So, to kick things off, here is our low priced sales page blueprint we recommend you use for your first online course, priced at less than $500:
")
Now let's dig deeper into what each of those template sections are and what they should contain to make creating them as quick and simple as possible.
Note: To make it easier to follow along, you can view a copy of the online course sales page template we're about to break down by clicking here.
Section 1: Above The Fold
The term ‘above the fold’ comes from the newspaper era. At a news stand, the daily paper would be displayed in a stack, with each one folded in half.
Passers by would see what was above the fold on the newspaper, and if it was good enough to grab their attention, they would pick it up to read more and usually buy it.
In websites, the above the fold is what's displayed at the top of a webpage and visible before the visitor needs to scroll.
Your above the fold has one job:
entice the reader to keep reading.
So screaming “Buy my course!” is going to drive people away. Instead, you need to grab their attention by immediately showing something they want and making it clear that visitors should read this now.
So how do you do that? Just like this:

The Above the Fold area of the Thrive Architect "Online Course Sales Page" template.
Let’s go through each element visible above the fold in our template:
With this combination, you’ve created interest and scarcity before the visitor has done anything. Killer combo.
Section 2: Subheading And Story
Next, resist the urge to start talking about how wonderful your course is. Instead, focus on the reader’s problems. There is a structure we recommend for this section, known as PAS. This stands for:
P
A
S
The idea is to perfectly explain THE pain points you uncovered back in Chapter 1. What is it that keeps the reader up at night? What do they find difficult to achieve?
If you can describe their pain even better than they can, visitors won't be able to help themselves from reading on. At this point you want you visitor thinking “Yes, that’s exactly me!”
Not only do you want to describe their problems, but you want to agitate those problems. That means you should dig in deeper describing all the reasons why that pain is so uncomfortable.
If you want to learn more about nailing the structure for this story section on your sales page, check out this article we published about the PAS format. And here's how that sections fits on our sales page template:
 (1)")
The Story Section of the Thrive Architect "Online Course Sales Page" template.
Section 3: Introduce Your Online Course
Once you’ve got your visitor reading and nodding along to your description of their pain, then you're ready to show them the ‘S’: solution… your online course.
If you’ve done everything right up until here, your visitors will see your online course as the solution before they’ve even read about the course contents.
Since an online course is a digital product, we highly recommend you use what we call a ‘box shot’.
A Box Shot is a graphic that represents your online course. In the old days when digital products were sold on CDs and DVDs, websites would show a picture of the package that would be mailed out to the buyer.
Nowadays, since we're skipping the physical product option, you want to show how the visitor can consume your course via the internet: on their desktop, laptop, tablet or smartphone. It should look something like this:

Introduce your online course with a box shot.
Creating a box shot used to be a hassle. You needed a designer to create mockups of different devices and substitute in graphics of your product.
But if you’re using our template in Thrive Architect, all those on-screen graphics are replaceable with a click.

Editing the box shot images in our sales page template is easy. Just replace the course images within the streaming devices. No photoshop or design work needed!
You just need to capture some screenshots from your course, images of yourself, or a logo for your product and add them straight into the editable box-shot shown on the page.
Voila! We just saved you from having to hire an expensive designer.
Section 4: Call To Action + What You Get
Now that you’ve introduced your product, it’s time to tell readers what they actually get — and more importantly — what it will help them achieve.
Once again, you want to focus primarily on the benefits to the student while also describing the features of the course. Do they get videos, workbooks, or any downloads? You want to show them what your course actually contains and how they will consume your teaching. But you must pay specific attention to how the course contents will help them overcome their problem.
Remember: They don’t want to buy a course, they want to buy a solution to a problem. This is where you describe how your course delivers that solution.
You also want to give the visitor a chance to purchase your product right here. Also in our template is a sticky banner. That means when someone scrolls past a specified point on the sales page, an ‘enroll now’ button will stay glued to the top of the viewing window, making your course checkout just 1-click away for the reader.
Our sales page template comes with this sticky call-to-action already set up for you. But like everything in Thrive Architect (our WordPress page building plugin), you can delete, modify or add this design element wherever you want.

The What You Get section of the "Online Course Sales Page" template in Thrive Architect.
Section 5: Your First Set Of Testimonials
Since you haven't created your online course yet, you probably don't have any testimonials — and that’s ok. Any of these template sections can be removed and added back into your sales page whenever you need them.
But as soon as humanly possible, you should add testimonials to your sales page... even if they first focus on your qualities as a teacher or subject matter expert instead of being about the actual course you're selling.
That's because testimonials make a world of difference to buyers.
They are evidence that other visitors have taken your course and that it helped them achieve the results they were after. But in the beginning, results you helped students achieve by coaching them 1-on-1 (either in person or online) can be used here instead. Just make sure you portray these testimonials truthfully (i.e. they're about your coaching and not your actual online course) since your new budding product has no customers yet.
If you want to get testimonials ahead of your actual product launch, we've written an article containing some field tested strategies to help you produce them. Check out the article here: How to Collect Course Testimonials Like a Business Pro (10 Tips).
And here’s how the testimonial section looks on our template:

Testimonials make any online course sales page more effective at getting conversions.
Section 6: Module Boxes
Since your online course is broken up into modules, it’s a good idea to carefully explain each module while once again paying attention to the benefit for the visitor.
You want each module to sound like it’s own self-contained course that gushes value. Rather than simply numbering each module, make sure you give each one a title that focuses on a huge benefit the learner will obtain:
")
Show your potential students what's covered in your online course with a Module Box section.
In the Module Box section of our online course sales page template, you can duplicate or delete the boxes until you have the right amount that matches what’s actually included in your online course.
Section 7: Bonus Section
Now you might be thinking “But I don’t have any bonuses yet!”
Let’s be clear: Bonuses are an excellent marketing strategy. At this point on your sales page, a bonus is anything that you have not had the chance to mention yet.
Yes, everyone gets these bonuses (unless they are a part of a higher pricing tier or limited time offer). The bonuses could be anything from email support, to facebook group access, to a digital download of a cheat sheet.
The point here is to over deliver on value. At this stage, some of your visitors are thinking “This sounds great… buuuut…”. You want your bonuses to be that extra push that sells them on your course.

Including a Bonus section on your online course sales page is an excellent marketing strategy.
Section 8: About The Teacher
By this point on your sales page, you’ve shown the value of your product and sold potential customers on its contents. In the visitor’s mind, something else starts to happen. The moment they think they are getting sold, they begin to formulate objections.
So your sales page should start to take a slow turn towards removing objections. Starting with your ‘About the Teacher’ section.
This is a simple section that introduces who you are and why you are the right person to teach this topic. It’s your chance to humanize and personalize the product.
Most ‘about the teacher’ sections are either written in the third person (“Mark is a graduate of…”) or first person (“I am a graduate of…”). Whichever you choose is fine, but accompany it with a pleasant photograph showing your professionalism and personality.

Adding an About the Teacher section is super easy to do with the "Online Course Sales Page" template in Thrive Architect.
Section 9: Testimonials About The Teacher
There is no such thing as too many testimonials. Your readers may not read all of them, but simply seeing a volume of testimonials says a lot.
Right after you’ve introduced yourself as the teacher, it’s wise to showcase your previous students who have great things to say about you.
Lo and behold, the Teacher Testimonial Section:

Why should you try to add so many testimonials on your online course sales page? Because they work.
Section 10: Value Comparison
This section makes more sense when you see what comes after it: the pricing table. Since your visitors are just about to discover the price of your online course, you want to precede this with anything that can pre-establish their pricing expectations.
The best way to do this is with a Value Comparison section.
This is your chance to explain why the course is so valuable. Compare it to other solutions. You might want to describe other educational facilities teaching this topic as being "10x more expensive". Or perhaps you want to illustrate how much time would be wasted if the user doesn’t take a course like yours at all.
Whatever it is, you want to prime the reader to discover your course price and immediately think: “Oh that’s good value!”

Explain exactly why your online course is so valuable with a Value Comparison section.
Section 11: Your Pricing Table
Here is your visitor’s first look at your course's price. Prior to this moment, they were never aware of what it would cost to enroll.
And with the Pricing Table element in Thrive Architect, it’s easy to deploy an ‘instance switch’, which lets the visitor select between types of pricing, such as a one-time-purchase or monthly-payments.
If you have multiple pricing tiers, this is the moment to explain what they are and present the matching ‘buy now’ button that links to the correct product package in your checkout tool.
We also recommend including a concise, listed summary of what students get with the course when they purchase:

Here's the pricing table included in the "Online Course Sales Page" template in Thrive Architect. It has a simple, yet powerful design so you can present your offer professionally to potential customers.
20+ Pricing Table Templates Included:
If you're a Thrive Architect user, don't forget you have instant access to over 20 pricing table templates you can substitute into your online course sales page fast:
The "Icons 3 Column with Toggle" pricing table template available in Thrive Architect.

The "Know How 3" pricing table template available in Thrive Architect.
To use one of the many templates available in Thrive Architect, just drag & drop the Pricing Table element into your Thrive editor window, select one of the pre-designed templates, modify it to your specific design needs, and then move on to building your next sales page section!
Section 12: Countdown Timer + Guarantee
Immediately following your pricing table, you should have a final countdown timer and a Guarantee box displayed.
Why? Because the moment a visitor sees the price, they are going to start thinking of reasons why they should not buy your course. So you’ve got to work hard to dissolve those fears right away.
A 100% money back guarantee for 30 days is the best solution.
There's a reason why marketers all over the globe always offer guarantees.
The answer is simple: the increase it gives you in sales will far outperform your refund requests. In fact, the longer your guarantee period and the more you declare it, the better your conversion rate will be.
Simply getting your visitors over the purchase decision line is the hardest part. Once they’re in your course, let the content speak for itself. The truth is that most students feel shameful about asking for a refund once they’ve received great value for their purchase.
And anyone who was planning to take advantage of your guarantee regardless isn't your ideal client anyway since they weren’t going to buy your course in the first place. So don’t sweat the shysters and focus on the customers that matter.
")
No online course sales page is complete without a product guarantee section. A countdown timer here also helps to drive the message home that your offer is available for a limited time.
Section 13: More Testimonials!
Yes, you read that right. Once you have them, you want to include even more testimonials on your sales page. At this point, you should try and include testimonials that showcase customers who weren’t sure about buying at first… but decided to anyway and were really happy that they did!
Testimonials like this are ideal at this point on your sales page, but if you don’t have them, any kind of testimonials will do.
")
Yup, that's right. You can add even more testimonials on your sales page if you have them!
Section 14: Frequently Asked Questions:
Here’s a big secret about FAQs: they’re not based on questions people are actually asking!
Okay, sometimes they are. But most of the time, as a marketer that knows your target audience, you need to address what potential customers are scared of. You’ll be able to read their mind before they’ve even dared to ask such questions. So, you’re going to confront those final nagging questions in your FAQ section.
Within our Thrive Architect online course sales page template, we use toggle buttons to help us do this. That means you can display the question and then a visitor can click on it for the answer to appear in a toggle button.
Fill these toggle buttons in with a selection of questions and answers to address your reader's final objections:

An FAQ section for your online course sales page is a great way to address important questions and objections about your product for people on the cusp of buying.
Section 15: End on a Friendly Note
Sales pages can get a little clinical. So if a visitor has made their way to the bottom, they are seriously thinking about your course — just unsure if they’re ready to buy it yet.
The best way to end your sales page is with a warm note from you, the teacher. This is a friendly sign off that shows you are here to help and... well... that's all. On our online course sales page template, we showcase a picture of the teacher and an area for you to add your signature (technical note: just make sure your signature is a .png file with a transparent background).

Don't forget to add a personal note about your course at the end of your sales page to help build trust with your potential students.
See, it wasn’t that hard to write a sales page for your own online course, was it?
This entire template was designed to help you draft your sales page quickly and then build it in Thrive Architect once your website is up and running (again, more on how to do that in the next chapter).
With any Thrive Architect template, all the text is tutorialized (to prompt you with exactly what to write where) as well as 100% editable. Once you load the template, you just have to do what it says and you’re off to a high-converting start.
To get your sales page draft written in a Google Doc first however, you can view a copy of this sales page template here.
We've been talking about how to create an online course, but there's one thing that follows online course creation. And that's...course delivery!
Outlook on Step 5: Determine the Course Delivery Method
Once you create an online course, you must deliver it to your students, so they can access it and consume the course content. You have options, so you should know how to choose the best format for:
For instance, if your audience is always on the move and the topic is lightweight, microlearning might do the trick. On the other hand, a more lengthy e-learning course should be necessary for more complex topics that require high-resolution imagery.
Besides course delivery, creating an online course requires content production, which is our next subject.
Outlook on Step 6: Filming, Recording, and Editing Your Online Course
Live or pre-recorded videos are one of the most effective means of teaching online. However, producing video content that looks professional might sound like a huge challenge...
Well, that doesn't have to be the case!
You can find many online resources about room staging, lighting, audio recording, and video shooting.
In the meantime, here's a rough plan of what you should do:
Whatever solution you go with, make sure to produce videos with your own personal touch and personality.
For now though, pat yourself on the back for all the hard work you’ve done setting your online course up for success. It’s now time to change gears and get technical.
That’s right… get ready to build your very own online course business website.
Online Course Creation FAQ
How Long Should My Online Course Be?
Now, here's a question that has no one-size-fits-all answer!
What's the smallest amount of lessons you need to get students to their desired outcome? That's the question only you can answer.
And don't fool yourself into thinking that a longer course translates into higher profits — that's just not how the online course creation business works! Don’t forget your audience isn’t paying for your lessons, they’re paying for an outcome. Provide them with just enough lessons to help them achieve the goal or goals you promised them.
How Do I Know if There Is a Gap in the Online Courses That the Competition Is Offering?
Use our competition analysis method to understand what competing courses are missing.
Here's a recap of how to do that:
Focus on your niche and find more details about our competition analysis method above in this chapter.
Should I Add Learning Communities and Cohort-based Learning to My Online Course?
Learning communities? Absolutely!
Cohort-based learning? — it’s up to you.
Humans are social creatures. That's why we seek person-to-person interaction.
So whatever self-paced online course you create, it’s a good idea to offer some kind of space for students to interact with you and each other. Creating an online learning community is a great way to provide that.
The learning communities provide social interaction by facilitating communication...
Or instead of creating a learning community for your self-paced online course, you can build a cohort-based online course. This special type of online course ensures students learn collaboratively as they work their way through your course content simultaneously.
What Video Equipment Should I Use for Creating an Online Course?
How Do I Get Feedback on My Course Content?
Before launching your online course or releasing a module, here’s how to gather feedback before the public launch:
Chapter Summary
To create an online course people will actually pay you for, your course must solve a big pain point that your target audience struggles with.
To deliver an exceptional outcomes, follow these six steps to building a successful online course:
Define your course's price first:
This will establish the perceived value of your course while making it clear how much effort you’ll need to exert when creating it.
Get to know exactly who your target audience is, where they “hang out” and who your competitors are:
This will help you address the needs of your students in unique ways your competitors aren’t.
Structure your course with an clear outline:
Focus all your lessons on delivering the most important learning outcomes.
Write your course sales page before creating the course:
This way you’ll deliver on the outcomes your sales page promised!
Choose the appropriate course delivery method:
Present your course in a way that best matches the course's topic, content, and audience’s learning needs.
Prepare, shoot, and edit your video lessons:
The best way to learn is by doing!
And there you go!
These are our tips and tricks on how to create an online course that your audience actually wants to buy. And if you’re looking for an online business building toolkit that has everything you need for online course creation on WordPress, check out Thrive Suite.
Share this Ultimate Guide on your Social Media Accounts with the buttons above
Next: How to Build an Online Course on Your Own Website
So now that your online course framework is locked in, the lessons have been outlined and your sales page has been written, it’s time to actually build the technical foundations of your business website.
In the next chapter, you’re going to learn:
Ready to get started building your new online course platform? Great! Move on to the next chapter to get going...
Disclaimer: Nothing on this page, our website, or any of our content or courses is a promise or guarantee of results. All the material within ThriveThemes.com is provided for information purposes only and we are not implying you'll duplicate any results. Your results will vary and depend on many factors. All business entails risk and no action should be taken solely based on the information in ThriveThemes.com. The publisher is not entering into any kind of practitioner/client relationship with its readers. The publisher is not responsible for errors or omissions.
This site is not a part of the Facebook website or Facebook Inc. Additionally, This site is NOT endorsed by Facebook in any way. FACEBOOK is a trademark of FACEBOOK, Inc.
Copyright 2019 by whitesquare GmbH, Thrive Themes | Contact | Privacy | Disclaimer