
FREE VIDEO SERIES
How to Launch an Online Business From Scratch
How to Launch an Online Business From Scratch >>
The Beginners Guide to Starting an Online Business
Chapter 4:
How to Sell Online Courses from Your Own Website

So now that your course has been outlined and your sales page drafted, it’s time to get technical about the tools you need to actually build your online business.
That means before you go any further, we need to discuss the foundation upon which your business will run.
This probably won't be a surprise to you, but the platform and digital storefront that you’ll create, market and sell your online course on will be a website. And right now, you need to get that website up and running as fast as possible so you can bring your online course to market.
As you’ve probably noticed, there’s no shortage of ways to build a website these days.
Available solutions include:
Available solutions include:
- 1Using a mass-marketed, but business un-friendly website builder like SquareSpace or Wix
- 2Hiring (and continually rehiring) expensive developers to build and manage a custom website for you — yikes!
- 3Or even going the distance and trying to code your own website solo — got a few years to spare before you pull that one off?
That’s why most non-technical entrepreneurs choose a solution that provides both affordability and advanced feature power so they can DIY their website — without having to know how to code.
In fact, the solution I’m referring to has become such an online business standard that 30% of the entire internet now uses it… and that’s why you’re going to use it too!
So the next step in your solopreneur business journey is going to be learning how to deploy this solution to build and launch your website... not in a matter of days or weeks... but in just a few hours.
But before unraveling the solution to sell online courses from your own website — without coding — let's talk benefits...
Benefits of Selling Courses From Your Own Website
Selling online courses through your website maximizes revenue. You won't need to spend a dime with an additional platform to build, promote, and sell courses online. You'll do it all from the comfort of your own website.
Plus, if you work so hard to sell online courses, you'll want to keep as much of your earnings as possible, right? But online course marketplaces can empty the pockets you filled with course sales.
Take the example of Udemy: The platform can eat up your profit margin by 50–75%. And even if you do all the marketing, you'll still lose 50% of your course creation revenue to Udemy.
Also, when you don't sell online from your website, you're jeopardizing a direct channel with your prospects and customers. I'm talking about email. For instance, you can implement email marketing campaigns or send them a monthly newsletter.
Email is still a highly effective marketing channel to nurture leads. It also allows you to increase customer retention and get more repeat customers. So, capturing the emails of your future buyers from your website and owning that contact database is extremely valuable.
Last but not least, when you sell courses via your website, you might offer product bundles to your potential students. You can complement your online courses with other information products and even physical products.
To sum up, these are the many ways in which course marketplaces are not the best option for you:
If you're wondering about alternative code-free platforms to sell courses online, check below.
Choosing the Right Platform To Sell Your Online Courses
It's time to discuss the platforms you have on the table to sell online courses (without coding).
You have three options:
Keep reading to learn what the best online course platform is, why you should use it and how it will help you grow your business over time.
WordPress: Your Online Course Business Platform
If you’ve never heard of WordPress before, it’s an open-sourced Content Management System (CMS) that’s free to use, easy to learn and technically powerful when integrated with the right third-party tools (a.k.a. plugins).
Rest assured that it’s also a website solution that can easily scale with your online business as it grows– meaning that you can always hire a pro-developer to build custom solutions for your business down the road when necessary.
If you need proof that WordPress is a solution for websites both big and small, here’s a list of some mainstream and "big store" brands that run their sites with it:
Of course, these companies have dedicated developers that create unique online experiences for their visitors, so for now, you’ll be using a set of third-party plugins to gain the functionality you need to get started.
Get ready, because the rest of this chapter will walk you through exactly what's required to get your new website up and running in the shortest amount of time and least amount of money possible.
“But Wait... Why Use WordPress instead of an Online Course Platform Like Udemy, Kajabi or Teachable?”
Well, like we told you back in Chapter 2, it’s important to host your products on a platform you own and control (a.k.a. your own website). That is to say, an online location where you can manage how you interact with your potential and existing customers as you choose — without interference.
If you use online course solutions like Udemy, Kajabi, or Teachable, you’re either forfeiting control over how you market your products and interact with your students (Udemy) or paying an arm and a leg to add courses to your website (Kajabi or Teachable). On platforms like these, your courses get lost in a sea of other products all competing at “race-to-the-bottom” prices.
That’s why quickly and cheaply building online courses on your own WordPress website is the ideal solopreneur solution since it gives you full control over your products as well as contact with your customers while also helping you stand out as an authority in your niche.
This last point is super important because great personal brand websites build trust with customers since people know they’re buying from a real expert instead of some fly-by-night course creator.
So now that you know why it’s so important to build and host your online course on your own website, let’s switch gears and discuss how to get your new WordPress website up and running right away…
A Note on Our Tool Recommendations & Setup Tutorials in This Chapter:
The end goal of this chapter is to help you build a working WordPress website for your very own course creation, selling, and marketing.
To achieve that, you’ll need to use third party tools built specifically for WordPress (also known as plugins). Some of these plugins are free (or have freemium functionality) while others require you to buy premium licenses.
Although there are several solutions you can use to build your online course website, we want to show you how to do it with the least amount of complexity and cost. The last thing you want to do is waste time, effort and money only to end up with a half-baked setup.
Many of the tools we recommend in this guide are created by the team here at Thrive Themes, but we do so because we’ve created them for the express purpose of minimizing overwhelm for solopreneurs like you. We also use them ourselves to run our own successful online business.
It's important for you to get the technical stuff done and out of the way as fast as possible with the fewest number of headaches and dollars spent. The tools you'll see below will help you do just that.
Build Your WordPress Website Today — With ZERO Coding Ability
So here we go… it’s time to start building your website.
Complete the following steps in the order they’re presented to get your WordPress website launched in the quickest possible time frame.
If this is your first time building a WordPress website — or any website for that matter — it may feel intimidating, but rest assured that it’s really not all that complicated… another reason to use WordPress!
And before you get started, I want you to adopt a very important mindset:
“
'Good enough' is better than perfect.
That’s right, you’re not aiming for perfection on your website… just “good enough” to get started growing a profitable online course business.
That’s because the perfectionist mindset will crush your ability to get anything done where a “good enough” attitude will have you shipping version 1.0’s of your content fast to gain real world feedback right away. This strategy will also help you iteratively improve as you go forward.
And if you remember back to what we said in Chapter 2, an 80/20 mindset is what separates successful entrepreneurs who get things done from those who keep wishing they had a working business, but never make progress actually building one.
But don’t worry, the steps you’re about to follow will make sure your “good enough” website actually looks great.
So here it is… the 5 steps you’ll need to get your website up and running on WordPress fast. Let’s get going.
Step 1: Choose & Purchase Your Domain Name
As you know, every website needs a domain name to call home, but please understand that this initial decision is something most wannabe entrepreneurs spend waaaay too much time worrying about.
Don’t overthink it.
Keep the domain name you choose simple and relevant to your niche. As long as your domain name makes sense for a wider range of courses you'll build in future, it's “good enough” to get started.
In fact, the only rule you need to follow when selecting a domain name for your website is whether or not it can pass the Grandparent Test.
What’s the Grandparent Test?
It’s just a simple exercise where you tell your Grandparent (or any technology or hearing impaired individual) your domain name — over the phone — to see if they can repeat it back to you correctly — on the first try.

An example of the Grandparent Test going horribly wrong...
By using this strategy, you’ll keep your domain name simple as well as easy to communicate across all types of media.
Seriously, that’s as much effort as you need to spend making sure you have a brandable domain name for your business.
Got it?
Good!
So now that you’ve selected a domain name, how do you actually lock it down for your business?
Well, there’s a number of domain registration companies out there you can purchase your domain name from.
Some well known domain registrars you’ve probably heard of include:
But it doesn’t really matter where you buy your domain name from because they all provide the same basic service. After creating a free account, use their domain name search function to make sure it’s available at an affordable price (usually around $10 USD) so you can pull the trigger on it.
Alternatively, you can also buy your domain name at the same time you purchase your web hosting (but more on that next). This is a great option to take advantage of so you can manage both your hosting and domain name registration in the same place.
It also makes setting up your DNS (Domain Name System) management easier, which we’ll also discuss coming up.
So now it's time for you to learn about hosting and how it works with the domain name you've chosen for yourself. On to Step 2...
Step 2: Choose the Right Hosting Service for Your Online Business
Whether you’re aware of it or not, hosting is one of the most important decisions you’re going to make for your online business.
Like many of the choices you’re about to make in this chapter, there’s a ton of companies to hire to solve the job you want done, but they’re not all created equal.
Essentially, you need to prioritize 3 things when choosing your hosting provider:
- 1Speed & Performance
- 2Security
- 3Customer Service
If hosting performance is bad, your website can crash or load so slowly that online visitors will bounce before they even read a single word on your website.
If security is poor, your online business and customers will be vulnerable to malicious attacks.
And if customer service is bad, addressing critical problems can take forever or be next to impossible to fix.
That’s why it’s not advised to simply pick the cheapest hosting service available. Instead, you need to hire a company that’s proven themselves in all 3 of these areas. Getting your WordPress hosting right will play a crucial role in your business success down the road.
Lucky for you, we tested several WordPress specialized hosting companies and have two suggestions for you, depending on your budget.
Our two recommendations are divided into an option for the cash-strapped solopreneur (with the expectation you’ll upgrade to a premium hosting company once your business gets rolling) and one for solopreneurs who want to prioritize peak performance at an affordable price from the beginning.
Both of the hosting companies we're about to recommend also allow you to buy your domain name at the same time you sign up for hosting (like we mentioned earlier).
So let’s now discuss these two recommendations in detail...
The "Solopreneur on a Tight Budget" Hosting Recommendation: SiteGround’s GrowBig Plan

SiteGround is a hosting company that offers WordPress specialized service plans for just a few bucks a month — but only for your first invoice period (either 12, 24 or 36 months).
This is an important point to take note of because after this initial invoice period is over, SiteGround’s pricing jumps dramatically and you’ll start paying premium prices for budget hosting.
That being said, what SiteGround provides you in terms of website performance, shared server storage (i.e. multiple customers sharing the same server hardware) and customer service is good enough to get started — especially if you’re strapped for cash.
Just know that you’ll need to upgrade your hosting when your business takes off (i.e. when your online traffic begins to spike) by migrating your site to a premium provider like we discuss next.
Premium WordPress Hosting for Solopreneurs: WPX Hosting’s Business Plan

For the same annual pricing that SiteGround charges after their introductory discount period ends, you can get premium customer service & website performance from a company called WPX Hosting.
Where SiteGround only gives you shared servers, WPX Hosting gives your business dedicated solid state hardware.
As per our own testing, page load speeds and customer service are super fast. Also, WPX Hosting’s support team is world class and handles critical services like site migration for you — free of charge.
So if you’ve got the budget for it, using a company like WPX Hosting from the outset will save you many potential headaches in the future as your online course business grows.
Step 3: Install WordPress on Your New Hosting Plan

So now that you’ve pulled the trigger on either SiteGround's GrowBig plan or WPX Hosting's Business plan, it’s time to install WordPress so you can start building your website.
How does one do this? Well, if you’ve chosen one of our two recommended hosting providers, it’s actually super simple. Follow the tutorial links below to see how “one-click” WordPress installs happen on both SiteGround and WPX Hosting:
How To Install WordPress on SiteGround
To install WordPress on SiteGround, follow their installation guide here.
How To Install WordPress on WPX Hosting
To install WordPress on WPX Hosting, follow their installation guide here.
Step 4: Choose and Install a WordPress Theme for Your New Site
Congratulations… you now have a bare-bones WordPress website installed!
That means it’s time to start putting some meat on those bones so visitors have something to look at when they find your site online.
So what’s the first order of business? Installing your WordPress Theme.
Here’s a few theme options for you to get this step completed in just a few minutes.
Free WordPress Themes
The developers over at WordPress release a new Theme every year, naming it after that year it was released:
To make getting started easy, many of these WordPress core themes actually come preloaded on your WordPress install, so you can just choose and activate the one you like best in the fewest possible clicks:
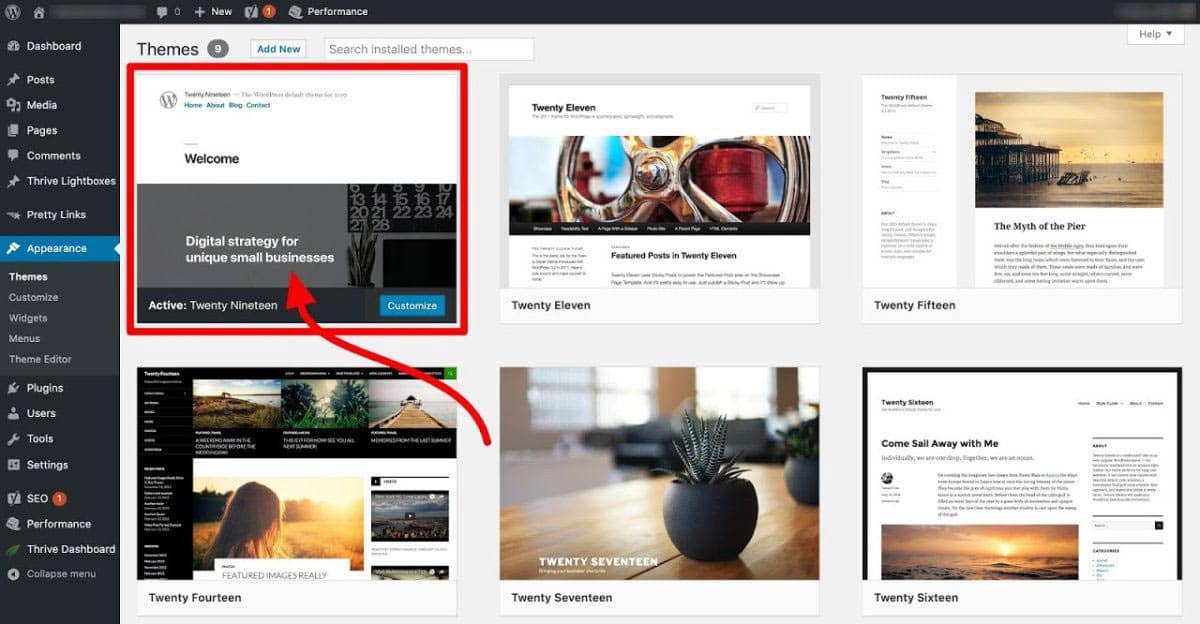
Several free WordPress core themes come with your WordPress install that you can use to get started.
However, if you want a WordPress theme that makes getting your entire site setup fast while giving you total design freedom at the same time... keep reading.
Premium WordPress Themes
Here at Thrive Themes, we've developed the most powerful WordPress theme for small businesses and DIY entrepreneurs.
Not only does it give you a step-by-step site setup wizard to get your online business up and running as fast as possible, but it also offers you complete freedom to customize every pixel of your WordPress website so it can meet the unique needs of your online brand.
This one-of-a-kind WordPress theme is called Thrive Theme Builder and currently comes with a variety of different companion theme template options to choose from, including:
All of these skins offer a gorgeously designed starting point that never limits your creativity or personality – they are completely customizable, meaning you can change the look and feel of your website to however you choose.
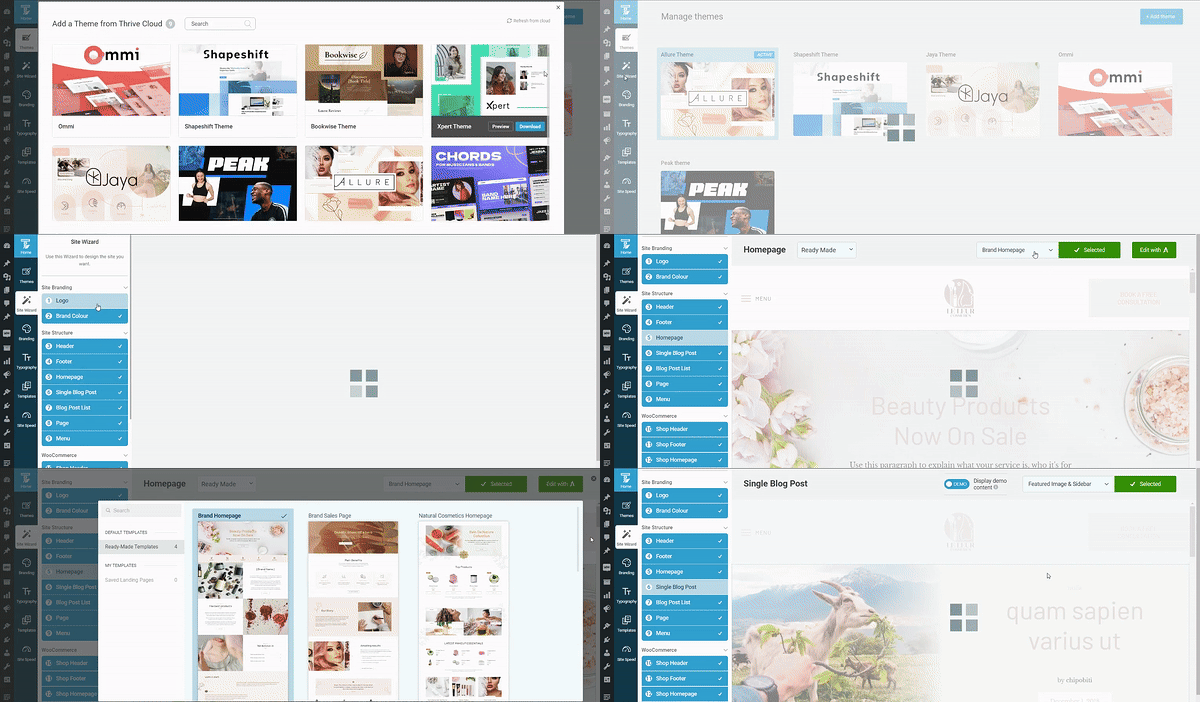
Thrive Theme Builder in Action
What's more, Thrive Theme Builder comes bundled with all the powerful Thrive Themes plugins when you get Thrive Suite - the ultimate online business building toolkit for WordPress.
Here’s how easy it is to install and activate Thrive Theme Builder (plus all the plugins included in Thrive Suite) on your WordPress site in just a single click:
Step 5: Set Up Your Essential WordPress Plugins
Like we mentioned above, WordPress plugins are the third party tools that give your website the functionality it needs to operate as an online business — without needing to know how to code.
However, WordPress plugins are a dime a dozen and can add up in cost to get the functionality you need to succeed.
That's why Thrive Suite provides you with a complete plugin toolkit that covers the majority of your online business and marketing needs — at a fraction of the cost.
Like you just saw the end of the WordPress theme install step – purchasing, installing and activating each of the plugins we’re about to showcase takes place through a simple, 1-click install Product Manager tool:
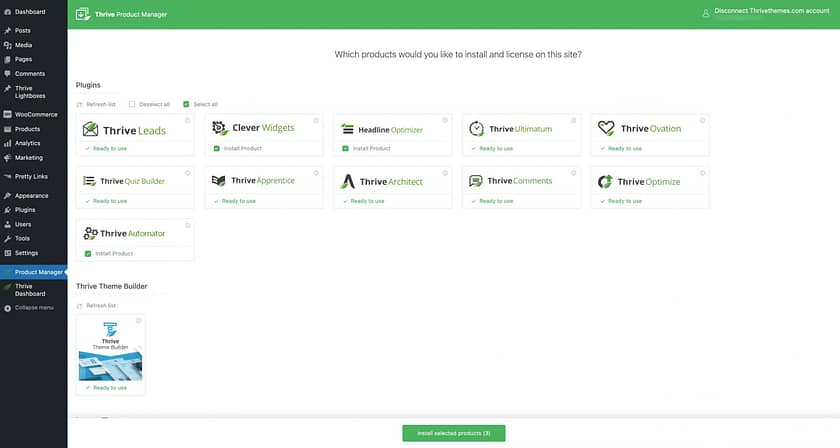
With the Thrive Themes Product Manager plugin, you can install all of your Thrive plugins and Thrive Theme Builder in a single click.
Click here to scroll back up and see how the Thrive Product Manager plugin works if you happened to skim past that installation tutorial video above.
And once you've got your theme and plugins installed, here's how to use the primary tools you’ll need to get your new WordPress site looking fly.
Your WordPress Page Builder: Thrive Architect
The way you custom build your own course website on WordPress — without knowing how to code — is with a visual page building plugin.
Of course, there are many WordPress page builders available for you to choose from, but again, not all tools are created equal. None offer the truly visual, front-end, drag & drop functionality that Thrive Architect does, which is why we recommend you invest in learning how to use it now:

The Thrive Architect front-end page builder is the most advanced WordPress builder on the market. With it, you can graphically create whatever post or page design you dream up — without ever having to touch a single line of code!
And when it comes to building a website for the purpose of selling online courses, the other mission critical plugins you get with Thrive Suite are hands down the best solution for solopreneurs just starting out like you.
One of the primary reasons we recommend Thrive Architect as your page building solution is because it has hundreds of professionally designed and conversion-focused landing page templates that allow you to load them up, change a few colors, swap out the demo images with your own and then modify the step-by-step instructional copy to get your content published as fast as possible.
Click here to see our gallery of 300+ landing page templates currently on offer:
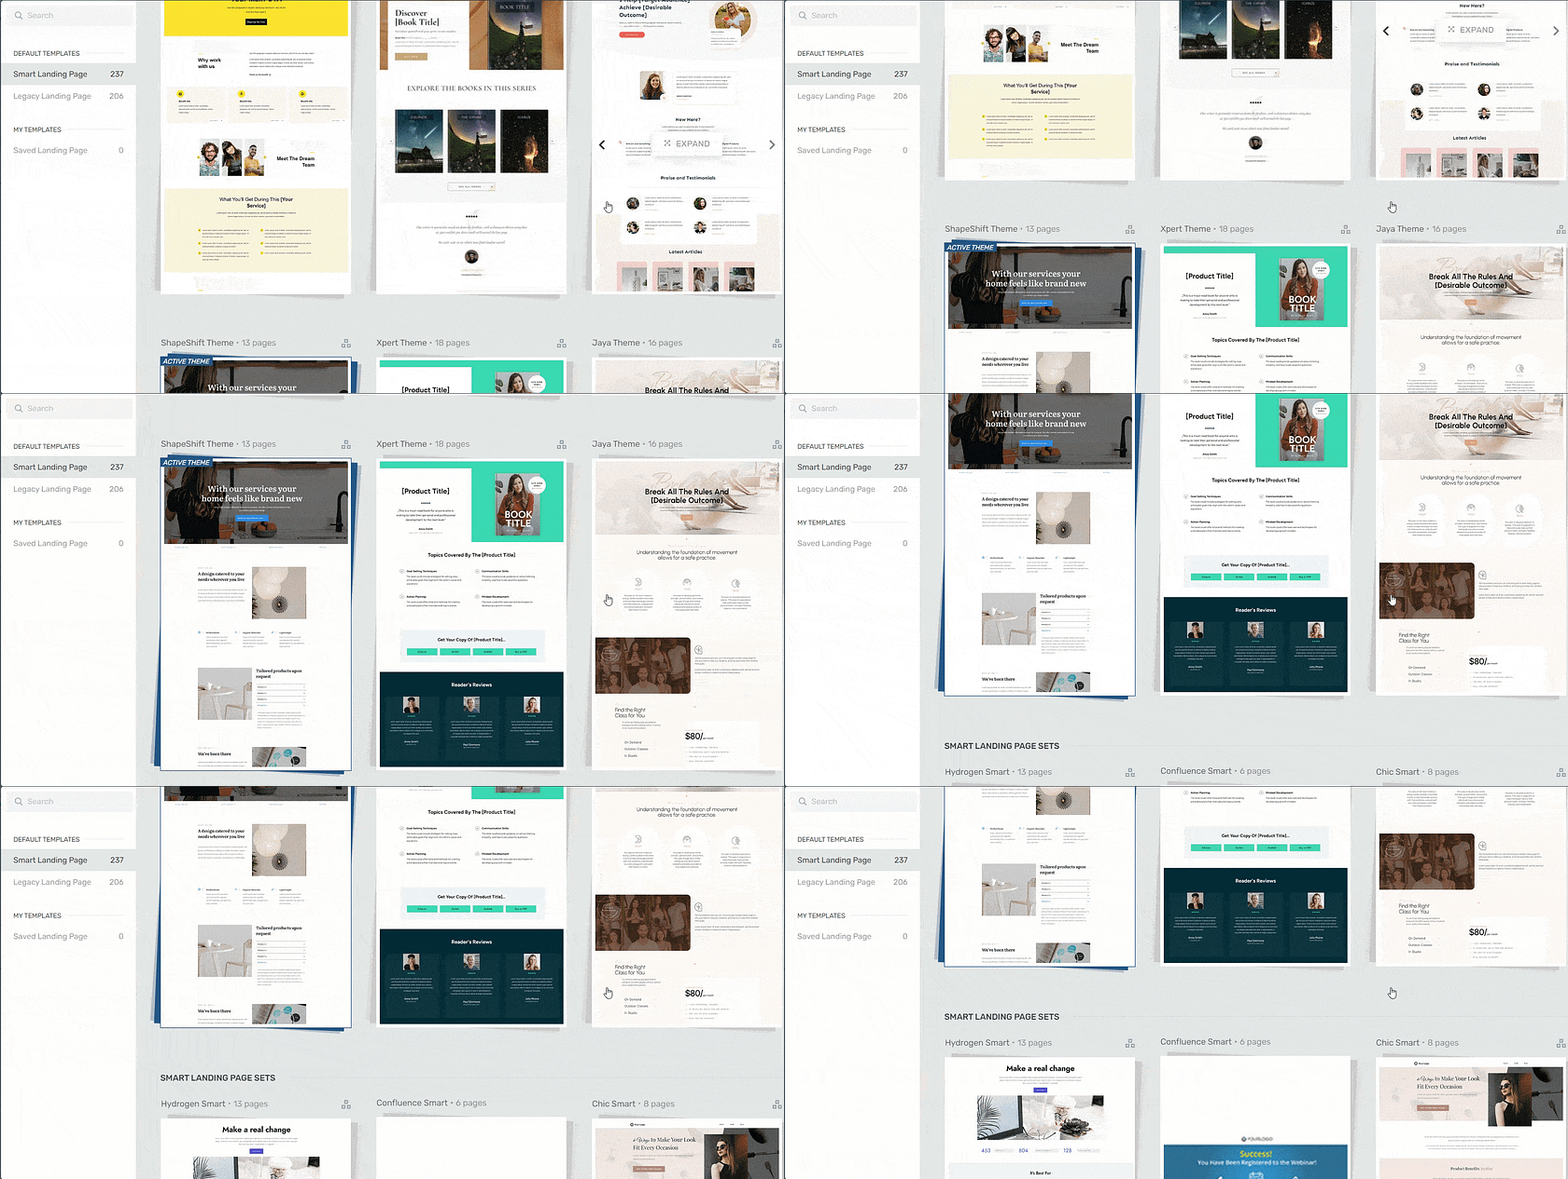
Click on the image to view the Thrive Architect landing page template gallery... a growing collection of professionally designed landing page and sales funnel templates you can use to build the critical pages of your — fast.
Investing up front in Thrive Suite — which includes the premium Thrive Architect page builder — will end up saving you both time and money when it comes to the other mission critical tasks of running your online business – like building your courses, email list and then marketing your products — as you’ll now see.
Your List Building Power Tool: Thrive Leads
If you can’t code (like most of us!), not only do you need a visual page building plugin to create a gorgeous website, but you'll also need a tool to visually build opt-in forms to start growing an email audience.
We’ll cover more about building your audience in the next chapter, but for now, know that you’ll need to strategically place opt-in forms across your site with the goal of growing a healthy email list.
In fact, without a powerful lead generation tool, it’s near impossible to cultivate an audience you can communicate directly with. And without that email list being engaged and eager to hear from you, it will be an uphill struggle for a profitable online course creation experience.
To solve this problem, you’ll use a plugin called Thrive Leads:
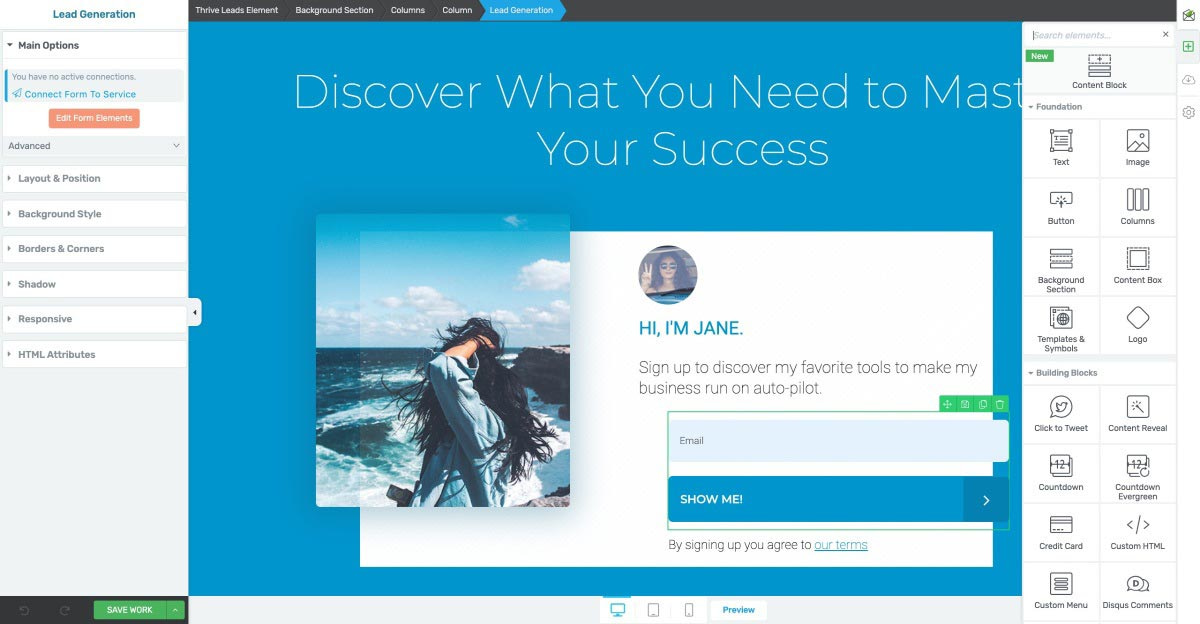
As you can see, the Thrive Leads opt-in form editor is identical to the Thrive Architect page editor. That means learning how to use one Thrive editor plugin automatically gives you the skills required to use another.
Thrive Leads uses the same visual building interface as the Thrive Architect page builder, which eliminates you having to learn a whole new tool to build your opt-in forms.
And now that you have your page builder and lead generation plugins installed, what else will you need to activate on your site?
Your Online Course Crafting Tool: Thrive Apprentice
Thrive Apprentice — surprise, surprise — also uses the same front-end visual building interface for your individual online course lessons that Thrive Architect and Thrive Leads provide.
However, you'll build and manage your online course module-chapter-lesson structure from the WordPress backend:
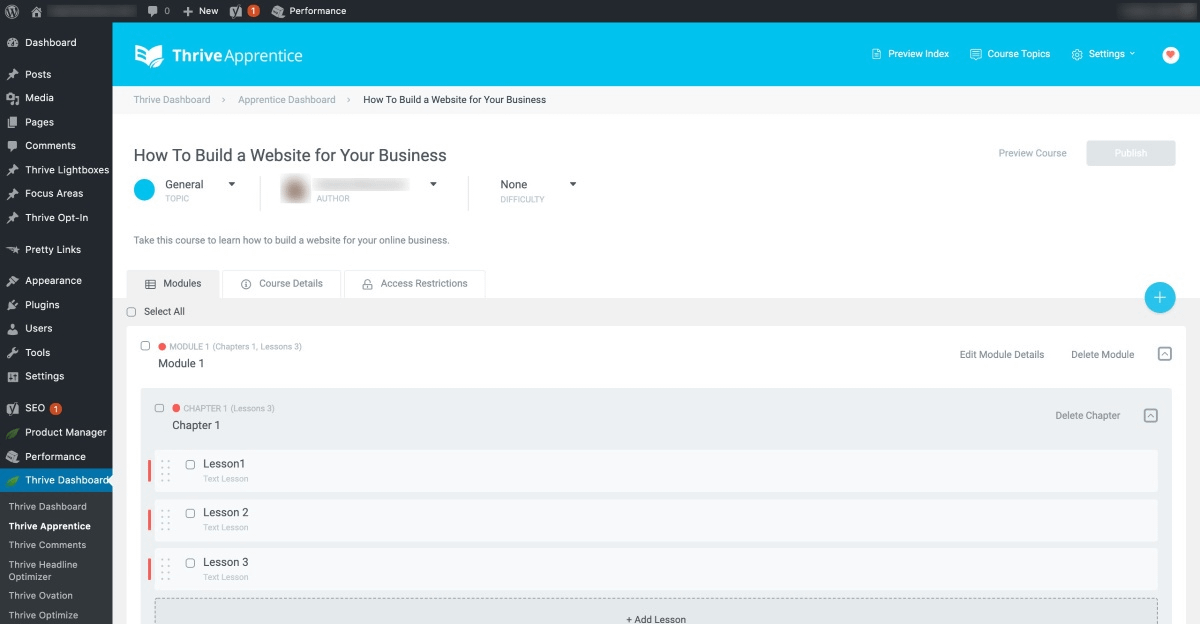
With the Thrive Apprentice Online Course plugin, you can quickly create online courses with multiple Modules, Chapters and Lessons. Also, the individual lesson editor works just like the Thrive Architect and Thrive Leads visual editors so you'll have your course built in no time.
We’ll get into the specifics of how to go about building your first online course in just a moment, but Thrive Apprentice is by far the simplest WordPress LMS (Learning Management System) plugin when it comes to crafting professional and engaging courses for your online students.
And when you take the final step of integrating Thrive Apprentice with a checkout tool like WooCommerce, ThriveCart or SendOwl, you’ll also gain the ability to limit your course access to paying customers only (more on this coming right up).
Miscellaneous Plugins You’ll Probably Need
There are a few more basic plugins you should consider installing on your infant website to boost its performance and security.
Without sidetracking too much, here’s 3 freebies you should install, activate and set up alongside your page builder (Thrive Architect), your lead generation tool (Thrive Leads) and your online course building plugin (Thrive Apprentice):
A•kis•met: Anti-Spam Plugin

Akismet is a spam filter plugin built and maintained by the creators of WordPress.
For just a few dollars a year (you get to decide how much you pay for it), you can purchase a basic license to prevent your new site from being blasted by unwanted spam comments.
AIOSEO: Search Engine Optimization Plugin
AIOSEO is a comprehensive Search Engine Optimization (SEO) plugin for WordPress you can use to:
And if you're willing to go with the paid versions of AIOSEO, you can even...
Because SEO can give you a competitive advantage when it comes to bringing potential students to your website, AIOSEO is an important plugin to help ensure your website looks good in the eyes of search engines.
W3 Total Cache: Caching Plugin for Page Load Speed Optimization

Like we mentioned before in the hosting section, the speed at which your website's pages load is critical to the success of your website.
One plugin that can help you make those load times even faster is W3 Total Cache. Activate and set up this free caching plugin on your WordPress website to give your load times a boost.
Side Note: In another small plug for one of our recommended hosting plans, W3 Total Cache comes pre-loaded on all WPX Hosting Wordpress installs by default!
Ultimately, this will help you engage more visitors and achieve higher conversion rates since less people will bounce from your site due to slow loading pages. If you're interested to learn more about how to optimize your site's load times, check out this in-depth post all about it.
Thrive Theme Builder also makes optimizing your caching plugin settings easy with it's native Site Speed Wizard:
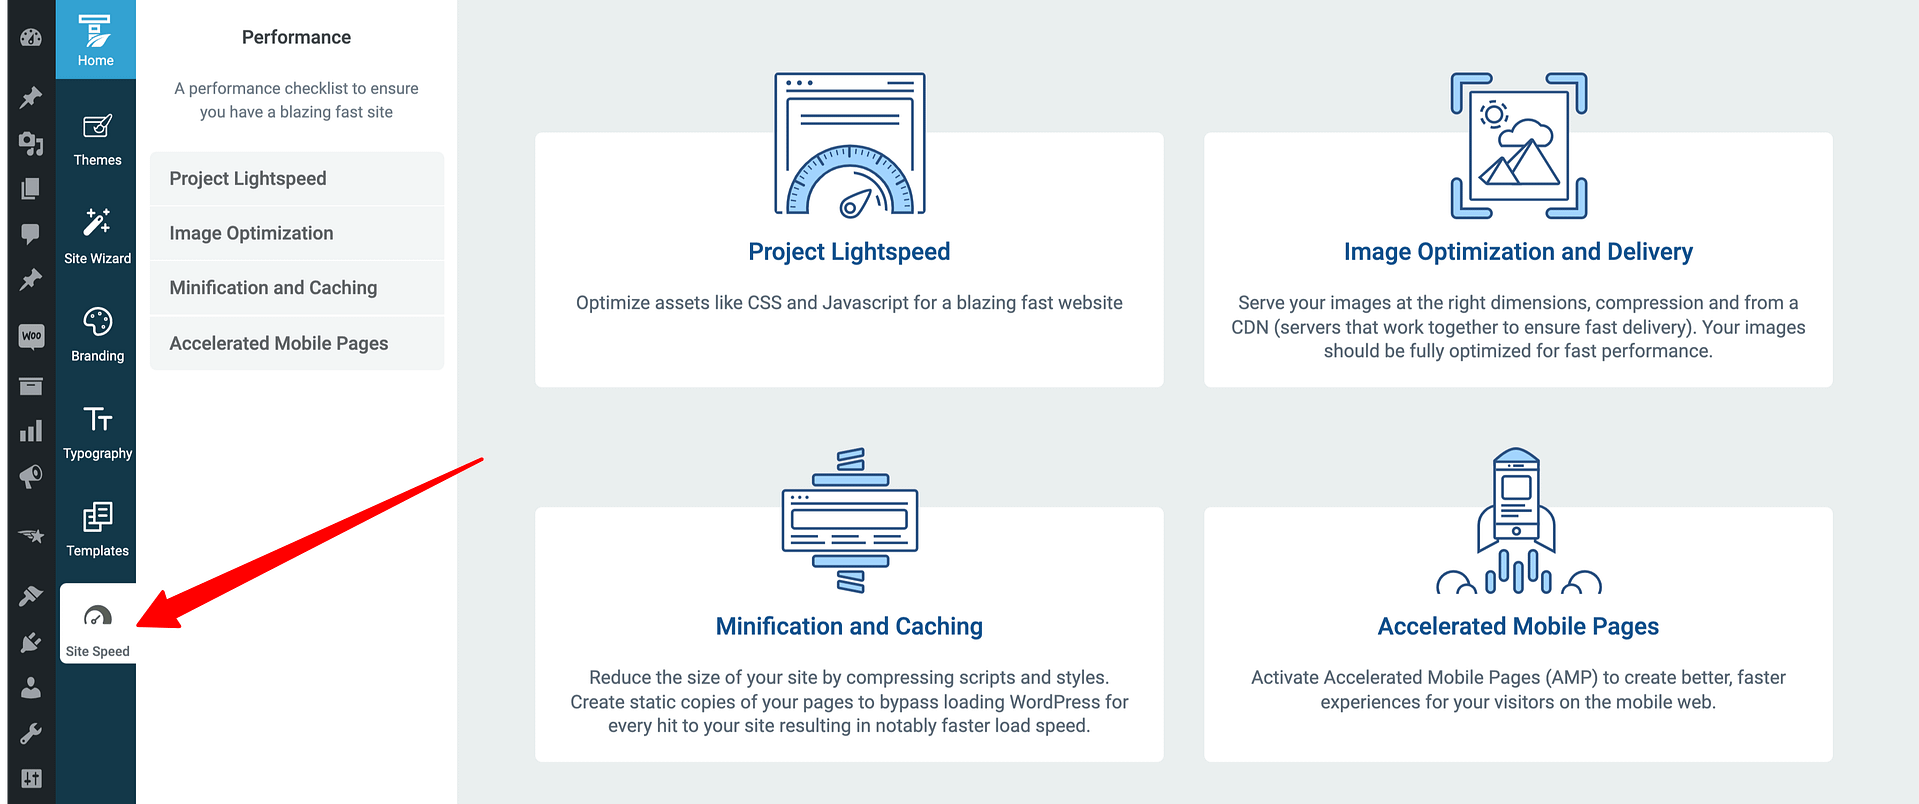
Thrive Theme Builder comes with a native Site Speed Wizard to help you optimize your site's CSS and Javascript (Project Lightspeed), Minification & Caching plugin settings as well as Image Optimization tool settings — in just a few clicks — to achieve a blazing fast website.
Use Landing Page Templates to Launch Your Essential Content Fast
Now that you have all your essential plugins installed, it’s time to start creating content for your new website!
What content will you need and where should you get started?
Well, for the first iteration of your website, plan on creating the following pieces of content. Your:
- 1Homepage
- 2Blog roll with your first 3 strategically crafted articles
- 3About Page
- 4Online Course Sales Page
And to get each of these mission critical pieces of content done fast, you’re going to use some pro-designed landing page templates. Remember that you're aiming for “good enough” to get your website up and running.
This is another reason why choosing Thrive Theme Builder as your WordPress theme and Thrive Architect as your landing page builder can help launch your website faster… the combo offers you hundreds of smart landing pages and content templates to choose from!
So let’s get your new website off the ground by rapidly implementing your Homepage — right now.
Build Your Online Course Homepage
Get started by selecting one of the many homepage templates the Thrive Theme Builder companion themes offer you. Shapeshift, Ommi and Kwik all give you several different homepage templates to choose from depending on what kind of business you have (personal brand, service business, local business, content/affiliate business):

Some of the Shapeshift homepage template designs available inside Thrive Theme Builder.
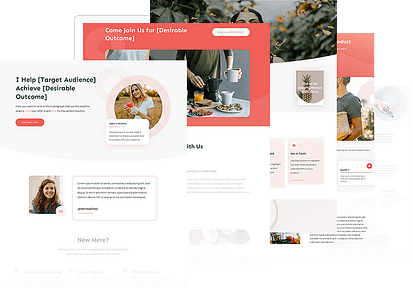
Some of the Ommi homepage template designs available inside Thrive Theme Builder.

Some of the Kwik homepage template designs available inside Thrive Theme Builder.
Just select one of the homepage templates available from either the Thrive Theme Builder dashboard or Thrive Architect Landing Page Cloud, and once your selection loads, replace all the images and modify the copy (as per the tutorialized copy instructions seen on the page).
Since Thrive Theme Builder templates are crafted with Thrive's smart landing page technology, the homepage template you choose will automatically inherit the smart brand color you set inside the Thrive Theme Builder site setup wizard!
Watch the following quick start tutorial to see how easy it is to get both your WordPress site and homepage published with Thrive Theme Builder in a matter of minutes:
Design Warning: A note about logos
One of the tasks you’ll have to take care of when creating your homepage is coming up with a new logo for your business and website.
Contrary to popular belief, spend no more than 10 minutes and $0 getting this done!
That means you don’t have to hire a graphic designer to create a unique new logo for your site. Instead, you can create a version 1.0 logo of your brand with text alone.
If you’re interested to learn how you can get a “good enough” logo on your new homepage in the next few minutes, read this blog post about rapid logos right now.
Seed Your Blog With 3 Strategic Articles
When building a brand new website, content creation can be a big challenge.
What sort of posts should you create to start growing your organic search engine traffic and building an audience most efficiently?
Well, when it comes to strategic blog content, there’s 3 articles that we recommend you start with. Think about this content as a mini marketing funnel that uses high value blog articles instead of landing pages.
If you’re interested in pursuing this strategy to start your blog off strong, read this post on what (and how) to write your first 3 blog articles about.
Knock Out Your About Page
Although most About pages look simple, they somehow become monsters for people to create in real life.
That’s why getting a little help to create a great About page will help you publish it before you can psych yourself out about it.
To create an About page for your new website that adds value and helps visitors understand what your business is all about, check out this blog post on How To Build a Powerful About Page now.
Bring Your Online Course Sales Page to Life
Remember that “sales page first” draft you created in the last chapter? It’s time to bring it to life on your new website.
And even though that still feels super intimidating, I’m going to give you a cheat that’ll make it super simple.
Instead of having to hack your new sales page together from scratch, you can use a brilliant Thrive Architect sales page template that was designed especially to sell online courses from your own website.
It’s called the ‘Online Course Sales Page’ template and it’s the one you’ll be using to get your “sales page first” draft built with Thrive Architect in the shortest time possible. And don’t worry, it looks amazing!

To give you a taste of what the Thrive Architect "Online Course Sales Page" template looks like, click the image above to check it out!
Follow along with this tutorial video to get your online course “sales page first” draft done and published on your WordPress website fast:
Let's Start Building So You Can Sell Online Courses from Your Own Website
Congratulations! You’ve arrived…
It’s finally time to start building your online course.
To do this fast, affordably and with the fewest number of tech hurdles blocking your way, we’re going to explain how to build your online course with Thrive Apprentice integrated with a payment gateway and a free WordPress checkout tool called WooCommerce.

Of course, there are other online course checkout tools and plugins out there you can choose to use for your online business instead, but this recommendation IS NOT made lightly.
Although this might not be the online course solution that gives you the most bells and whistles, IT IS professional looking, simple to set up and insanely affordable for a bootstrapped solopreneur.
Too many entrepreneurs underestimate the cost of complexity when starting their business and we guarantee you that other online course setups out there are cashing in on that fact. They‘ll keep you busy trying to duct tape complex and expensive tools together when what you really need is to get the tech stuff done quickly so you can actually start building your online course.
That’s why, by the end of this section, you’re going to have an online course setup on your WordPress website that not only delivers a pro-learning experience, but can accept payments and restrict course access to paying customers only.
Setting Up Thrive Apprentice on Your WordPress Site
Assuming you already installed Thrive Apprentice through the Thrive Product Manager plugin discussed above, now take the following free online course to learn just how easy it is to build online courses and sell them using the free WooCommerce checkout tool.
Once you've completed this course, you’ll be able to start selling premium online courses on your WordPress website:
Setting Up Video Hosting for Your Online Courses
In order to sell a high-value online course on your website, you’ll need to make your online course video-based. That’s because video courses have a higher perceived value by customers, which makes it easier for you to deliver a course in the $200+ price range.
However, it’s not practical to host your course videos directly from your website. If you do, you’ll quickly burn through your hosting service’s monthly bandwidth limits and crash your site.
To get around this problem, you’ll need to subscribe to a video hosting service.
The video hosting service we recommend starting out is Vimeo Plus because it’s the easiest to use, highest quality video delivery solution at the lowest price.
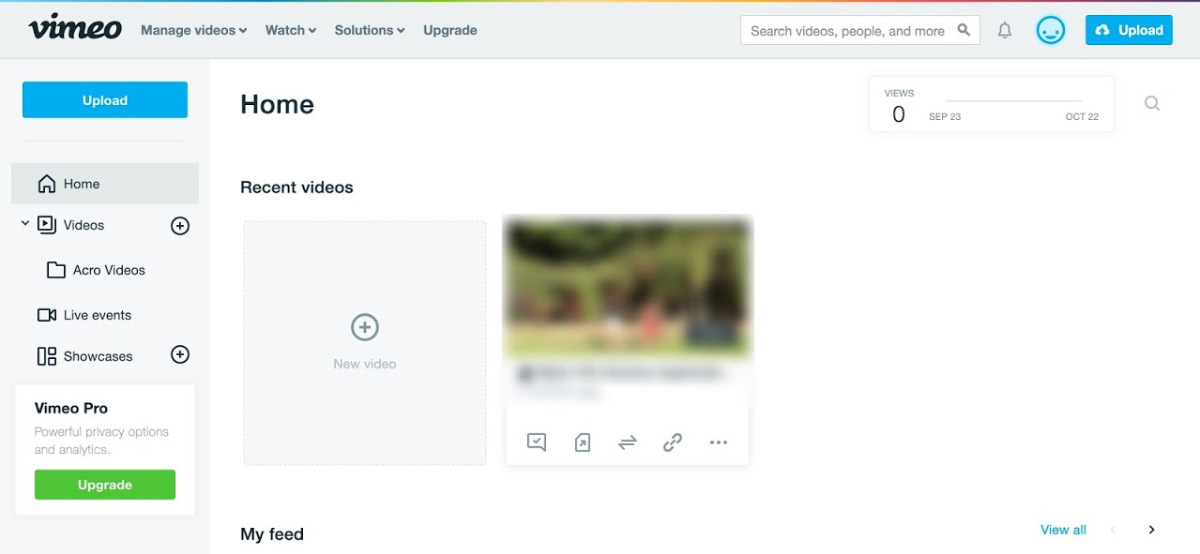
The Vimeo Plus dashboard where you'll upload your videos and generate links to place within your online course.
Vimeo Plus also comes with good privacy/protection options so non-customers can’t view your course without purchasing and logging in — which is exactly why you shouldn’t use YouTube to host your videos if you were wondering.
We don't recommend messing around with Amazon S3 and custom video players either. It saves you a bit of money, but adds a ton of complexity to creating your online courses.
At this point, you have your own website and your online course is ready. All that's left to do is...making money! So, let's focus now on selling your online course.
It’s Time To Tell People About Your New Online Course
To sell online courses, you have to build an audience and promote the courses to that audience. It's an ongoing process, so laying down your arms after launching each course is out of the question.
The secret is consistency, and the reward is the continuous growth of your course creation business. You'll find out below our tips on how to sell online courses to get the most out of them.
Engage Your Network
If you don't have an extensive email list, you should start with your contact network. Networking is key in any business, but it doesn't happen by chance or overnight. You should build a strong network with patience and technique.
Indeed, word of mouth is still an effective promotion channel, but you should use other channels too.
Build Your Organic Traffic
Take some action to bring qualified traffic to your website.
Promote Your Course on Social Media
Course creators have a hard time figuring out how to drive traffic to their websites and build an audience. But that's when social media holds the key to the solution!
Here are a few pieces of advice that can get the show on the road:
Share Your Content to Your Email List
As soon as you select your course's topic, you should start building your email list. As a result, by the time you finish publishing the course, you'll have an audience to contact and start selling to.
You can build your email list by creating free content such as ebooks, checklists, webinars and email courses. Try this lead magnets guide to encourage your potential students to sign up to your email list.
Although lead magnets can help you attract new subscribers, they should also solve a problem for your audience. Additionally, lead magnets should be good-looking, quick to consume and relate to your course's topic.
With an email list, all the email marketing possibilities open up to you. The goal is to increase your course sales over time and get your potential students to buy your courses. Let them know of your new products and discounts. Educate them on how valuable your products are. And when they finally turn into your customers, keep in touch with them between purchases.
All of those actions will nurture your relationship with your email list subscribers. You’ll keep them engaged with your brand and aware of its developments. Plus, you’ll increase the chances that your email subscribers become your loyal customers. For instance, create a welcome email series that starts right after the sign-up.
Create Scarcity by Launching Your Course for a Limited Time
A limited launch means making your course available to buy for just a few days or weeks. This generates a sense of urgency and pushes your prospects to make the decision to buy.
If you want this to be an effective strategy, you can always repeat the limited launch after some months to a new audience. And you can use Uncanny Automator to start a countdown timer to promote the limited launch each time you set the status of your course to “open for enrollment” in your WooCommerce store.
Your course's price and audience's size determine the number of times you open your course for enrollment. You can, however, create a waiting list and keep subscribers warm until the course starts.
To learn more about course launching, have a look at chapter 6.
Summary of Steps for Selling Courses From Your Own Website
In this chapter, you learned all the technical details of how to build your WordPress website and get your tools ready to craft your first online course.
Now that the technical hurdles are out of the way and you finally got your first course built, it's time to move on and learn how to start growing an audience of true fans that will love to pay you for your online courses — even if you’re starting your audience from scratch.
Want to learn more about how Thrive Suite can help you sell online courses from your own website? Check this out.
Frequently Asked Questions
How Do I Sell a Course Online?
The most profitable option is from your own website.
Choose a hosting service that supports WordPress and build your website by following the instructions in this chapter.
Then, build an audience and promote your course to them.
How Can I Make Money Selling Online Courses?
Definitely, not in online course marketplaces!
Selling online courses from your own website is the best way to maximize revenue. Plus, you get to:
Which Online Course Sells the Most?
This is a tricky question, so don't be fooled by it!
Whereas some course topics — such as health and wealth — have massive demand, selling lots of online courses comes down to answering an audience's pain points.
Then, make sure you price your course in a way that your audience can afford it. Also, reach out to them and communicate the value of your course clearly.
Finally, don't go with online course market trends that promise you dream sales. Create a course on a topic of your passion or experience, and your audience will feel connected to you (as an expert) from minute one. That'll contribute to hitting your sales goals down the road.
Plus, students have a radar that quickly detects small talk or unsubstantiated claims, so make sure to communicate your expert's love for the topic. That'll engage them intensely.
How Do I Publish a Course Online?
Chapter 4 Final Thoughts
In this chapter, you learned all the technical details of how to build your WordPress website and get your tools ready to craft your first online course.
Now that the technical hurdles are out of the way and you finally got your first course built, it's time to move on and learn how to start growing an audience of true fans that will love to pay you for your online courses — even if you’re starting your audience from scratch.
Share this Ultimate Guide on your Social Media Accounts with the buttons above
Guide Contents:
Next Up: How To Build Your Audience
We’re going to show you:
By the end of chapter 5, you’ll be well on your way to growing a loyal audience ready to launch and sell your first online course product!
Disclaimer: Nothing on this page, our website, or any of our content or courses is a promise or guarantee of results. All the material within ThriveThemes.com is provided for information purposes only and we are not implying you'll duplicate any results. Your results will vary and depend on many factors. All business entails risk and no action should be taken solely based on the information in ThriveThemes.com. The publisher is not entering into any kind of practitioner/client relationship with its readers. The publisher is not responsible for errors or omissions.
This site is not a part of the Facebook website or Facebook Inc. Additionally, This site is NOT endorsed by Facebook in any way. FACEBOOK is a trademark of FACEBOOK, Inc.
Copyright 2019 by whitesquare GmbH, Thrive Themes | Contact | Privacy | Disclaimer


