Do you want to effortlessly capture leads and grow your audience directly from your website? Lightboxes offer a powerful solution for engaging visitors and encouraging sign-ups.
In this article, we’ll clarify the key differences between lightboxes created with Thrive Architect and those from Thrive Leads, helping you choose the right tool for your needs.
- Understanding the Core Differences
- Adding and Displaying Your Lightbox
- Additional Settings and Information: Enhancing Your Lightboxes
Understanding the Core Differences
Before getting started, it’s important to understand the main differences between lightboxes in Thrive Architect and Thrive Leads. The key differences are where they come from and how they are set up.
Where Do Your Lightboxes Come From?
The first key difference is where each lightbox comes from:
- Thrive Architect Lightbox: This type of lightbox is built into the Thrive Architect plugin. If you have Thrive Architect, you can use this feature.
- Thrive Leads Lightbox: This lightbox is part of the Thrive Leads plugin, which is mainly used for collecting email sign-ups and building your email list.
Knowing which plugin the lightbox comes from is important because it changes the way you create, manage, and show these lightboxes on your website.
How Your Lightbox is Constructed
The next differentiating point is how the lightbox is made.
- Thrive Architect Lightbox: This lightbox can be built using the “Lead Generation” element. You can easily add this element from the right sidebar when editing a page with Thrive Architect. It’s simple and quick to add to your page design.
- Thrive Leads Lightbox: With Thrive Leads, you start by creating a “Leads Group” in the Thrive Leads dashboard. After naming your group, you add an “Opt-in Form” to it. This way of organizing things helps you manage many forms more easily, especially if you have a lot of lead generation forms on your site.
Adding and Displaying Your Lightbox
The process of adding and displaying lightboxes differs significantly between Thrive Architect and Thrive Leads. Let’s break it down:
Adding a Lightbox Using Thrive Architect
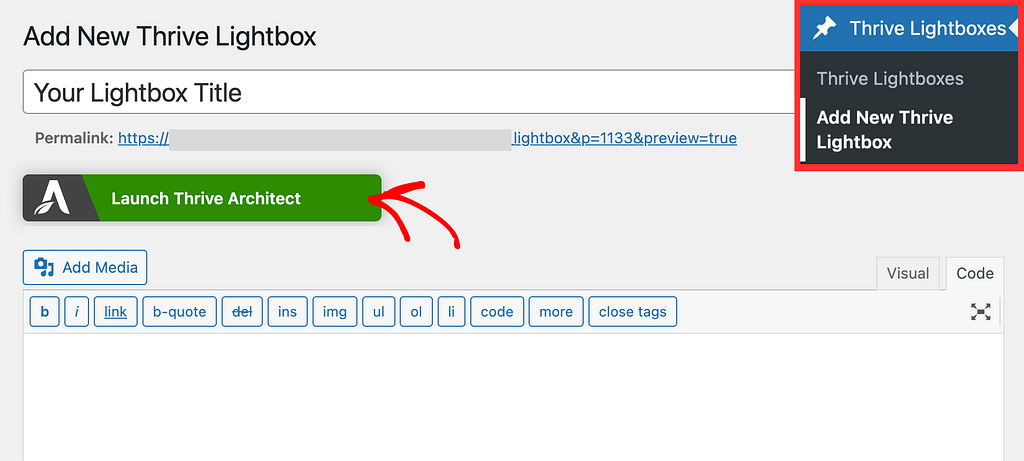
To add the Thrive Architect Lightbox to your page, open your WordPress admin area, navigate to Thrive Lightboxes >> Add New Thrive Lightbox, enter the lightbox title, and click on the Launch Thrive Architect button.
After clicking the Launch Thrive Architect button, you’ll see a Thrive Lightbox opened in the editor.
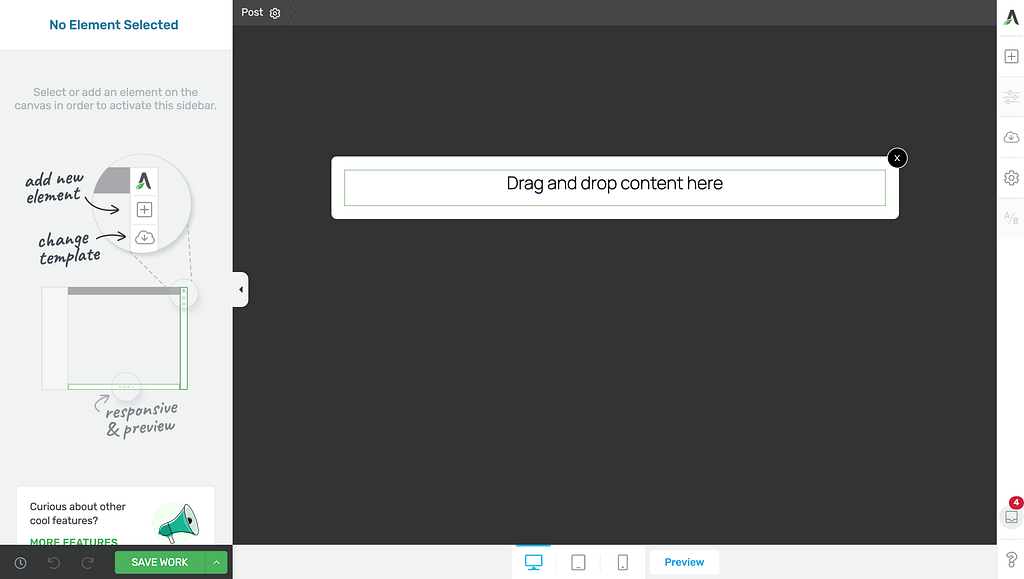
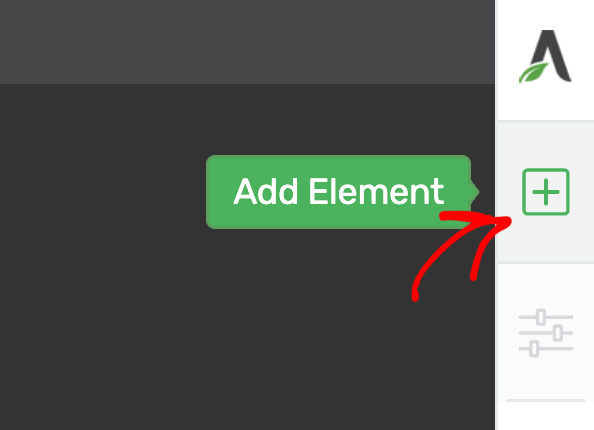
When in the editor, click on the plus icon in the right panel.
Clicking on the plus icon will display the Thrive Architect elements you can use on the lightbox. From this list, drag and drop the Lead Generation element in the lightbox.
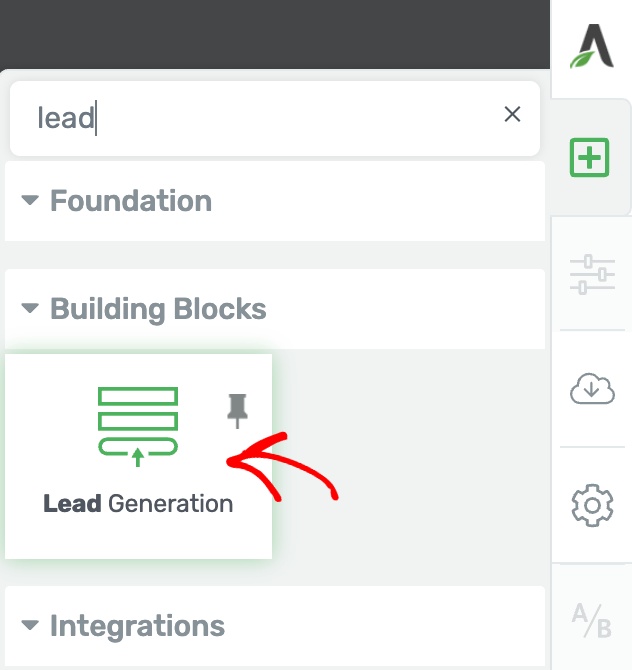
Dragging the Lead Generation element in the lightbox will open a popup with lead generation templates that you can select from. Here the procedure to set this up is the same as that of the Lead Generation element in Thrive Architect.
Thrive Architect Lightboxes are manually added to individual pages. To do so, link them to specific elements (like buttons or images) on the page, which then trigger the lightbox. It’s important to remember that these lightboxes can only be displayed on pages that have been built using Thrive Architect.
Adding a Lightbox Using Thrive Leads
To add a lightbox using Thrive Leads, we’d recommend you to read our document that’ll help you get started with Thrive Leads so you can add a lightbox on your website.
Thrive Leads Lightboxes offer more flexibility in display. You can configure them to appear on multiple pages or posts, or even based on categories, tags, or post formats. This is managed through the “Display Settings” in your Thrive Leads dashboard.
Since Thrive Leads is a standalone plugin, its lightboxes can be shown on any page or post on your self-hosted WordPress site, regardless of whether it was built with Thrive Architect.
Additional Settings and Information: Enhancing Your Lightboxes
Both Thrive Architect and Thrive Leads have features that help you make your lightboxes work even better, not just create and show them.
- Controlling When and How Your Lightbox Appears
- Pre-designed Options for Your Lightbox
- Dynamic Views for Enhanced User Experience
- Optimizing Your Lightbox Performance
Controlling When and How Your Lightbox Appears
Thrive Architect Lightbox: This lightbox is typically triggered when a user accesses the page where the form has been added. You set the trigger when you initially add the “Lead Generation” element to the page. The lightbox can be linked to elements like a “Button” or an “Image” using the “Animation & Action” settings in the left sidebar of the Thrive Architect editor.
Thrive Leads Lightbox: Thrive Leads offers more trigger options, allowing for more dynamic display. These can include triggers based on time, scroll percentage, exit intent, and more. Additionally, for Thrive Leads Lightboxes, you can also set the display frequency, controlling how often the lightbox appears to a user.
Pre-designed Options for Your Lightbox
Thrive Architect Lightbox: Thrive Architect provides a predefined set of templates for its lightboxes. These templates offer a good starting point for your design, which you can then customize further to match your website’s look and feel.
Thrive Leads Lightbox: Similarly, Thrive Leads also allows you to choose from a variety of templates for your lightboxes. This ensures that even with the added functionality of Thrive Leads, you still have access to professionally designed starting points for your opt-in forms.
Dynamic Views for Enhanced User Experience
Thrive Leads Lightbox: Thrive Leads Lightboxes offer the powerful option of adding multiple states in addition to the default one. This means you can create different views or designs for your lightbox that appear based on user interactions. For example, a user might click a button, and the lightbox could transition to a new state with different content or a different form. This allows for more interactive and multi-step opt-in processes.
Thrive Architect Lightbox: Thrive Architect Lightboxes do not inherently support multiple states in the same way Thrive Leads does. They are generally designed for a single, static view once triggered upon page access or element click.
Optimizing Your Lightbox Performance
A/B testing is important to understand which versions of your lightboxes perform best in converting visitors. Both platforms offer A/B testing capabilities, but with different approaches:
Thrive Architect Lightbox: To perform A/B testing with a Thrive Architect Lightbox, you will need the Thrive Optimize plugin installed on your website. This plugin integrates with Thrive Architect to allow you to test different variations of your lightboxes and analyze their performance. This means an additional plugin is required to unlock this functionality.
Thrive Leads Lightbox: Thrive Leads Lightboxes come with integrated A/B testing functionality directly within the plugin. You can access and manage A/B tests for your opt-in forms directly from your Thrive Leads dashboard. This allows for seamless testing of different opt-in forms against each other, or even different types of forms, without needing an additional plugin.
We’ve just seen the differences between the lightboxes in Thrive Architect and those in Thrive Leads.
Next, if you are not sure of whether you should be using Thrive Leads or Thrive Architect to build an email list, our document here will help.