No more manual data entry. Just easier automation and simpler workflows.
Did you know that automating workflows can deliver an 80–90% reduction in manual data-entry errors and a 20–25% boost in productivity?
Now ask yourself: how much time, accuracy, and opportunity are you losing when your forms still rely on manual processes or clunky multi-tool setups?
We know most entrepreneurs don’t just use forms for newsletters. Your forms are powering CRMs, client onboarding, membership platforms, e-commerce orders, and complex workflows that keep your business running. But too often, that means juggling fragile webhooks through third-party tools, paying for extra integrations, and still risking data slipping through the cracks.
So we made it easier — and faster. Native webhooks are now built directly into Thrive Architect and Thrive Leads forms.
Introducing Native Webhooks for Thrive Architect & Thrive Leads 🚀
Webhooks let your forms send data instantly to any service that accepts them. The moment someone clicks “submit,” their information flows straight into the systems that matter — your CRM, your email platform, your project management tool, or even multiple destinations at once.
This turns every Thrive form into a real-time automation hub. No Zapier fees. No middleman tools. No waiting around.
Starting today, every form you create in Thrive Architect or Thrive Leads can send its data anywhere you want, instantly — without middleman apps, expensive automation tools, or endless manual steps.
This means:
What This New Webhook Integration Means for Your Business
Instead of listing feature after feature, let’s think about the problems webhooks actually solve for you:
This Is Perfect For:
✨ People who value simplicity and want their tools to “just work” without juggling multiple apps.
🕒 Anyone short on time who would rather spend their day serving customers than manually moving data around.
💡 Entrepreneurs who love efficiency and want every form submission to spark the right action automatically.
🌱 Small teams or solo business owners who need automation that scales without adding new subscriptions or complexity.
🙌 Anyone who wants fewer moving parts in their tech stack and more confidence that leads won’t slip through the cracks.
How to Use Webhooks With Thrive Architect Forms
We’ve made the setup just as simple as you’d expect from Thrive.
For this tutorial, we’ve used a dummy webhook, but don’t worry, the process works the same way no matter what service you’re connecting to. For your actual integration, just follow the webhook setup instructions from your target platform.
Here’s a quick walk-through of how to set up a webhook on your form.
Step 1: Edit Your Page in Thrive Architect
Head into Thrive Architect and open the page with your form. If you don’t have one yet, add a Contact Form element to get started.
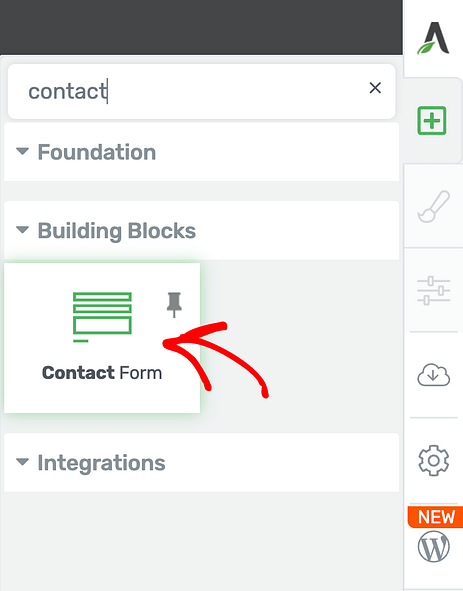
Step 2: Add or Select Your Form
If you’re working with an existing form, just click on it to open its settings. If you’re adding a new one, pick a template, drop it onto your page, and you’re ready to move on.
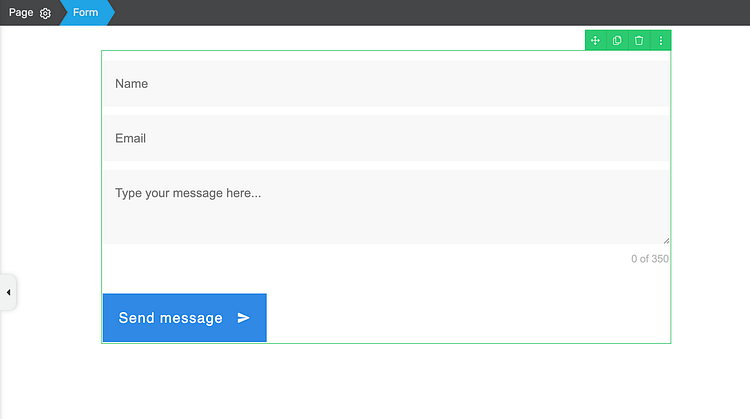
Step 3: Open the Connections Panel
With the form selected, go to the sidebar and find Connections. From the dropdown, choose Webhook.
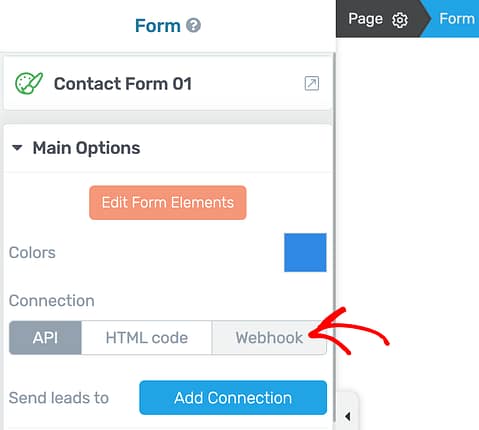
Step 4: Paste Your Webhook URL
This is where you drop in the endpoint from the app or service you want to connect. Think of it as handing Thrive your forwarding address — every new submission will get sent there automatically.
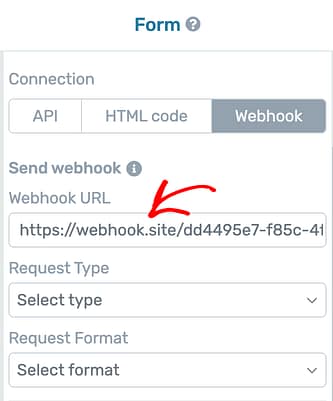
Step 5: Configure Request Type & Format
Most services will ask for POST requests, and JSON is usually the cleanest format to work with. That said, always check what your target system expects. Thrive gives you the flexibility to choose: POST, GET, PUT, PATCH, or DELETE, with JSON, Form, or XML formatting.

Quick Learning: Webhook Communication Rules
Before you dive into mapping fields and sending data, it helps to understand a couple of basics: request types and data formats. These are simply the “rules of communication” between your Thrive form and the platform you’re connecting to.
Request Types Explained
These are the “verbs” that describe what action the form submission should trigger on the receiving system:
Webhook Request Types (Verbs)
Request Type | What it Does (Action) | Example Scenario | Common for Forms? |
|---|---|---|---|
POST | Sends new data to your system. | New lead submits form → details are sent into your CRM as a new contact. | Most Common |
GET | Requests data from the system (retrieves information). | Form pulls a customer’s account details when they enter their email. | Less Common |
PUT | Replaces an existing record with updated information. | Client updates their phone number → system replaces the old number with the new one. | Less Common |
PATCH | Partially updates a record. | Lead only updates their email address → CRM updates just that field. | Less Common |
DELETE | Removes an entry from your system. | User requests to unsubscribe or delete their account → record is removed. | Less Common |
Data Formats Explained
These define how the data is packaged when Thrive sends it across to the other system:
Webhook Data Formats (Languages)
Data Format | What it Does | Why it’s Good | Best Use Case |
|---|---|---|---|
JSON (JavaScript Object Notation) | Packages data in a structured, lightweight format (e.g., | Clean, universal, and widely supported. | Best choice in most cases. |
Form (key-value pairs) | Sends data like a traditional web form (e.g., | Simple and straightforward. | Older systems sometimes require this format. |
XML (eXtensible Markup Language) | Wraps data in tags, similar to HTML (e.g., | Useful if your receiving service is older or built on XML-based APIs. | XML-based APIs or legacy systems. |
Quick Guidance for Most Workflows
- In most cases: Use POST + JSON → it’s clean, modern, and works with nearly every app.
- If you’re not sure: Always check your target platform’s webhook/API instructions. They’ll tell you which method (POST/PUT/etc.) and which format (JSON/Form/XML) they expect.
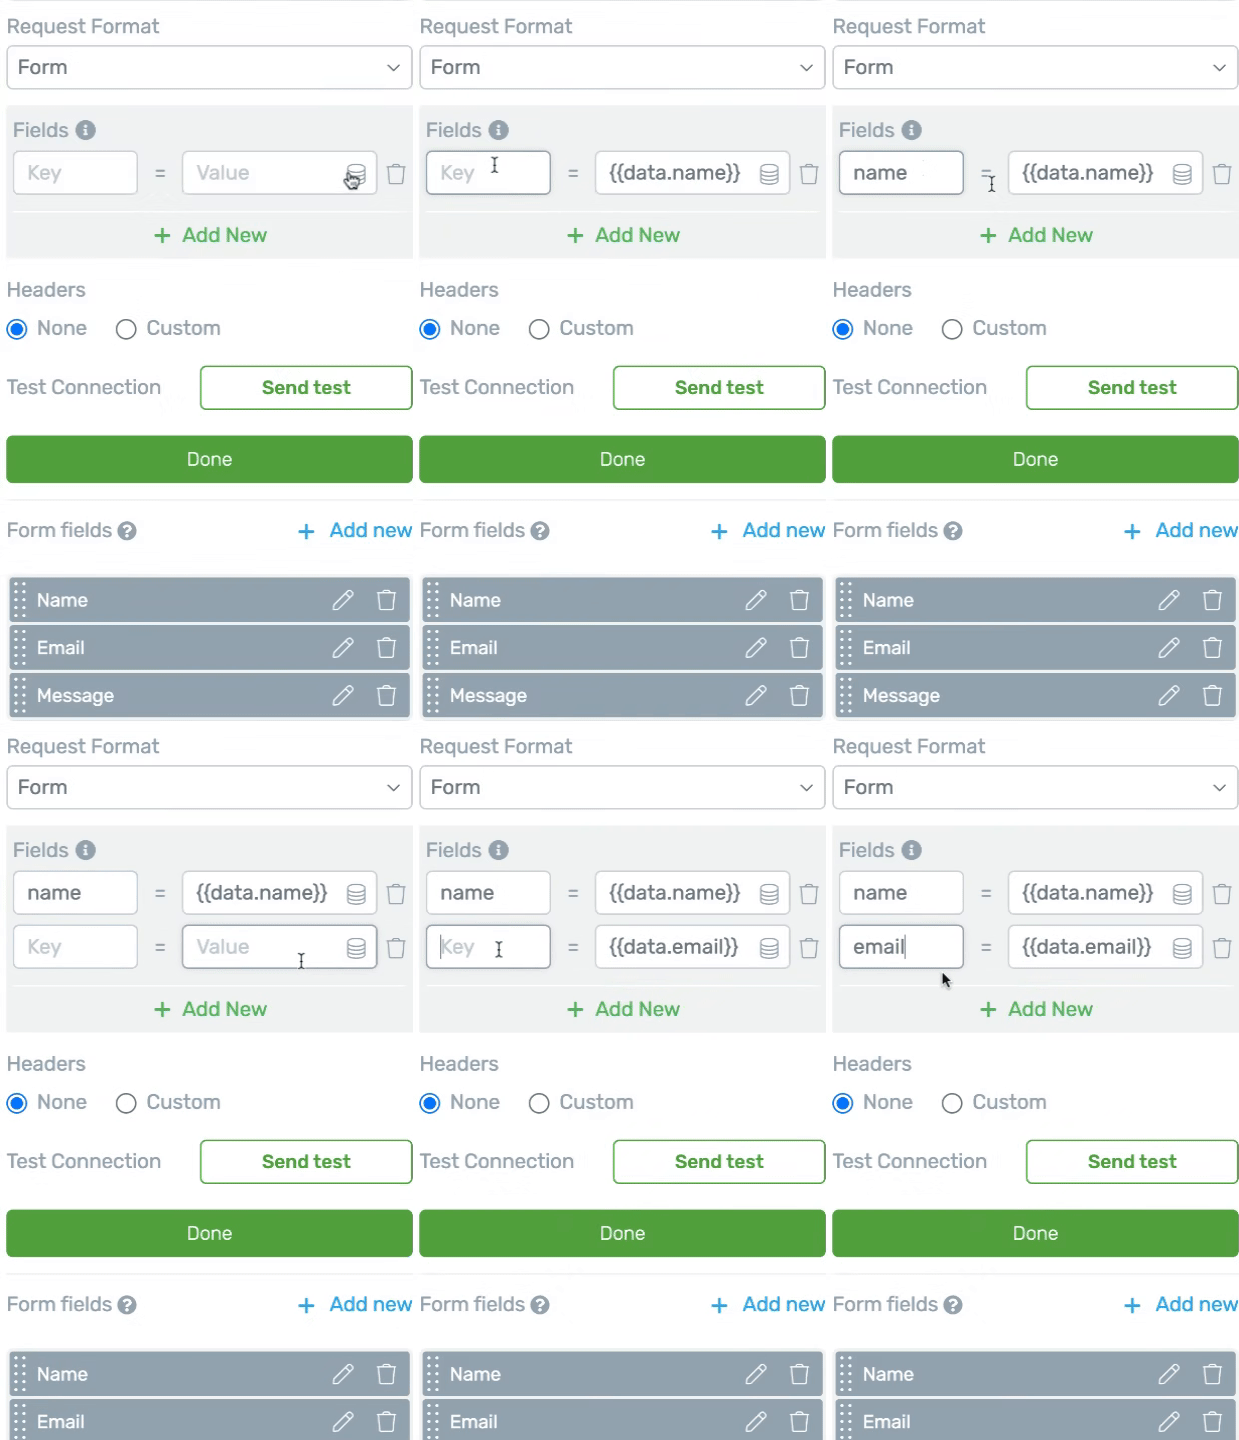
Step 6: Map Your Fields
This is the critical step. Match each form field (name, email, phone, message, etc.) with the corresponding key that your receiving system expects.
If you skip this, your data might arrive but won’t land where it should.
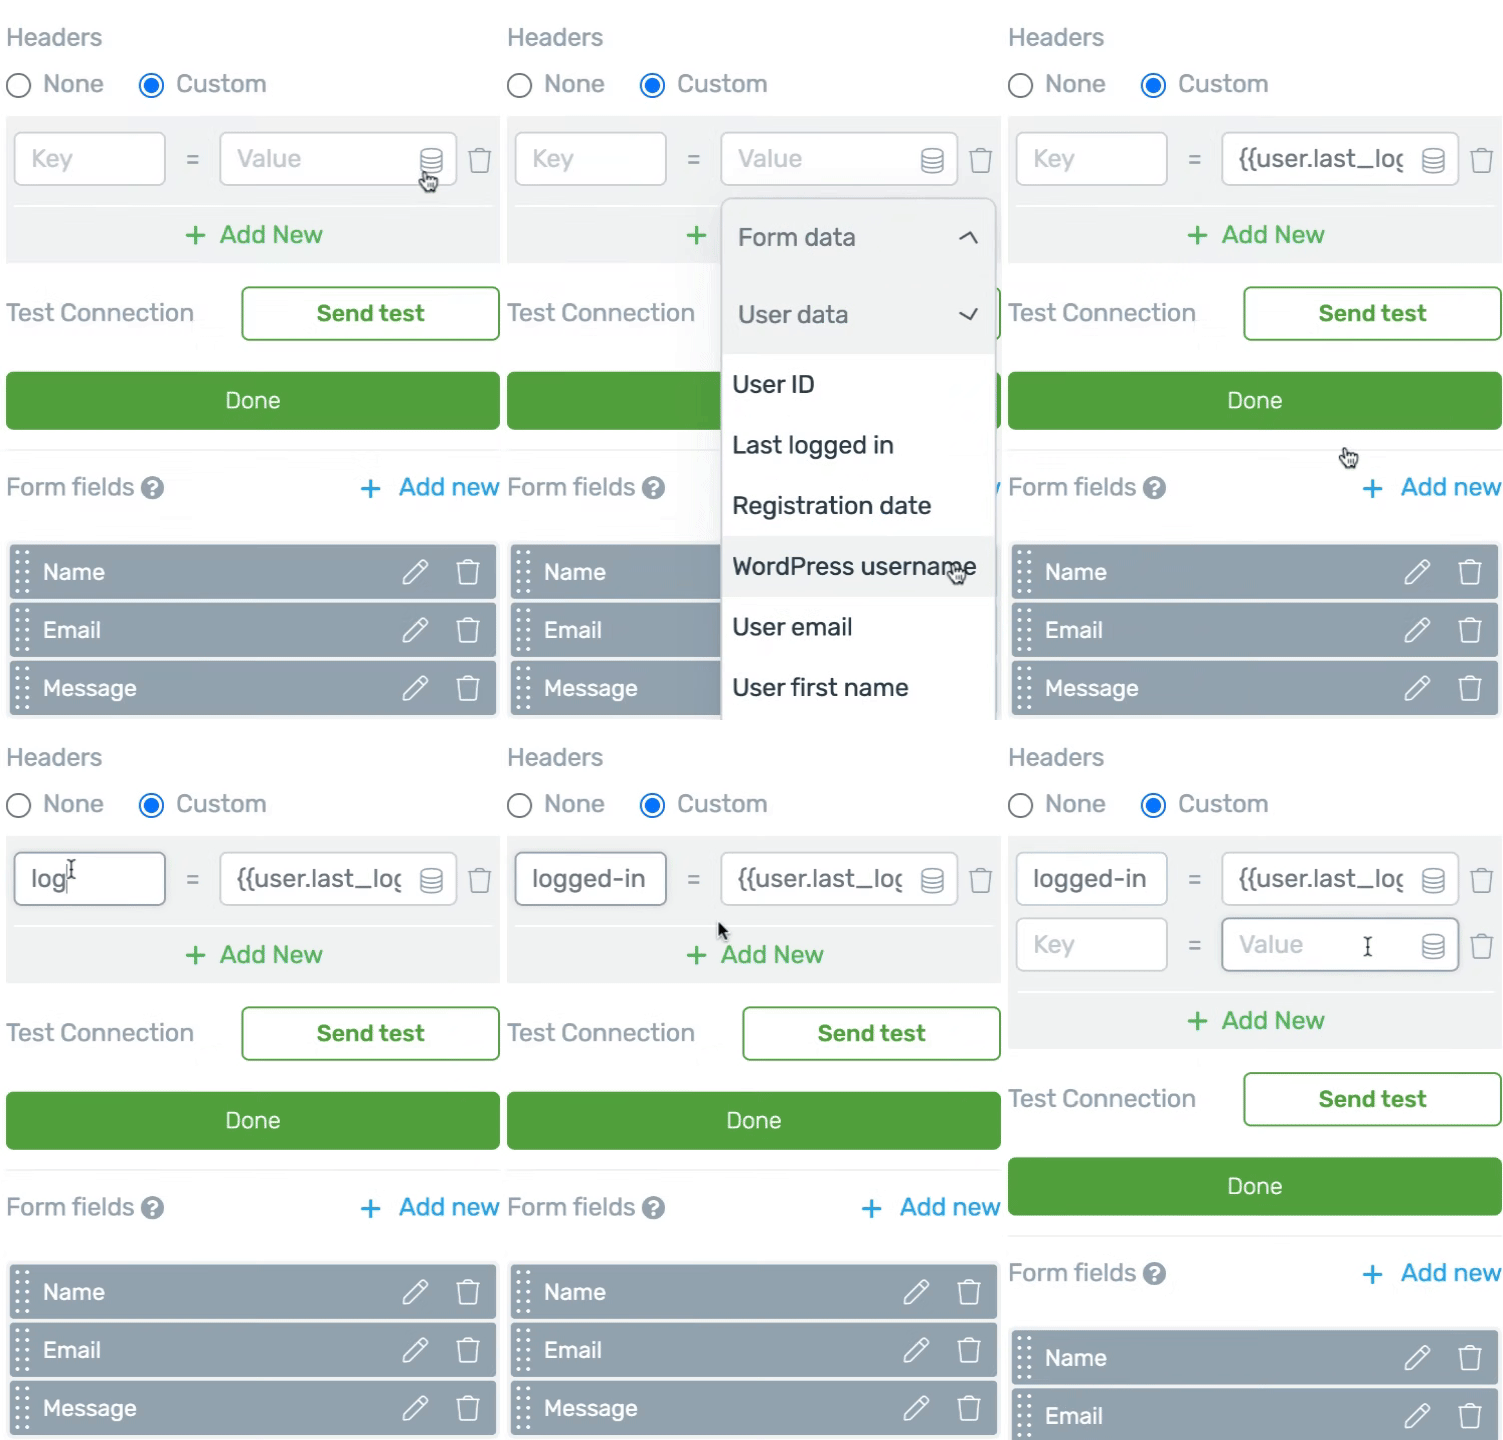
Step 7: Add Any Custom Headers (Optional)
Some services need more than just the basics — like an API key or token in the header. Thrive lets you add those easily, along with any extra metadata you want to include.
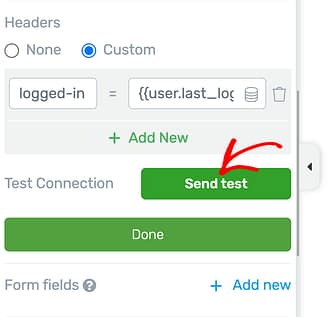
Step 8: Test and Activate
Use the Send Test button to fire off a sample submission. If it works, hit Done and your webhook is live. From now on, every form submission will trigger that workflow instantly.
That’s it — your webhook is live! From here, every form submission can instantly power the workflows and automations you’ve set up.
👉 Want a deeper dive? Check out our step-by-step tutorial in the Thrive Docs where we walk you through everything in even more detail — including advanced options like custom headers and field mapping tips.
🎥 Prefer to watch and learn? Check out Tony’s quick video tutorial below, where he shows you exactly how to set up a webhook in Thrive Architect, live on screen.
Why Thrive’s Approach is Different
Other form plugins offer webhook support — but they usually hide it behind premium add-ons, or require you to pay extra for third-party automation platforms.
With Thrive Architect and Thrive Leads, webhook support is built-in. It’s included with your license, and it works right out of the box.
That means you get enterprise-grade automation power without stacking another subscription on top of your business.
Are You Ready to Automate Your Forms?
Every lead you capture deserves more than a static entry in a spreadsheet. With native webhooks in Thrive Architect and Thrive Leads, a single form submission can now set your entire business in motion — from your CRM, to your email marketing, to your team notifications, and beyond.
This is where your website stops being passive and starts actively running your workflows.
👉 Log into Thrive Architect or Thrive Leads today, set up your first webhook, and experience what it feels like when your forms work as hard as you do.
— Angie & the Thrive Themes Team
P.S. Don’t have Thrive Suite yet? Click here to join and unlock webhooks — along with every other conversion-focused tool we’ve built to help your online business grow.


