In this lesson, we'll set up payment using Stripe.
For in-depth instructions on integrating Stripe with WooCommerce, check out WooCommerce’s documentation.
Want to use a different payment processor?
WooCommerce integrates with a myriad of payment processors. Check out WooCommerce's documentation for their complete list of payment gateways and how to use them.
1. Install the WooCommerce Stripe Plugin
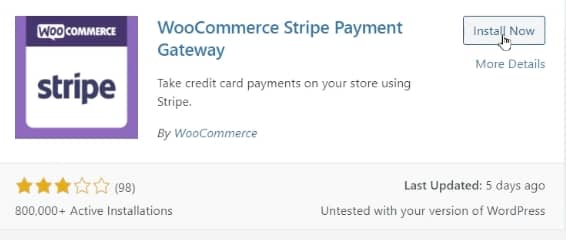
Head over to the left-hand side of your WordPress dashboard, click on the Plugins >> Add New sidebar tab options, and search for WooCommerce Stripe Payment Gateway in the plugin search bar:

Install and activate the ‘WooCommerce Stripe Payment Gateway’ plugin to integrate Stripe with WooCommerce on your site.
Choose the WooCommerce Stripe Payment Gateway when it appears and hit the Install Now button followed by Activate.
2. WooCommerce Settings
From here, open up the Settings area of the WooCommerce plugin. When it opens, head on over to the Payments tab, where you'll scroll down to toggle on Stripe and click its corresponding Manage button.
In the popup box that loads, enable Test mode to prevent money from actually being exchanged during your setup and testing phase.
Next, retrieve the Test Publishable Key as well as the Test Secret Key. In order to do this, you'll need to log into your Stripe account.
3. Stripe API Keys
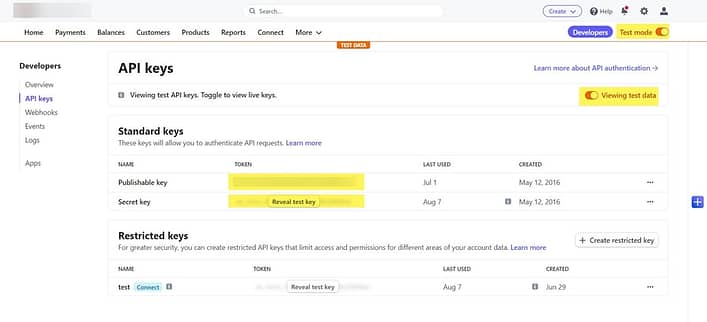
Inside your Stripe account dashboard, click on Developers >> API keys in the left-hand sidebar.

You'll need to log in to your Stripe account to get the API keys necessary for the WooCommerce integration.
Enable Test mode, and click View test data.
Copy the Publishable key and paste it into the Publishable Key field inside your WooCommerce dashboard.
Repeat this step for the Secret Key field as well.
4. Create a Stripe Webhook
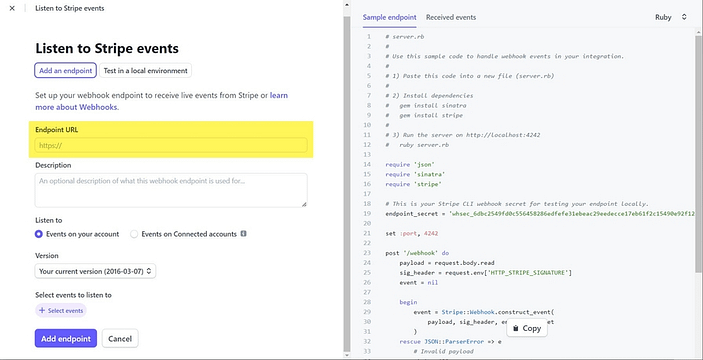
Now, you’ll need to create a Stripe Webhook, which you’ll do in your Stripe account under Developers >> Webhooks.
Click on + Add Endpoints.
In the lightbox that appears, you’ll need to paste an Endpoint URL, which you'll find in the WooCommerce Test Account Keys and Webhooks popup.

To create a Stripe webhook, follow these + Add Endpoint setup steps in your Stripe account.
Copy-Paste the URL you find there into the Endpoint URL field.
Next, scroll down the lightbox to the Version setting and select the Latest API version.
Finally, add the following list of events to the Events to send setting:
- source.chargeable
- source.canceled
- charge.succeeded
- charge.failed
- charge.captured
- charge.dispute.created
- charge.refunded
- review.opened
- review.closed
- payment_intent.succeeded
- payment_intent.payment_failed
- payment_intent.amount_capturable_updated
Finish this step by clicking Add endpoint.
5. Enable Payment Requests
Next, still in your Stripe account dashboard, click on Signing secret to reveal a link, and paste it into your WooCommerce Test Webhook Secret field.
Click Save Test Keys.
Scroll down in your WooCommerce dashboard to find the Full Bank Statement option and type in either your name or the name of your course.
Don't forget to Save your changes.
And that's it... You’re done setting up the WooCommerce Payment Settings!
A Word to the Wise!
Be sure to disable Test Mode when you want to start selling your course & receiving payments from your customers.
In the next lesson, you’ll learn how to integrate WooCommerce with your email marketing tool; we’ll be demonstrating how to do that with Mailchimp.

Should we disable WooCommerce payments and only allow stripe payments?