Did you miss us?
Over the last few months, we've been focusing on some big changes.
The Thrive Apprentice 4.0 launch on January 25th was huge! In a single update, we super-charged your online course platform with new technology that turns your whole website into a membership business, adds impressive drip-technology, and introduced Conditional Display.
Then, last week, we reintroduced single-plugin licenses, meaning you can pick and choose which plugins from Thrive Suite you need and purchase them individually.
But you didn't think our developers were taking a break, did you?
Today, we're proud to share a stack of 7 new improvements and features we've added to our plugins. Read on to learn what they are and how to use them in your online business!
More...
1. Incoming Webhook Trigger in Thrive Automator
Aaaaaaaaah! This is amazing!
We let the cat out of the bag last week about just this one feature— incoming webhook triggers for Thrive Automator— and feedback started rolling in...
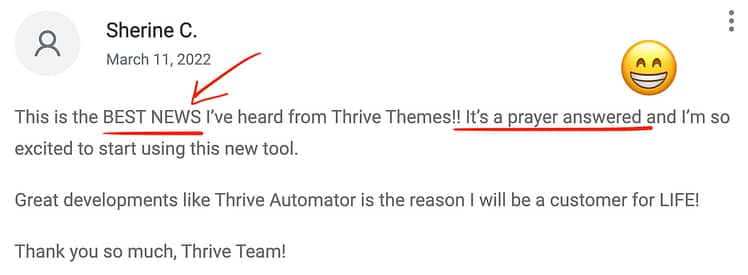
If you're wondering what's the fuss, then you're in the right place.
The new Incoming Webhook Trigger for Thrive Automator is— and I mean this 100% seriously— a game changer.
Webhooks are the glue of the internet. They're like micro-messages shared between web applications instantly. We've had an outgoing webhook action in Thrive Automator since October last year, meaning you could get realtime data out from your website to an external tool with ease.
But the incoming webhook is different. It's an automation trigger. That means an automation will only start once that webhook is received.
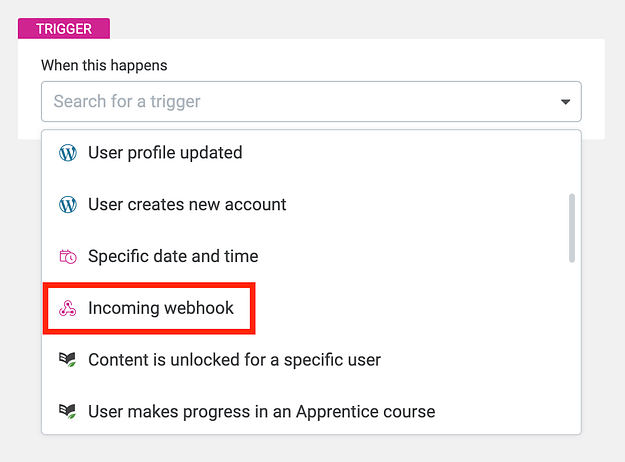
Look for the new 'Incoming webhook' in the Thrive Automator trigger list.
To quote David who wrote it best on the announcement article published last week:

"Incoming Webhooks mean that any other web application can now talk directly to your WordPress website in real-time. Email services, checkout tools, scheduling applications, online course platforms... they can all share their data with your site, so you can set up smart automations to save time and integrate your funnels."
Let's have a look at how it works.
How to use the Incoming Webhook Trigger:
When you add an Incoming Webhook Trigger in Thrive Automator, it will create a unique URL. This is the destination that a 3rd party needs to send their data to in order to trigger your automation.
Then, you'll need to map your incoming data fields.
The trigger looks like this.
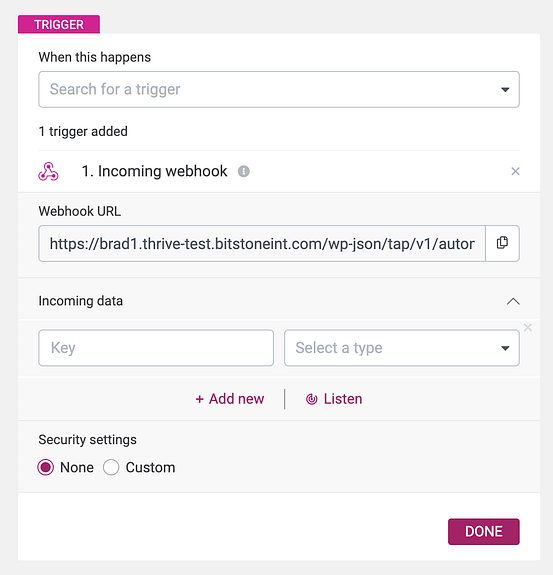
The new Incoming Webhook trigger when it's first opened.
Think of webhooks like instant text messages or emails, made to be read by software.
A webhook is just a block of text formatted into data pairs. Each pair consists of a Key (the name of the data pair) and a Value (the information included in that pair).
For example...
Key = Value
Email=[email protected]
First_name=Brad
Product_ID=45
Those data pairs will be listed one-after-the-other in a big paragraph that can look pretty confronting if you try to read it. But you don't have to.
The tool that receives that webhook just has to know what the information means, and what to do with it.
To set this up, you just need to configure your data Keys, and then choose what type of data it is... and the easiest way to do that is in the 'Listening' mode.
By enabling Listen mode, Thrive Automator will listen out for a test webhook you send at it for 60 seconds.
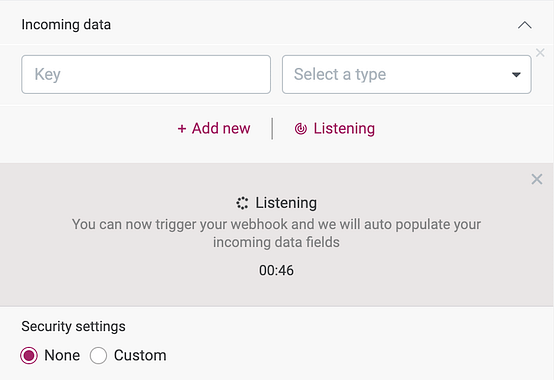
With 'Listening Mode' enabled, Thrive Automator waits to see what webhooks arrive.
Then, throw a webhook at your webhook URL, and Thrive Automator will automatically read it and populate all the incoming data pairs.
In my example below, I sent a webhook from ActiveCampaign. Thrive Automator unpacked about 20 different data pairs that I can scroll through.
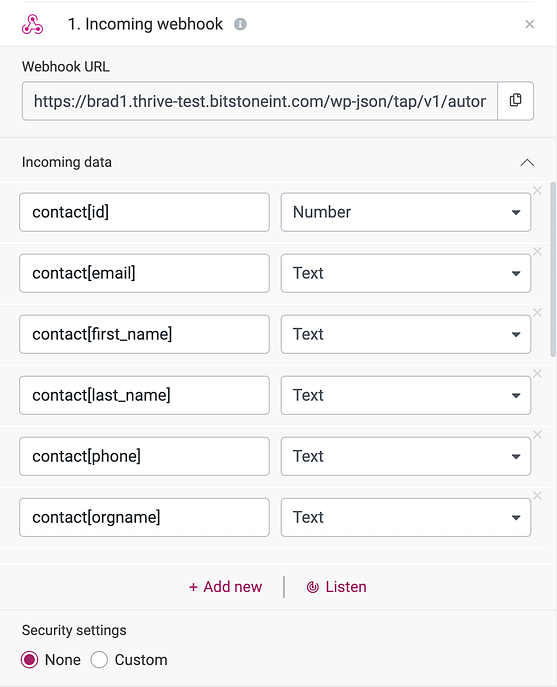
ActiveCampaign webhook data keys are now visible on the left.
I'm a bit of a magician.
I can read minds... and I know what you want to do with this feature.
You want to give someone access to an online course whenever a webhook arrives in Thrive Automator, don't you?
Great idea!
To do this, we can disregard all of the incoming data fields except 'Email'. That email address is important, because identifies who the automation will run for. Therefore, we can delete all other fields from my ActiveCampaign webhook, and make sure we map the email address to the 'Email' data type.
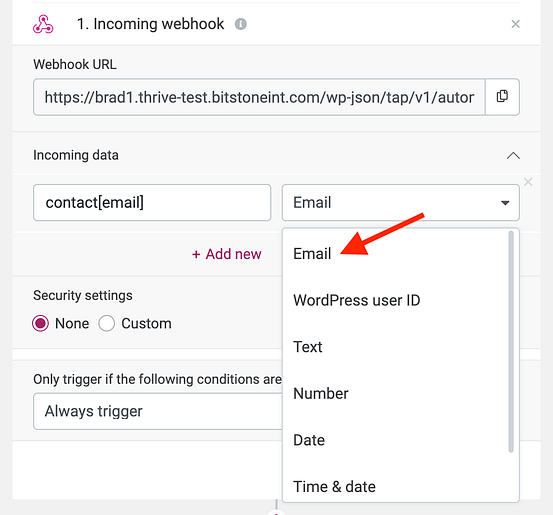
If you're catching an email address, make sure you map it to the 'Email' data type!
This tells Thrive Automator to treat that email address as an email address. You'll see why this is important soon.
"But what about security? How can I stop just anyone sending webhooks to my site?"
Security can be important with Incoming Webhooks, depending on what you're trying to achieve. You don't want someone to guess the unique webhook URL and then be able to trigger your automations when you don't want them to.
We recommend you keep your Webhook destination URLs to yourself. Don't go sharing them with just anybody.
But our Incoming Webhook feature also comes with some security settings built in.

Enable custom security settings and then you can set an authorization pair.
When you enable Custom security settings, you can create a fixed Key and Value pair that must be included in the sending webhook header (think of a header like the subject line of an email).
For example, you might set:
authorization=12345678
If Thrive Automator receives any webhooks that do not have that exact key + value pair in the header, it will simply reject the webhook. No automation for you, evil webhook!
How to Grant Access to a Course with an Incoming Webhook:
With the email field mapped, your incoming webhook is set. Now it's time for the rest of the automation.
Although your incoming webhook is providing an email address, there is one thing missing... Thrive Automator needs to know if a user account exists with that email address or not.
Afterall, course access is granted to a WordPress user account in your database. So, we need to add the newly improved Find or create user action.
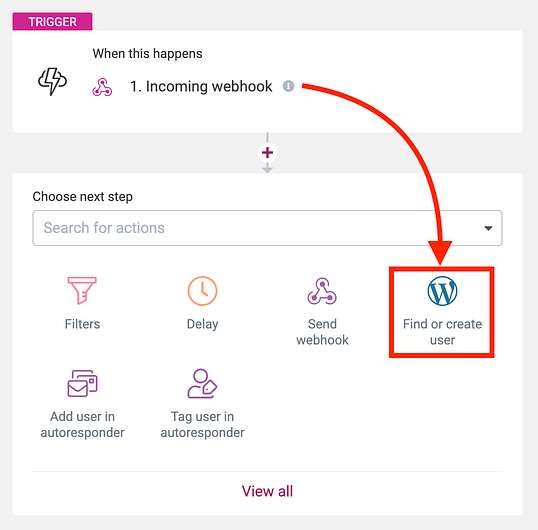
'Find or create user' is the bridge between incoming data and on-site actions.
This means Thrive Automator will check to see if a WordPress User Account with that email exists.
If it does, hooray! It'll find and collect all the user data for that account and keep it available for any other downstream steps in your automation.
But if it doesn't find a matching user account, it'll create a new WordPress User with that email address. Either way, this guarantees that after this step there is always a WordPress User Account that Thrive Automator can work with for the following steps.
Now, just add a 'Grant access to product' step, choose the Thrive Apprentice course product want to give and... voila!
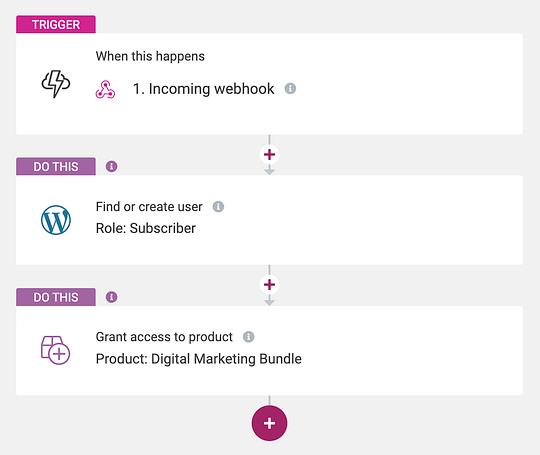
A complete automation granting access to a course from an incoming webhook.
This is an automation that will immediately grant course access to a user with the provided email address as soon that webhook arrives.
It's magic!
But do you want to know why this is so mind-blowing amazing?!
Check this out!
I configured my incoming webhook to match the data pairs coming from ActiveCampaign. Now, in ActiveCampaign, I can create an automation that sends a webhook with a user's contact information anytime a specific tag is added. It looks like this.
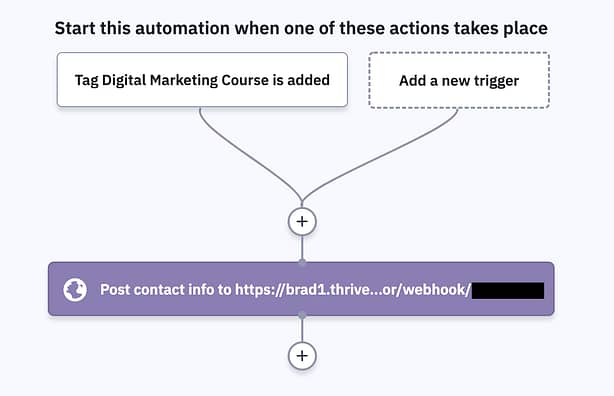
ActiveCampaign will now send a webhook to my site whenever that specific tag is added.
That means that now I've set it up, I can give someone access to an online course just by adding a tag to them in ActiveCampaign!
Mind blown!
There are so many tools that can add a tag to a contact in ActiveCampaign or any other email tool. And now all of them can control course access... just like that!
Whenever ActiveCampaign sees that a specific tag is added, it'll shoot a webhook to your website, and Thrive Automator will do the rest. Within a fraction of a second.
If you have Thrive Apprentice installed, you can configure the email that newly registered users get sent from your website with their login information whenever Thrive Automator creates their account.
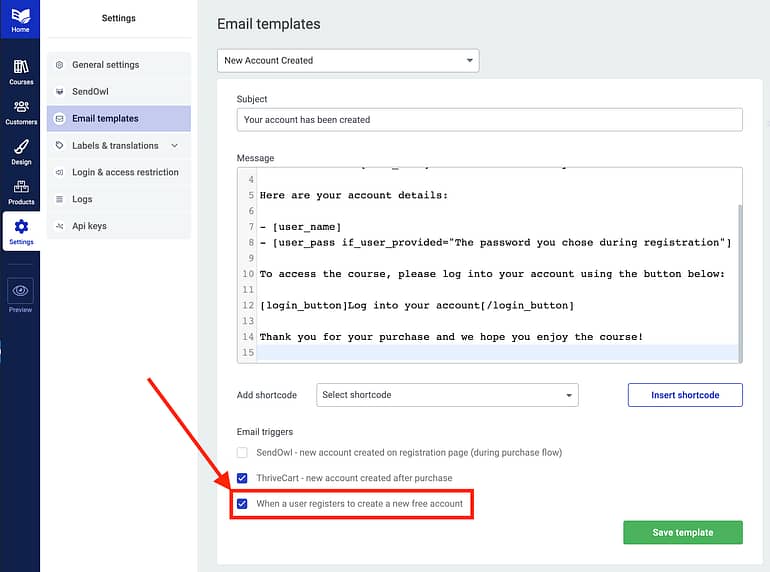
Edit your caption text here
This exact setup is so flexible that it works with all kinds of new checkout tools, including Digistore24 and Stripe, both tools we deliberately tested this with.
In fact, our Documentation team have prepared specific tutorials that will show you how to do it.
> How to use Thrive Automator to sell courses with Digistore24
> How to use Thrive Automator to sell courses directly with Stripe
(Ps. In the next release we're going to add an improvement to the registration step that supports First and Last name dynamic field mapping!)
2. New 'Register Form Submit' Trigger + Granting Access to Free Courses!
Do you want to give away free courses as lead magnets to grow your mailing list?
Now we've made it super simple!
There are actually two updates here that make this work, and two different ways you can use them.
The first is a new 'Register Form Submit' Trigger, and the second is an under-the-hood change that lets you grant course access from any regular Lead Generation form on your website.
Remember the awesome, visually-editable WordPress Registration form element we have? You know the one with loads of designer-made templates, API connections, custom fields, and more?
This one?
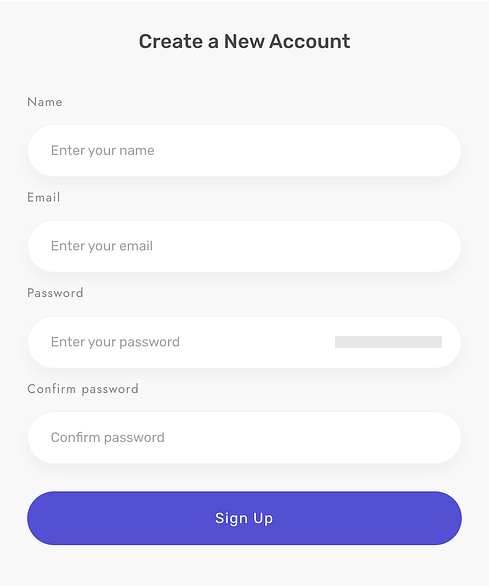
With Thrive Themes, you can have this registration form on your website.
Beautiful, isn't it?
Well, you can now use this Registration Form to sign users up to your website, your mailing list, and to specific free courses all at once.
Simply enter edit mode for the Registration state, and under 'advanced', add a form identifier.
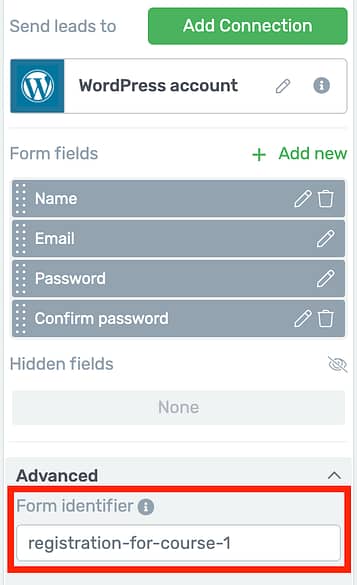
Give your form a unique name for internal use only.
Now, hop over to Thrive Automator and use the new 'Registration Form Submitted' trigger.
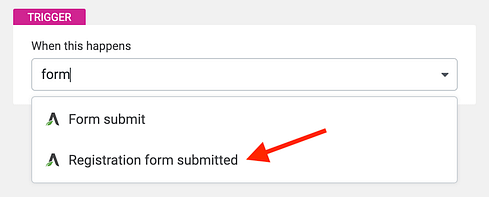
There are two 'form submit' actions now, but the second is strictly for Registration forms.
You don't want this automation to run for every registration form, so add a condition for a specific form and select your unique identifier.
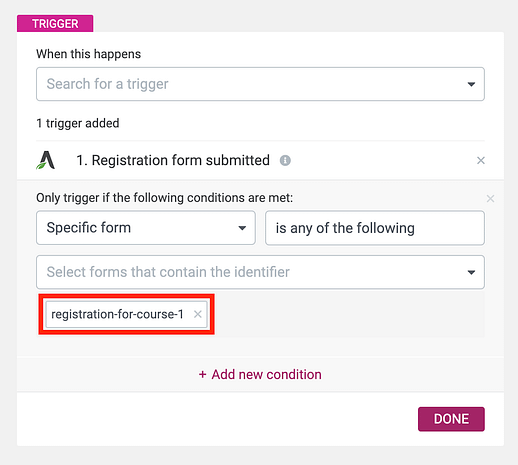
This is where you use your form identifier to select just that one form on your site.
Then, add an action to grant access to a product in Thrive Apprentice.
This time, you don't need to use a 'Find or Create User' action, because the registration form is only ever submitted when a user is freshly created. That means the user data is known. No special email matching required.
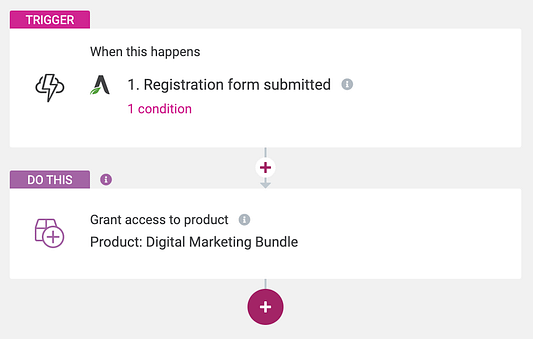
That's it! You're giving a user access to a free course in this automation!
The under-the-hood change we've also released means you can achieve the same result with a regular lead generation form too.
That means rather than asking for a password, or forcing the automation to only run for brand new users, you can add a form like the one below which can be triggered from known users too!

A simple lead generation form that gives away a free online course when someone joins your mailing list. It's magic!
The only difference is that for a regular form submit, it will fire even without a WordPress User being registered, so you will want to add the 'Find or Create User' step.
This will grant access to a user whether they account existed before the form was submitted or not.
3. Improved User Access Manager
Course creators, membership site owners and Thrive Apprentice users— you're going to want to pay attention to this one.
We've rebuilt our User Access Manager, and added two very useful new features.
"The... what...?"
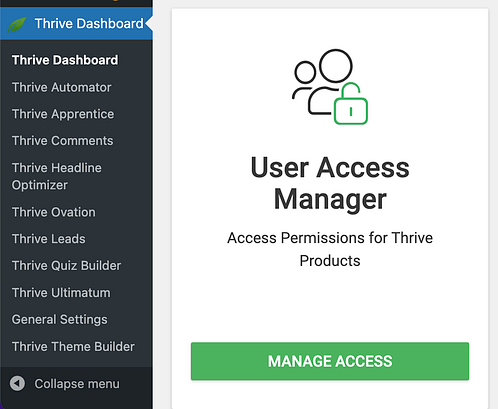
Look for the 'User Access Manager' card in Thrive Dashboard.
Did you know that there was an access manager, that lets you control which WordPress user roles can access your Thrive Plugins?
The Author, Editor or Contributor WordPress User Roles were originally designed to make it easy for you (the admin) to grant limited permissions to a team of people that need help you build your website.
Well, we made it really easy to hide backend access to specific Thrive plugins per-user role too.
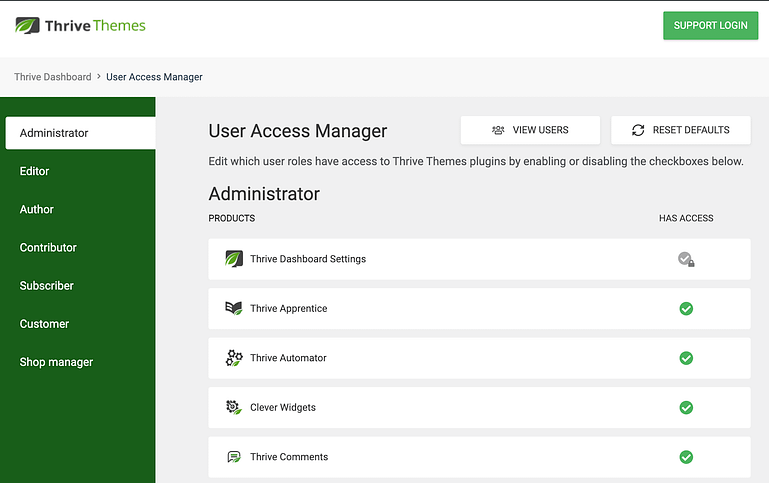
User Access Manager lets to customize which user roles can access which plugins.
Perhaps you want an Author to have access to Thrive Architect only, but an Editor to be able to create quizzes in Thrive Quiz Builder.
It's as easy as clicking the tick or cross next to a product from the User Access Manager to enable or disable their access.
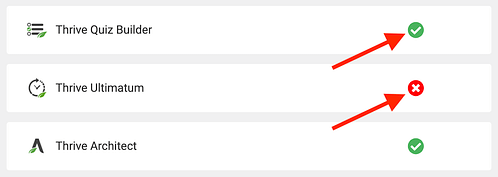
Clicking this button adds or removes plugin access per user role.
Apart from an improved User Interface that is friendlier with long-lists of custom user roles, what else is special about this?
You can now disable the WordPress Admin Bar and change the WordPress Login Redirect... per User Role.
Let me show you.

Two new functionality options have been added in the User Access Manager too!
Admin Bar Visibility
Does that pesky admin bar still show for your Subscribers?
WordPress itself, 3rd party plugins and strange server configurations have repeatedly fought to show or hide the WordPress Admin Bar. We have disabled it from Subscriber User Roles when Thrive Apprentice is installed, but occasionally we hear from you that it still shows. When we investigate these support requests, it always seems to be that there are server configurations hardcoded by some hosting companies that seemingly overwrite it.
So we figured it's time to let you have the option, and to force it.

This is the WP admin or nav bar, and you probably don't want it there for your students.
If you set Admin Bar Visibility to 'inherit', it will give way to any other plugins or server configurations that are trying to show or hide it. But you can now override it yourself by setting it to 'show' or 'hide'.
We recommend you set it to 'Hide' for the subscriber user role, or any other user roles that are not used by you or your website editing team.
WordPress Login Redirect
A few years ago, we released a gorgeous, visually-editable Login & Registration form.
And even though it's wonderful, occasionally your users may stumble upon the default WP-Admin Login Form.
That's why we also added WP-login form branding, so that the default gateway still exists, but you can make it look on-brand with the rest of your site.
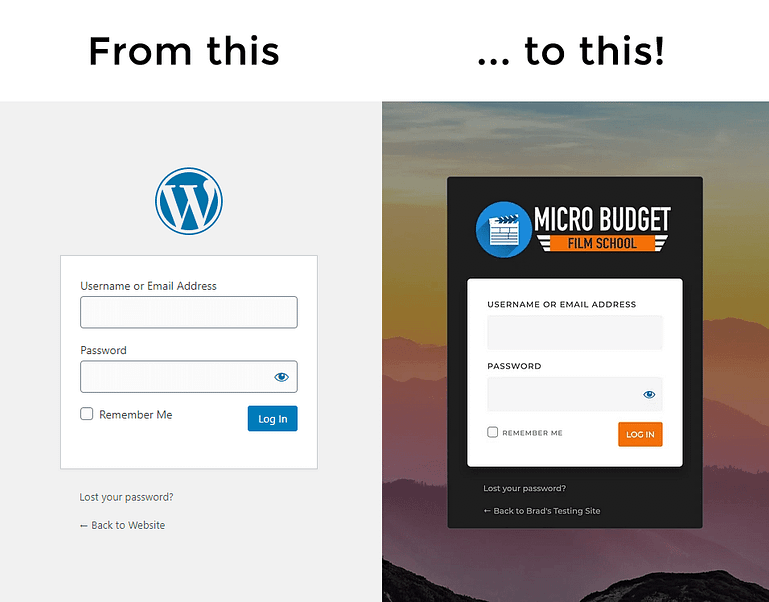
Login screen branding turns your default from this (left) to this (right) with just a few clicks!
Often your users will need that default login form during a Password Reset process. And during that, WordPress does something really annoying...
...it redirects users to the backend of your website.

Sure... thanks WordPress... because that's exactly what a user wants to see after changing their password (NOT).
After a user resets their password, no-one wants to go here:
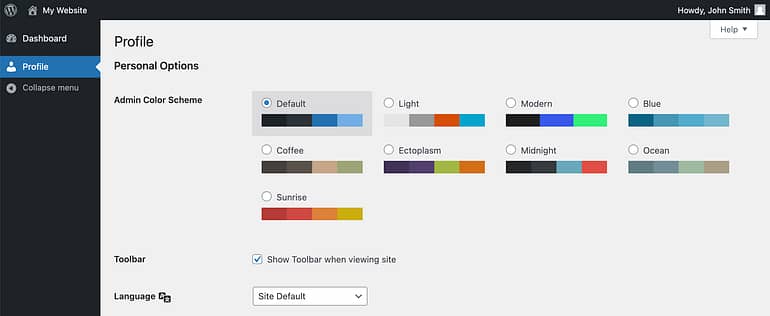
After password reset, some users landed here. Whyyyyyy?
With the new option in User Access Manager, you can now set the default redirect to:
- Your homepage
- Your Thrive Apprentice courses page
- Any custom page of your choosing
- Inherit (let any other plugin decide or override the redirect)
- The WordPress Dashboard (I mean... if you really want to, we won't stop you)
We recommend you hop straight in to the improved User Access Manager, and change these options to suit your website.
We haven't forced any new defaults, but for Thrive Apprentice users, try this:
For the 'Subscriber' user role (which is used for students) set Admin Bar Visibility to Hidden, and set WordPress Login Redirect to Apprentice Homepage.
4. New 'Time Between' Rule for Conditional Display
Among the Thrive Apprentice 4.0 launch, the new Conditional Display feature got a bit buried.
But it's worthy of the attention of a whole new plugin. In fact, there are premium paid plugins in WordPress that attempt (and often underdeliver) to do what this single feature can do.
And yet, we included it as a native feature across our entire Visual Editor, at no extra cost.
But we want to make it even better. Last week, we improved Conditional Display by adding a few improvements to it.
If you're out of the loop, let's cover the basics: Conditional Display allows you to create alternate blocks of content on your webpages, and then show different content depending on who is visiting your site and which display rules they match.
In last weeks' release, we added a 'Time Between' rule. This means that you can show different content on your website between different hours of the day or days of the week— perfect for sharing contact hours.

When the conditions are met, this is the view of the page content seen.
In that image above, there is a 'Call Us Now' text box call-to-action. But it will only show between 9am and 5pm.
That exact same text box will display different content if a visitor arrives at the website outside of those hours. Here's what that visitor would see:

If a user doesn't match the rules, they'll see the display view instead.
Is the significance of Conditional Display starting to sink in?
When preparing your conditions for specific displays, you'll find under the 'Time and Date' option that you can now choose 'Time >> Between'.
In the image below, I've set 9am and 5pm. Easy! But you can combine that with a 'day of the week' rule and select only weekdays too. Like this:
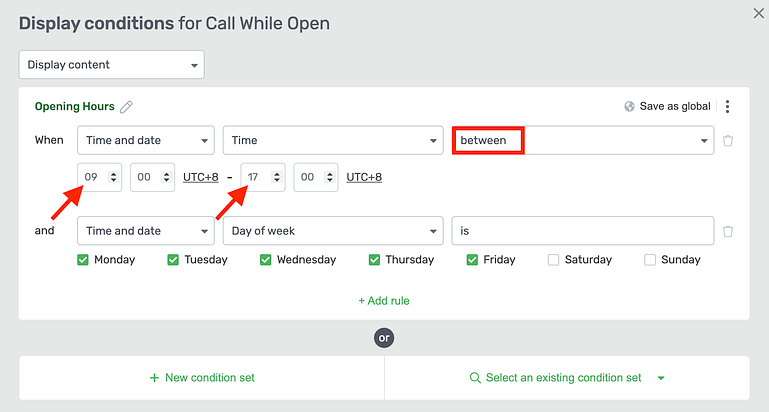
Stack rules with 'AND' logic, or 'OR' logic until you have fine-tuned who the conditional display is for.
Your CTA will now show only between 9am and 5pm, on Monday to Friday, skipping weekends!
How good is that?!
And since it can be tricky to wrap your head around how your website is seen to visitors, we have a Conditional Display previewer accessible from the WP Admin Bar when your are logged in as the Admin and previewing a page.
It's as easy as 2 clicks to see how the page will look for visitors that match your conditions.
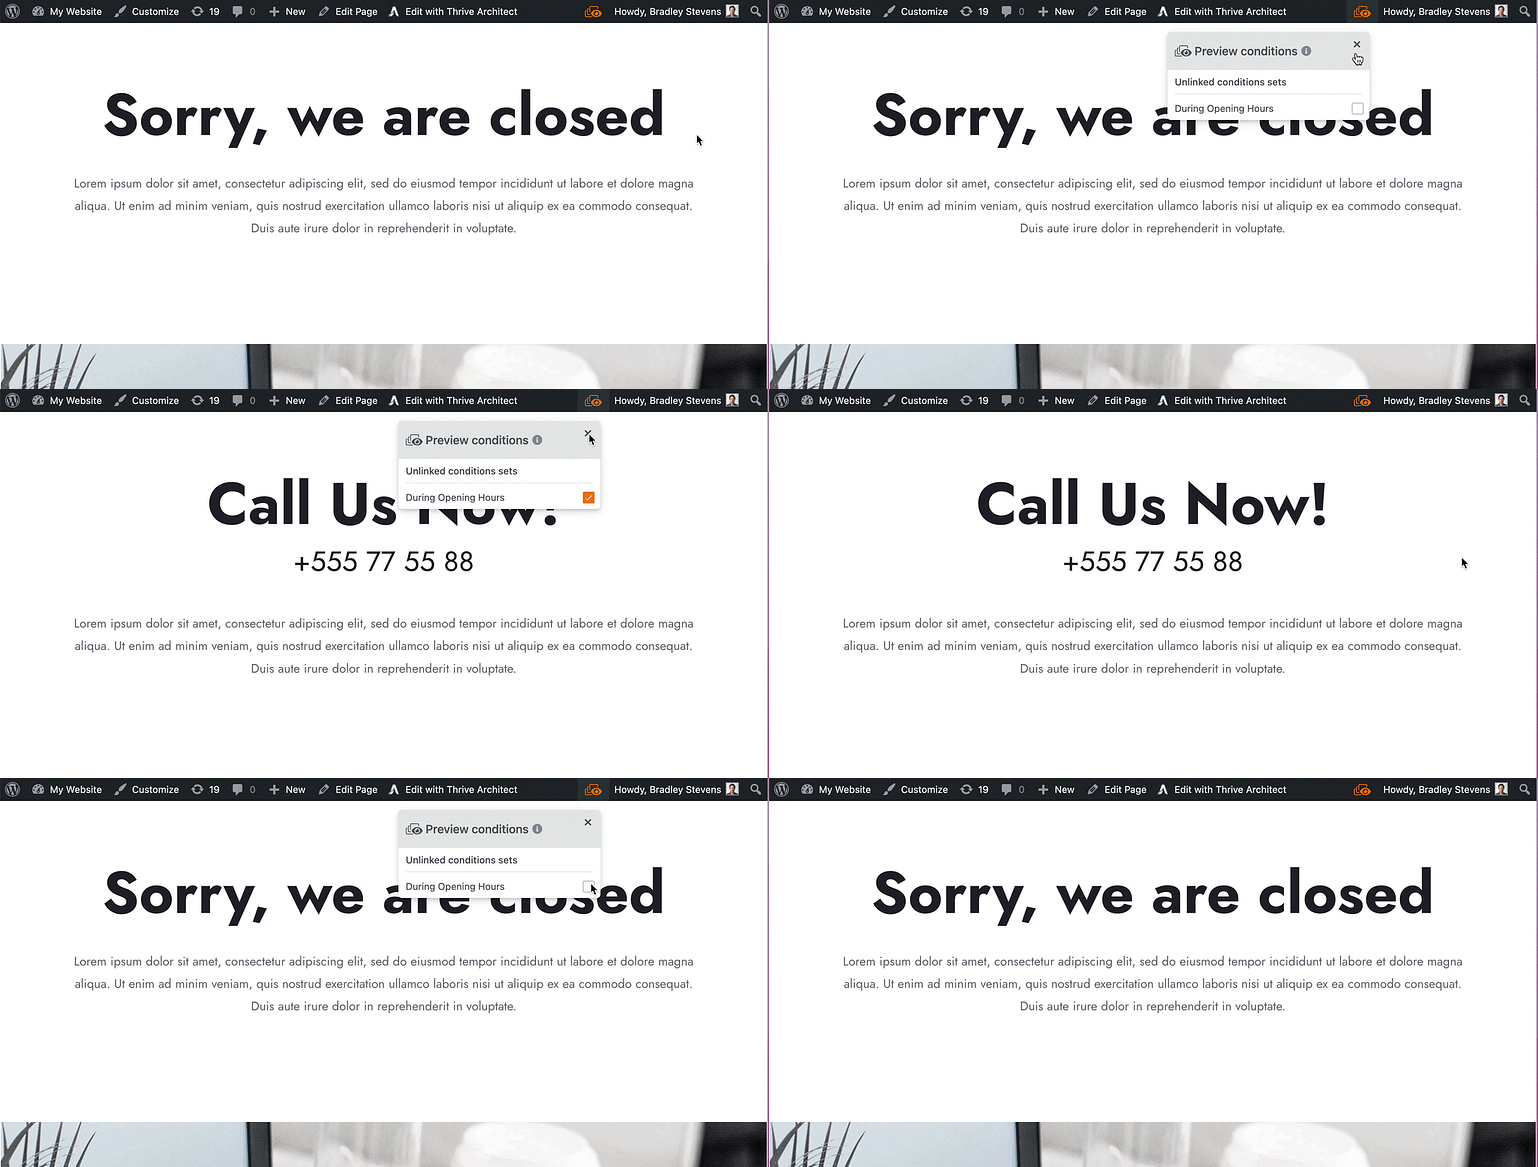
Logged-in Admins can preview the page and force the alternate views, to better understand their visitor's experience.
5. Conditional Display Navigation Tool
Developing Conditional Display was a huge user-experience challenge. How can we help you harness this power without getting confused about which sections of your page have alternate content?
To help, we added a small UI improvement.
Whenever you open a page with the Thrive Visual Editor, whether that's Thrive Architect, Thrive Theme Builder, Thrive Apprentice or anything else, if we detect that there are any conditions active on the page, you'll see an orange dot over the conditions icon on the right-hand side.
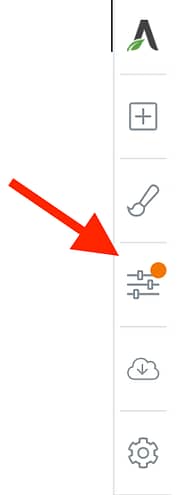
Look for the orange dot.
That orange dot serves as a reminder: there's something on your page that may change depending on which display conditions are active.
When you open the editor, you'll always see the default display views first.
But if you click that icon, out springs a panel which will list all the Conditional Display content on your page, helping you to locate it.
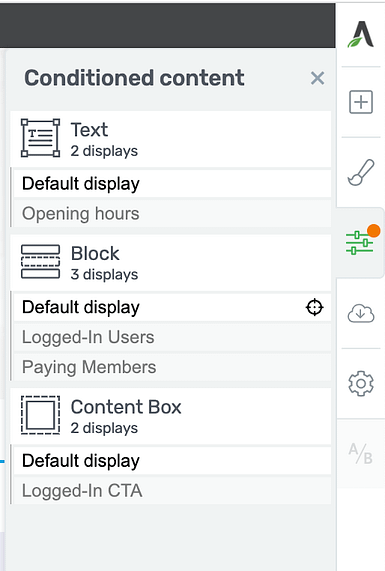
All the Conditional Display content from the page, listed in one easy-to-use navigation tool.
From here, you can click the crosshair icon to zoom to the section of the page with conditions, or click the name of any other content with Conditional Display to swap the display settings immediately.
It's a small quality-of-life improvement, but we felt that it was necessary. We've given you a huge amount of power, and we don't want you to get lost in it.
6. Conditional Display API + WP Fusion Integration
One more change for Conditional Logic...
We have created a public API.
What exactly does that mean? It means that any 3rd party plugin can add their own conditions into the Conditional Display rule builder, and it should take about a day to do it.
To test and demonstrate that the Conditional Display API is easy to use, our developers went ahead and built a WP Fusion integration that we've included in the latest release.
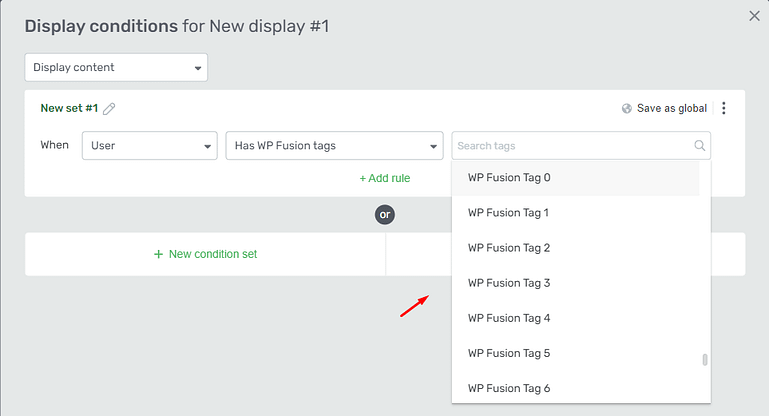
WP Fusion tags are now supported in the Conditional Display rule builder!
Look carefully at that image above. That's the Thrive Conditional Display rule builder... with WP Fusion Tags available.
WP Fusion is a 3rd party membership tool, and if you have it installed on your WordPress website, you'll find these new options in the conditions rule builder.
Yes, that means you can change display content based on which WP Fusion Tags a member has access to. Amazing right?!
If you have a preferred 3rd party membership tool, or if you know of any plugin that would benefit from a symbiosis with Thrive Conditional Display, please let them know that our Conditions API makes it easy!
Point them to our Developer Documentation right here:
How to develop custom rules for Conditional Display
Our developers have even created a sample plugin on Github that can be cloned, edited and published. That means you don't even have to start from scratch when building your custom conditions! Just copy the code, make the changes, and that's your integration done!
We'd love it if you helped spread the word about our public Conditional Display API.
7. Export + Import Page Content
For some time now, we've had the ability to export and import Landing Pages built in Thrive Architect.
And we've had the ability to save local templates of any content, and reuse them with the 'Templates and Symbols' element in the Thrive Visual Editor.
But what if you need to share your content with someone else? Or between different websites?
We believe one of the reasons you use Thrive is because you need flexibility. So last week, we added a feature that allows you to export and import regular post and page content built with Thrive Architect.
...and yes, it works between any websites with Thrive Architect installed!
How Post and Page Exporting Works:
Open any blog post or WordPress page that you've built with Thrive Architect, click the settings cog on the right, and you'll find a new 'Export Content' option.
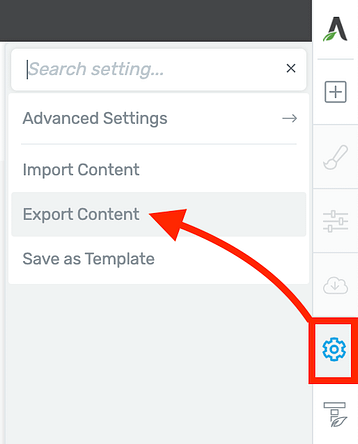
The new 'export content' option
When you click this, you'll be prompted to name your content.

Once you've named it, click 'Download File'. You'll see that your browser will immediately start to download a .zip.
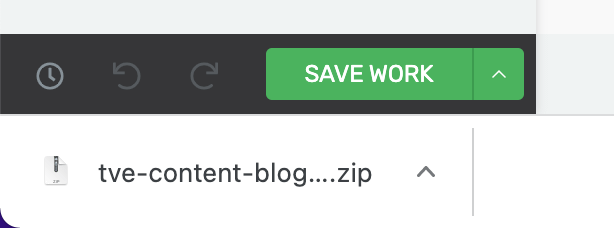
After exporting, your browser will download the .zip file of your content.
You can now share that .zip file with anyone else that uses Thrive products.
All they have to do is click the same settings cog, choose 'Import Content', and then you can drag-and-drop your .zip file into the Media Library.
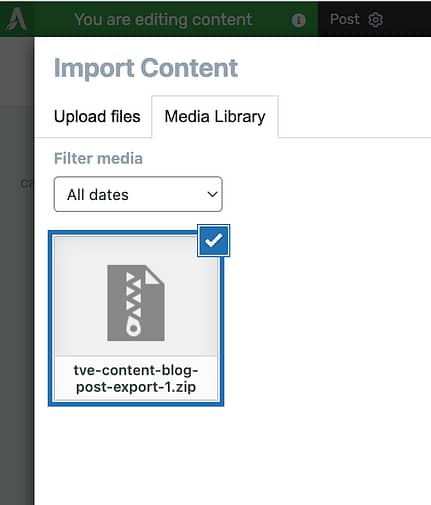
Upload and select your .zip file with the 'Import' option.
Select the file, click import, and you'll find all of your elements will immediately appear on the page!
Just remember, this is exporting the content area— excluding the post or page metadata, featured media or the WordPress template.
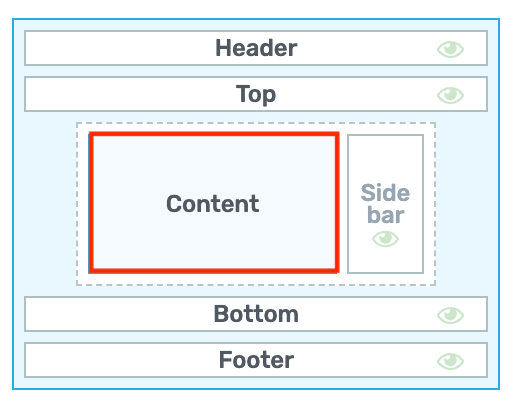
This feature exports the content area only, meaning the body of your blog posts, pages or lessons.
What do you think? Leave us a comment!
As always, we love your feedback. Your comments and ideas create conversations amongst our product team, and we're constantly looking for ways to help you get even more out of your website, and to grow your business.
Drop us a comment below and let us know which of these feature you're the most excited about!


Bravo for User Access improvements.
I was about to say the same, great improvements!
Yes, the WP Fusion implementation is what I wasn´t even hoping for 🙂 Amazing
Sneaky, right? I bet no-one was expecting that so soon after Conditional Display was released
Insane, I am like, whaaaaaatt! This literally opens endless possibilities for Thrive Members.
Being able to copy/export regular pages to other sites is great.
Love the integetration with WPFusion. For the april updates I wish an integration between Thrive Aprrentice 4.0 and GamiPress, to use gamification within my courses.
You may be pleasantly surprised quite soon, Florian…
Epic, thanks for adding the import export option! Will save me a lot of time.
-ted
Glad to hear it, Ted!
WP Fusion yeahhhhhhhhhh this isa hugeeee oneeeee literallyyyyyyy, a huge oneee!
Right?! 🙂
I love the new Incoming Webhook Trigger Feature, Brad.
And thanks for your help in checking that it would work with Digistore24!
this is a great update. I LOVE the content share feature. Will put that to immediate use…:)
OMG – so much content. I think I have to read this blog post several times to realize what’s happening and to USE those things. Great!
I just got my head around Conditional Displays this weekend. Course has student info and now with conditional displays, and a new user type, (mine is “facilitator”) we can show tips that only the teachers see. Needed to get the plug-in, User-Role-Editor, free.
With the Conditional API and tags, (we don’t use Web Fusion) I’ll go and beg that the developers at Constant Contact and Keap get this cooking. Then mind-blown again.
It does take a while to get your head around it, but once you have, you’ll start to see how powerful it is!
All great stuff, as usual!
I just have 1 question about the form submit:
If you’re using double opt-in for your email list (and really, everyone should these days), then how can you ensure that they are given course access after they’ve confirmed their email, instead of direct from the form?
Hmm, double opt-in can be tricky because it’s managed differently in a few systems. Here’s some ideas:
– If you just want to do it with Apprentice, then the registration email sent from Apprentice gives the user their auto-made password. That means that in order to log in, the user must open their inbox to see that email. You can also customize that email to say what you want. So at that point, they’ve verified that they are the email account owner.
– You could also manage it with Automator + webhooks. Let’s say you’re using ActiveCampaign (that’s what I’ve had the most experience with). They sign up to your mailing list, AC sends a double opt in email. The user then clicks on the link in the email to confirm it. In AC, you can program that confirmation step to add a tag. Following my tutorial above, you can send a webhook only when that tag is added and use Automator to give access to the course. The result: if they don’t click the link to confirm, they don’t get the course.
Awesome! You guys are geniuses. 🙂
Haha, that’s some tall praise! Thanks Joan
Great upgrade! I’m just wondering how to get FluentCRM tags and user profile data if user email is the same as on the FluentCRM database. I’m not a developer, but just thinking if this should come from their side, or should I hire some developers to do it?
I haven’t had much experience with FluentCRM, so I’m not sure sorry. This might be a good question to ask in our Facebook group where other Fluent users can comment.
Great updates again Bradley. OK, so we have the ‘Login’ redirect option, but what about ‘Logout’ redirect functionality? It would be great if we had an option to redirect to to a page after logout when using Dynamic Link – Site – Logout
It’s actually already in the works 🙂 Will most likely be included within the next two releases.
That’s excellent, another game-changing feature from Thrive 🙂
That last one, export and import content is something I have been wanting.
I would love a blog post from you guys that explains how you keep all this stuff that you do organized at your own company?
I continue to hold onto my Thrive Themes subscription only because its like a hobby for me now, to be able to TRY to understand how all this stuff works. I am a slow learner and have just a couple practice blogs with literally nothing to sell, (YET).
I use OneNote to keep my things like mailing list flows and screenshots of the total picture of something from start to finish like opting in to a form and a screen shot for each step.
What I don’t understand is how YOU GUYS keep this stuff organized? Understanding now you all organize your company and all the moving parts, and do such a good job of it all, would be a great blog post.
Anyway, I’ll take my small bite of progress with the content exporting, and leave the other stuff to the big boys/girls for now.
It’s fun watching this company do what they do and do it so well.
JF
Really, you’d find that interesting? We do have some unique processes to keep on top of everything, but they’re only really valuable for someone working in software.
But I love it. So… maybe one day we’ll go on a tangent and share how we do things.
Speechless. So much here to unpack.
Value, on top of value, on top of value…
thank you
I’ll love that you export this particular blog page formatting used for this post to me. I’m a Thrive Themes customer, and I’ll love to layout our blog posts like this (my email you’ll find in the comments).
You mean our Thrive Themes blog, with the header image, sidebar, etc? Believe it or not, we’re working on completely re-doing our website. So there’s a time in the not-too-distant future where this blog post template won’t exist anymore
Wow, some really cool things happening here.
Love all of it.
Now that we can import export pages, will importing and exporting apprentice courses come soon?
So we can move a course from one site to another?
Also, it would be awesome if we could customise the login page, by add some of our own text and images.
Something that I miss from using Joomla is that when creating a page you build it with modules (like a architect element) but you have the option to just hide or unpublish that module.
It would be really great if we could just unpublish/hide elements instead of having to delete them.
Sometimes I need to temporary change a landing page so it would be great if I could just temporarily hide elements.
This would be different from conditional display as the page would be for the same users.
Hope to see these features added in the future.
Keep up the amazing work,
Hey Adam, we looked at exporting courses and it was a little bit more complicated, so we decided to circle back to it later. What we’re working towards is building the foundations for a more open ecosystem where any content can be exported, imported or managed easily. Not just Landing Pages, but whole custom TTB theme templates, page blocks, etc.
In the next few releases you’ll see more and more focus on template management.
For that idea about temporarily hiding page blocks— I love that idea. I’ve often wondered the same. We might be able to adapt Conditional Display to allow content to be temporarily hidden from a page. I’ll discuss it with our team.
just go to html display and unclick all options including desktop. so you hide a complete block from all devices.
Thanks for all the updates. My head is spinning…not any kind of developer – just trying to develop a website…so many options to use for so many ways…I have a custom CRM using FileMaker – and trying to connect various aspects to the website…2 years developing and always new releases…I cannot seem to keep up! Getting close to launch basic website now – then can focus on courses…so many of these features will be important. I cannot even conceive the options. I feel like I am such a novice…Sigh.
I’m sure you’re not a novice! We deliver a lot of updates, but we don’t expect anyone to stay on top of them or know it all. We have an amazing knowledge base at help.thrivethemes.com, and there is a tutorial for EVERYTHING. The idea is that when you need to do something, you’ll find an article on it. But until then, no need to get overwhelmed! Only use what you need
Absolutely freaking brilliant.
Some Great Improvements!
I have been struggling with the WP admin bar -sometimes appearing sometimes not! This is a great fix!
Fantastic Brad.
On another note, do I speak to support about the change in pricing? I’ve previously bought the plugins separately from the very beginning, then I subscribed to thrive suite. I don’t really use all the plugins and would probably be better of going back to a per plugin payment model.
My question is: do I have re-purchase all the plugins I purchased prior to subscribing thrive suite? Apologies if this is not the appropriate forum and would be glad to be redirected.
Love thrive (since the very beginning).
Hi Michael,
You can send all your questions via [email protected] they will be able to check what access you already have and help you out!
Love, love, love the innovation and constant improvements. I tell everyone about Thrive Themes. Great work from the whole team!
Great news! You do a great job. I still struggle with my Integration MemberPress / Apprentice / Sendinblue. As soon as a course is sold by a transaction in MemberPress, i want to add the user to a list within sendinblue. So far, NONE of the offered triggers within ThriveAutomator has worked.
Going to try it with incoming Webhooks now!
And as you have all set up now, just ask myself why i do not skip MemberPress and go with Stripe Checkout and Paypal Checkout directly? Do you know if i can setup Webhooks in PayPal per transaction type? So „fire off webhook only if transaction is XY“ ?
Hi, with the stripe webhook it is now possible to sell courses just with TA, it’s not necessary Woo or ThriveCart anymore.
Did I get it right?
Do you plan to make the checkout process easier and make TA a fully stand alone plug in, that manages payment as well?
Yes you did 🙂
Wow wow wow. My mind is blown, yet again.
I expect one day to not be blown away by new features but so far it hasn’t happened. Incredibly brilliant, my love for Thrivethemes gets deeper 😉
Again, these are improvements that make me love ThriveThemes’ services. Thank you so much for your continuous improvements! The conditional viewer and modifying it via the API will possibly solve a big development issue for me. Thank you!
Love the additions guys:)
Do need small some clarification on “user access control”
When you turn “access” on or off, I assume access means WRITE/Change access is on/off not the ability to see or read (such as pages created with Architect)
It may seem trivial information, but it’s not. There is not a lot of granularity. For example, if you turn off “Dashboard settings” not sure what an editor user say, could do/not do
Also curious to know if it collides with plugins like the User Role Editor? 🙂
Joe C
Let’s say an Editor is logged in to the backend of your website. But you’ve removed access to, say… Thrive Quiz Builder for the Editor user role. That logged in Editor will not see Thrive Quiz Builder in the Thrive dashboard. It’s simply not there. That means they have no way of seeing the backend of TQB, of creating or managing quizzes. As far as their account is concerned, it’s not accessible to them at all. However, on the front end, if they visit a page with a quiz on it, they’ll still see the quiz and be able to complete it. The Thrive dashboard should be disabled by default, but if you give access back to an Editor, then they’ll be able to see the User Access Manager again and make changes.
One of the reasons we changed the UI was so that there was a left-hand sidebar for each user role, and there’s room to list more and more roles. If User Role Editor adds custom User Roles, you’ll find them all listed there.
Hope that helps! If you need more info, check our knowledge base at help.thrivethemes.com or hit up our support, and they can dig a bit deeper.
Thanks Bradley, I assumed something of the sort but wanted to confirm. 🙂
Just a heads up – The User Access Control “force admin bar” setting does not work with the membership plugin we use, s2member nor does the redirect. Just tested it. 🙂
Joe C.
Then it sounds like s2member must have some pretty aggressive settings that we aren’t able to overwrite. Unfortunately, there isn’t much we can do about that. But if s2member has such aggressive settings, then I would assume (or hope) they have an option to configure the admin bar visibility from their own plugin.
Actually they do have several such options 🙂
Thanks for this awesome post, Brad.
You gave the example of how to add people to a course with an incoming webhook. How would this work if I have 10 different courses?
Thanks again!
Henk
Hey Henk, you’ve got 2 options.
First, a Product in Thrive Apprentice 4.0+ can contain more than 1 course. It would literally only take you a few clicks to put 10 courses inside of one free product, and grant access to that. Anyone that has the product has access to everything in it.
Second, if you have a need to keep your courses as separate products, the ‘Grant access to a product’ action in Thrive Automator allows you to pick multiple products. Let’s say you have one product per course, you can easily pick all 10 products in the one Automator step.
In either case, that’s one incoming webhook and the user will get access to all 10 courses.
Thanks Brad,
There is still one thing which confuses me.
How does Automator know which of the products to pick? Is that information sent within each webhook?
No that information is set within the “Give access to an Apprentice product” action in Thrive Automator.
You have a filter their that allows you to choose which course to grant access to.
So the webhook would tell you WHO should get access and the action will decide what products to grant access to.
Hanne, in my action “Grant access to product” there is no filter where I could choose which products to grant access to. I can only select one or multiple products.
Could you please explain how to filter within that action element?
Use case of backoffice/Henk and me:
10 different online courses (for example connected via Digistore24 with ONE (1) webhook)
10 different products within Thrive Apprentice
Customer buys 1 product ( = 1 course)
1 automation
with
1 trigger “incoming webhook” (from Digistore24).
IMHO, it does not work as described by you and Bradley at the moment.
I think you will need 10 automations that will lead to 10 different webhooks that you have to individually connect to each online course (within Digistore24).
But PLEASE prove me wrong 🙂 🙂
Hey Holger, for our first version of this, you cannot pass dynamic data into the ‘grant access to product’ action. But we already have this extra feature in the works.
Right now, using Digistore24, you can configure the outgoing webhook to send to a different URL per product purchased.
This means that for your 10 different courses, you’d require 10 different automations. In Thrive Automator, you create an automation with an incoming webhook trigger and make it give access to a specific course. Then, Digistore24 just has to point to that URL if that’s the product purchased.
It works exactly as I described in my article.
But like I mentioned, support for dynamic down-stream actions is coming soon, and would allow you to do it with 1 automation instead of 10 individual ones.
Thank you very much Bradley for replying and those insights in your roadmap.
FYI, meanwhile I have found a workaround thanks to FluentCRM that only needs 1 Digistore24 webhook for e.g. 10 products and only 1 automation in FluentCRM. Then access gets granted to products within Apprentice.
But it would be great when Thrive offers this feature 🙂
Thx again for your time.
How about this: syncing content templates and symbols between websites(separate WP installs).
Sorry Mariano, I don’t think we’ll do this. That’s what we call an ‘edge-case’ (rarely used and rarely needed), but would require a huge amount of technical effort to achieve.
Great features again, Bradley!
One question: we we used to use a seperate website for Thrive Apprentice, for 1 reason and that is management of the users. They are all in one stack with our teachers, moderators, content builders, administrators etc.
Do you have some advice how to handle this the right (or a proper) way?
My team is a bit apprehensive to install a plugin that is on a beta stage (regarding compatibility, bug..). Does Thrive Automator can cause serious issues ? What can you say to assure them ? Thanks for your help.
Hi Audrey,
Thrive Automator is in Beta from a developer point of view, not from a user point of view.
This means that you can safely install and use Automator on your site.
We’ve added the label “Beta” because if a developer creates an integration with the Automator API it might not be backwards compatible when we make new developments to the plugin.
Amazing how you keep adding new features!
To keep you going, I have a feature request:
I would like to see 2 new triggers for Thrive Automator when somebody:
a) watches a certain percentage or time of a Vimeo or Youtube video
b) stays on a page for a certain time
When this happens I can add a tag to ActiveCampaign to trigger an automation there. That would be really cool… 😉
Is this something you are planning to release in the near future?
Wouter