We've been working for months to be able to make this announcement.
Our team is incredibly proud of the two massive new features we've released today.
The first is one of the most highly-requested features for Thrive Architect and Thrive Theme Builder that we've ever had, and the second takes Thrive Apprentice's drip feature to the next level... again.
Introducing:
The new front-end filters, coupled with the Post List element, means this update is capable of replacing many expensive and now-unnecessary 3rd party plugins from your website. But it's not just one type of filter... it's 6 different filters rolled into one!
And Sequential Unlock for Thrive Apprentice puts our drip timeline editor miles ahead of any other on online course platform on the market— bar none— by making it super simple to force your students to progress through a course in order.
These are big updates... so do yourself a favor and read on to find out why they're so impressive.
More...
Front-End Filters for the Post List
If you haven't discovered it yet, our Post List element in Thrive Architect and Thrive Theme Builder is just insanely good. It's driven by market-leading dynamic tech, allowing you to make advanced filter selections, to pull in any posts and pages of your choosing on your website, and display them beautifully.
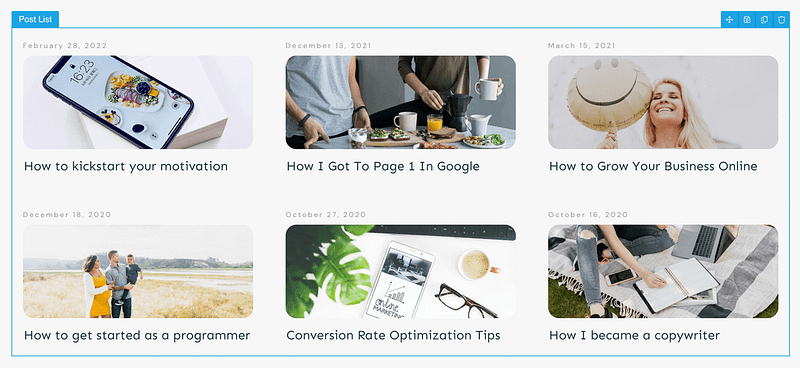
The post list element can be configured in thousands of combinations, giving you freedom to present your content how you please.
It comes with options for a grid view (pictured above), list view or masonry.
You can style every corner, border, font, label, color and more. And since it's a dynamic template, the style changes you make will be applied to every new post that loads into it. Of course, you don't need to style it from scratch, because it comes with 42 pre-built designer-made templates (and that doesn't include the theme-styled templates that come with Page Blocks or Thrive Theme Builder).
At WordCamp Europe, we demonstrated this element to some power-users of another page builder whose name we won't mention. Needless to say, they were astonished at how flexible it is.
But there was a feature request that we kept getting.
"Can you add filters on the front-end so my website visitors can change the content in the post list?"
Front-end filters is has become the most requested feature we've had in recent time for Thrive Architect and Thrive Theme Builder. It took us a long time to figure out how to give you the best front-end filters that are flexible, and can be placed anywhere on your website.
Today, we are proud to announce the new Post List Filter element.
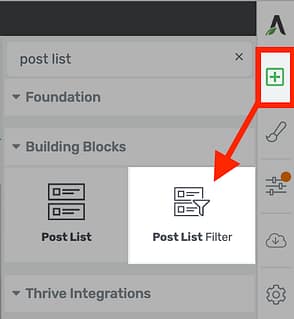
Look for the new 'Post List Filter' element in the element tray.
Yes, it really can be placed anywhere because it's a separate element to the Post List itself.
That means you can place your post list filters in your theme template sidebar (built with Thrive Theme Builder) and make those filters target any— or specific— post lists added to your regular page content with Thrive Architect.
Not sure what we mean by a front-end filter? Look at this image below.
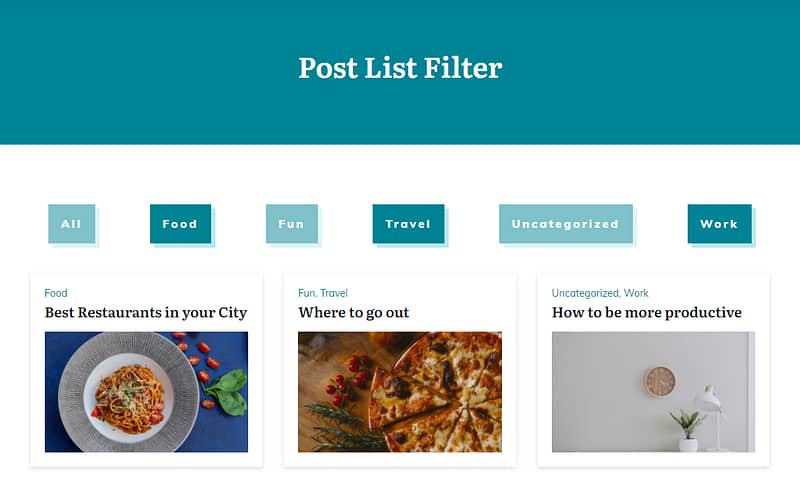
Post list filters work alongside the Post List element on your page.
See that row of buttons across the top? Users can click them and the content of the post list underneath will immediately update without requiring a page refresh!
What could you do with the post list filters? Here some ideas:
When you drop a Post List Filter on the page, you'll have many options to choose, but most importantly is selecting the filter option. This declares what taxonomy you want to filter on.
"Taxo... what?"
Wikipedia describes Taxonomies as"...a scheme of classification, especially a hierarchical classification, in which things are organized into groups or types."
By default, the taxonomies available in the Post List filter include: Categories, Tags and Authors. These are WordPress' core taxonomies. But the element is smart enough to find any custom post types on your website and fetch their taxonomies too, whether that's filtering on a recipe type, a team member occupation, or a country of origin.
Once you choose the taxonomy you're filtering on, you can search and select which specific results you want your filter to include. As pointed out below, I've chosen 3 categories that I want my visitors to choose from: marketing, members only and motivation. But it's incredibly easy to add more.
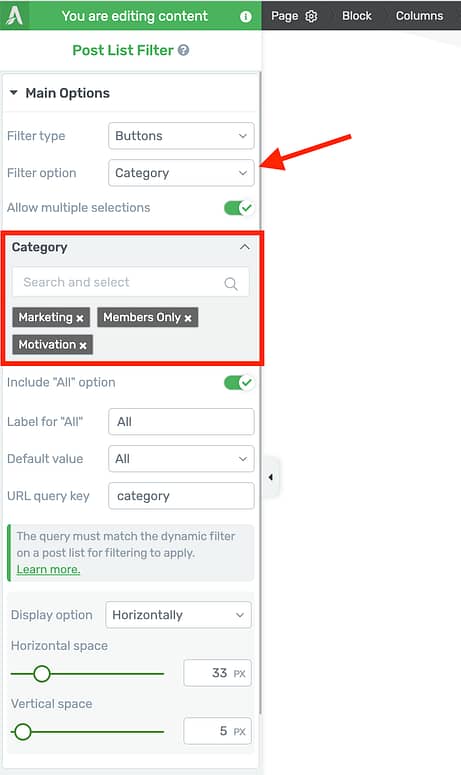
You can choose, search and apply what filter terms you want your visitors to be able to engage with.
Given that our Post List element is the most flexible, versatile post grid in WordPress, we wanted to make sure that the Post List Filters were just as flexible.
To do this, we didn't just release one type of filter...
We released 6 different filter types, including Search!
When you drag-drop a Post List Filter onto the page, you'll be able to easily configure which of the 6 filter elements you want, and what filter values you want it to load.
In the following examples, I'm showing filters for 3 categories on my test website: Marketing, Motivation and Members Only. The posts that I'm loading will fall into one or more of these categories, and when visitors select the filter of their choosing, the post list automatically shows only the posts in that category.
Let's go through the 6 filter types.
1. Button Filters

Horizontal button filters, added with just a few clicks.
The button filter can be set to horizontal for placing above page content and posts lists (image above), or it can be set to vertical, ideal for sidebars or columns layouts (image below).
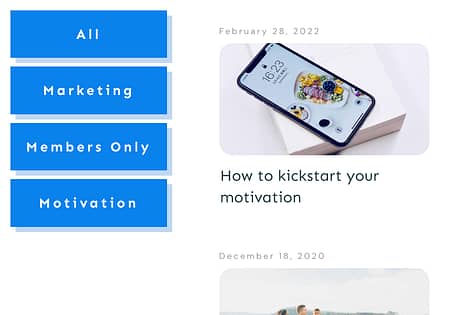
Vertical button filters, perfect for sidebars or columns.
With a click, you can enable or disable multi-select. With multi-select enabled, visitors can click multiple buttons to add to their filters. With it disabled, clicking any button will clear the previously active buttons.
This filter type has all the design features you know and love from the button element, including smart color inheritance (change it with a click), group styling, optional button icons, and more.
The limit is only your imagination.
Don't forget that we already have stacks of pre-made button styles too.

Pick from one of many pre-made button styles.
2. Checkbox Filters
If buttons don't suit your website's design aesthetic, there's also checkboxes. A much more subtle, but equally familiar user-interface component.
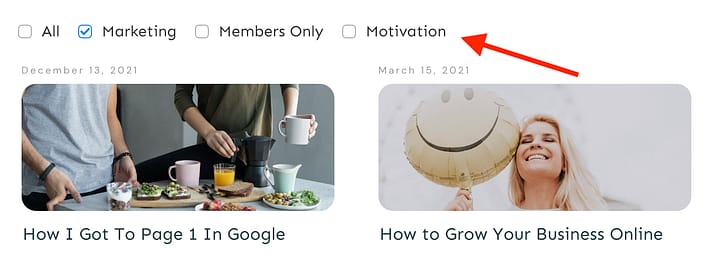
Simple checkbox filters, added above a post list showing filtered posts.
Just like buttons, checkboxes also support horizontal and vertical layouts. In fact, the first 4 filter types do. The last 2 filter types don't need it, and you'll see why when we get to them below.
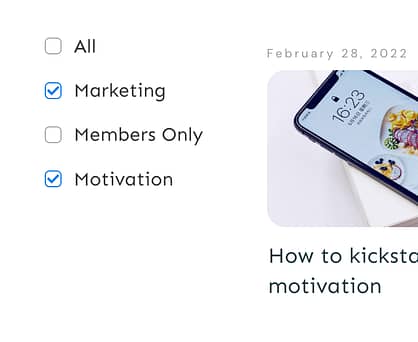
Arrange your checkboxes vertically with just one click.
Generally, checkboxes are a UI (User Interface) component known for support multi-select. But with our filters, that's optional. Just like with buttons, if you disable multi-select, then any previous checkboxes will be unchecked when a vistor picks a new one.
Once again, you can style text size, checkbox size and color, the appearance of the 'active' state and 'inactive' states separately, and you can pick from a set of checkboxes styles too.
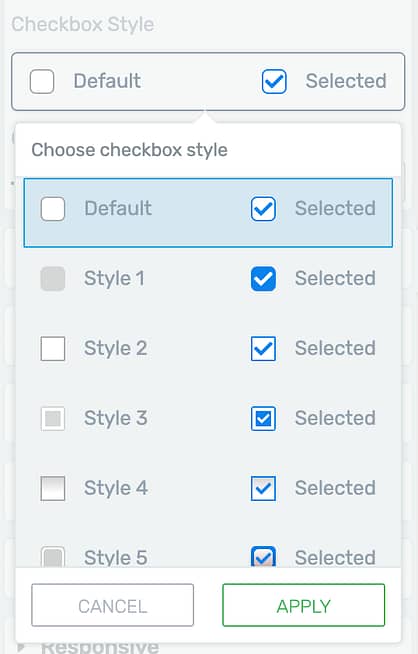
Applying a new checkbox style is easy!
3. Radio Button Filters
Radio buttons are a UI component used when only one value can be selected at a time. This is a universally understood rule of the component type, so choose radio buttons only if you know that you don't want your visitors to multi-select.

With all the same styling options as checkboxes, radio buttons are designed for a single-select only.
In the example above, if I choose 'motivation', then 'marketing' will be deselected.
Radio buttons can be set to vertical or horizontal, and has all the same styling options as the checkbox filter type, with it's own set of design styles as well.
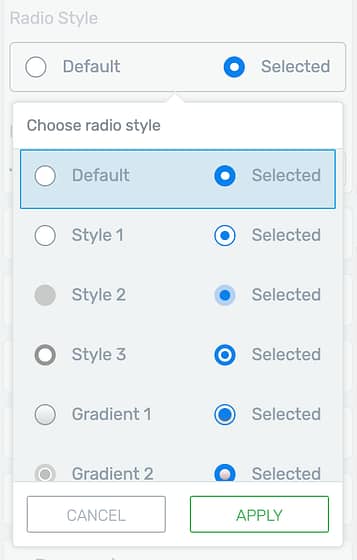
Plenty of radio button styles to choose from!
4. Text Link Filters
What if all the above is too much, and you just want a simple list of category or tag names?
For this we have the text links filter type, which is a dynamically generated list with optional icons as bullet points for each line.
It looks like this:

Text links look just like hyperlinks, but they won't take a user away from the page they're on.
Also available in a horizontal version, with an easy way to change the horizontal spacing and vertical spacing if the values spill over more than 1 line.
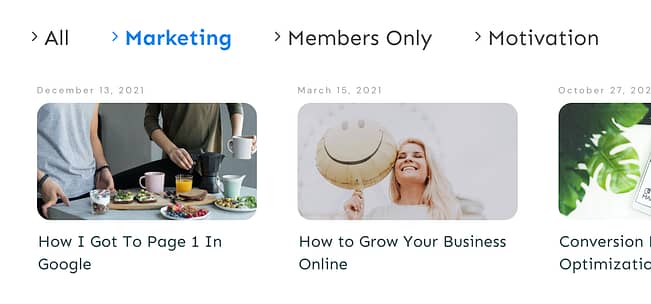
Horizontal? Easy. Change the spacing between each? Just as easy!
Text links for filtering purposes are unique because they hyperlink does not take the visitor to a new URL. They remain on the same page after clicking these links. Therefore, it's important to indicate which text links have been clicked and which have not.
To manage these appearances, select the 'Filter list item' breadcrumb and click the CSS state dropdown in the top left. You'll see 3 options: Normal, Hover and Active.
Active lets to you change the typography and design of your text links when they've been enabled. In this example, I've bolded the text and made it green, the same smart color as the rest of the page.
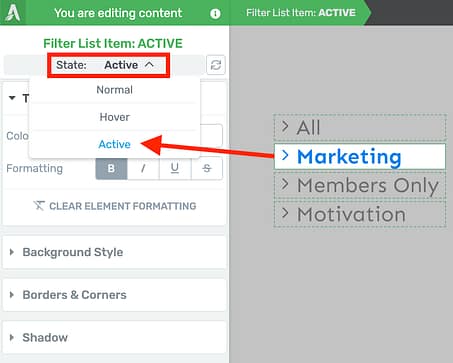
Easily edit the 'active' state of your links, making it clear which filters a visitor has enabled or not.
Since the first 4 front end filter types present a set of options that a user can interact with, all of them have these 3 states on the design items in the grouped set.
If you want to fine tune your filters, its worth getting familiar with this state toggle to make your changes.
"Can I style the icons, though?"
Of course you can. You can entirely disable the icons bullets from your text links, or change their color and size, even picking from our built-in library of hundreds of unique icons. And you can ungroup icons if you want a unique icon per listed link.
Edit your icons freely, with all the power of our icon picker.
5. Dropdown Filter
Unlike the first 4 filter types, a dropdown uses much less screen space.
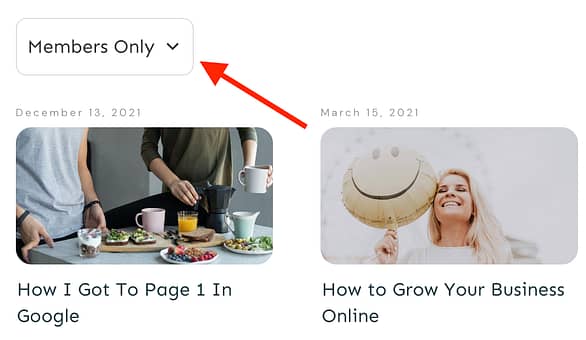
Dropdowns are perfect for keeping your page clear of clutter, while giving your visitors options.
This filter type means a huge list of available filters can be tucked away into a simple dropdown selector.
When you visitors click on the dropdown, a scrollable and visually-editable box will drop down, and they can choose the filter option they want.
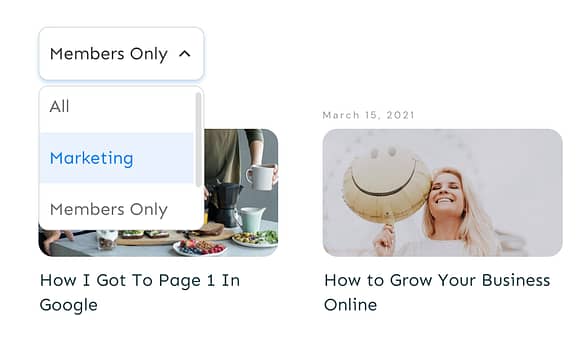
Your filter types will be listed, and the opened dropdown can be styled too, of course.
Keep in mind that a dropdown only allows a single value to be selected at a time. And of course, we don't leave you to style every corner, border and color on your own. It also comes with pre-made styles to get you started.
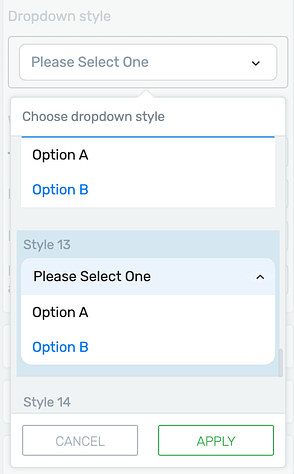
Start by picking a style that suits you, and customize it from there!
6. Search Filter
As if those 5 filter types above aren't already enough, this last one is just the icing on the cake: a search filter that narrows the results of your backend filters by displaying any post that contains specific text in the post title or content area.
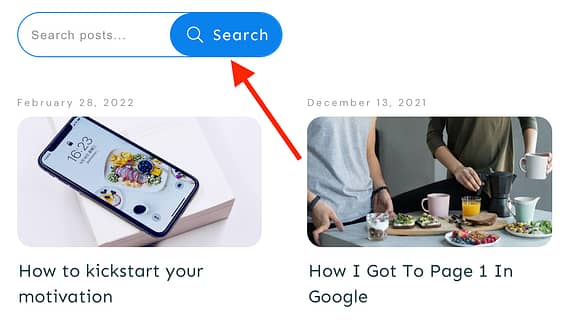
Visitors simply type in the search field, click search, and the posts below will be filtered to show any that contain that search term.
The best part? It performs the search right there on the page without a page reload!
WordPress already has search functionality built in. But it's a bit clunky. As a visitor, you enter a search term into a search box and then you get whisked away to a different page, driven by a WordPress theme template, presenting search results. That page is quite difficult to edit, too— unless you have Thrive Theme Builder, of course.
And it'll search almost all of the content on your website, returning results that you probably don't want your visitors to find. The visually editable search element that we built years ago allows some limited filtering on what post types the search should be performed. But we couldn't push it much further without some advanced filtering rules.
...Like the advanced filtering rules we've already built in to the Post List element.
This front-end Search filter for the post list is just awesome. It will only find posts that match BOTH the back-end filters you've preset and the search terms a user inputs.
And doing it all without a page refresh? That's just a game changer!
I doubt you'll be surprised to know that the Search Filter also comes with loads of pre-designed templates too.
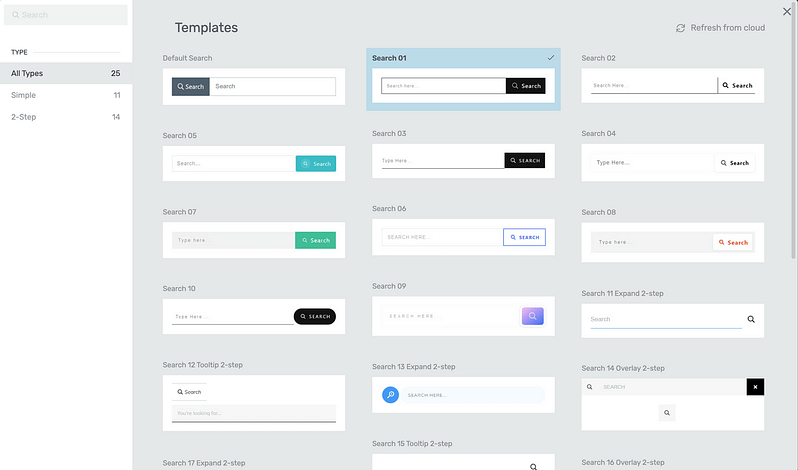
Look at all those pre-made designs! Including 2-step search too!
You can choose to include an icon or not, put the 'search' button on the left or the right of the input field, or even change it to a 2-step search— where the user clicks a small search icon that opens up into an expanded input field.
Borders, corners, colors, fonts, placeholder text— everything is editable.
We don't mess around.
How to apply the Post List filter
We know— the design potential here is incredible. You can pick your jaw up off the table now.
...Because to use this element, you'll want to understand an important concept:
The URL Query Key.
The Post List Filter and your Post Lists are two separate elements. But they need to communicate. And how they do this is by speaking on the same 'channel', known as the URL Query Key. You'll find it in the main options of your Post List filter settings.
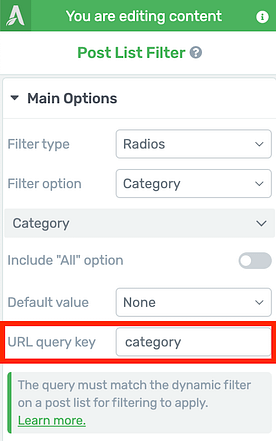
URL query key is the link between your filters and your post lists.
The URL query key is the name of the filter variable that will be applied as a URL query string when a user clicks on it. You can see above that it's called 'category' in this example.
That means that when a user clicks on my 'Motivation' category filter, the URL in their address bar will change (without a page refresh) to:
domain.com/page/?category=motivation
'Category' becomes the channel that this filter is operating on, and 'Motivation' is the filter value applied on that channel.
Now you'll want to tune your post lists to listen to that channel. So next time you click the 'filter' button on your post lists (see image below)...
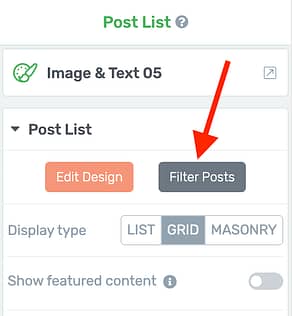
Tie your Post List to your filters by clicking 'filter posts'
...you'll notice that in your back-end filter settings you can choose which front-end filters this post list should start listening to.
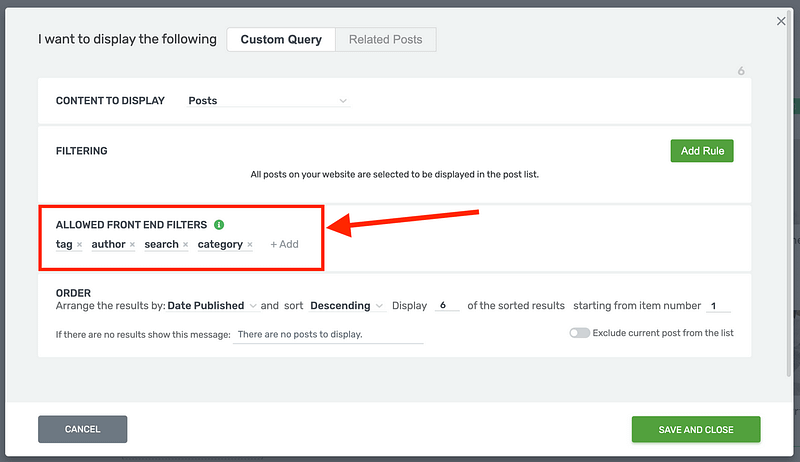
Add your URL Query Keys under the 'Allowed front end filters' and your Post List will begin listening to the available filters.
This is a new setting we added in this release.
By default, any Post Lists already on your website will not have any Allowed Front End Filters. You'll need to add them manually. But any new Post Lists you add will come with those 4 'channels' (or rather URL Query Keys) enabled: tag, author, search and category.
At this point, your post lists are listening to the front end filters.
Keep in mind: You can customize your URL Query Key.
If you have more than one Post List on a page, you might want to create filters that target only one of those Post Lists. To do that, you can edit the URL Query Key of your front end filters, perhaps changing it from 'category' to 'category_2'.
Then, hop over to the Post List that you want to listen to the new channel, and click '+Add' from the 'Allowed front end filters'. You'll see 'category_2' is logged as a new URL Query Key on your website and can be added.
Try it out!
With 6 filter types to choose from, and being smart enough to read the taxonomies of any custom post types, this feature is huuuge.
And because it's a separate element, you can add multiple filters to a page and place different headings or style components around or between them.
Start playing around with it! It'll blow your mind just how flexible it is.
Phew... that was a big feature! Now on to the next...
Thrive Apprentice Drip: Sequential Unlock
In today's release, we've refactored some of the user-experience when setting up a drip schedule for your online courses in Thrive Apprentice.
This refactoring was necessary to clear the way for a brand new feature: Sequential Unlock, which allows you to force your students to complete your course content in order. They won't be able access lessons until they've marked those before it as complete, meaning that they consume your content in the order that you decide is best.
You already know that Thrive Apprentice's Drip scheduler is leagues ahead of other online course platforms.
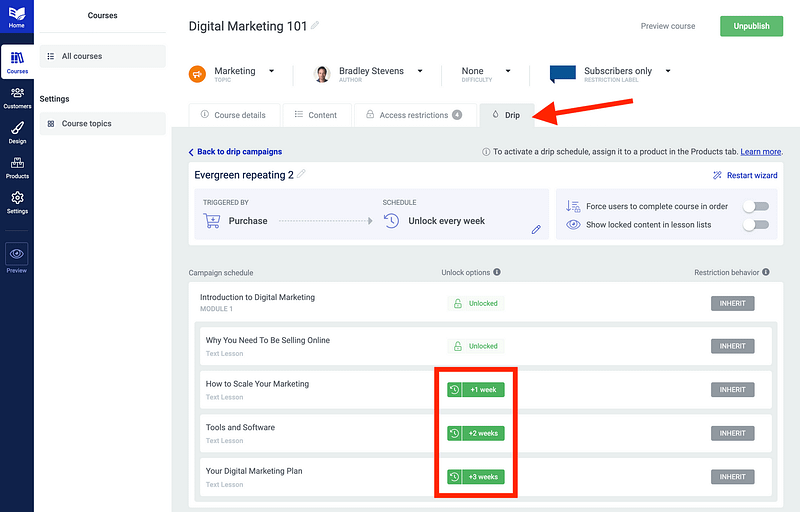
Your drip timeline shows you what unlock rules are set on the content in your online course.
You can set evergreen drip schedules that release content on automated schedule. You can configure specific calendar dates to release course content. You can even customize the unlock rules per lesson or module, allowing you to pinpoint exactly when and how your students can consume your content— including when they complete quizzes or achieve certain scores.
This isn't empty rhetoric.
We know that our drip sequencer is better than anything out there because we did the research and made sure of it.
There was one thing missing, though...
"What if I don't want to set complex drip rules, but I just want to force my students to access my course content in sequential order".
You're right. That should be really easy. And today, it is.
New 'Force users to complete course in order' toggle
Sequential Unlock is when the only rule that matters is that all previous content has been marked as complete. You're not fussed about specific dates or events (though you can add those too). You just want to make sure that your students cannot advance to the next lesson until they've marked the previous one as complete.
That is now represented by this toggle:

This toggle was previously marked as "Coming soon". But now, it's here.
With one click of this toggle, your enrolled students will have to progress through your course in order.
But to accompany this, we've improved the drip template library.
Now when you go to create a new drip campaign, this is the first screen you'll see:
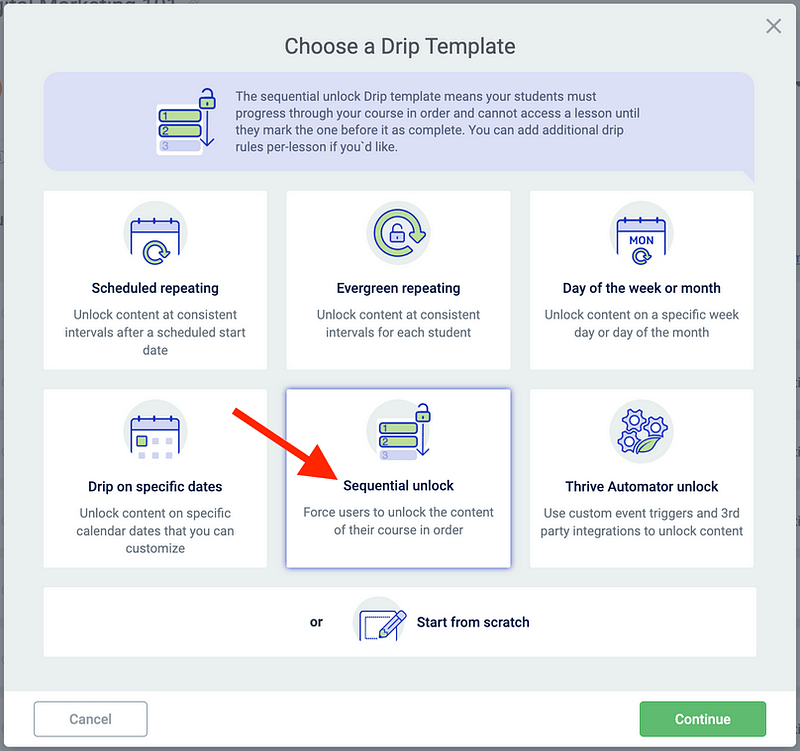
There are now 7 templates instead of 6, with more information on the opening template screen.
'Start from scratch' has been moved to the bottom, making space for a new template called 'Sequential Unlock'.
When you make a selection of a drip template on this screen and click 'Continue', you'll be able to edit all the necessary settings on the second screen.
In the image below, I've applied an Evergreen Repeating template. Now I can adjust any settings I want. Templates are there to pre-configure settings, and after you've selected it, the template type no longer matters.
Notice the 'advanced settings' toggle at the bottom?
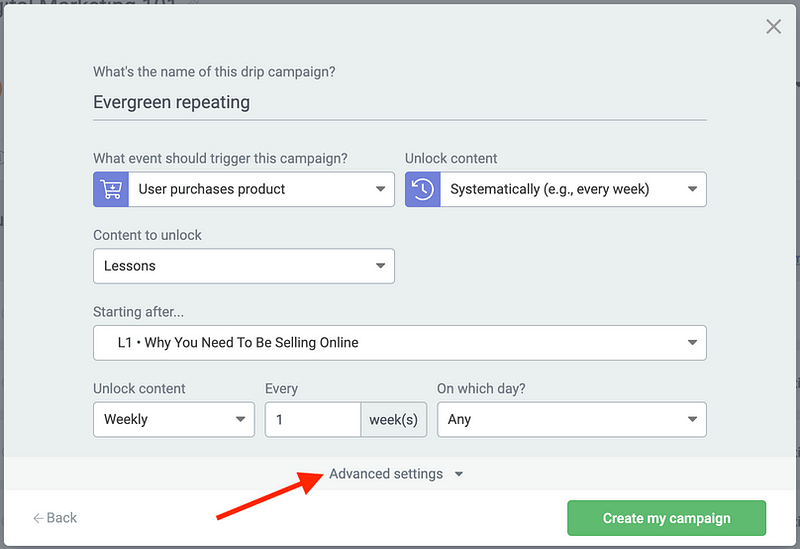
The second template screen has a new but discreet 'Advanced settings' toggle.
While you're configuring your drip campaign, you can open this toggle to make quick decisions about both locked lesson visibility and— the new feature— whether or not you also want to force your students to unlock the content in order.
New Sequential Unlock Drip Template
For example, if you select the new 'Sequential Unlock' template, you'll see that the advanced settings toggle is already opened and both options are enabled.
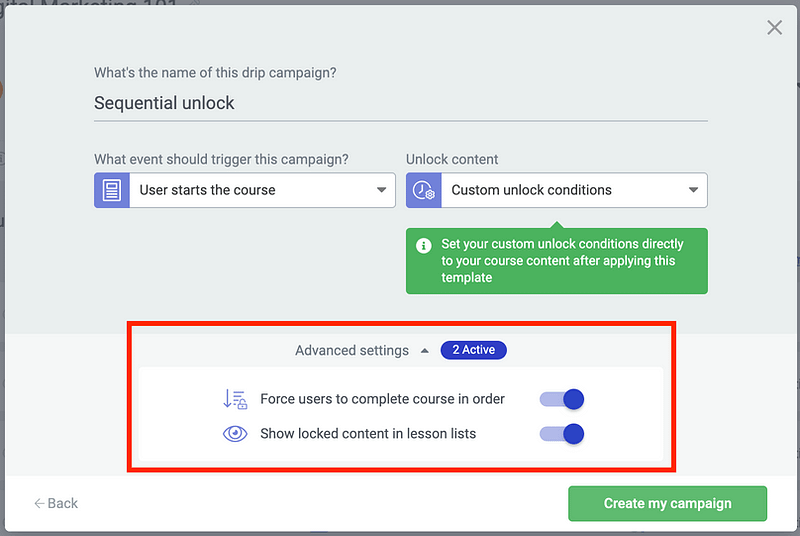
When advanced settings are applied, a small notice will alert you to see what they are.
This means that creating a brand new drip template just to force your students to unlock their course in order is as easy as 3 clicks.
That's it.
And how is this reflected in the drip timeline? You'll see a new light-green 'sequential' status on any lessons that have only this rule applied. Of course, you can also add specific drip rules as well, and these will be marked in dark green. If the sequential rule also applies, you'll see a floating number (1), indicating that there's 1 other rule on that lesson.
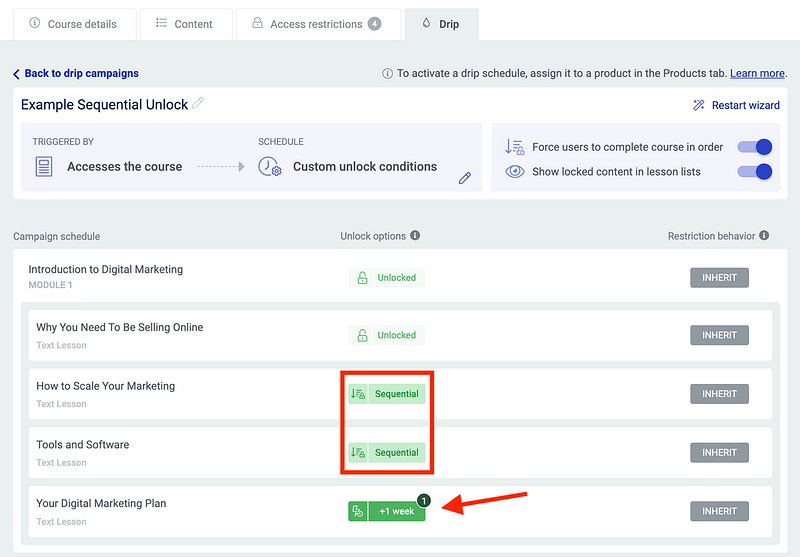
Lessons with sequential rules applied are locked but only until the lessons before it are completed.
Editing your sequential unlock rules per lesson
But that's not all.
We really did go the extra mile here. We asked our beta testers if they felt there would ever be a time when you want to force your students to take a whole course in order... except one or two lessons.
They said yes, there might be.
So we needed a way that after applying a sequential unlock rule to your whole course, you could choose specific lessons that deliberately ignore that rule.
If you click to edit the drip rules on a specific lesson that has a Sequential rule applied, you'll see this view:
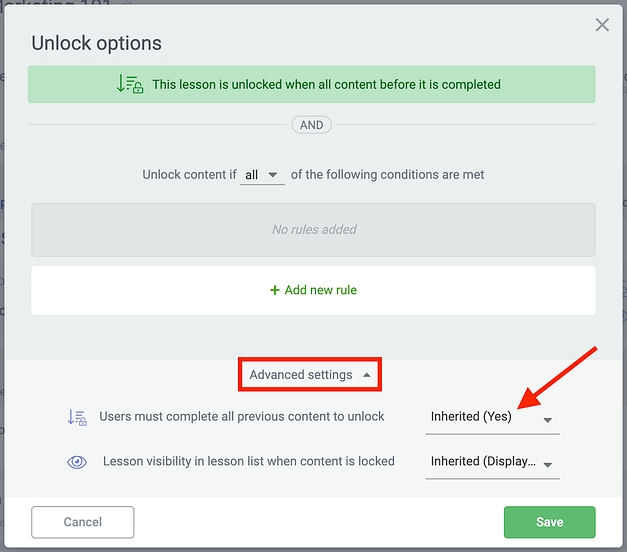
Easily disconnect a lesson from its inherited sequential unlock rule.
Open the 'advanced' toggle at the bottom, and you'll see that your lesson's sequential unlock settings are set to inherit from the drip campaign itself.
But you can change this to 'No', disconnecting any inheritance, meaning that this specific lesson will be accessible by students without them having to complete the rest of the course material before it— even though that rule remains in place for all other lessons.
And two more around the corner...
There's two more announcements— one coming tomorrow, and another one in the coming weeks.
Keep your eyes on your email inbox and on our blog. The first is a huge accomplishment, but technically it's not a feature that you can use straight away. And the second is whole set of brand new templates centered around a small update that we've snuck into the latest release.
Until then, we'd love to hear your comments and thoughts about the new Post List Filters and Sequential Drip. Drop us a comment below!


Aw yeeeeah! I can finally ditch out round-about ways of adding filters (I used Toggle elements and custom .js scripts, haha…) 😀 Awesome!!
Happy to hear that! We do our best to be a code-free solution, so ditching your custom .js scripts— that’s a big win!
We JUST bought FacetWP but this looks visually SO much better out of the box. I’m excited to give it a try. Any plans to support fselect type (multi-select drop-down with search) in the future?
Okay after diving in and using it, I have to say it’s awesome. Well done!
I have two additional suggestions/requests (in addition to fselect):
– option to display the number of results next to each item (e.g., Marketing (21), Members only (12), Motivation (4) )
– add a front-end sorting option (e.g., sort by: newest first, oldest first, price low to high, etc.)
Good additions, thanks Ryan. At that point, it’s transitioning from just post list filters to a complete solution for directory listings. I’ll add it as a feature request
Hi guys, wanted to add a thought here:
• this is a great way to sell, or upsell items (products and or courses), in a space like your member’s area. See the comment below #Iynnek
The post list item could be teaser posters for ‘related courses’ for example, and then the option described in this comment for sorting could be used for difficulty level, beginner/advanced for example, so the post list tool becomes multi-functional.
Feature request: please make the sorting option customizable if possible.
I think the creative uses for this new functionality help with retailing, courses, posts, and products – for sales, promotions, upsells etc.
This might be the storefront promo gamechanger for so many people.
Thank you for such a great tool.
Do you know when could come certificates?
I am doing them with Photoshop =(
Certificates are in the works, but we don’t give dates of release. Things can go wrong that cause delays, and we won’t release until we know it’s absolutely ready to be released.
All in good time! Keep going with Photoshop for now.
My dream came true, when I started to launch a brand new Blog. Thank You Team Thrive
You’re welcome.
Stellar! As always!
Cheers Matt!
Amazing! Thank you Thrive Themes team ???? for continuing to listen to your customers and respond with meaningful updates. I’ve been an avid fan from your early days. As a team you’ve continued to deliver great new features month after month. That’s why I am still telling people Thrive is the best platform in this market.
Hey, this is all awesome! I have a feature request or the question, if this is planned:
I would be a cool feature in Thrive Apprentice, if my course customer could always get an automatic Email, when new content is unlocked for him or her. Like “Hey Mark, there is a new lesson unlocked for you!”
This is very useful if I have breaks (1 day, 1 week…) in the drip schedule and the customer could forget about the course in this breaks.
Is something like this planned in the future?
Greetings!
There is a way to achieve this already, but we are looking to expand on it.
To achieve it right now, in Thrive Automator you can create an automation with the trigger ‘Content is unlocked for a specific user’, and use that to pass a tag to an email service. Then, an email tool can send an email when a specific tag is applied, notifying the student that the content has been made available.
But we’d love to offer more control over that in-house. We just haven’t figured out how to tackle it yet.
Well done Thrive team. This is huge as you say. The sequential drip with the option to bypass some lessons is exceptional. Thank you.
It was the option to bypass it for some lessons that made it extra challenging. But we really wanted to get it right, and I think we’ve nailed it.
Thanks Quentin!
Fantastic work as usual. I’d give you 5 stars but ovation doesn’t allow us to do that. Well done.
Haha, a subtle feature request slipped right in there, I see
That reminds me – more flexible Ovation templates, please 😛 Current ones are ancient and pain to customize fully 😛
We have 2 pieces of work that are precursors to Ovation getting an improvement. Both have been scheduled and once they’re done, we’ll finally be better prepared to deliver some updates to Thrive Ovation.
WOW, WOW, WOW! THANK YOU! ????????
Yay! Now I can quit “harassing” my students with multiple reminders that the lessons go in a specific order **for a reason** 😉 Now just a gentle mention…and sequential drip! PERFECT!
Yes, exactly!
Wow, well done!
And good timing too: I am about to start building a website where the filter feature will be extremely useful!
Nice one!
Love hearing that the stars align at the right time. Good luck with your new website, Luca
Love it! The sequential unlock is a big help.
I am excited to see something like these filters. My membership will have certain areas and if I could create a post list filter – they could decide to consider other items from one area to the next at the same time! I am wondering if protected content is not affected by this addition? It will all remain protected? Even if there is a search?
Yes, correct. So this is why the Search filter is, in my opinion, more flexible than the standard WordPress search. It will only find posts that ALSO match the backend filters you set for the post list.
That means if you put a post list on the page and set the backend filters to exclude your membership protected content, then you also add some front-end filters such as the search, a visitor who changes those front-end filters won’t ever see the membership protected content.
Alternatively, maybe you do want them to see it. In a post list, you can show the title and a small excerpt of the content. But if a user clicks on the post, it will take them to the specific post URL, and if that’s protected— the visitor will see a “Sorry, you need to buy a membership to see this content”, which might be exactly what you want them to see.
Can’t wait to update my plugins and apply filtering function onto my website.1 question, when will the filtering support fields from ACF? I can custom post type with many ACF’s custom fields. That would be terrific if the filter can support ACF’s fields
Hey Jason, I know we discussed this in the Facebook group, but I want to answer here for visibility for anyone else too:
One step at a time. Step 1: create the filters and have them work with custom taxonomies. This was a huge achievement worth celebrating on its own, first. Additional features we’ll consider adding as we collect more feedback.
ACF technically isn’t a taxonomy, it just adds fields of data. Though admittedly, checkbox and radio ACF fields can be treated as taxonomies. We’ve found ACF notoriously difficult to work with, so although it makes things flexible for a user, it makes it difficult for our development team. That means I don’t expect this to be something we can add easily.
Nonetheless, thanks for the feature suggestion, we’ll explore it with the product team when we have time!
And I’d like to report a bug. When I set pagination at post lists, I first filter a certain category, the original post list shows correctly. However, when I hit load more, the newly loaded posts are not within the category I filtered previously. Is it my setting problem or there will be an update to correct this?
Thanks Jason, we’ve caught that bug and have already pushed a fix for it. Pagination should work without any issues if you update to the fixed version.
Mine had 2 problems with the Post List Filter:
– No automatic Loading filter when selecting a theme
– It is having problems with Vietnamese Unicode UTF-8
Please open a support ticket explaining the issues, so our team can log it.
Hmmm… awesome features, yes, but we can’t do this in Thrive Apprentice and filter courses there by their topic using buttons for example 🙁
Now, THAT would also be a huge help and boost, since the dropdown menu is ok, but not that much helpful. Having visitors and students (multi)pick by course topic would be really awesome. I hope you add this feature too soon (in case it is already available and I haven’t found out yet how to do it, I apologize).
One step at a time 🙂 The Thrive Apprentice course list element is a bit like a child-element of the Post List. So to roll out features to it, we have to start by adding them to the Post List, ensuring they’re stable and collecting feedback. Once we’re 100% happy with the feedback we’re getting, we can explore applying the same filters with the Course List element.
Really looking forward to it. I am sure everyone will love it ????
In the thrive theme builder breadcrumbs, I want to disable one breadcrumb. https://prnt.sc/IFPKAmmsiIlK
I want to keep home breadcrumb and disable blog breadcrumb. Is it possible to manually control this?
Not with our breadcrumbs element, no. However, categories and home links are all dynamic links, so you could build your own set of breadcrumb-style links from text elements. It looks like what you want is a quick link to ‘home’, and one to the category that the blog post is in, which in your case is ‘news’. You can do that by adding a dynamic category link.