If you're searching for a simple method to add social media icons to your WordPress menu, you've come to the right place.
Whether you're setting up a new website or improving an existing one, adding social media icons to your website can enhance the user experience, build trust, and expand your online presence.
In this post, we're going to guide you through the process of adding social media icons to your WordPress menu using 3 easy methods. Choose the one that best suits your needs. Let's get started!
More...
The Benefits of Integrating Social Media Icons into Your WordPress Menu
Adding links to your social media profiles is more than a mere design trend. It's also a strategic move that can bring multiple benefits to your brand:
1. An Enhanced User Experience: Adding social media icons to your WordPress menu or widgets makes it easy for visitors to find them. Those who wish to connect and engage with you on social media accounts can easily do so without enduring a frustrating hunt. (Click here to learn more about what makes a good website.)
2. Increased Brand Trust and Credibility: Displaying your social networks prominently on your WordPress site can significantly enhance your brand's credibility. If you have positive reviews and interactions on your social media channels, they can act as social proof, building trust among new visitors.
3. Increased Engagement: Social media icons provide an additional, convenient communication channel for your valued clients and customers, as it's incredibly important to keep them happy. Your audience can choose their preferred platform to ask questions, provide feedback, or discuss their needs.
The simple addition of social media icons can promote communication, build trust, and make your website more user-friendly.
Ready to get started? Follow our easy step-by-step instructions for adding social icons to your WordPress menu.
How to Add Social Media Icons to Your WordPress Menu Using Thrive Theme Builder
If you're looking for the easiest way to add social media icons to your website, then look no further than Thrive Theme Builder.
Thrive Theme Builder is a WordPress theme that lets you design and customize your website to your exact specifications. It's all done through an intuitive drag and drop builder, allowing you to add a social icon widget strategically throughout your site.
Not a designer? No problem. Thrive Theme Builder comes with dozens of pre-designed templates to help you get started fast — perfect for beginners and non-coders (no need to worry about HTML, CSS, or anything like that).
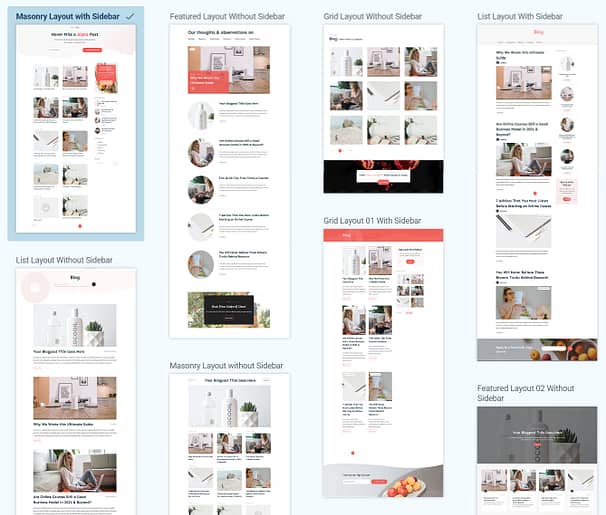
A sampling of some of the templates that come with Thrive Theme Builder.
One of the many handy features that comes with Thrive Theme Builder is the ability to easily add social media icons to your website. And, with the Smart Site feature that comes with Thrive Theme Builder, if any of your social media URLs change, simply make the change once and Thrive Theme Builder will magically update your URL throughout your site (menus, footers, widget area, and everywhere else), saving you loads of time and effort.
Sound like the perfect tool for your needs? Then head to the pricing page to check out Thrive Theme Builder.
Need even more? Consider Thrive Suite, our complete package that includes Thrive Theme Builder along with our entire collection of tools. Thanks to a powerful landing page builder, LMS system, popup builder, and other conversion-focused feature, Thrive Suite equips you with everything you need to design stunning and high-performing websites, landing pages, and marketing campaigns — all at an incredible value.
Check out pricing for Thrive Suite
After purchasing Thrive Theme Builder (or Thrive Suite), follow our step-by-step guide to easily add social media icons to your WordPress menu.
1. Install Thrive Theme Builder
Start by logging in to your Thrive Themes account and downloading the Thrive Product Manager plugin.

Download the Thrive Product Manager plugin by logging in to your Thrive Themes account.
Next, access the back end of your WordPress website and upload the Thrive Product Manager plugin. After installing and activating the plugin, navigate to Thrive Product Manager in the left sidebar and follow the prompts to install and activate Thrive Theme Builder.
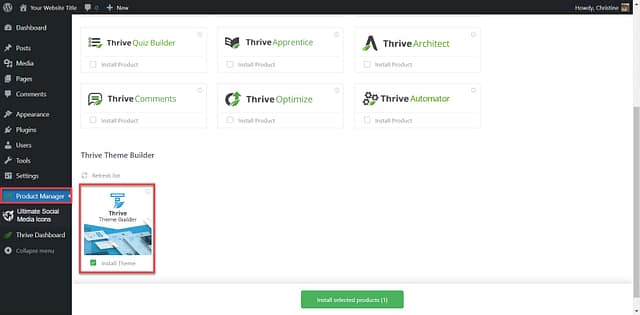
Follow the prompts to install Thrive Theme Builder.
2. Add Your Social Media Links to Smart Site
One of the biggest benefits to using Thrive Theme Builder as your WordPress theme is the ability to manage essential information that appears multiple times throughout your website from one central location, Smart Site.
If any of your essential information changes, simply change it in Smart Site, and Thrive will update it throughout your website, automagically.
To access Smart Site, navigate to your Thrive Dashboard, look for Smart Site, and click the Smart Settings button.
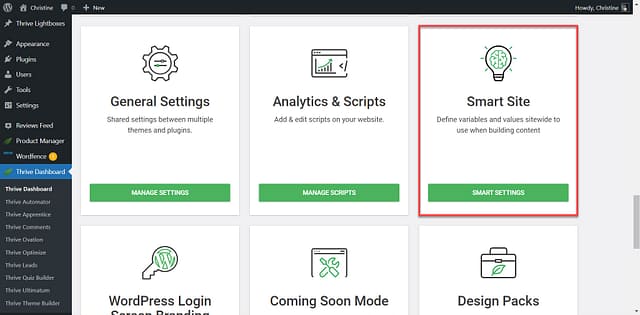
Smart Site can be accessed from the Thrive Dashboard.
Take a few minutes to fill in your social media profile information. And if you haven't already, now would be a great time to fill in your company and legal page info, too.
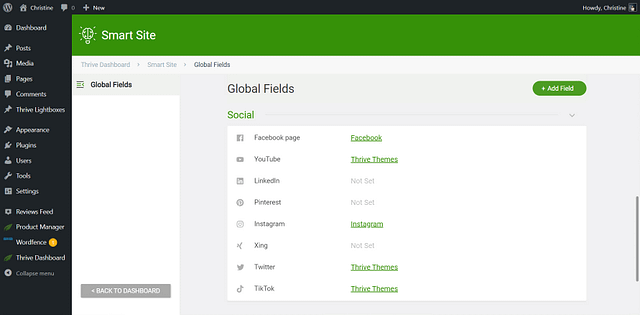
Fill in your social media profile information in Smart Site.
Next, you have two choices for adding social icons to your WordPress menu using Thrive Theme Builder:
- Selecting a header template that contains social icons (easiest and fastest solution)
- Adding social icons to your menu manually (great for building a custom design)
Let's start with the former option.
3A. Choose a Header Template with Social Icons
Thrive Theme Builder comes with a variety of templates for each section of your website, letting you build a custom design that matches your precise needs. The absolute easiest way to add social icons to your menu is to select a header template that has social icons built right in.
Here's how to do it:
1. Access the Thrive Theme Builder Site Wizard: Navigate to the Thrive Dashboard > Thrive Theme Builder. Then, access the Site Wizard tab.
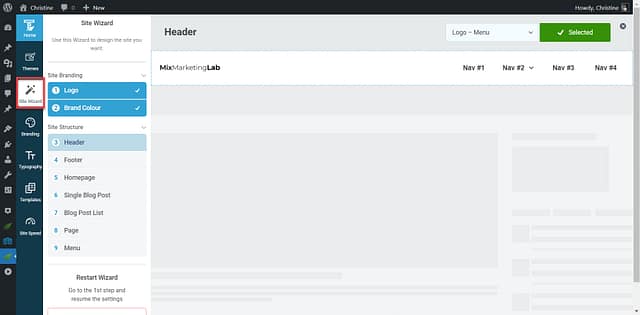
The Site Wizard will guide you through selecting template designs for your website.
2. Select a Template: Click the Header section and choose one of the pre-built templates. Don't worry if you can't find exactly what you need, as we'll be making customizations in the very next step!
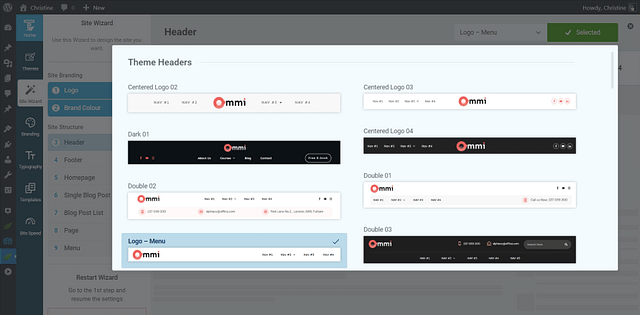
Some of the header templates available in Thrive Theme Builder.
3. Customize Your Header: Navigate to the Templates tab, look for your Active Homepage, and click Edit Landing Page.
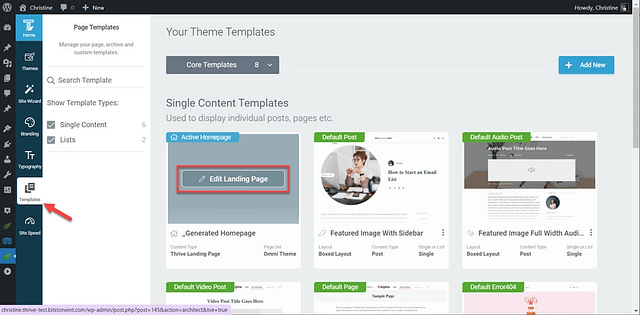
You can edit your header from your Homepage template.
With your template open in the Thrive Visual Editor, start making your customizations by clicking inside of the Header section, then click the Edit Header button.
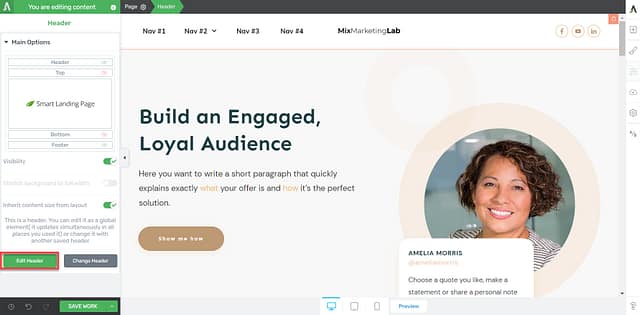
Click the Edit Header button to access the header.
To make edits to your social icons, click the Social Follow element, ensure that Social Follow is highlighted in the breadcrumbs, and use the options in the left sidebar. Enjoy customizing your icon size, colors, fonts, spacing, and more!
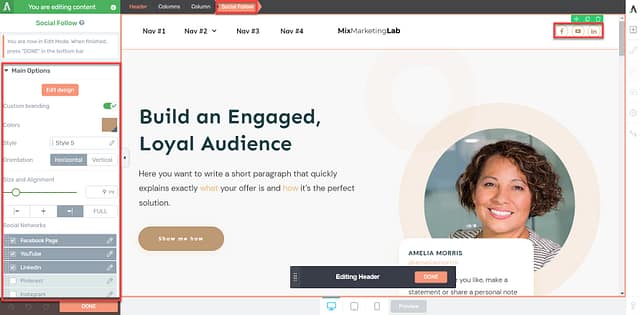
Edit the Social Follow element using the options in the left sidebar.
3B. Add Social Icons to Your WordPress Menu
Thrive Theme Builder comes with dozens of pre-designed templates -- all 100% editable. Choose any template design and make it your own by changing spacing, background colors, borders, and... adding elements such as the Social Follow element.
Whether you've already built a menu in Thrive Theme Builder or you've selected a template that doesn't contain social icons, adding social follow icons is easy to do in just a few clicks.
Here's how to do it:
1. Select Your Template: Navigate to the Templates folder in Thrive Theme Builder and select the template that contains your menu.

Select a template that contains your menu.
Once you've opened the template in the Thrive Visual Editor, click the Header section, then click the Edit Header button.
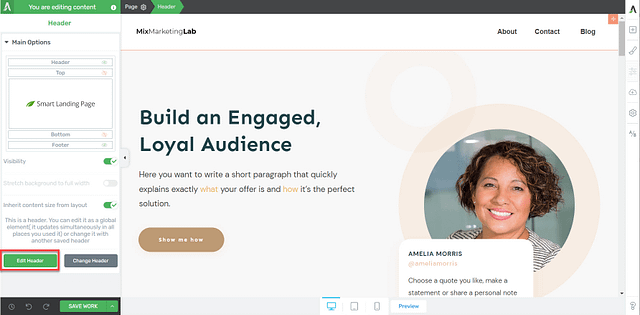
Click the Edit Header button to access the header.
2. Add Your Social Icons: Add the Social Follow element to your menu by clicking the Add Element button, then click and drag the Social Follow element to its desired location.
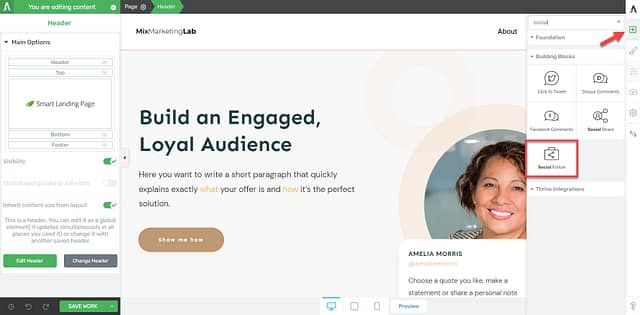
Add the Social Follow element to the page by clicking the Add Element button in the right sidebar.
3. Customize Your Menu: Use the options in the left sidebar to adjust the layout, size, colors, and more. In just a few minutes, you'll have a set of social icons in your menu, ready to help you build engagement.
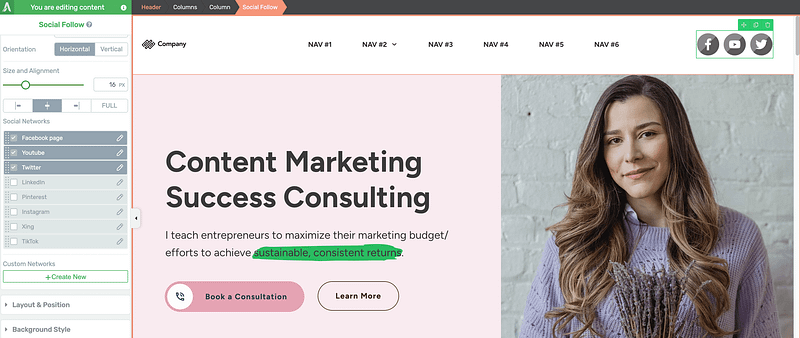
You'll notice options for Facebook, Twitter, Instagram, LinkedIn, YouTube, and much more. Chose the social media pages you want to highlight using the checkbox, and then choose the behavior for your custom link by clicking the pencil. Most people choose to have their social profiles open in a new tab, but it's up to you.
You can also add new social icons by clicking create new. Just enter the links to your chosen social media pages, add your link text (e.g. Whatsapp, or TikTok), then choose your icon from the Font Awesome icons list (use the search bar to search for your chosen platform).
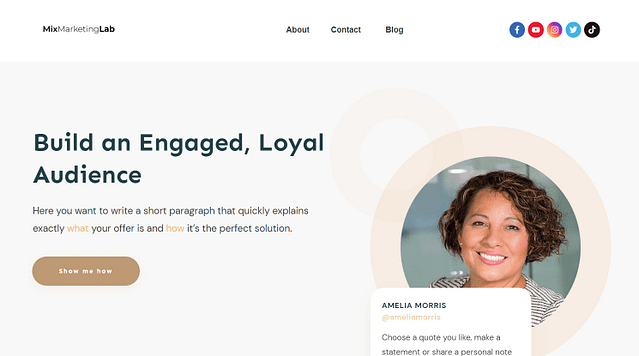
The completed header section with social media icons added.
With Thrive Theme Builder, adding social media icons to your WordPress menu is a quick and easy process. It's a fantastic tool for creating an attractive, user-friendly, and socially connected WordPress website.
How to Add Social Media Icons to Your WordPress Menu Using the WordPress Theme Customizer
The WordPress theme customizer can be a good tool when it comes to customizing your WordPress website, and it does allow you to add social media icons to your navigation menu. However, it's important to note that this feature is theme-dependent; some themes provide social media integration while others may not. In this demonstration, we are using the Twenty Twenty-Three WordPress theme.
Here's how to add social icons using the WordPress customizer:
1. Access WordPress Theme Customizer: Navigate to Appearance > Customize. This will lead you to the WordPress theme customizer where you can modify various aspects of your theme.
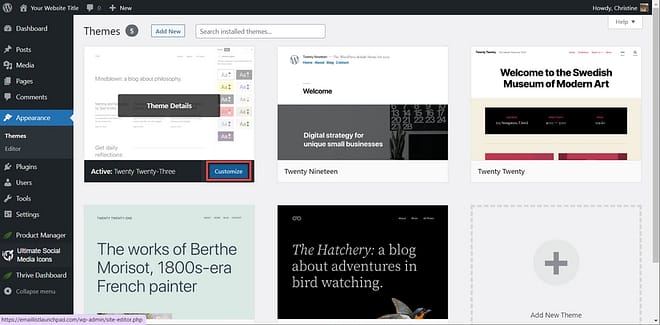
Visit the WordPress theme customizer.
2. Find the Relevant Section: This next step will depend on the specific theme you're using. Click the section that you would like to edit.
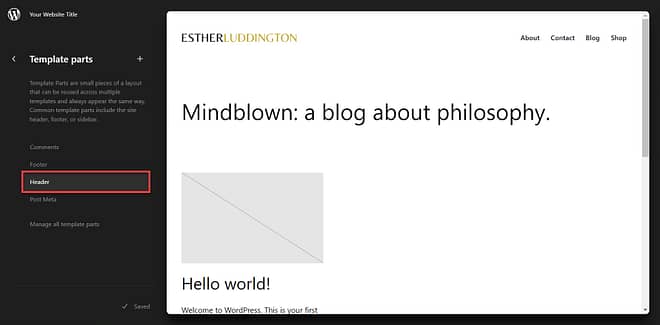
Locate the appropriate template section.
3. Add Your Social Media Links: Click on the plus sign that appears between blocks to add a Social Icons block. Click on the plus sign again to add individual social platform icons. Rearrange the blocks as necessary.
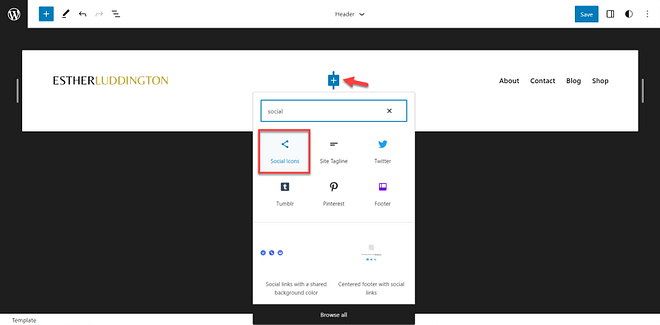
Add a Social Icons section by clicking the plus sign.
Add individual platform icons to the social icons block.
Click on individual icons to add the link to your social profile.

Click the platform icon to add your link.
And that's all there is to it!
The completed header section.
Some themes will allow you to edit the appearance of your social media icons. You may be able to change their size, color, shape, or hover effect.
The availability and location of these features can vary significantly between different themes. If you find your current theme lacks the social media integration you desire, you might consider switching to a theme that offers more comprehensive social media support. We recommend Thrive Theme Builder for its ease of use and Smart Site feature.
How to Add Social Media Icons to Your WordPress Menu Using a WordPress Plugin
If you're looking for a simple way to integrate social media icons into your WordPress menu without altering your WordPress theme, using a plugin specifically for this task is an excellent choice. One such free plugin is Social Media Share Buttons & Social Sharing Icons (aka Ultimate Social Media Icons).
Here's how to use it:
1. Access the Plugin Settings: Once the social media plugin is installed and activated, navigate to Ultimate Social Media Icons in the left sidebar.
The Ultimate Social Media Icons dashboard
2. Select Your Social Media Platforms: In the plugin settings, you'll find a list of various social media platforms. Select the platforms that you use and want to include on your website.
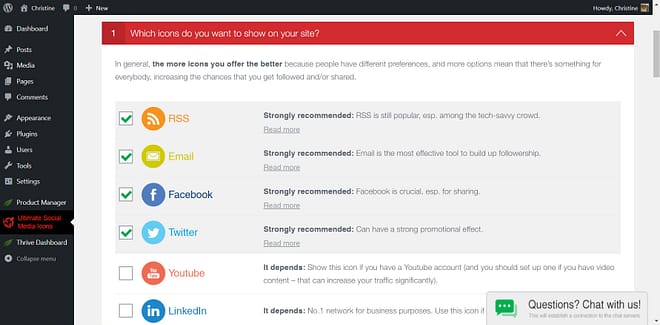
Check the boxes for the platform icons you would like to display.
3. Select the Functionality of Each Icon: For each platform, you may select how you would like each icon to function. Among the choices are:
- Visit my profile
- Like/follow me
- Share my page
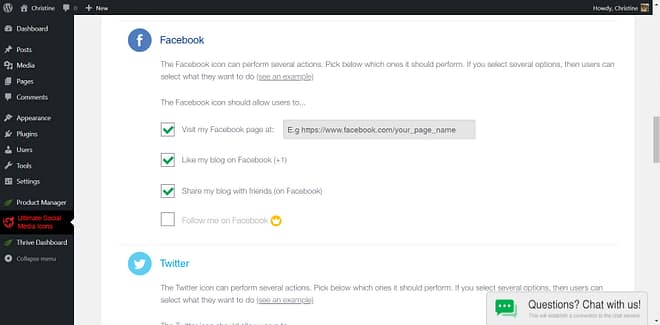
Select the functionality you would like for each platform icon.
4. Select Where to Display Your Icons: The plugin offers a variety of placement options. To place your icons in the main menu of your website, select the In Your Theme's Header option.
Alternatively, select the Place via Shortcode option. Then copy and paste the provided shortcode into the header of your website. Accessing the header section of your website will vary depending on your theme.
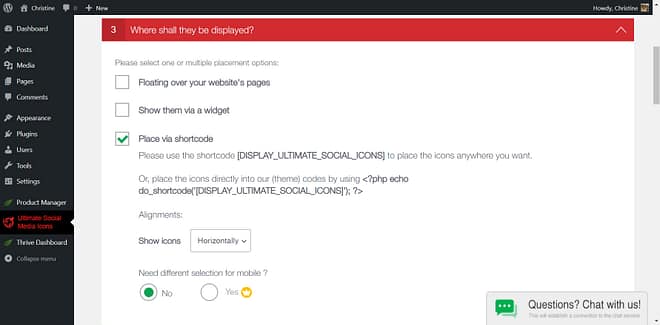
The 'place via shortcode' option allows custom placement of your social icons.

The completed header section.
Voila! Using a plugin like Social Media Share Buttons & Social Sharing Icons provides a straightforward and efficient method of adding social media icons to your WordPress menu.
Ready to Add Social Media Icons to Your WordPress Website?
If you're looking for the fastest and easiest way to add social media icons to your WordPress menu, then our top pick is to use Thrive Theme Builder — an especially good solution if you already have Thrive Theme Builder installed, or if you're thinking about revamping the design of your website.
Alternatively, a dedicated social media icon plugin such as Social Media Share Buttons & Social Sharing Icons is a great solution for those looking to add social media icons without changing their WordPress theme.
Either way, adding social icons to the menu of your website is a relatively easy task that can enhance the user experience while building trust with your audience.
Want to learn more? Check out our accompanying video:
Next, Get to Know Thrive Theme Builder
If you're interested in Thrive Theme Builder, don't miss these free resources to help you get started quickly:
- Thrive Theme Builder Tutorials
- Is Thrive Theme Builder Right for Your WordPress Website?
- Meet Kwik: A Lightning-Fast, Fuss-Free WordPress Theme Optimized for CWV
- WooCommerce + Thrive Theme Builder
Now there's just one thing left to do: buy Thrive Theme Builder today!


