Looking to create a course on WordPress but want to keep it under wraps for now? You're in the right place.
Whether you're fine-tuning your content, planning an exclusive launch, or just need to keep your course private, hiding it is a straightforward but powerful tactic.
In this step-by-step guide, we'll show you exactly how to create a hidden course on WordPress.
What Are the Benefits of Hiding an Online Course?
Hiding a course might sound like a strange thing to do, but it does have its benefits.
First, hiding your course makes it easier to fine-tune your content without the pressure of public view. This also gives you more control over when and how you release your online course – unless you want to keep it hidden indefinitely.
This strategy also works well if you want to promote as an exclusive product and only want a select number of people to access it – probably after they’ve paid for it.
For example, if you run a membership website and offer a mix of free and premium courses, you can hide the premium courses from the free membership tier and only make them available to your paid, logged-in users.
That way your non-paying members will only see the free courses and nothing else. This is just one of the many use cases for hiding online courses.
How to Create a Hidden Online Course
Learning how to create a hidden course on WordPress doesn’t have to be hard – especially with the right plugin.
This quick tutorial will show you how:
1. Download & Install Thrive Apprentice
If you want to create a hidden, premium course you’ll need a solid course-building plugin that offers this functionality.
Preferably a learning management system (LMS) plugin that lets you create engaging, interactive courses your learners will love and want more of.
You should use Thrive Apprentice, the best WordPress LMS plugin in the market — and its perfect for beginners.
Thrive Apprentice is miles ahead of other WordPress e-learning plugins (e.g. MemberPress, LearnDash, LearnPress) thanks to its user-friendly interface and powerful, advanced features.
This plugin was created with ease in mind. You’ll use the drag-and-drop course builder, equipped with customizable templates to create your impressive online courses.
The beauty of the Thrive Apprentice course builder is its live editing feature. You get to see every change you make to the front-end of your online courses. No need to switch between the WordPress Block Editor (Gutenberg) and your course pages.
This saves you tons of time and makes the course creation process much faster.
Thrive Apprentice also offers a variety of drip content settings, so you can create a release schedule for your lessons if you don’t want your students to access them all at once.
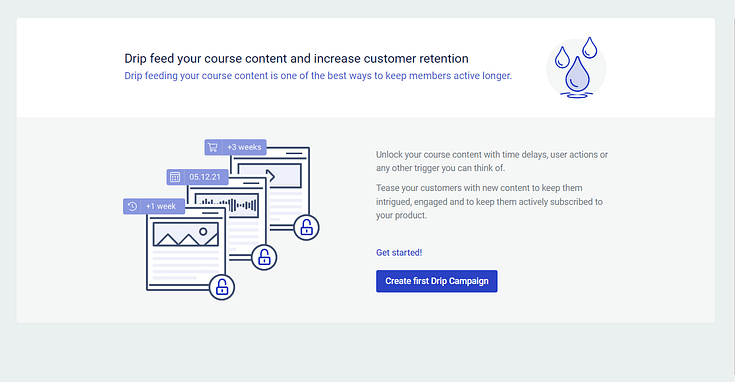
Other game-changing features that set this LMS plugin apart from other options include:
- Powerful reporting engine to gain deep insights into your courses’ performance
- Assessments functionality to test your students and create an engaging online learning experience
- Customizable certificates to reward your students at the end of the course
These features are a part of your Thrive Apprentice subscription — very different to other LMS plugins that offer them as pro
add-ons.
You won’t find all of this in another course-building plugin on WordPress.org or WordPress.com – and for the same price as what Thrive Apprentice is going for.
Once you get this plugin, you get everything you need. No free version with limiting features. No expensive add-ons.
Setting Up Thrive Apprentice
If you have already set up your web hosting and built your WordPress site, all you need to do is activate Thrive Apprentice. Here's how:
After purchasing Thrive Apprentice, start by logging in to your Thrive Themes account and downloading the Thrive Product Manager plugin.
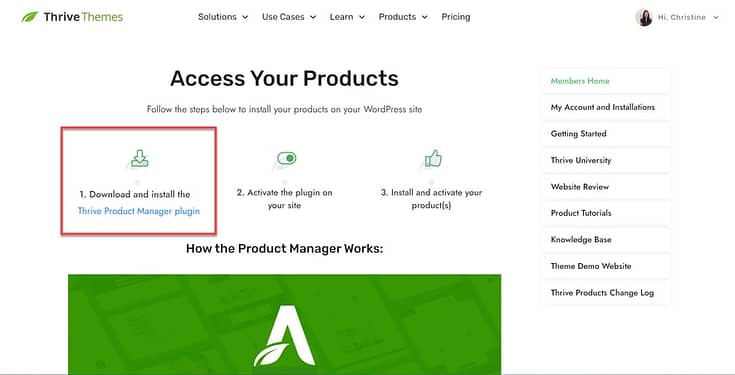
Then, navigate to the Plugin section on your WordPress dashboard and click Add New. Proceed with installing and activating the Thrive Product Manager
plugin on your WordPress site.
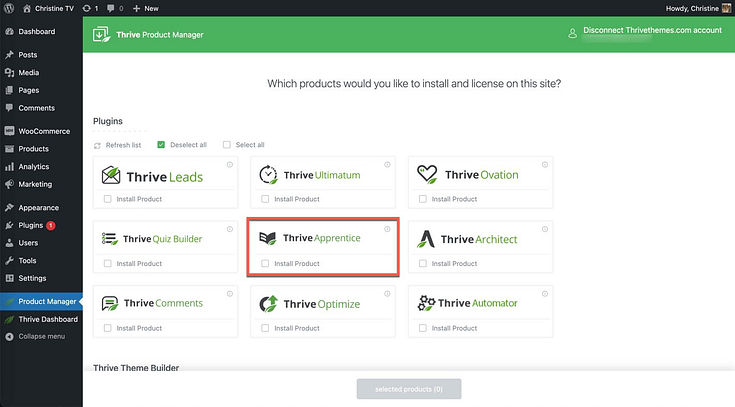
Once that's done, navigate to the Thrive Product Manager, and follow the prompts to install and activate Thrive Apprentice.
2. Create & Upload Your Online Course Content
Your next step is to plan, create, and build your online course:
- Create your online course outline: This is the roadmap for your course content. Use this outline to define your lesson objectives, plan every course module, and list the topics each lesson will cover.
If you plan to include assessments in your course, add them to your outline. Don’t forget to create an online course checklist to make sure you don’t miss a step. - Create your course content: Use different types of media (text, video, and audio) to make your lessons engaging.
Adding real-life examples also makes your content relatable and easier to understand.
Don’t forget to include mini-activities or discussion topics to make your lessons interactive. That way, your students will have something to do and are less likely to become bored.
- Upload your course content in Thrive Apprentice: Once you’ve created your course material, launch Thrive Apprentice, add your content, and organize your modules and lessons.
3. Add Assessments to Your Online Course
There are four types of assessments in Thrive Apprentice:

- Quiz Builder Assessment: Lets your students take a quiz you built in Thrive Quiz Builder
- Assessment Upload: Requires your students to upload a file (PDF, PowerPoint, etc.) where they need to answer questions elsewhere, or any other file type.
- YouTube Link: Allows your students to submit a link to a YouTube video
- External Link to Assessment: Students can provide a link to anything— whether it's a file on their personal Google Drive, their own website, an app, and other types of student work
To add an assessment in Thrive Apprentice, click the “Courses” tab in your dashboard.
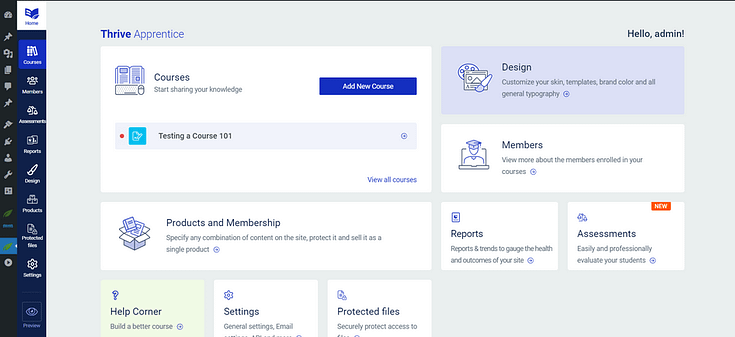
Select your course or "Create New Course" and click the “Content” tab.

Click on Assessments and follow the instructions, configure your grading and main assessment settings, and add your first assessment to your course.

If you want to change the order of your assessments or lessons, you can use the drag-and-drop editor to do so.
4. Mark Your Course as Hidden
Hiding your course is super simple in Thrive Apprentice.
In your course dashboard, click on the “Unpublished” button in the top right corner.

Select the “Hide” option
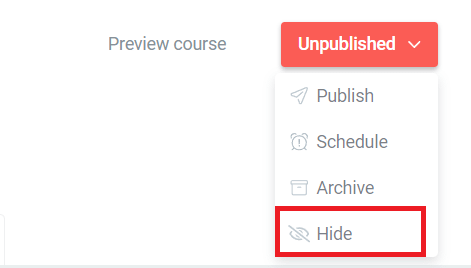
Hiding your course means it won’t appear on your public course list. Only users you manually add to the course will be able to access it.
However, this could become a hassle if you have to manually add everyone who purchases a product from you, right?
Well, you can use Thrive Automator, our WordPress automation plugin, to create a workflow that automatically adds a user to your hidden course once they’ve purchased it.
Thrive Automator is a free plugin that lets you connect your WordPress website to a variety of plugins, email marketing tools, and payment gateways.
You can connect Thrive Automator to most popular eCommerce checkout tools and payment processing apps like WooCommerce, Stripe, PayPal, StudioCart, and many more.
Next Steps: Create Your First Assessment for Your Course
Assessments are a great way to ensure your students are retaining the right information and getting the most out of your courses.
They also help you identify your students’ individual strengths and weaknesses, and provide relevant feedback or resources based on your findings.
For example, you can use Thrive Apprentice’s drip functionality to set up a workflow that unlocks an extra set of lessons if your student fails a specific assessment.
Another awesome feature is setting automatic grading with the “Quiz Builder” assessment type.
When you select a Thrive Quiz Builder quiz as an assessment type, the quiz results will be instantly mapped to Thrive Apprentice assessment grades, where you both set a required passing grade and automate the grading.
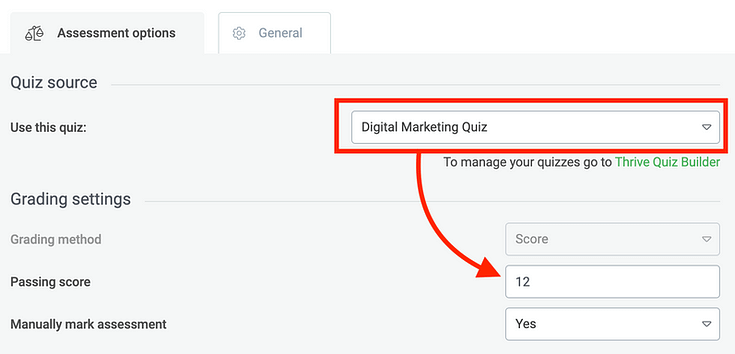
When configuring your assessments, you can enable automatic grading by:
Setting a minimum passing score
Selecting “No” next to “Manually mark assessment”
Your student’s assessment will automatically be marked based on the score they get. If they pass, they can continue with the course. If they don’t get the minimum number of correct answers, they’ll need to retake the assessment to move forward.
But, you’ll need Thrive Quiz Builder to enable this function.
You can purchase Thrive Apprentice and Thrive Quiz Builder separately, or get them both (and 8 other premium plugins) when you purchase Thrive Suite.
Promote and Grow Your Online Course Business
Creating and selling online courses is a great way to share your knowledge, build an engaged community, and grow as an authority in your industry.
To build an online course platform your students will love, you must use the right tools – and that’s why we recommend Thrive Apprentice.
This online course and membership plugin gives you everything you need so you can focus more on content creation and community building, and less on the technical aspects of running an online platform.
Here are four more resources to learn how to improve your courses and grow your online course business:
How to Create an Online Course Landing Page (Step-by-Step Guide)
The Ultimate Online Course Launch Checklist: Everything You Need to Know
If you purchase Thrive Suite, you’ll get access to 10 powerful plugins that will help you create a stunning online course website your potential customers — and search engines — will love.
Don’t just take our word for it.
Give Thrive Suite a try today and start generating more sales for your business.


