Welcome to another roundup of our latest releases, features and improvements at Thrive Themes!
We're excited to share with you how Thrive Suite has been growing stronger and stronger with every release, helping online business owners and course creators build a better business on the back of our software.
Today, I'm rounding up 9 new features and improvements, including a few that slipped by without getting the attention they deserved back in March.
Read on to see what's new!
More...
1. Thrive Ovation: New Capture Form & Testimonial Display
This feature is huuuuge, and we need to take a moment to really highlight what it means. If you haven't seen Tony's short overview yet, check out the video below to see the new Thrive Ovation in action.
Social proof is one of the strongest influences on your conversion rate. No matter how great your copywriting or marketing skills, potential customers want to hear from other people like them, to validate that your products can help them get what they need.
Thrive Ovation is an incredible plugin that lets you capture, categorize, tag and display targeted testimonials at the right places on your website, to give your potential customers the confidence they need to make a purchase.
There are two halves to this update that make Thrive Ovation even better: the capture form, and the display element.
New Testimonial Capture Form
The new testimonial capture form has all of our visual editing capability, and more. We've got a bunch of pre-made templates you can choose from, and you can style and edit every border, corner, font, color and available field until it looks just how you want it to.
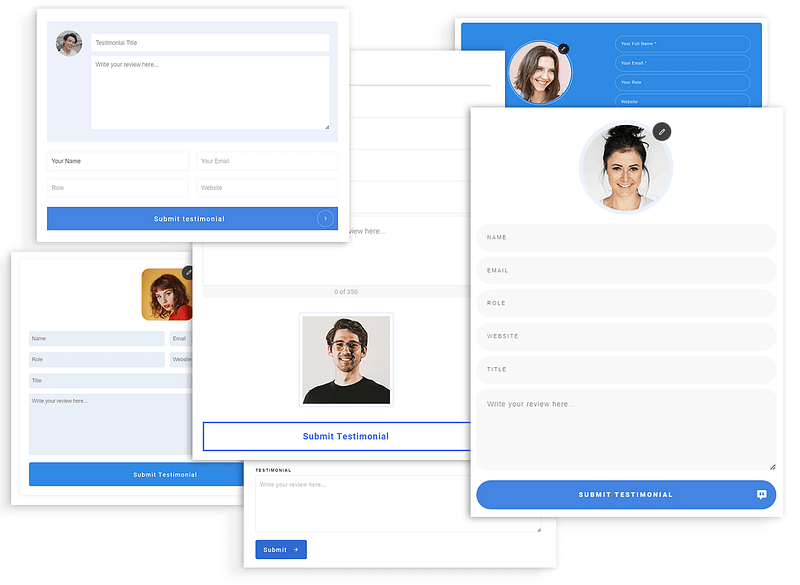
Check out these beautiful templates that will inherit your theme color instantly.
The Testimonial Capture form should feel just like our Lead Generation element, meaning you can add and edit your fields from the left hand sidebar.
But take note— this update means you can add other connections too. Want to add the user to your mailing list, or update a tag when they add a testimonial? Now you can, by simply adding other connections. You can even map custom fields!
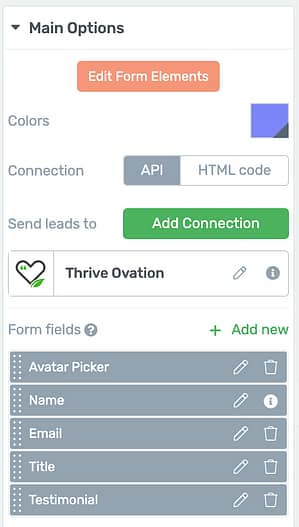
Thrive Ovation capture settings.
Testimonial Capture forms have a new 'Avatar Picker' element in them too. This allows your visitors to add their avatar from Gravatar, Facebook, Google or a custom URL (you'll need to add API connections for the social accounts).
Enter edit mode and select the Avatar Picker to customize the options you want to offer to your customers, and on the front end, they'll be able to choose which avatar they prefer, just like this:
Visitors can choose their preferred avatar source.
New Testimonial Display
When it comes time to show your testimonials on your site, they're going to look fabulous. Why? Because the new Testimonial Display element leverages our post list loop builder technology, including the side-scrolling carousel.
That means you can easily display a rotating list of your testimonials, that will dynamically update when new testimonials are added. And— like everything else in Thrive— you can visually customize it to your heart's content.
Here's a screenshot of a Testimonial Carousel added on a page with just a few clicks and no additional edits.

Displaying your testimonials in a side-scrolling carousel is only a few clicks away.
We're super proud of the latest changes to Thrive Ovation, and we hope you use it to its fullest to capture your testimonials, display them at the right places and ultimately boost your conversions.
2. Thrive Quiz Builder: Select Multiple Answers + New Quiz Navigation
These are two of the most requested features we've ever had for Thrive Quiz Builder. Once again, I'll let Tony demo it quickly:
By allowing quiz takers to select multiple answers, you have new ways to test their knowledge. But your quiz takers might want to revise their answers, especially for quizzes used in Thrive Apprentice.
Now they can easily jump back to previous questions and change their answers, meaning that by the time they submit their quiz, they are locking in their final answers for grading.
Haven't seen how Thrive Quiz Builder integrates with Thrive Apprentice for course creators? Learn about it here.
3. Certificates Improvements in Thrive Apprentice
In November last year, we released our Certificates feature for Thrive Apprentice, that lets you visually edit and create stunning, print-worthy PDF certificates for your students.
Now, we've made a few improvements to make it even easier to manage your certificates.
Whenever you select a student in the Thrive Apprentice members list, you'll see a new column with their certificate status.
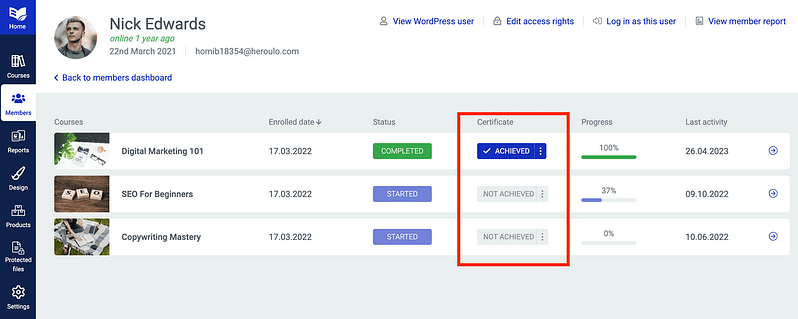
See your student's certificate status from the members list.
It's an easy way to see which courses have a certificate assigned, and for those that do, whether or not your students have earned them.
But there's more. Hover over the 'Achieved' status and you'll see 3 options.
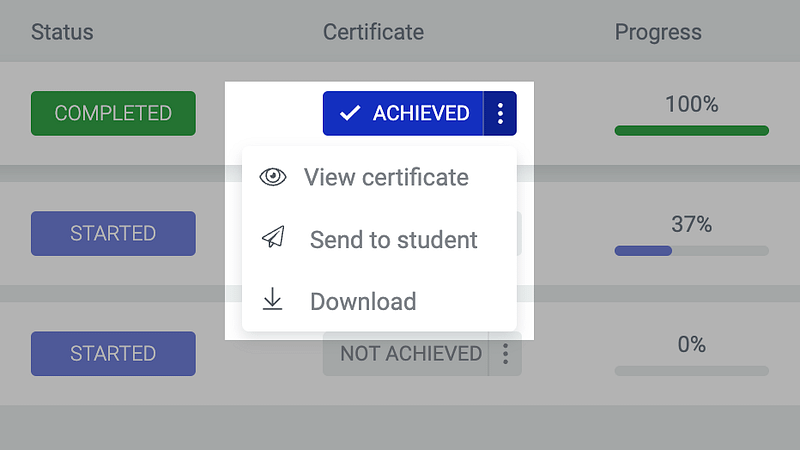
Control your certificates right from the student view.
With a single click, you can view the certificate design with that student's name and information on it, giving you a quick preview of what your student is getting.
Or you can go one step further and just download the PDF certificate straight away.
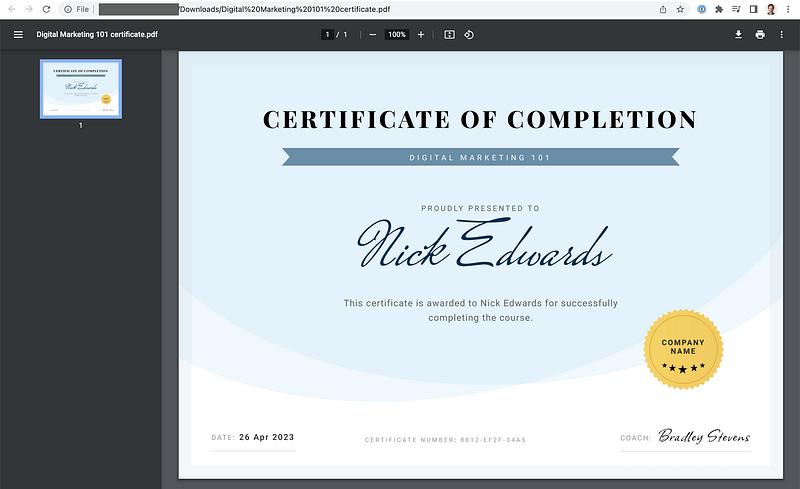
Your student's certificates can be downloaded with a click.
But there's a 3rd option: Send to student.
You can now send an email from your website whenever you manually issue a certificate to a student.
Visit Settings > Email Template > 'Certificate Manually Issued', and you can customize the content of that email.
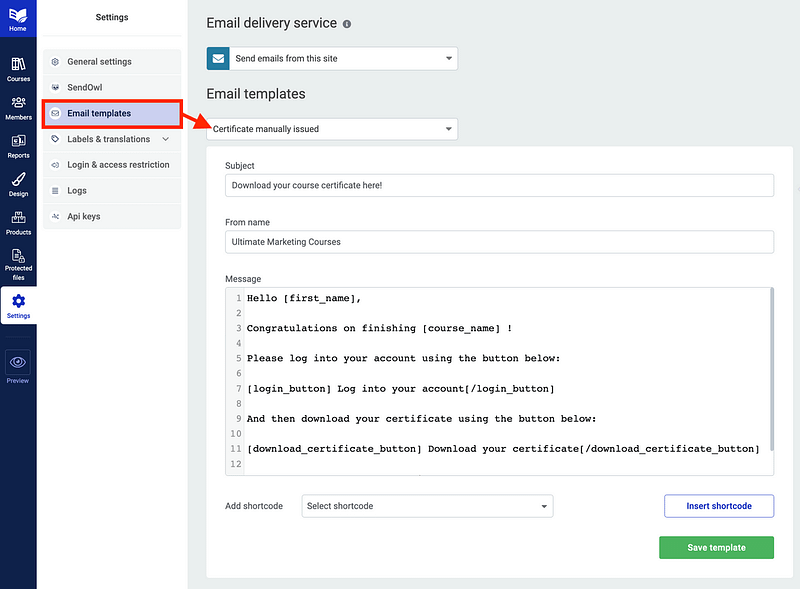
Edit your certificate email and send it with a few clicks.
This email won't send automatically when a student achieves a certificate. That's because, if you've enabled the 'Course Completion Page' option in Thrive Apprentice, students will be able to download their certificate right there.
But with this new feature, you can send it to your students on request with one click.
There's more, though. We've added some Thrive Automator triggers and actions around certificate management too.
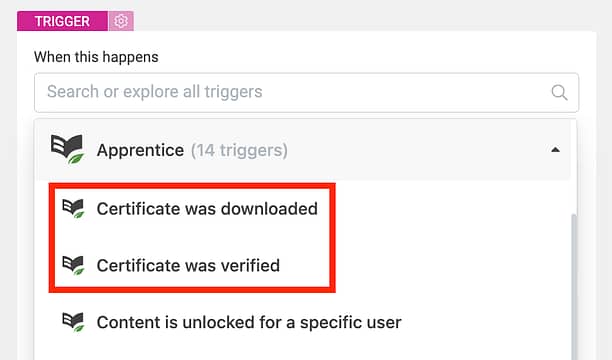
Look for the new Thrive Automator triggers based on Certificate Events.
You can trigger automations when a certificate is downloaded or verified, and there's a new action for 'Issue course certificate' too, as shown below.
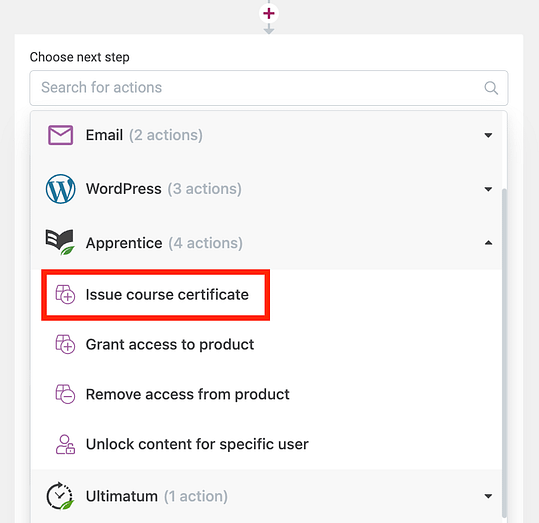
'Issue course certificate' will send an email to your student.
That means with one simple automation, you can fire off that email as soon as students earn a certificate. The automation to do this might look like this:
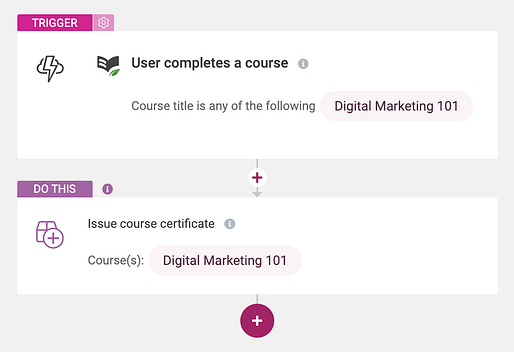
A simple automation like this puts a certificate in your student's email inbox.
But— you can go one better!
Perhaps as a course creator, you want to grant certificates to students only after they...
By pairing any triggers with the 'Issue course certificate' action, you have all the control to choose when and how your students can access to their certificates.
4. Click to Call + Click to Email
Once again, over to you Tony:
For many years, we've had Global text and Global Links options in Thrive Dashboard, under 'Smart Site'.
It's an easy way for you to centrally add your business name, email address and phone numbers (or any other custom information) and apply it anywhere on your website. All you have to do is add them as Global fields.
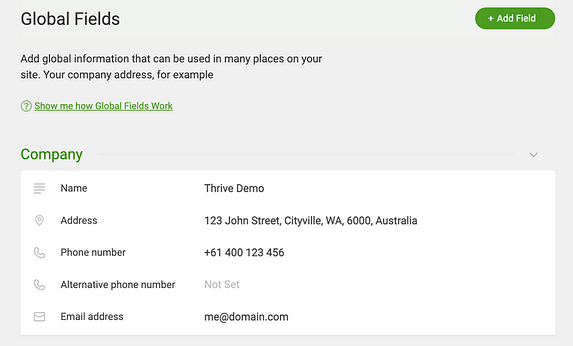
Update your Global Fields, and they'll auto-update across your whole website too.
The best part? If you need to change your business number, you just change it once, and all of those instances that show your phone number will automatically update— making sure your customers are always calling the right person.
But now we have an easy way to include click-to-call or click-to-email with your global links.
Whenever you apply a dynamic link to text or a button, you can pick the 'Click to ...' option, like this:
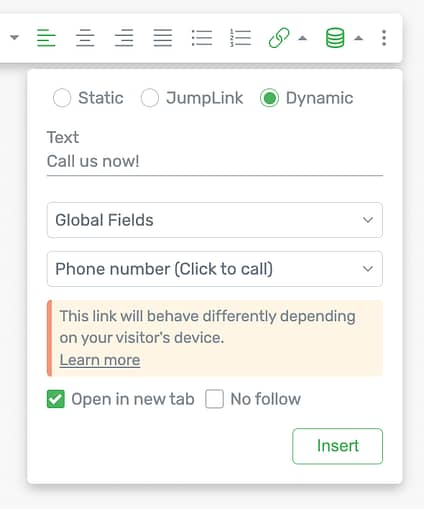
Pick your global field and add it anywhere in seconds.
Not only can you show your business number or email address wherever you want with a few clicks, but you can apply an action to the link too.
If it's a click-to-call, then one tap on the phone number and your browser or mobile device will start a phone call.
If it's a click-to-email, one tap will open their email client with a new email addressed to your business.
How easy is that? 😁
5. Thrive Ultimatum: Cookie-based countdown and redirect on expiry
Wait... Thrive Ultimatum is getting an update?
You bet! It's one of our most requested features too. Thrive Ultimatum is our scarcity plugin for WordPress, and it allows you to show countdown timers that restrict access to content on your site once they expire. With this plugin, you can create and manage scarcity campaign timelines just like this:
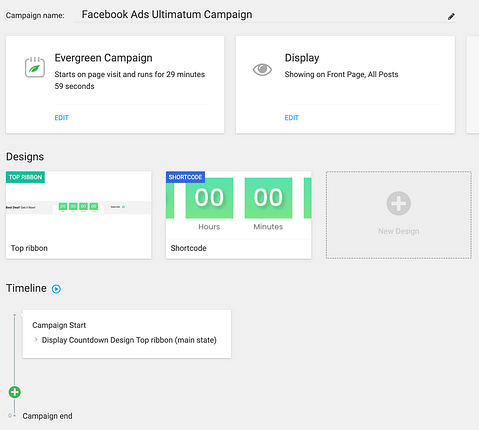
Manage your settings, designs and timeline from one central view.
Your scarcity campaign makes pages and promotions on your website only be accessible within the campaign window. When that expires, that visitor has truly missed their chance.
And to make it clear how much time they have left, Thrive Ultimatum lets you easily add beautiful and functional countdown timers to your site, just like this:
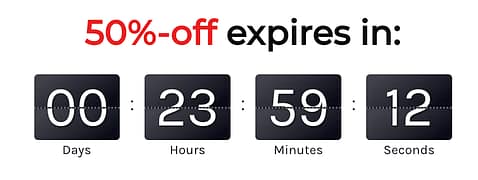
Yes, the numbers animate as they change.
But what makes Thrive Ultimatum super special is our Lockdown campaign type.
We're very proud of the Evergreen 'Lockdown' campaign type in Thrive Ultimatum because it is authentic, unbeatable scarcity that is unique per-user. It's handled server-side, and ties to a user's email address, meaning that no matter what a user does, they cannot get around the scarcity campaign.
Once it ends, it truly ends. And each user can trigger a different countdown sequence that is unique to them and their email address.
But that's the one catch: it does require you to know a user's email address first before you can trigger this campaign type.
For this reason, we've had requests for evergreen campaigns that redirect on expiry and that don't require an email address. These campaigns are cookie-based, meaning that although they aren't unbeatable (someone can re-start the campaign by clearing cookies and revisting the page), they are perfect for driving anonymous traffic from a platform like Facebook into a scarcity funnel.
Here's how it works.
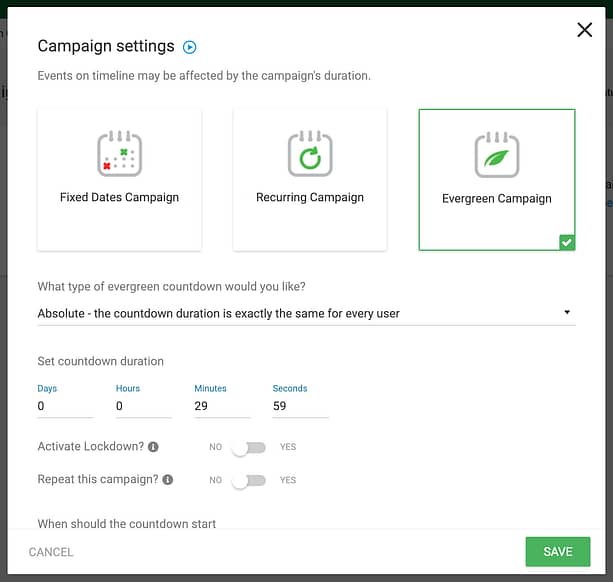
Start with an Evergreen Campaign type in Thrive Ultimatum.
Select an 'Evergreen Campaign' type in Thrive Ultimatum, set your duration but— in this case— do not activate 'Lockdown'.
Remember, Lockdown is what ties it to a user identifier, an email address.
Set the page that should trigger your campaign, and then you'll see a new toggle: Redirect when expired.
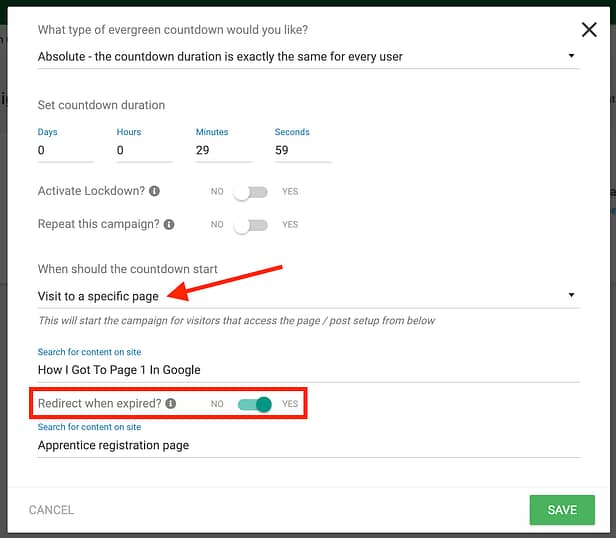
Look for the new toggle.
This new toggle is where you'll access the new feature we've just released. Enable the Redirect toggle, and choose your target page.
That's it!
When any visitors arrive on your campaign page, the countdown campaign you've configured will begin, and when it reaches zero, they'll be redirected away. Just remember, this is based on cookies and not on identified users, so if you have a nosey visitor who knows how to clear their cookies, they could find a way to re-trigger the countdown campaign.
Of course, to show your visitor how much time left, you'll want to add one of our beautiful countdown timer templates built by our design team, and customize it to your liking.
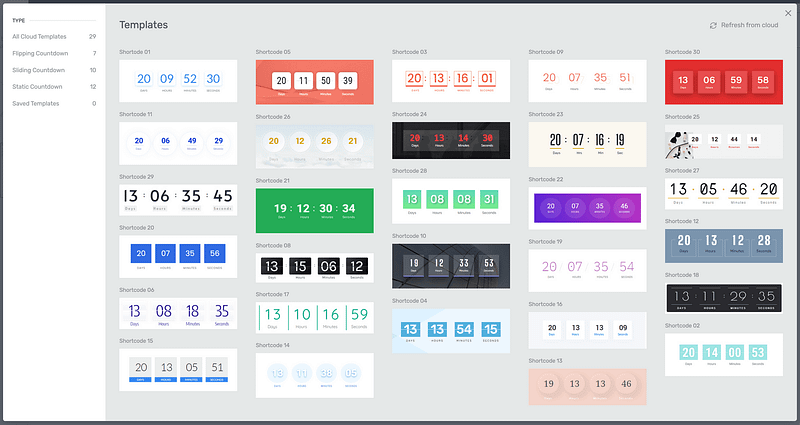
Choose from many designer-made templates.
How would you use this?
Think about it.
You can now build a PPC scarcity advertising funnel by driving traffic from Facebook or Google ads straight to your promotion page, where visitors will instantly see a countdown timer that truly redirects them when it hits zero. Try it out, we're convinced you'll see a boost in your conversion rates.
6. Facebook Events with Thrive Automator
Speaking of Facebook...
We've released an integration with Facebook/ Meta's Marketing API. And when you understand how exactly you can use this, it'll blow your mind.
If you haven't tried advertising on Facebook yet, you might find that your opinion on Zuckerberg will change. It's easy to get started with such a small advertising budget to test your funnels, and evaluate your ROAS (Return On Ad spend).
Given that Facebook has a huge amount of data on it's users, that data means you can target a very specific set of users— people who will be interested in your topic or product.
But if you can pass information back to Facebook about a group of users on your website, and build what Facebook calls a 'Custom audience', then you can also target a 'Lookalike audience'— people who are similar to those who converted on your website, but who haven't yet. In other words: the people who want what you're selling.
Following me so far?
Let me show you an example. It starts by creating a Facebook/ Meta marketing account and adding your Pixel ID and Access Token in Thrive Dashboard.
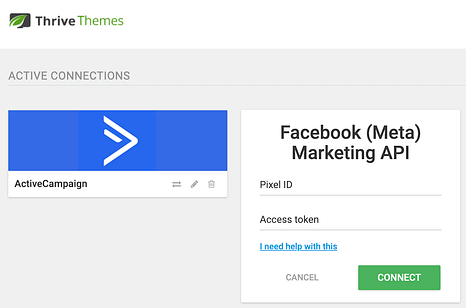
Connect Facebook/ Meta through Thrive Dashboard > API connections
Once you've done this, you can open up Thrive Automator and build an automation.
Let's imagine that you want to create a custom audience on Facebook that consists not of your customers, but specifically of those who are engaging with and completing your online courses.
Set a trigger of 'User completes course', and then pair it with an action: Fire Facebook Custom Event, one of the new actions available once you've connected the Meta API.
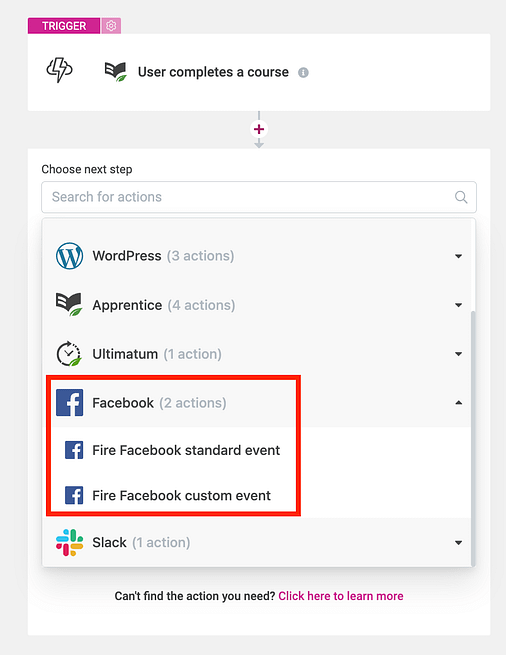
Look for the new Facebook actions once you've enabled the Meta API
You can define the name of your Custom Audience too. In my example, I've named it 'Course Completion'.
Now, when a student of mine completes a course, it'll register an event with my Facebook/ Meta Pixel. You can see in the screenshot below that the data has been received in my Facebook Events view.
Under Facebook Events, I'm now receiving Course Completion data.
Great! Now what?
Under Facebook Audiences (a different area for managing your advertising and targeting) I can create an audience of all Facebook User Accounts that have completed my online courses, and every time a new student completes one, that audience will automatically update to include the new student.
Then, I can create a 'Lookalike audience', just like this:
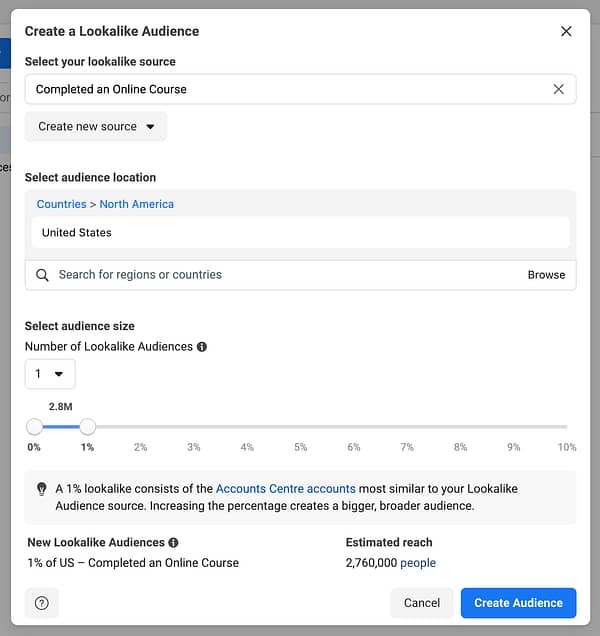
Lookalike audiences help to find similar users that will want what you're selling.
Next time I run a Facebook Ad, I can target that lookalike audience, knowing Facebook will only show my advert in the Facebook Feed for users that have similar traits to those who have completed my online courses.
And with such accurate targeting, I won't waste my budget on showing ads to the wrong people.
Starting to see the power of this feature now?
You can do the same with WooCommerce product purchases, lead generation form submit, quiz completions, and more, building out any custom audience for the Facebook advertising that makes sense in your business.
7. Improvements to Video Cover User Experience
Were you aware of our Video Cover feature in Thrive Architect?
It allows you to create a clickable thumbnail over the top of your video in Thrive Architect, meaning you can drag and drop text, icons, images, and more. The whole video cover is treated like a context box that, when clicked, plays your video.
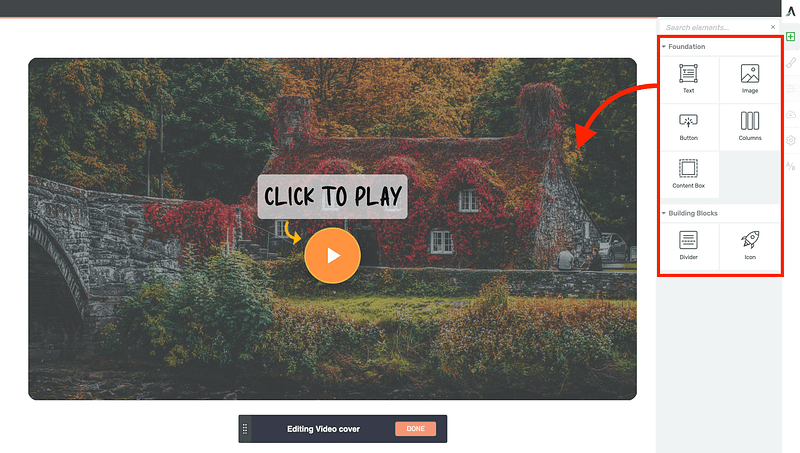
Build out your video thumbnail right inside of Thrive Architect
And because it's a Thrive Architect element, it can be dynamic— meaning you can place it in your theme templates with Thrive Theme Builder and automatically feed featured images into each unique video cover, or display blog post titles in the text on the videos.
You don't even have to build it from scratch— we've already got designer-made templates to get you started with your video covers.
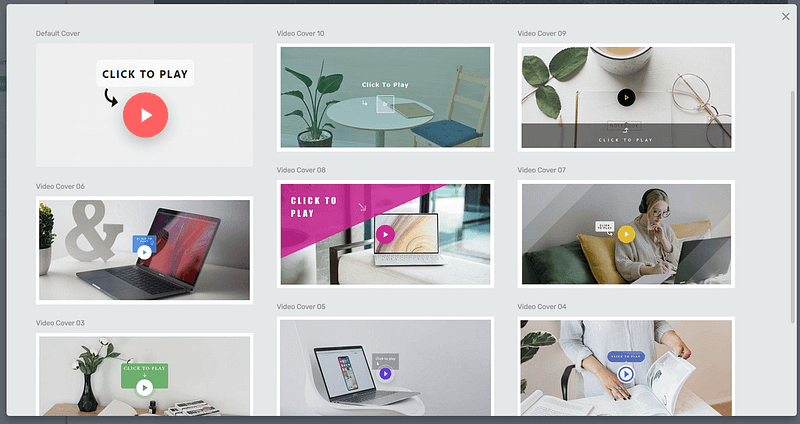
Choose your preferred video cover design.
However, we heard some of you had issues with the video cover, mainly that when a user clicks to play a video, they sometimes have to click a second time for it to play.
We investigated, and found that different browsers (Safari, Chrome, Firefox, etc) on different devices (iOS, android, etc) have some rules around autoplaying, intended to prevent videos from suddenly blaring loud audio when a user doesn't want it to.
These rules have meant that in some situations, a video with a cover requires 2 clicks to start.
In our latest release, we dug really deep into this, and managed to improve the user experience with some coding sorcery. That is our commitment to making your website vistors' experience as easy as one click and not two.
8. Thrive Apprentice Data Optimization
Have you ever wondered "Can Thrive Apprentice host a huuuuge online course library?"
The answer is yes, provided you have good website hosting. In our latest release, we've performed even more optimizations, testing with a database consisting of over 100,000+ students, making your experience as a course creator snappy and fast on the backend, no matter the size of your business.
Our goal is to make Thrive Apprentice the leading online course platform for marketers, so if you find anything is slowing you down, we want to know about it.
9. Support for MailerLite Version 2
Recently MailerLite, a popular email marketing service, updated their API. To make sure we're keeping on top of it, we've release our support for Version 2.
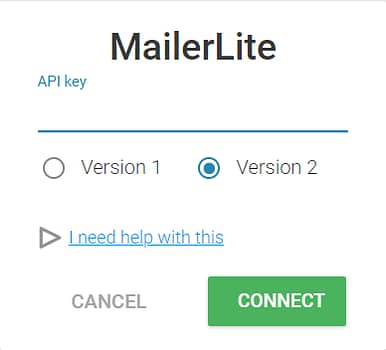
If you've been using MailerLite for some time, you'll likely be using Version 1 and your integration with Thrive Themes should continue to work just fine.
But if you want to access some new features of MailerLite, you may want to generate a Version 2 token.
To do that, visit your MailerLite account -> Integrations -> API -> and click 'Generate new token'. Return to the Thrive Themes API dashboard, select Version 2 for MailerLite, and paste your new token. You can now enjoy all the benefits of the new integration with Thrive lead generation forms.
Are you using Thrive Suite yet?
We’re constantly adding new features, plugins and professionally designed templates to Thrive Suite to make it easy, fast, and fun for you to build a successful online business in 2025.
Thrive Suite
And if you are using Thrive Suite, we'd love to hear your feedback on this latest round of updates. Drop a comment below!
For now, that's all, but keep an ear out for next months updates in late May.
Bradley Stevens
General Manager, Thrive Themes.


Wow, the Facebook Pixel integration is brilliant. I love Thrive for such marketing features.
Great update, as always.
I’m particularly pleased about the double-click fix for single-click video covers, that one was a real pain.
Does the update also fix the sound issues i.e. no sound on autoplay until they manually unmute it?
It’s difficult to answer this. Really, it’s like… yes and no. Browsers are very strict on allowing autoplay with sound, for obvious reasons: as a user, imagine you click a link on a untrustworthy website, get unexpectedly redirected in a new tab, and suddenly audio is blaring out of your speakers. This is the problem browsers are fixing.
The way a browser or video player like YouTube will permit audio on autoplay is down to:
A) what kind of device they are on (mobile devices are stricter)
B) how much that visitor has already been interacting with audio elements/ video on that website or browser session.
If they land on a new website they’ve never been and a video autoplays, the browser will force it to have sound off. We don’t have any say over that.
If they are navigating the same website where they have unmuted the player earlier, then browsers might permit autoplay audio.
TL:DR; Autoplay with sound is not a bug we can fix, it’s a standard by browsers that is being enforced.
OK, thank you for the detailed explanation. At least the one-click fix will help when using the video covers. 🙂
Hi Brad 🙂
Do we have to go back to our previous videos and make some changes so there is a single play?
Hey Vahn, no— I don’t believe so. Just update to the latest version of our software. But… I will double check that with our devs.
Hi Brad, great new features all together.
Can the facebook and pixel stuff be controlled by a consent banner like “Real Cookie Banner”? I am asking because of GDPR related tasks.
Hey David, technically it’s not a cookie. In this case, it’s a direct API connection with the facebook/meta API. I’m not too sure how the rules here work with GDPR, because the data passed by Automator is around facebook session IDs. Facebook can interpret that and find a user to add to the custom audience, but it’s anonymous to you. For example, you can’t open the Facebook events manager and see who is in your custom audience.
In summary: I’m not sure about the GDPR take on this option.
Awesome features guys, thanks for all your efforts.
Quick question: why is the “redirect to URL” option not available in the Thrive Architect Countdown element? When not running an Ultimatum evergreen campaign but a fixed deadline, redirecting visitors after it expires feels like a logical step, right?
When we have time and after we’ve moved through other priorities, we want to make some improvements to Thrive Ultimatum, both around functionality and usability. We’d like to make it interface more with Thrive Architect so you can set up Thrive Ultimatum campaigns right from the Architect editor.
But Ultimatum does a lot more than it might seem (like managing a database of users in different stages of scarcity times, handling cookies, logic, etc). So we won’t replace it with just an Architect countdown element, we’ll just make it easier to get the result you want.
That sounds great Bradley, thank you for your reply. I see what you mean, looking forward to the updates 🙂
Wow I’m impressed!
Keep them updates coming guys 🙂
Very happy with this one 🙂
And we’re very proud. There’s still a lot more in the pipeline too
I would love a first-party Youtube / Instagram feed widget. Are you planning such a thing?
It’s an idea we might explore, but just not at the moment. We have other priorities in the roadmap
this is awesome!
Great updates as usual!
About Thrive Ultimatum Brad, you say “so if you have a nosey visitor who knows how to clear their cookies, they could find a way to re-trigger the countdown campaign. “. Is it the same thing if someone visits from a laptop and the day after from his smartphone? I think so but I’d like to make sure (was paying loads of money to DeadlineF and I may cancel now 🙂 ).
Yeah, so to clarify: there is a difference between what we call a ‘lockdown’ campaign, and this new redirect type. The lockdown needs an identifier for the user— their email address— and can only be triggered after any of the following: a) they’ve filled out a Thrive Leads form on your site, b) you’ve sent a user to your promotion page and include their email address in the query string (which means you’ll need them on your mailing list first), c) you know their email address and trigger a campaign in Thrive Automator.
In these cases, it doesn’t matter if they try from a laptop, then smartphone, then incognito, then VPN— the campaign is always locked to the one user.
But the new type of cookie-based countdown we just released does not require an identifier. So if a user opens on their laptop, then on their smartphone, both devices will have unique cookies unrelated to each other.
There is a time when this campaign type is useful, but if you’re comparing to Deadline Funnel, you’ll want to look at our Lockdown Campaigns with the email identifier. Then it’s unbreakable
Thanks loads Bradley for the clarification 🙂
If I have been building funnels on a different platform but would like to move them to Thrive, is there a clone page feature for that so I don’t have to start from scratch?
It kind of depends which platform, but generally, the answer would be: no, you’ll need to start from scratch. You can reach out to our support team ([email protected]) who might be able to better advise you, if you share your setup with them.