Your site looks… fine. But fine isn’t memorable. It’s not making anyone stop and think, “Wow, this brand gets me.”
That’s why you’re here.
You’re trying to figure out how to add custom fonts in WordPress that actually reflect your style, not just the defaults every other site is using.
But there’s a problem. If you add fonts the wrong way, you could be quietly killing your site speed.
Even a 100-millisecond delay can drop your conversion rate by up to 7%. People won’t wait. They’ll click away before your headline even loads.
If you want your site to stand out, use custom fonts in your WordPress theme, and still keep things fast, you need to get this right.
In this post, I’ll show you how to do it the smart way – what to avoid, your best options, and the method I recommend if you care about performance, brand trust, and conversions.
Let’s fix those fonts before they start costing you.
Why Add Custom Fonts in WordPress in the First Place?
This isn’t really about fonts. It’s about clarity, trust, and making sure your site feels like it was built with purpose, not default settings.
It’s not just about finding the best fonts for WordPress. It’s about choosing the right fonts for your business, using them intentionally, and applying them in a way that supports conversions – not clutters your design.
The 5 Ways to Add Custom Fonts in WordPress (And Which One We Recommend)
There’s more than one way to get custom fonts working on your WordPress site - but not all of them are worth your time, especially if you care about performance and keeping things simple.
Some methods give you complete control but require you to get a little technical. Others are easier but come with baggage like bloated plugins or compatibility issues.
In this section, we’ll walk through five common ways to add custom fonts in WordPress, including a new built-in option and the method I personally recommend for business owners who want a fast, brand-consistent site without the drama.
Let’s start with the most widely accessible one.
1. Use the WordPress Font Library (For Block Theme Users Only)
Since WordPress 6.5, there’s a built-in feature called the Font Library, available inside the Site Editor (go to Appearance, then Editor).
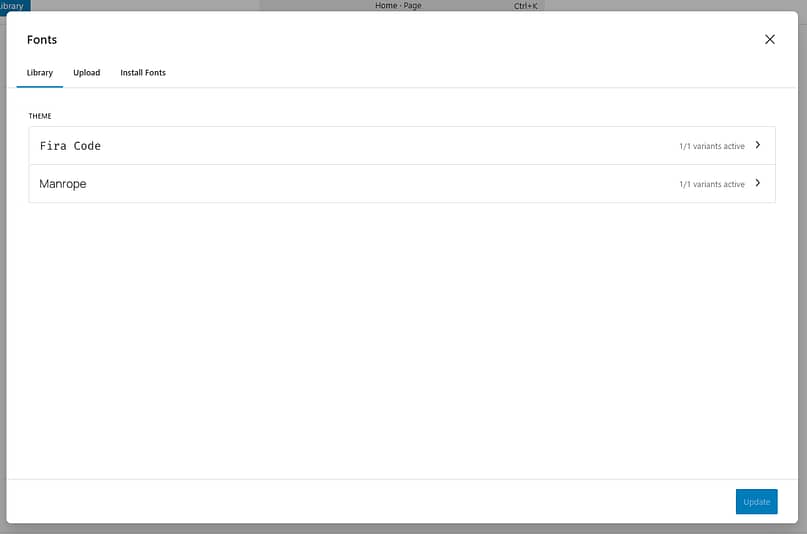
It lets you connect to Google Fonts, upload your own custom fonts, and manage them locally on your site. This means better performance and GDPR-friendly font hosting.
If you’re using a full block theme, like Twenty Twenty-Four or another FSE (Full Site Editing) theme, you can apply fonts globally across your site or customize them per element — headings, buttons, body text, and more.
✅ Pros
- No plugin required
- Fonts are hosted locally, which helps with speed and privacy compliance
- Easy to manage fonts site-wide or on individual blocks
⚠️ Cons
- Only works with block themes that support the Site Editor
- Not as intuitive or flexible as visual builders like Thrive Architect
- Doesn’t appear if you’re using a classic or hybrid theme, which is still what most sites are built with
If you’re already using a supported block theme and want a native way to add Google Fonts to WordPress or upload fonts without a plugin, this is worth exploring. If not, there are better options ahead.
2. Use a WordPress Font Plugin (Quick Fix, but Comes with Baggage)
If you’ve ever looked up how to change font in WordPress, you’ve probably seen a few plugin suggestions pop up. Tools like Easy Google Fonts, Use Any Font, and Custom Fonts all promise an easier way to add custom fonts without touching code.
They’re popular because they’re fast, flexible, and work with most WordPress themes — even if your theme or builder doesn’t support custom typography out of the box.
Some let you connect to Google Fonts, others let you upload fonts directly to your media library. In most cases, it feels like a shortcut that gets the job done.
But short-term convenience often comes with long-term frustration.
✅ Pros
No coding required
Works with most themes, including classic ones
Lets you upload fonts to WordPress or add Google Fonts with minimal setup
⚠️ Cons
Can slow your site down if fonts are loaded from external servers
Adds plugin bloat and potential compatibility issues
Limited control compared to tools that handle typography at the theme or builder level
May not work consistently across your entire funnel
If you’re testing things or need a quick solution, a WordPress font plugin might be fine for now. But if you’re building a real brand and want long-term control over your WordPress typography, you’ll want something cleaner and more reliable.
3. Add Fonts Manually with CSS (For Confident DIYers Only)
If you’re comfortable editing code, you can add custom fonts to WordPress manually using the @font-face rule in your stylesheet.
Here’s how it works: you upload your font files to your theme (usually into a /fonts folder), then define the font in your style.css file using @font-face. Once that’s set up, you can apply the font using standard CSS rules.
It gives you full control, but it also opens the door to potential issues if anything’s even slightly off — especially when you're editing a live theme.
✅ Pros
Full control over font usage and fallback behavior
No plugins required
Works with any theme if you know your way around CSS
⚠️ Cons
Requires FTP or file manager access, plus comfort editing theme files
Easy to break something if your CSS or file paths aren’t correct
Fonts can slow down your site if not optimized
You’ll need to manually update everything if you change themes later
Unless you’re already familiar with CSS and your site’s file structure, this method can turn into more hassle than it’s worth. And yes, the next method is technical too — but hang tight, because Option 5 is made for you if you want full font control without any of this backend stress.
4. Add Fonts with theme.json (Built-In, but Developer-Oriented)
If you’re using a block-based theme and you’re comfortable editing files behind the scenes, WordPress also lets you define custom fonts directly in your theme.json file.
This method gives you full control over your typography setup, including font families, weights, and how they’re applied across different elements — like paragraphs, buttons, and headings.
It’s a clean and powerful approach for developers, especially if you’re building custom themes or want fonts baked into your design system from the start.
✅ Pros
Full integration with WordPress’s block theme architecture
Clean, no-plugin setup that travels with your theme
Gives you granular control over WordPress typography and styling
⚠️ Cons
Only works with block themes
Requires a good understanding of how theme.json works
No visual interface — everything is handled through code
Easy to misconfigure if you’re not careful with the syntax
If you're a developer or building custom themes for clients, this method might be perfect for you. But if you just want to upload fonts and see them show up in your editor, there are much easier — and faster — ways to get there.
5. Use the Thrive Font Library (This Is the One I Recommend)
If you want full font control without plugins, without coding, and without wondering if your theme even supports it — this is the option I recommend.
The Thrive Font Library is built directly into all Thrive tools, so you can add Google Fonts or upload your own custom fonts in seconds. No external tools, no CSS, no guesswork.
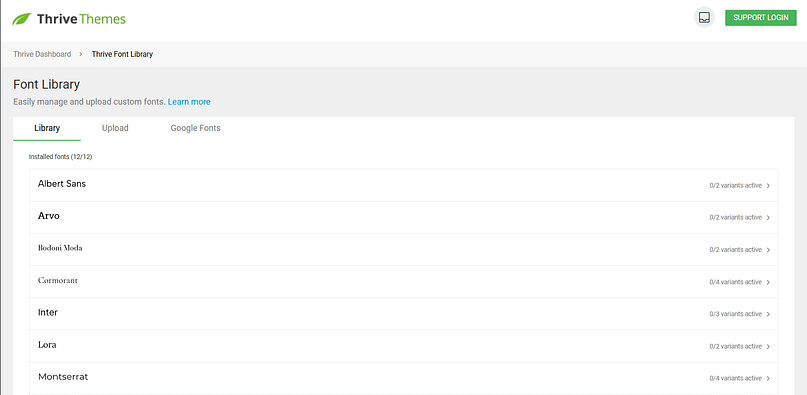
It’s fast, beginner-friendly, and designed specifically for people who care about conversions and brand consistency — not just how their site looks, but how it performs.
✅ Pros
- Instantly access the entire Google Fonts library
- Upload custom fonts in formats like TTF, OTF, WOFF, and WOFF2
- Fonts are available across all Thrive tools, from landing pages to quizzes
- Global typography settings let you change your fonts site-wide in just a few clicks
⚠️ Cons
- Requires Thrive Suite (which is a pro-level toolkit for people building serious websites)
- You may never want to go back to other builders again — fair warning
If you’re building your site with Thrive, you already have everything you need to manage fonts the right way — and that’s just the beginning. Thrive Suite gives you full visual control over your entire website, from landing pages to blog templates to opt-in forms, all without relying on extra plugins or patchwork tools.
And if you’re not using Thrive yet? Honestly, this might be the reason to switch — especially if you want a fast, conversion-focused site that actually feels like your brand.
Up next, I’ll show you exactly how the Thrive Font Library works, step by step.
How the Thrive Font Library Works (Step-by-Step)
If you’re already using Thrive Suite, the good news is you don’t need to install anything extra — the Thrive Font Library is already built in and ready to use.
It gives you a clean, visual way to manage your fonts across your entire website without plugins, code, or compatibility headaches. Let’s walk through how it works, from setup to full site control.
1. Open the Thrive Font Library from the Thrive Dashboard
From your WordPress admin, go to the Thrive Dashboard in the left-hand menu. Next, look for the Thrive Font Library card and click it. This is where you can browse fonts, add new ones, and manage everything in one place.
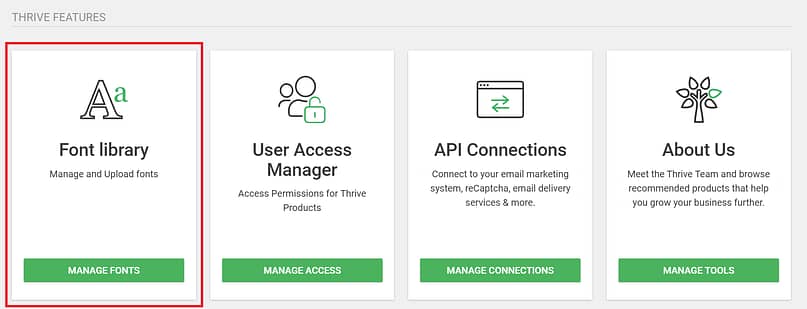
Once added, your fonts become instantly available across all Thrive tools — no extra setup needed.
2. Browse and Add Google Fonts Instantly
The full Google Fonts library is already integrated. You can search by name, preview font styles, and activate only the fonts you want to use.
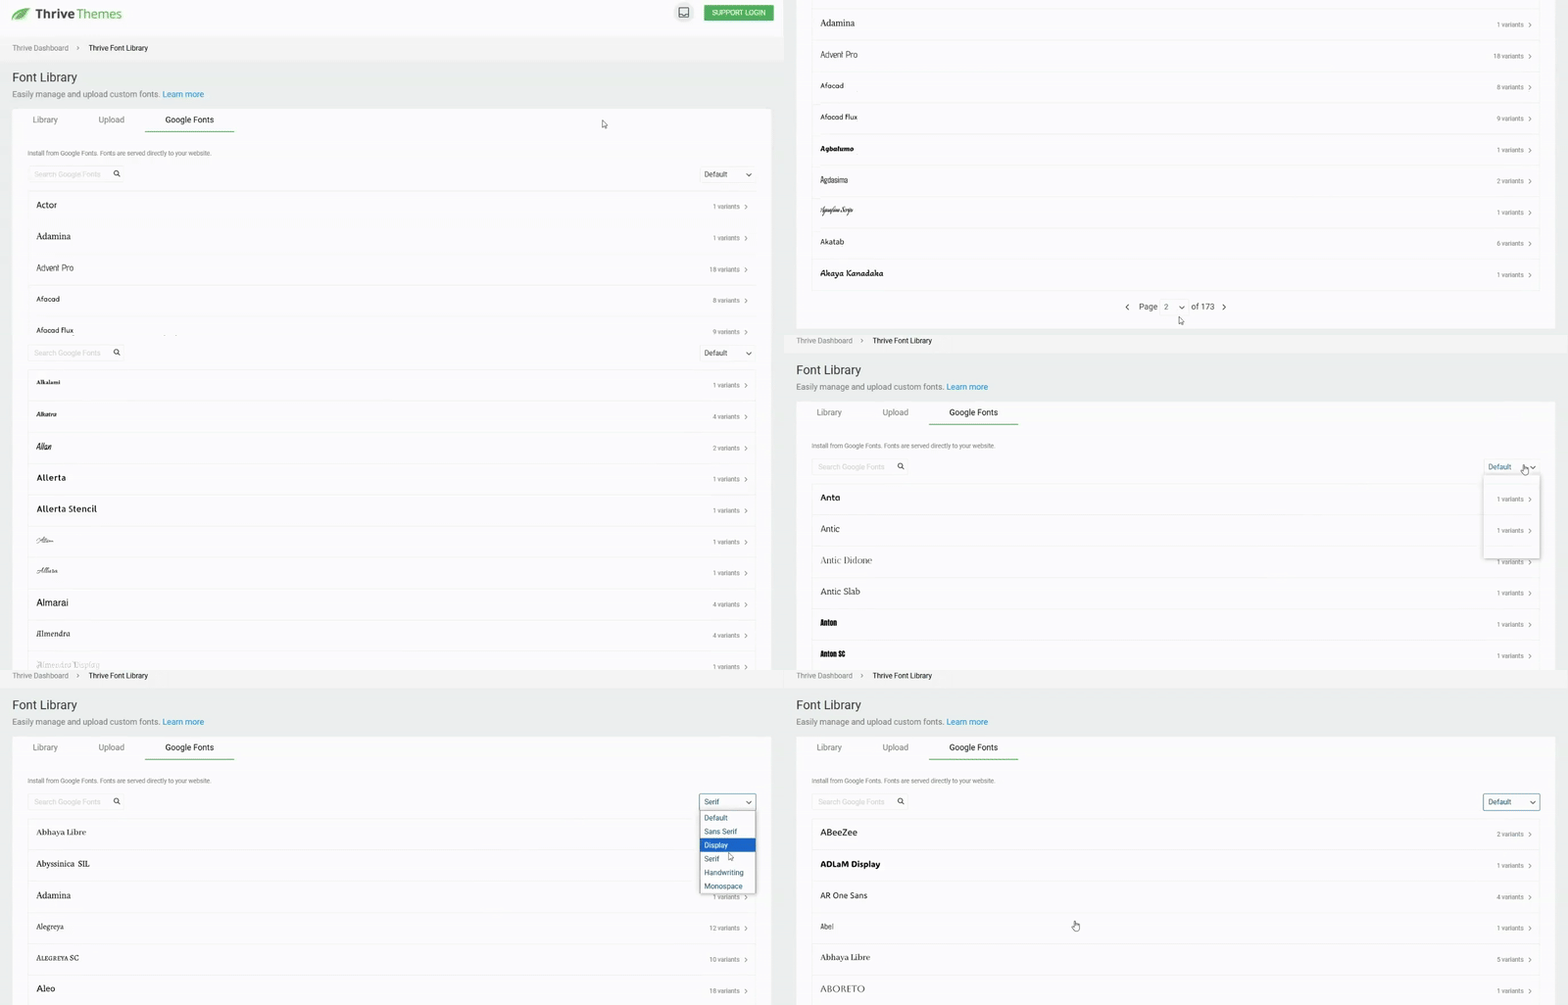
There’s no need for an API key or a separate plugin. Just click Add Font, choose from the list, and it’ll appear in your typography options inside Thrive Architect, Thrive Theme Builder, and more.
Bonus: Since Thrive only loads the fonts you select, you avoid unnecessary bloat and keep your pages lean and fast.
3. Upload Your Own Fonts (TTF, OTF, WOFF, WOFF2)
Want to upload your own premium fonts or use something outside of Google Fonts? You can.
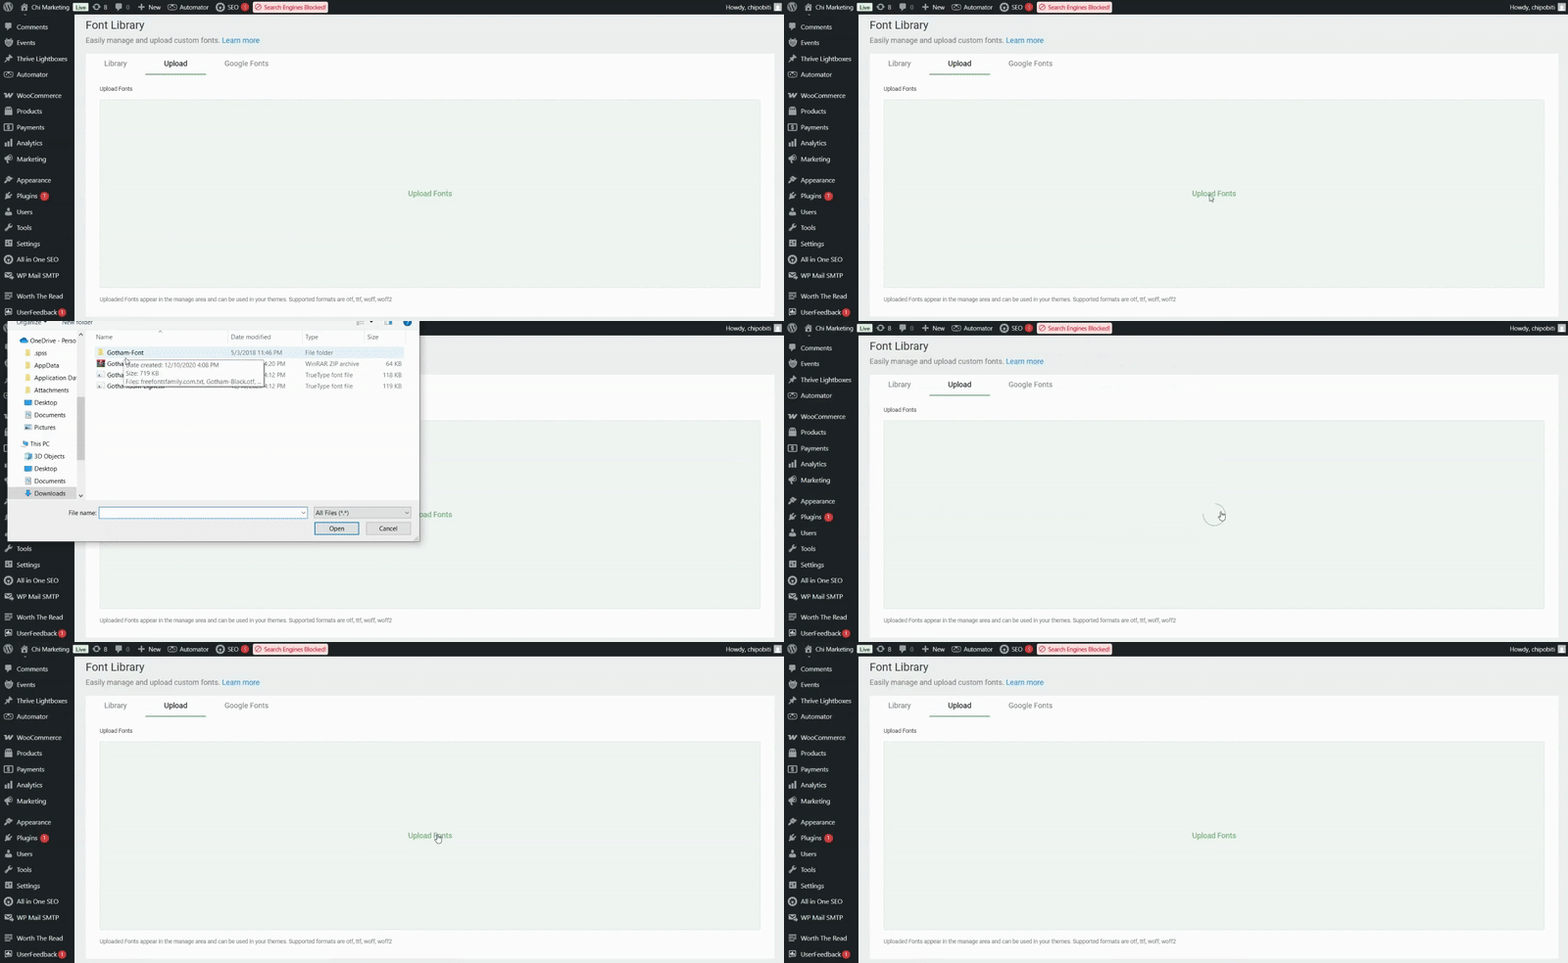
In the Font Library, go to the “Your Fonts” tab and click Upload Font. Choose your font file — TTF, OTF, WOFF, or WOFF2 — and Thrive will handle the hosting and formatting behind the scenes.
These fonts are served locally on your site, which helps with both performance and privacy compliance.
4. Use Your Fonts in Any Thrive Tool
Once a font is in your library, it becomes available across all Thrive tools. You’ll see your custom fonts show up in the Typography panel inside Thrive Architect, Thrive Theme Builder, Thrive Leads, and even Thrive Quiz Builder.
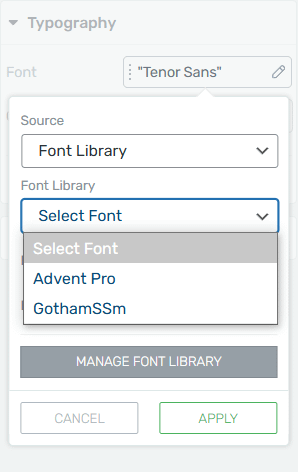
No re-uploading, no compatibility issues — just your brand fonts, ready when you need them.
5. Set Global Typography with Thrive Theme Builder
If you're using Thrive Theme Builder, you can set fonts globally for headings, body text, buttons, and other elements in your site’s design.
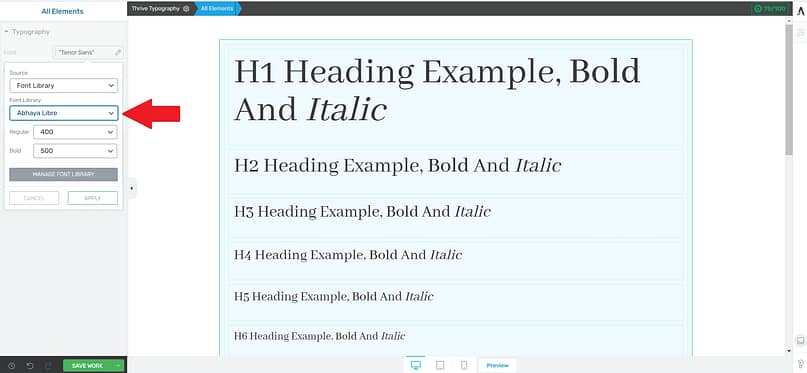
One font change updates every instance across your templates — saving time and ensuring everything stays consistent.
It's one of the easiest ways to build a site that looks and feels professionally branded, without needing a full-time designer.
Make Your Fonts Work Harder (For Speed, UX, and Conversions)
Your fonts shouldn’t just look nice. They should help your site load quickly, be easy to read, and guide visitors toward taking action. Here’s how to make that happen:
Having Font Trouble? Here’s What to Check
Font issues can sneak up on you — and if they’re not fixed, they can quietly hurt your site’s performance and credibility. If your fonts aren’t showing up, check that the file paths are correct, your browser supports the format, and your site is using HTTPS. Clearing your cache can also make a difference, especially if you’ve recently updated something.
If your fonts look off or your site feels slower than usual, you might be loading files that are too large or using too many styles. Web formats like WOFF2 are faster and more efficient, and limiting font variants helps keep things running smoothly. A quick test with GTmetrix or PageSpeed Insights can reveal if fonts are part of the problem — and if they are, it’s worth fixing now before it starts costing you clicks.
Fonts Are Just the Start — What About the Rest of Your Website?
You’ve nailed your typography. That’s a big win. But even the most beautiful fonts can’t save a site that’s hard to navigate, inconsistent, or just… off.
Design isn’t just about looking good — it’s about guiding your visitors, reinforcing your brand, and helping people take action without confusion or friction.
Here’s what to look at next:
Layout matters. Even great fonts will feel awkward if your content is crammed together or lacking space. Thrive Architect gives you full drag-and-drop control to create clean, easy-to-follow landing pages.
Your CTAs need to stand out. Typography helps with hierarchy, but your buttons and forms need visual impact too. Use strong font pairings and test what drives clicks.
Consistency builds trust. If your homepage and blog look like they were built by two different people, that disconnect chips away at credibility. With Thrive Theme Builder, you can apply fonts, colors, and layouts globally so everything feels unified.
💡 Want to make sure your design choices actually support conversions? Check out our guide to the 13 Core Design Principles Every Conversion-Focused Website Should Follow.
Wrapping Up: How to Add Custom Fonts in WordPress the Right Way
If you’re adding custom fonts, you’re already thinking like a brand builder — not just someone tweaking design settings.
But don’t stop at making things look pretty. When done right, custom fonts can improve your site’s speed, create a more cohesive experience, and support every click that matters.
✅ The Thrive Font Library gives you everything you need — full font control, no friction, and total flexibility across all your Thrive tools.
Ready to take control of your typography and boost your conversions while you’re at it?


