


TL;DR: How to Make a Quiz in WordPress
To make a quiz in WordPress, you need a quiz plugin. I'm using Thrive Quiz Builder here, and the whole build comes down to ten steps:
- Install Thrive Quiz Builder: through Thrive Product Manager
- Tell it what the quiz is for: list building, social shares, customer insights, or from scratch
- Set your results first: pick how the quiz scores, then name the results people can land on
- Write the questions: five is plenty, with every answer pointing to a result
- Add the opt-in gate: the email form people fill in before they see their result
- Tag people by their answers: so every subscriber lands in the right email segment
- Build the results page: with different advice for each result
- Add a splash page: the intro screen with the Start button
- Put the quiz on your site: with the WordPress block, a shortcode, or Thrive Architect
- Test every path, then read the report: and A/B test whichever page is leaking
The clicking is the easy part. The real thinking happens in steps 3 and 4, and step 10 is the one most tutorials skip, even though it's the step that tells you whether any of it worked.
Chances are you're here because you want more people on your email list, and a signup box in your sidebar isn't bringing them in. A quiz gives people a reason to join that a form can't, because by the time they've answered the questions, they really want to know their result, and an email address feels like a small price for it.
That's what we saw when we built a quiz for the Thrive blog in 2021. 3,259 people visited it, 1,906 of them ended up on our email list, and the reports showed us exactly where we lost everyone else.
So this tutorial walks you through building one in WordPress, screen by screen, using a five-question quiz called What's Holding Your Email List Back? And we won't stop once it's on the page. We'll also set up what happens to each person's email address, how every result gets its own follow-up, and how to tell whether people are giving up halfway through.
I'm building it with Thrive Quiz Builder because it's built around marketing quizzes, the kind that grow an email list. The opt-in gate, the answer tags that go to your email service, the results pages you design yourself, and the reports and A/B tests are all part of the plugin, so you don't have to piece them together from separate tools. And it all runs on your own WordPress site, so the quiz and its data stay with you.
How to Make a Quiz in WordPress (Results First, Questions Last)
Here are the three results our quiz sorts people into, so the screenshots make sense as you go:
It's a list-building quiz, which is what most businesses build a quiz for, so it touches every part of Thrive Quiz Builder you're likely to need. If you're making something different, like a personality quiz or a product finder, almost every step still applies, and I'll point you to the dedicated guides where things split off.
Step 1: Install Thrive Quiz Builder (It's Not in the Plugin Directory)
Thrive Quiz Builder is a premium plugin, so you won't find it by searching the WordPress plugin directory. It installs through Thrive Product Manager, a small plugin that installs and licenses every Thrive tool you own from one place.
The route looks like this:
Once it's in, you'll find it under Thrive Dashboard → Thrive Quiz Builder. That screen is home base from here on, because every quiz you make lives there, and so do the reports.
Step 2: Tell It What the Quiz Is For (This Choice Shapes Everything After It)
Click Add New on the Thrive Quiz Builder dashboard, and the first screen you get is a choice of four templates. Each one sets the quiz up for a different job:
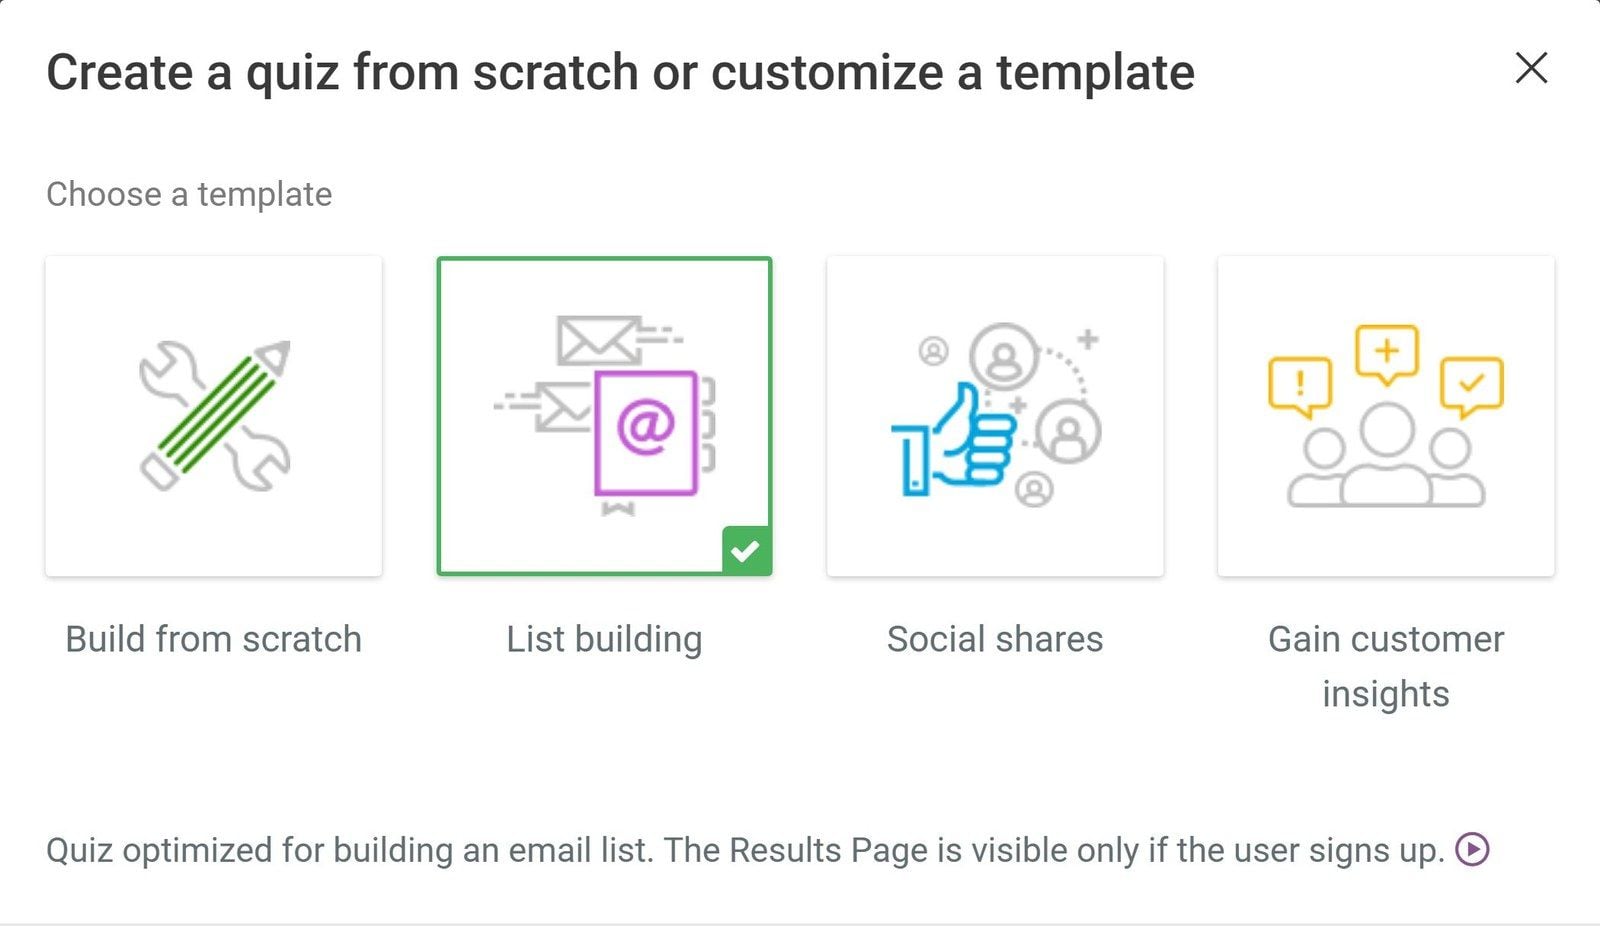
The first screen of every new quiz. List building is the one for growing an email list.
For an email list quiz, pick List building. The note underneath spells out exactly what you're agreeing to: people only see their result if they sign up. You can soften that later (I'll show you how in step 5), but for a quiz whose whole job is growing your list, I think gated is the right place to start.
Then give the quiz a name. This one is only for you, since your visitors never see it, so call it something you'll still recognize in six months when you've built three more.
Step 3: Set Your Results Before You Write a Single Question
This is the step I'd slow down for, because it's where most quizzes go wrong without anyone noticing.
The natural instinct is to write your questions first and work out the results afterward. When we built our quiz for the Thrive blog in 2021, we did the opposite, and we called it the back-to-front method: results first, questions second. Once you know exactly which results someone can land on, writing questions that lead to them is straightforward. Do it the other way round, and you end up trying to pin results onto questions that don't point anywhere in particular.
We planned the whole thing on paper first, results included, before anyone opened the plugin. This is the sketch the team worked from:
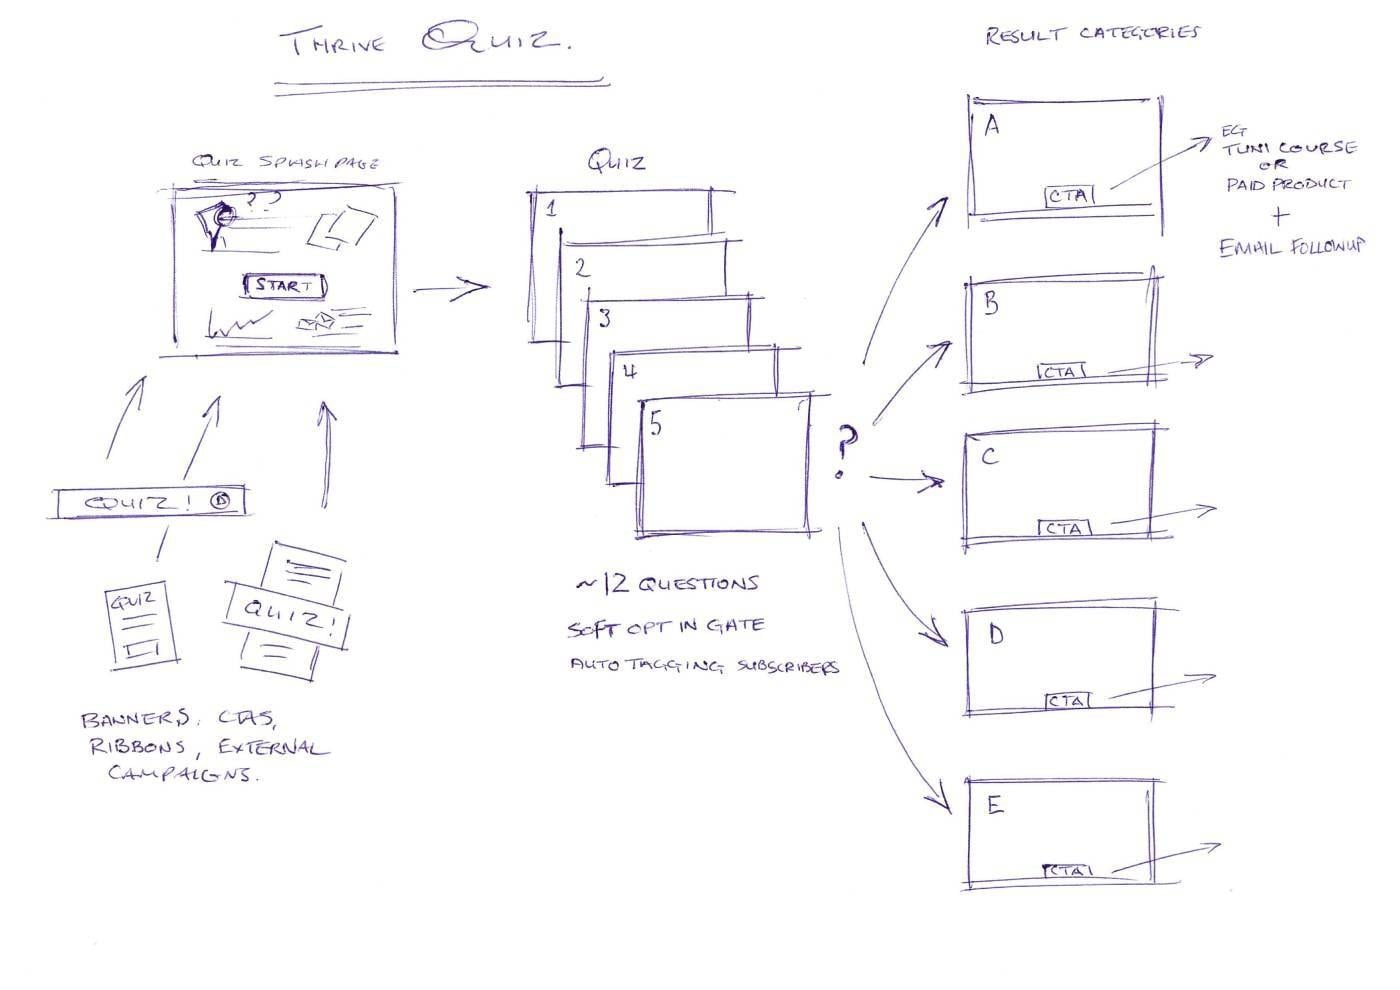
The pen-and-paper plan for our 2021 quiz, with the splash page, the questions, and five result pages drawn out before anything was built.
Thrive Quiz Builder works this way too, because it asks for your results before it asks for a single question. On the quiz's dashboard, click Change Type and choose how the quiz scores:
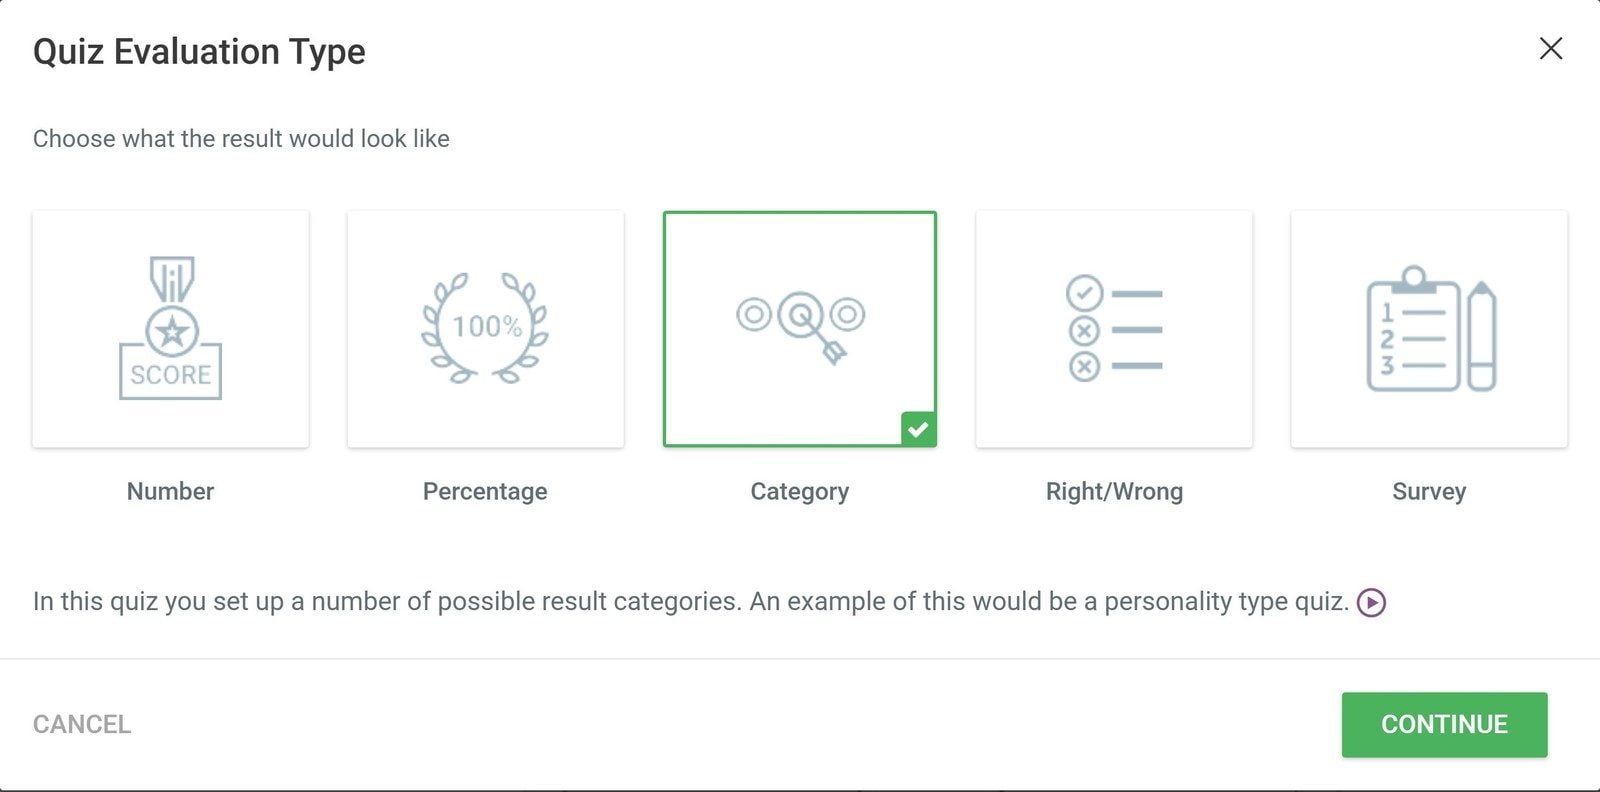
Category is the scoring type for a quiz that sorts people into results.
For a list-building quiz, Category is almost always the one you want, because a category is something you can act on. "You scored 62%" doesn't tell you what to email someone next. "Weak Offer" does.
Then add your results. Ours are the three from earlier: Hidden Form, Weak Offer and Quiet List.
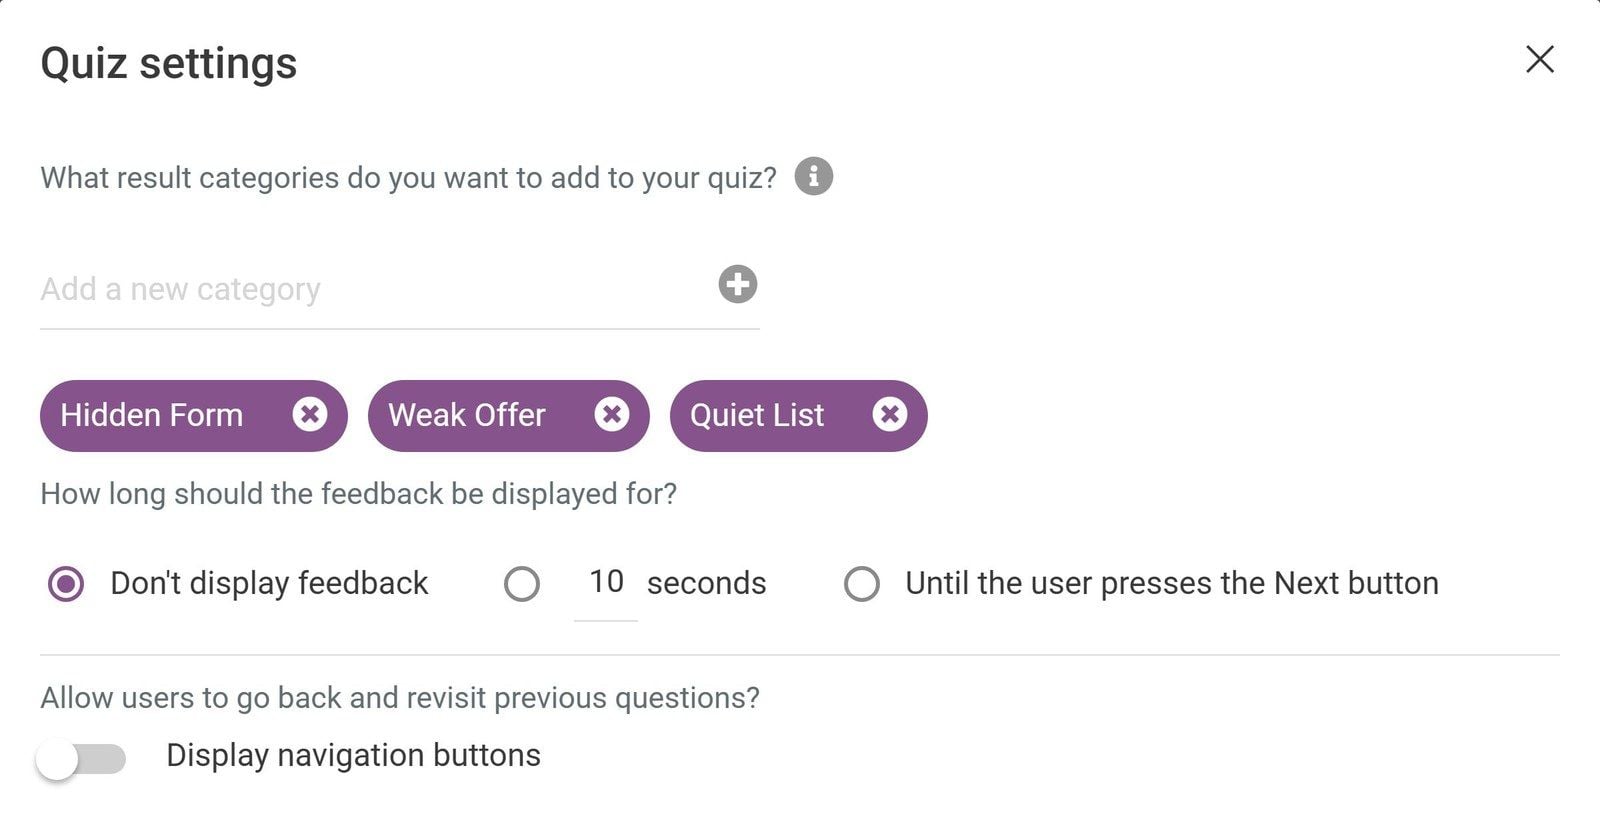
The three results for our quiz, with feedback switched off.
Three is plenty for a first quiz. Our 2021 quiz had five, and the reason behind that number was refreshingly practical: nobody knew yet whether the quiz would work, so it made more sense to publish something than to spend weeks perfecting results pages for a quiz nobody had taken. You can always add a fourth result once real answers start coming in.
On the same screen, you'll set your feedback, which is the little message that can pop up after each answer. For a gated quiz, choose Don't display feedback, so nobody gets a preview of their result before they reach the opt-in gate.
Last, pick a quiz style. Each style is a matching set of four designs (the splash page, the questions, the opt-in gate and the results page), so the quiz looks consistent from the first screen to the last. Ours uses Lush.
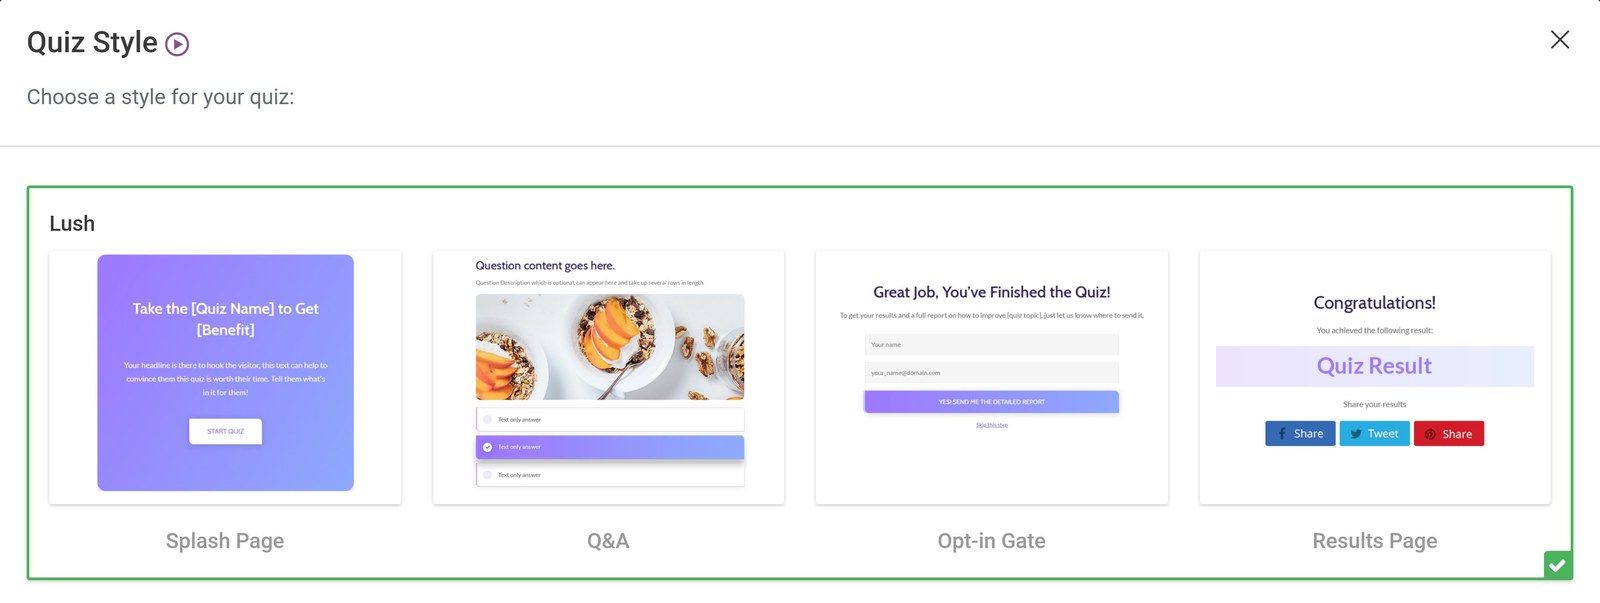
Every style comes as a set, so all four screens of the quiz match.
If you're building a personality quiz specifically, this is the step our guide to creating a personality quiz spends the most time on, because in a personality quiz the results are the whole point.
Step 4: Write the Questions (Fewer Than You Think)
With your results set, the quiz dashboard shows the whole quiz in order: the splash page, the questions, the opt-in gate and the results page, each with its own Manage button. I'm going to leave the splash page until last, because an intro is much easier to write once you know what the quiz actually delivers.
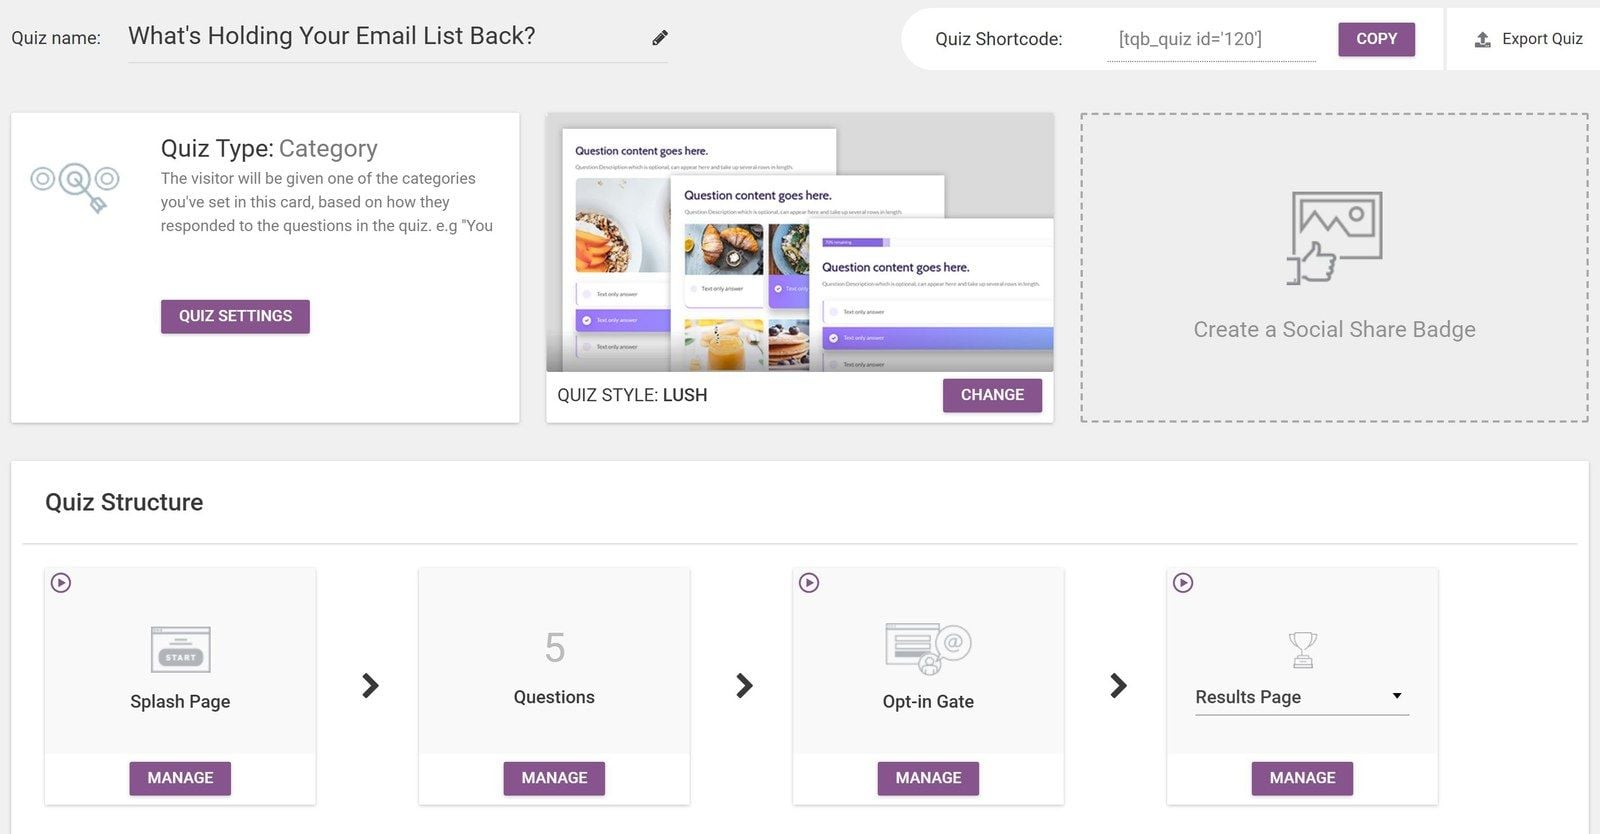
The quiz dashboard, with every part of the quiz in the order a visitor sees it
Click Manage under Questions to open the question editor, then click Add Question. You'll get three question types: multiple choice with buttons, multiple choice with images, and an open-ended question. For a quiz like ours, buttons are the simplest option, and they're quick to tap on a phone.
Type your question, then add your answers. Every answer has a Category dropdown, and this is where setting your results first pays off. You already know where people can end up, so each answer has an obvious job, which is to point to one of those results. Our first question, Where do most visitors see your signup form?, has one answer for each:
Each answer counts as a point toward its result, and whichever result collects the most points by the end is the one the person gets. On our 2021 quiz, every answer carried an equal weight of one. But if one answer is a much stronger signal than the rest, you can switch on Weights for that question and make it count for more.
As you add questions, they appear on the canvas. Connect them in order by dragging from the dot at the bottom of one question to the dot at the top of the next, starting from Quiz Start.
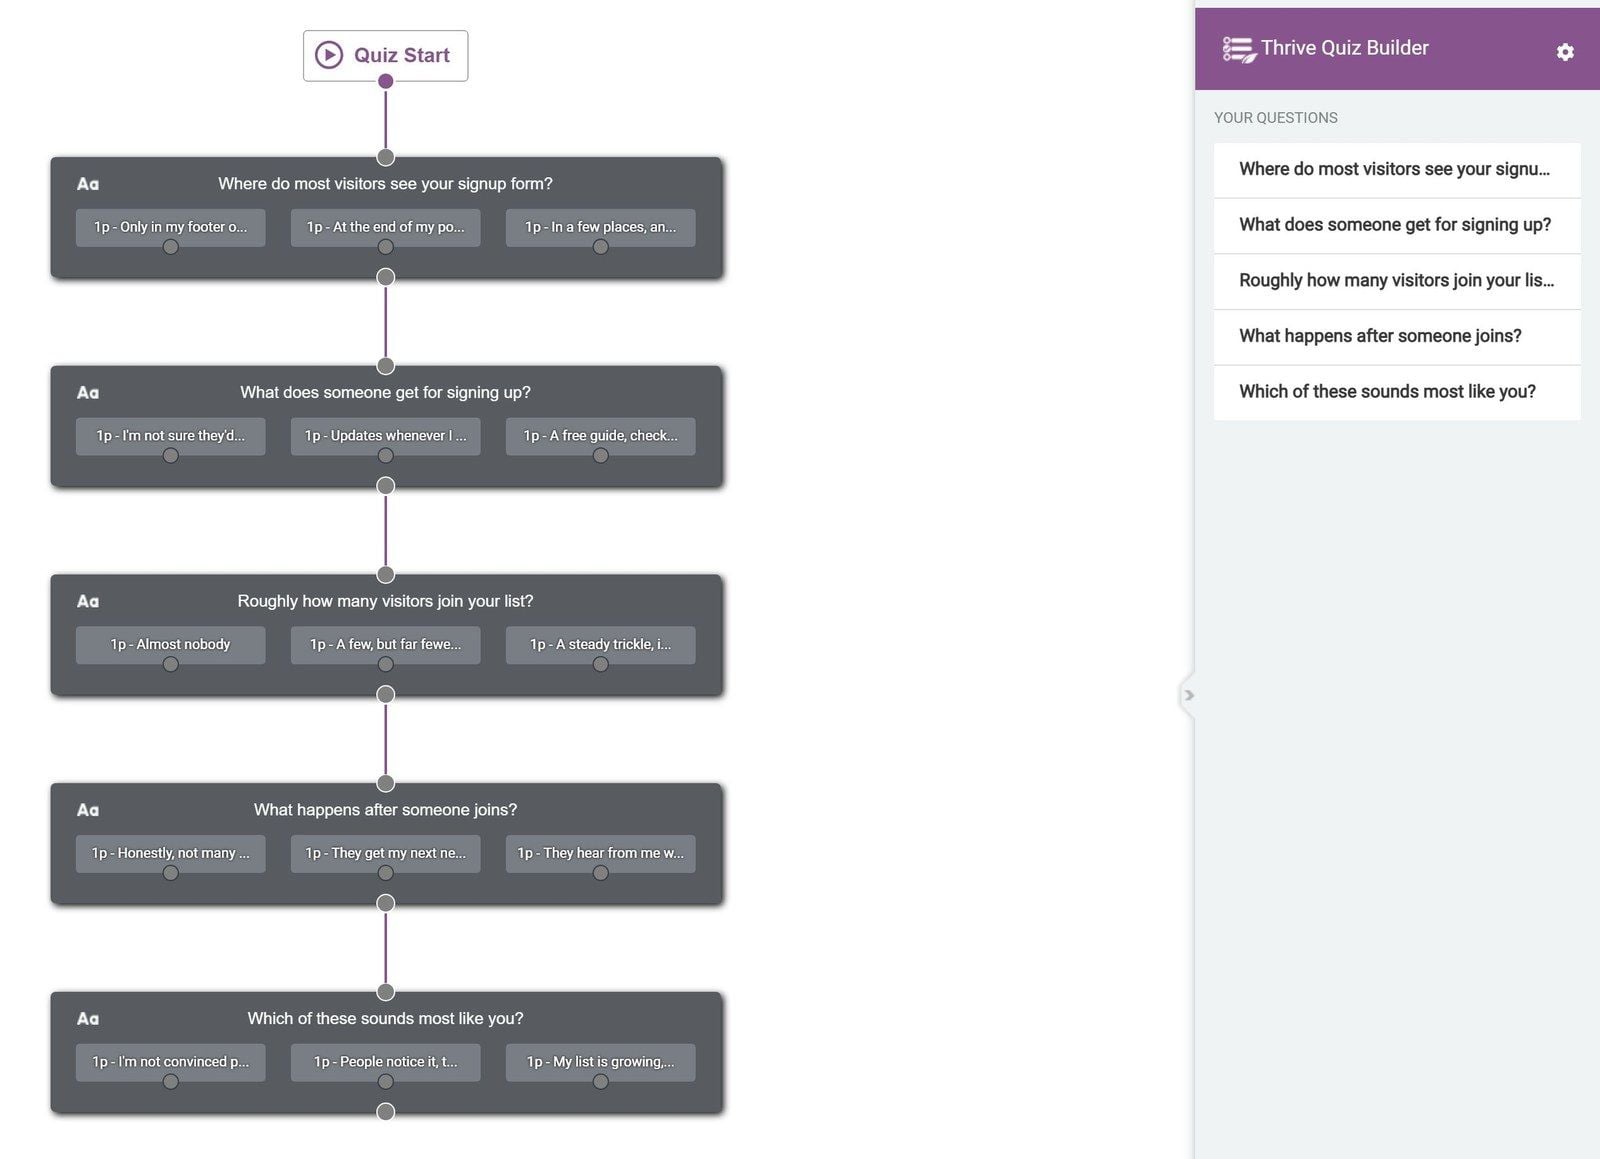
Our five questions, linked in order from Quiz Start.
You'll notice every answer has a dot of its own as well. Drag from an answer's dot instead, and that answer can send people down a different path, which is how you build a longer quiz without making everyone answer every question.
So how many questions should you write? Our 2021 quiz had 13, with a branching question near the start so that nobody had to answer all of them. Even so, the questions were the biggest leak in the whole quiz, and 40% of the people who started them gave up before the end. That's why ours has five. I'd much rather someone finishes five questions and gets a useful result than abandons thirteen, and once the report (step 10) shows you people are sticking around, you can always add more.
Step 5: Add the Opt-In Gate (and Decide How Firm It Should Be)
The opt-in gate is the form people see after the last question and before their result. Because we chose the List building template, the quiz already has one. Click Manage under Opt-in Gate, then edit the design, and it opens in the visual editor.
The first decision is how firm the gate is. Out of the box, the template has a Skip this step link under the form, which makes it a soft gate, where people are encouraged to sign up but can still see their result without doing it. Delete that link and it becomes a hard gate, where the result only appears once they've subscribed.
Our 2021 quiz was planned with a soft gate and switched to a hard one before it went live, because the result was useful enough to be worth an email address. That's the test I'd use for yours too. If your results page gives people something specific, like a diagnosis, a plan, or a recommendation, a hard gate is a fair trade. If it's a one-word label, let them skip.
Next, connect the form to your email service. Click the form to select it, and the Lead Generation panel opens on the left. Under Send leads to, click Add Connection and choose your email service. If it's not in the list yet, connect it first using the Go to the API Dashboard link in the same panel. Thrive works with all the major email marketing services.
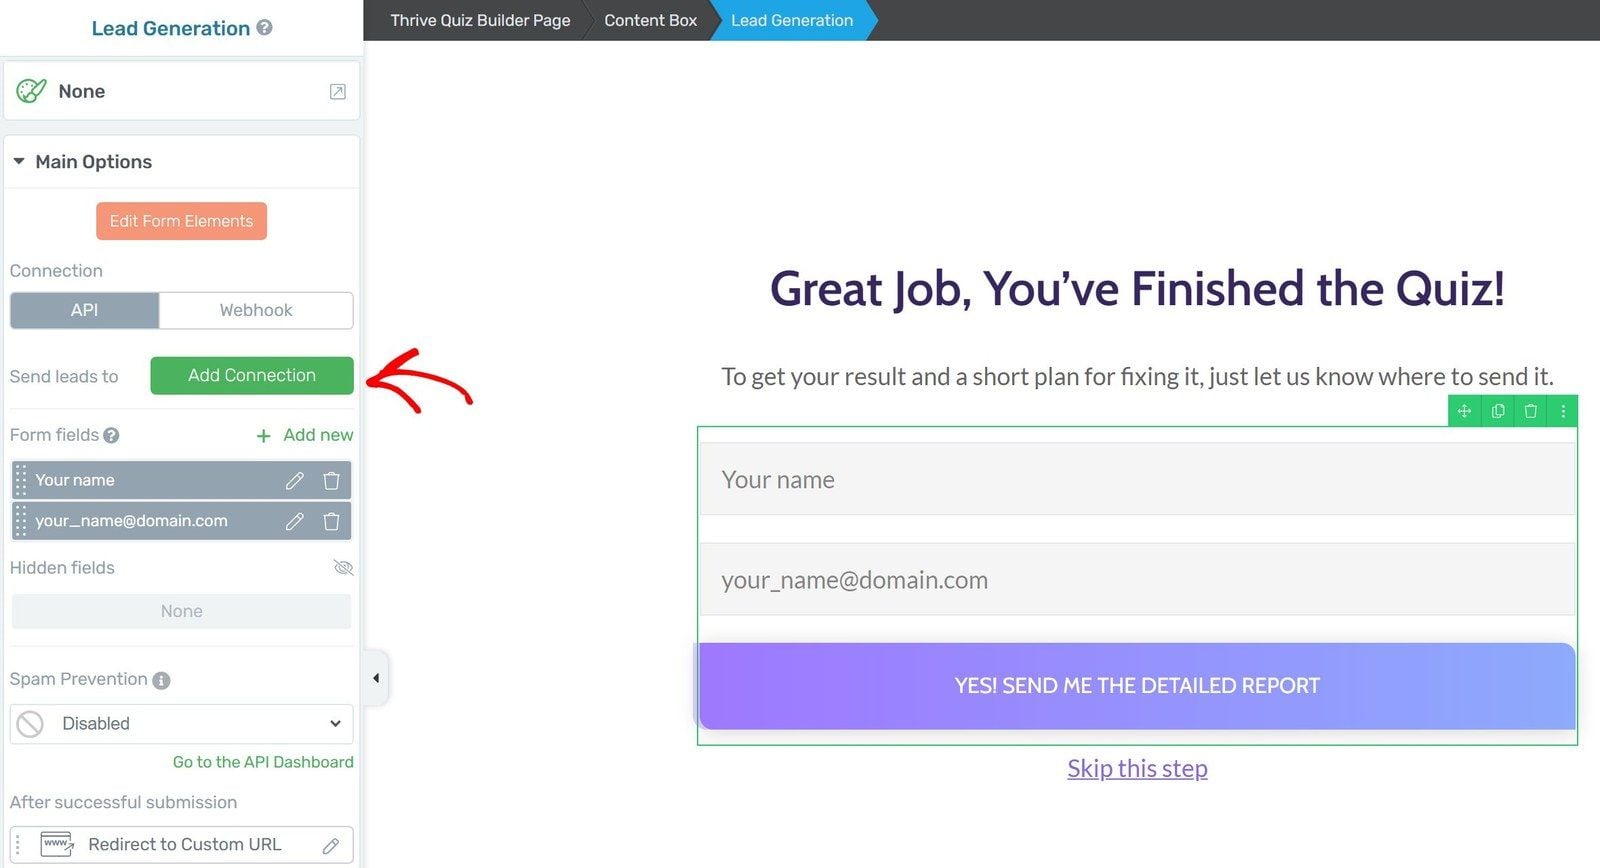
Add Connection is where the gate starts sending people to your email list.
While you're in the editor, rewrite the line above the form so it promises something specific. The template's version is a placeholder, and ours now reads, "To get your result and a short plan for fixing it, just let us know where to send it." And tell people they're joining your email list. It's the honest thing to do, and in a lot of places, under rules like Europe's GDPR, it's also a legal requirement.
So how much does a gate cost you? On our 2021 quiz, only 2.8% of people dropped off at the opt-in gate. But I want to be upfront about why that number is so low. We launched the quiz with an email to our existing subscribers, and the gate was set up so that subscribers arriving from that email didn't have to type in their details again. So don't expect 2.8% from cold traffic. What it does show is how little a gate costs when people already trust you.
There's one more setting worth knowing about. On the Opt-in Gate's own screen in the Thrive Quiz Builder dashboard, you can skip the gate for logged-in users. That's handy if you run a membership site and your members are already on your list.
Step 6: Tag People by Their Answers So Your Emails Can Follow Up
A result tells the person taking the quiz something about themselves. Tags tell you something, and more importantly, they tell your email service.
In the question editor, open a question and switch on Tags. Every answer gets a tag field, and the tags on the answers someone chooses go along with their email address when they subscribe through the opt-in gate, as long as your email service supports tags.
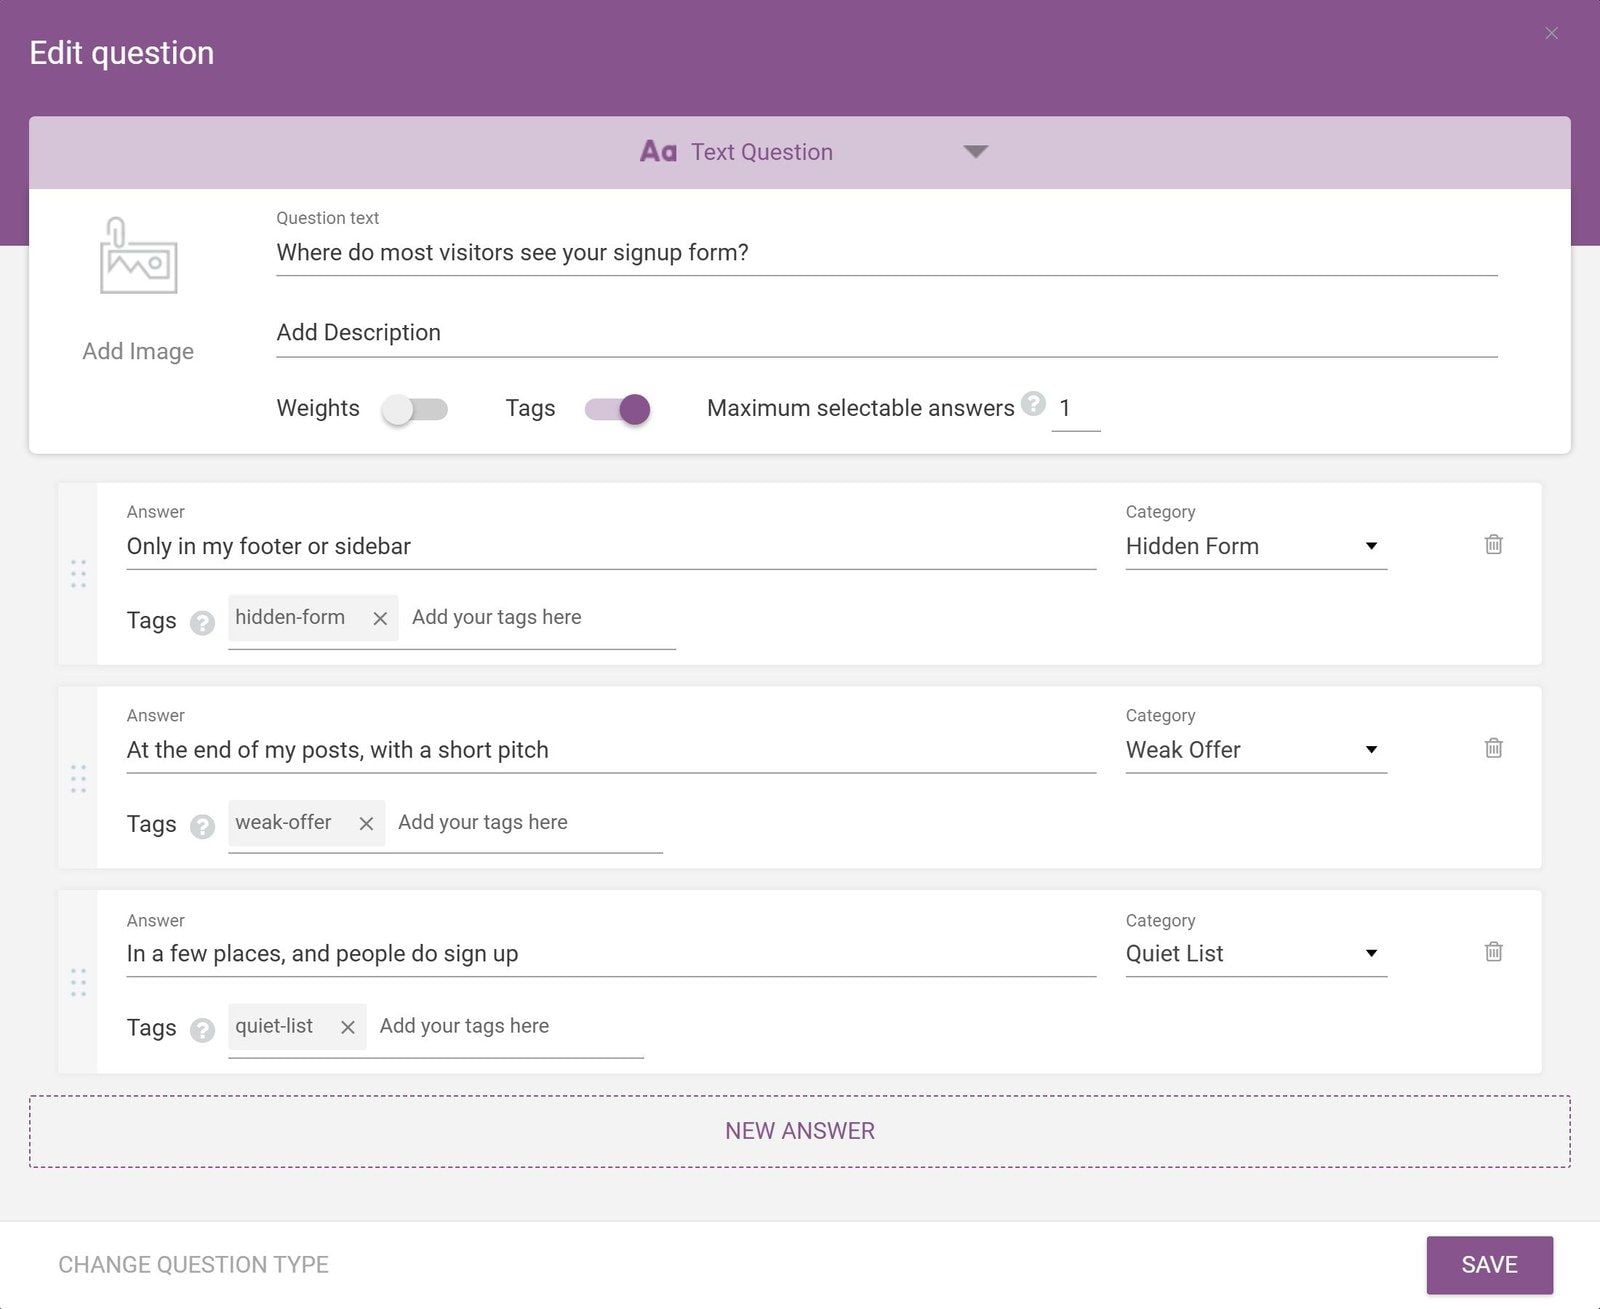
Each answer points to a result and carries a matching tag.
We tagged every answer with the result it points to: hidden-form, weak-offer and quiet-list. So someone who keeps choosing Weak Offer answers arrives in your email service already labeled, and the first email they get can be about fixing their offer instead of a generic welcome.
But your tags don't have to mirror your results, and some of the most useful ones won't. Our 2021 quiz included a few questions purely to learn about the people taking it, with a tag on every answer. The breakdown showed that 30% of quiz takers ran a service business (coaching, fitness, consulting and the like), only 8% ran an ecommerce store, and 48% said time was the resource they had most of for building their business, while just 5% had a team helping them. You'd never get that kind of picture from a signup form.
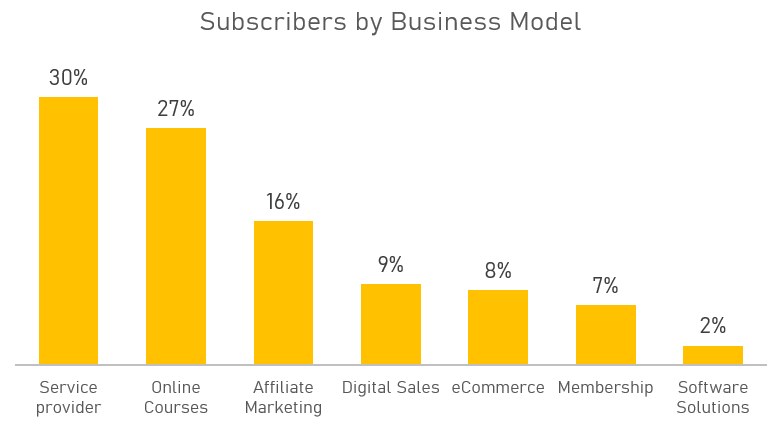
What answer tags told us about the people who took our 2021 quiz.
Step 7: Build a Results Page That's Worth Handing Over an Email For
The results page is where the quiz pays off for the person taking it, so I'd give it more of your time than the template suggests it needs.
Click Manage under Results Page and edit the design. The template shows the person's result using a shortcode (leave that in place, because it's what displays their result) along with some share buttons. On its own, though, that only gives someone a label. To give each result its own advice, add a Dynamic Content element from the elements panel. A bar appears along the bottom of the editor with a tab for each of your results, and whatever you write under a tab only shows to the people who got that result.
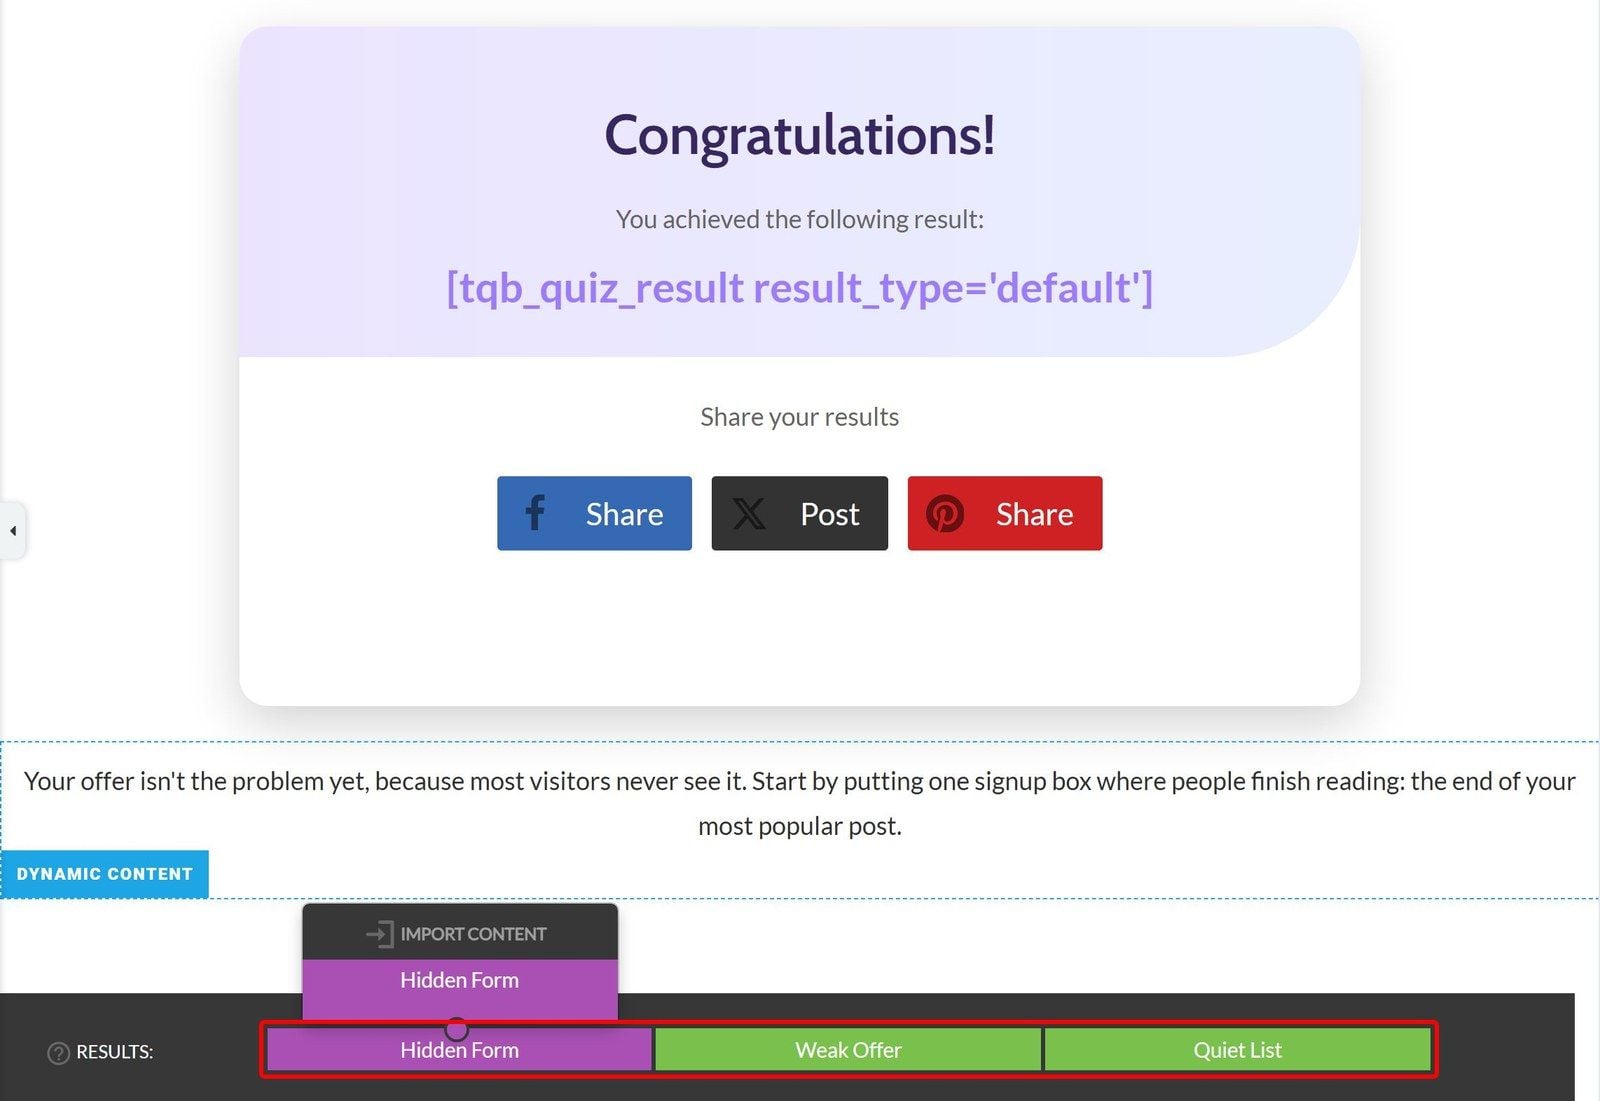
One element, a tab for each result, and different advice under each tab.
And this is what someone who lands on Hidden Form actually sees:
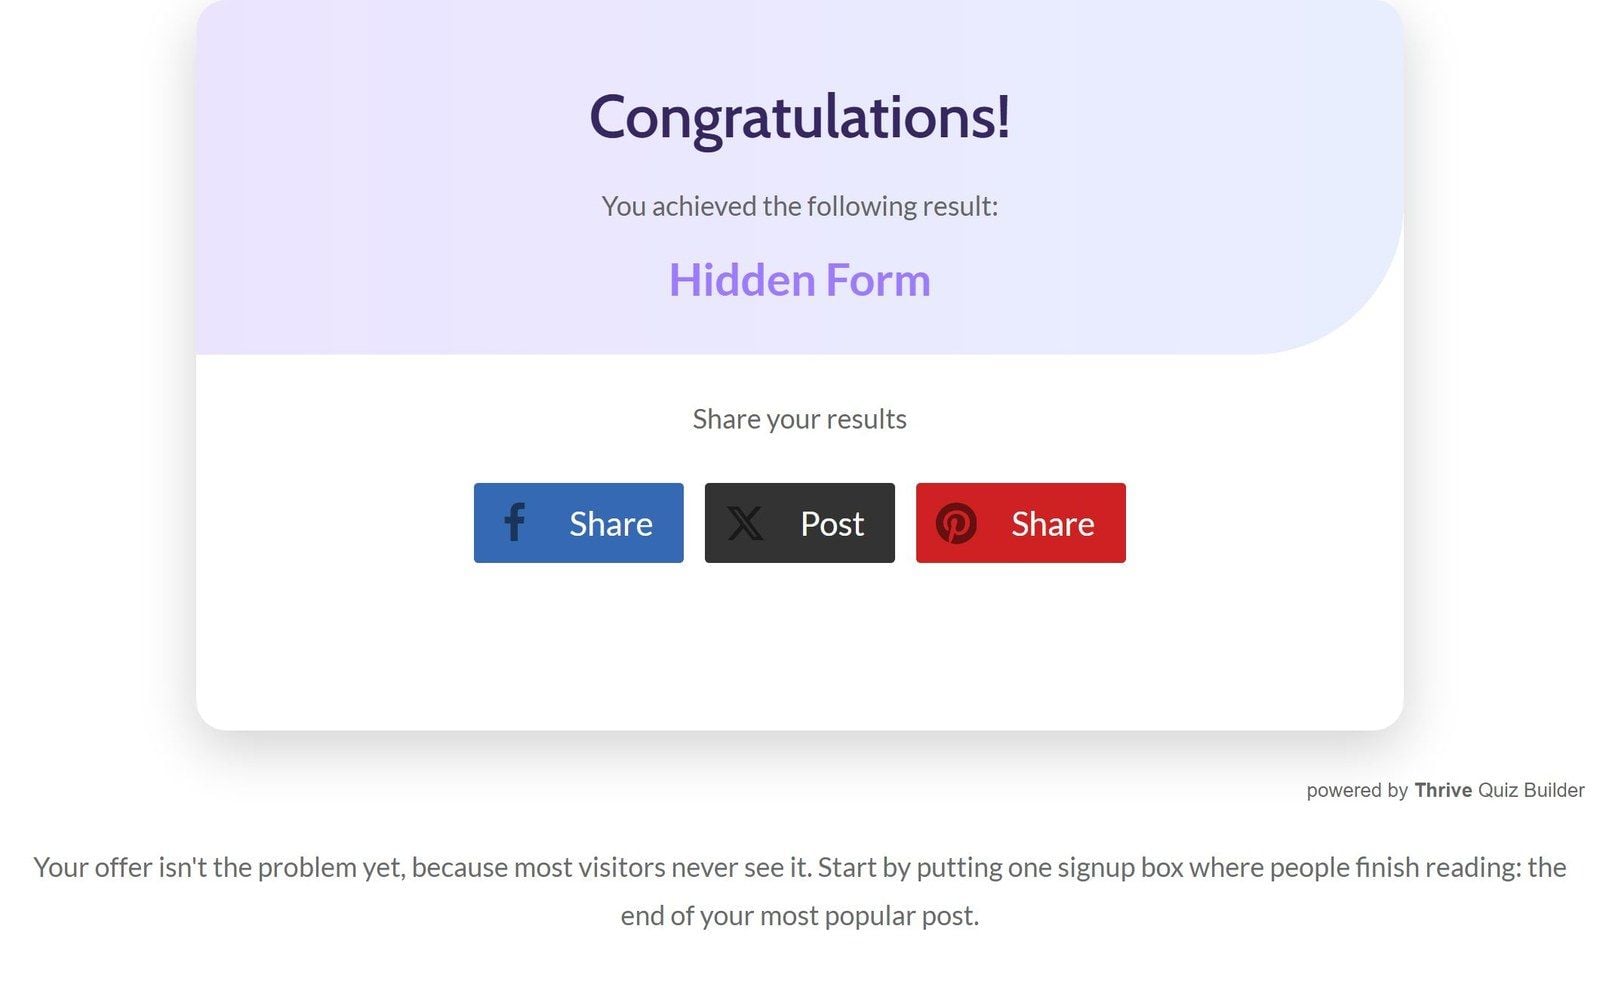
The result, followed by the advice written for that result.
If you'd rather give each result a full page of its own, the Results Page card on the quiz dashboard has a URL Redirect option instead. Our 2021 quiz worked that way, with five separate result pages built in Thrive Architect, each one recommending a different kind of opt-in offer. It's more work up front, but it gives every result room for a proper next step. And if your quiz recommends products, our guide to building a product recommendation quiz covers sending each result to the right product.
Whichever way you go, end every result with somewhere to go next. Ours point to the one fix that matters most, and the 2021 result pages each promoted a free list-building masterclass. Someone who's just read their result is about as interested in what you have to say as they'll ever be, so don't let the page just stop.
As for those share buttons, the quiz dashboard also has a Create a Social Share Badge card, which turns someone's result into an image they can post. It's the centerpiece of the Social shares template, and it's worth the extra few minutes if you want the quiz to travel. For a list-building quiz like ours, the share buttons that come with the template are plenty.
Step 8: Add a Splash Page So the Quiz Doesn't Start Cold
Without a splash page, the quiz opens straight onto question one, which can feel abrupt when it's sitting in the middle of a page. The splash page is the intro screen: a headline, a line about what people will get out of it, and a Start Quiz button.
Click Manage under Splash Page and edit the design. The template's headline is a fill-in-the-blanks placeholder, "Take the [Quiz Name] to Get [Benefit]," and honestly, that's a decent formula. Name the quiz and name the payoff. Here's ours:
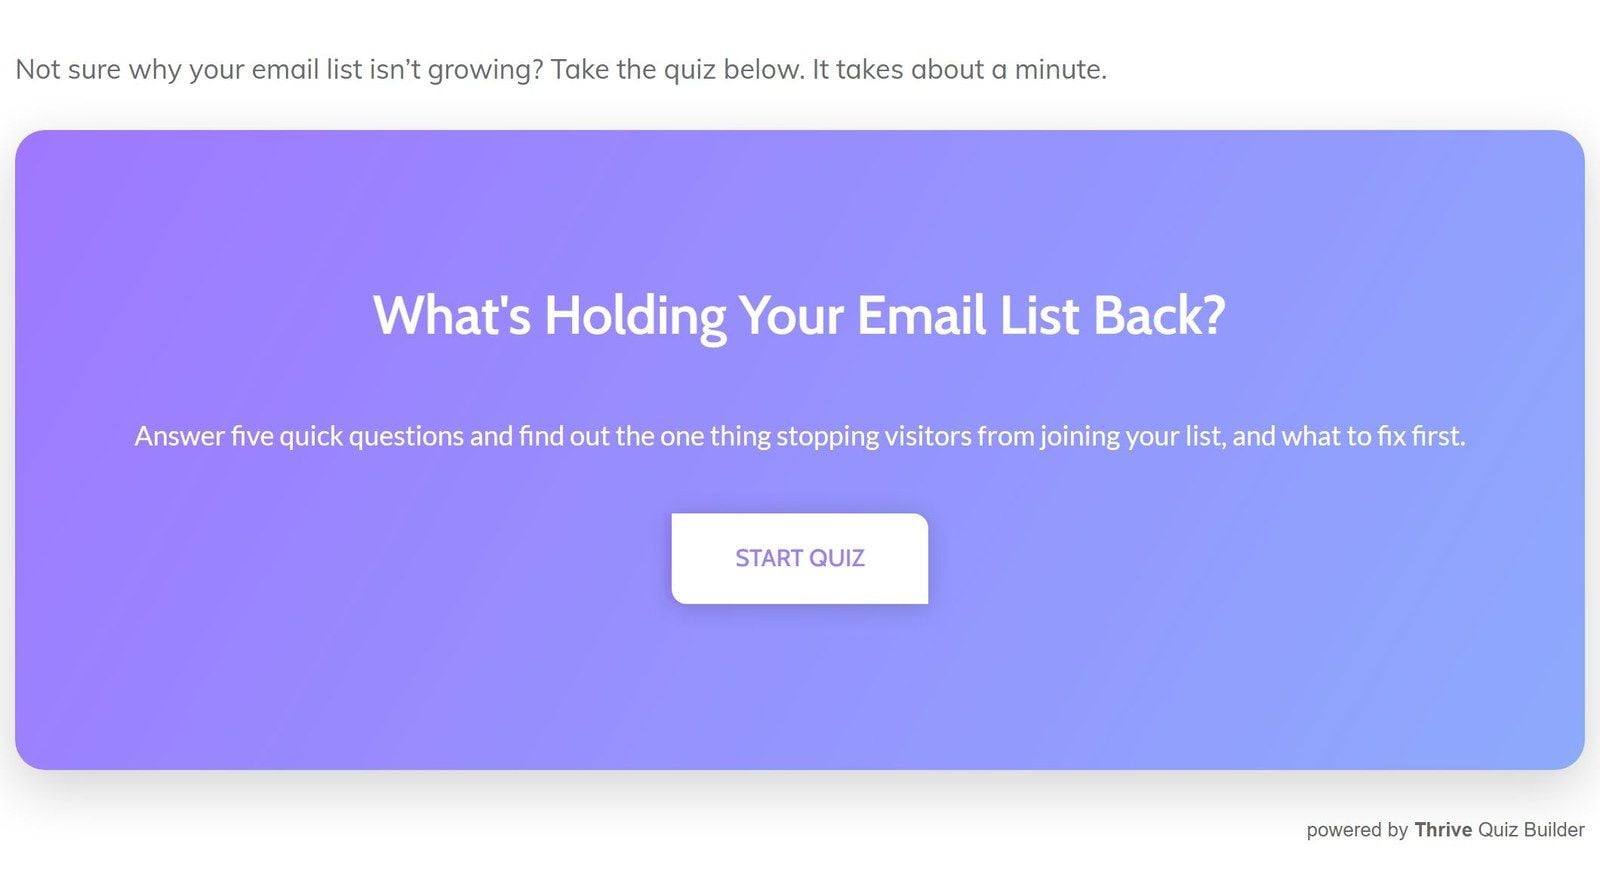
The splash page, sitting on an ordinary WordPress page.
The line under the headline does the persuading, so make it specific. Say how long the quiz takes ("five quick questions") and what people walk away with. Ours promises the one thing someone with a stuck email list wants to know, which is what to fix first.
When we built our 2021 quiz, we treated the splash page as the quiz's main promotional page, and I'd give yours the same attention, because it's the first thing every single visitor sees. If people don't click Start, nothing else you've built gets a chance.
Step 9: Put the Quiz on Your Site (Pick Whichever Way Suits How You Build)
There are three ways to add the quiz to a page, and they all end in the same place, so use whichever one matches how you already build:
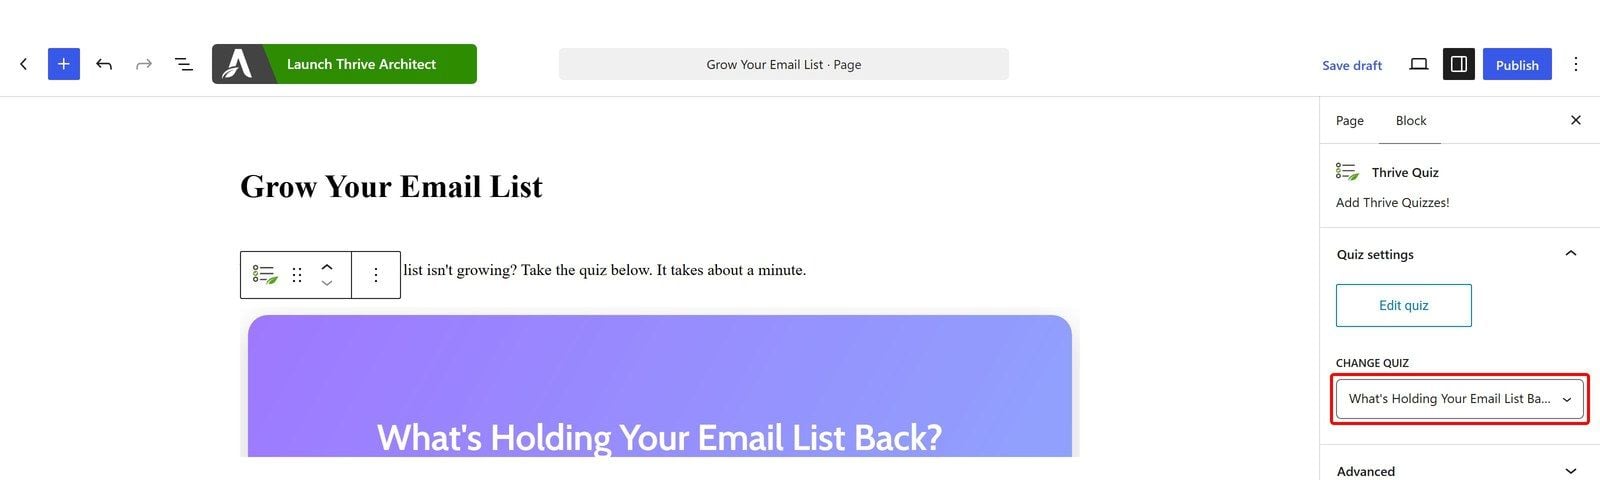
The Thrive Quiz block, with the quiz chosen in the sidebar.
Where it goes matters as much as how. Our 2021 quiz got its traffic from banners and ribbons across the site, plus an email to our subscribers, and that last one is the part people forget. Your existing list will happily take a quiz, and it's the quickest way to get real answers into your report. Beyond that, I'd start with three spots: your homepage, the end of your most popular post, and a page of its own that you can link to from emails and social posts.
Step 10: Test Every Path, Then Read the Report
Before you send anyone to the quiz, take it yourself, once for every result. Pick every first answer, then every second answer, then every third, and check that each run lands on the result it should. It only takes a few minutes, and it catches the most common mistake in a category quiz, which is an answer quietly assigned to the wrong result. We ran all three paths on our quiz before taking any of these screenshots, and each one landed where it should.
Then, once real people start taking it, open Reports from the top of the Thrive Quiz Builder dashboard. There are four of them: Quiz Completions, Flow, Questions and Users. I'd look at the Questions report first, because it shows how people answered each question and how many dropped off at it.
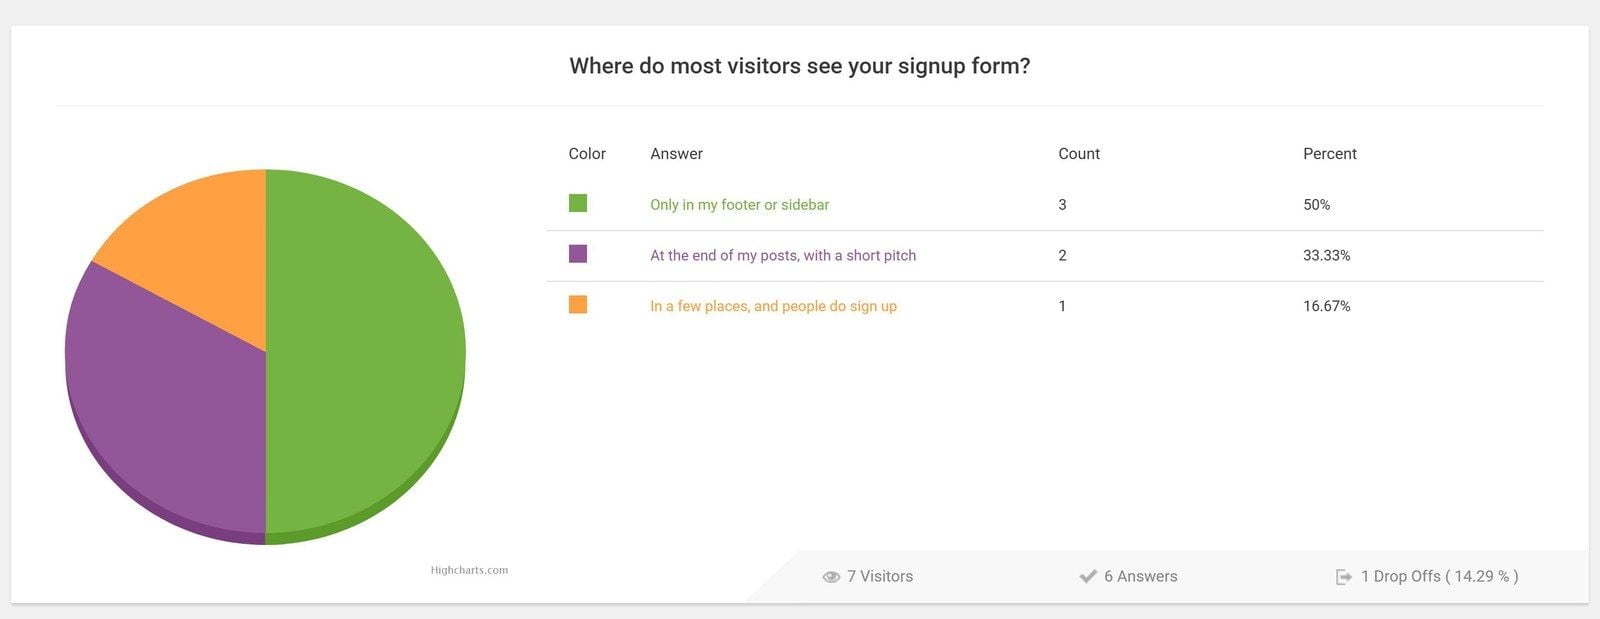
The Questions report. These numbers are from our test runs, so they're tiny. Yours will mean much more.
This is exactly where our 2021 numbers came from. Of the 3,259 people who visited that quiz, about 57% made it all the way to their results page, and the Flow report showed us where everyone else went. The questions lost 40% of people, the opt-in gate lost almost nobody, and 1,906 people joined our email list.
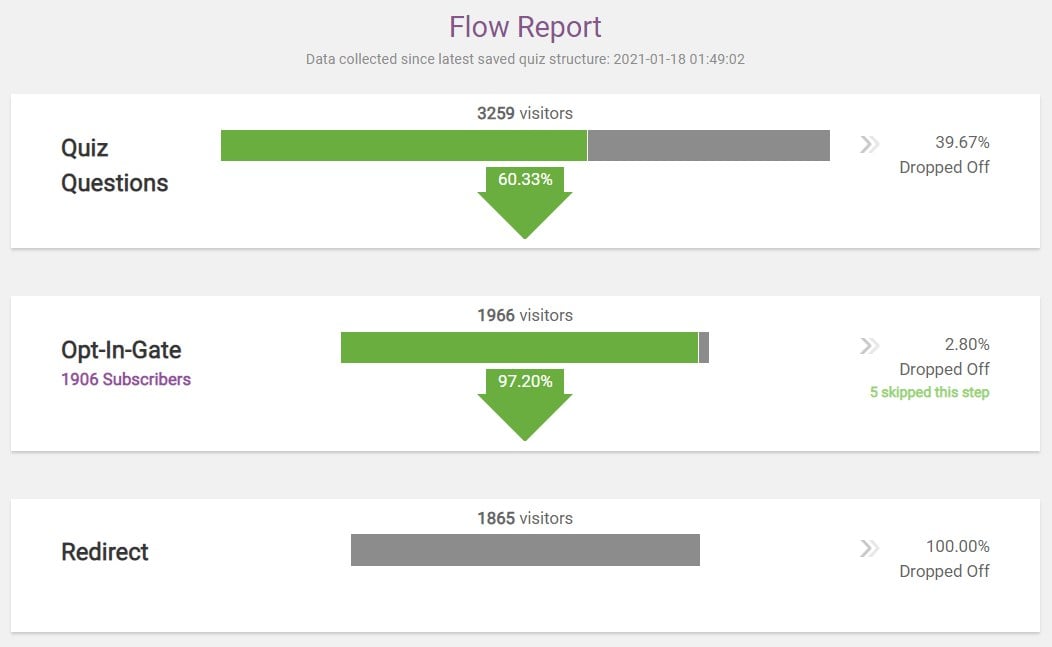
That tells you what to fix. If your questions are the leak, cut a few or add a branch. If it's the gate, look again at the promise above the form.
And once you know where the leak is, you can test a fix properly instead of guessing. The splash page, the opt-in gate and the results page each have an Add A/B Test Variation button on their own screen. Add a variation, change one thing (the headline, the promise above the form, the call to action), and Thrive Quiz Builder tracks impressions and conversions for each version, so you can keep the one that wins.
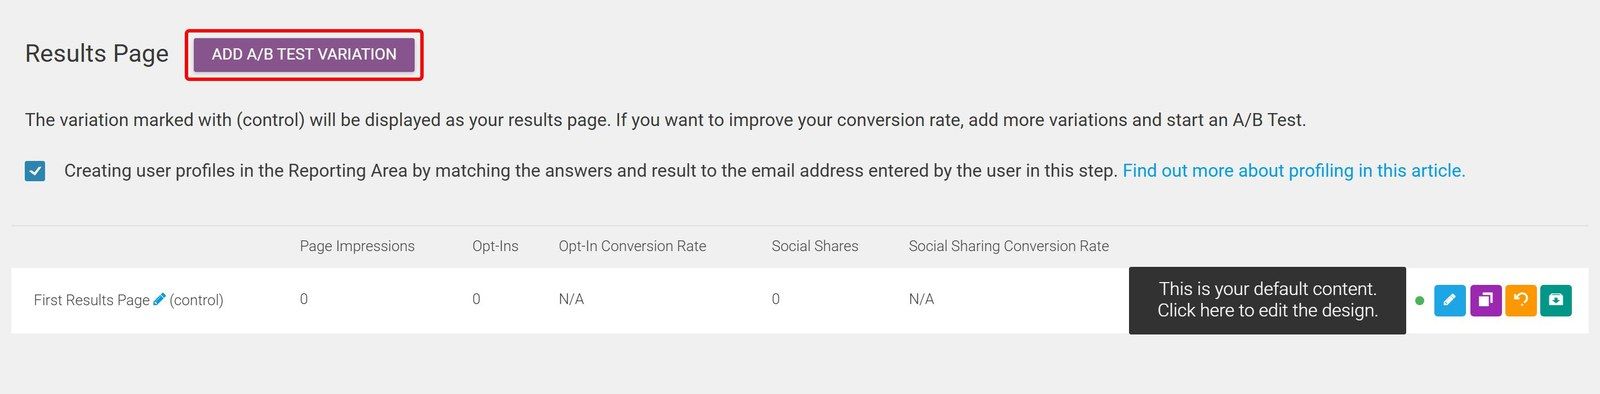
Every page of the quiz can be A/B tested from its own screen.
Frequently Asked Questions About Making a Quiz in WordPress
These are the questions people ask most when they're getting ready to build their first quiz, plus a couple that tend to come up while they're still comparing plugins.
What Is the Best Quiz Plugin for WordPress?
It depends on what the quiz is for. If you want a quiz that grows your email list and sorts people into results, I'd pick Thrive Quiz Builder, which is the plugin this whole tutorial uses. I'm obviously biased writing that on the Thrive blog, so here's an outside view: WPForms' roundup of WordPress quiz plugins ranks Thrive Quiz Builder second, behind WPForms' own plugin.
If you mainly need graded tests for an online course, a form plugin with a quiz add-on or your course platform's built-in quizzes may suit you better. We've compared the main options side by side in our guide to quiz funnel software.
Can I Make a Quiz in WordPress for Free?
Yes. Plugins like HD Quiz, Quiz Maker by AYS and Quiz and Survey Master all have free versions in the WordPress plugin directory, and they'll handle a simple quiz. Before you commit, check whether the free version includes what a list-building quiz needs, like an email opt-in, answer tags and reports, because those are often part of the paid tier.
Thrive Quiz Builder is a paid plugin. It costs $199 a year on its own, or it's included in Thrive Suite at $599 a year (prices as of October 2026).
Can ChatGPT Create a Quiz?
It can draft one, and it's a genuinely useful shortcut for the writing part. Thrive Quiz Builder doesn't generate questions for you, so you'd paste them in yourself. If you do use ChatGPT, give it your results first and ask for questions where every answer points to one of them. That's the back-to-front method from step 3, and it stops you ending up with a list of generic trivia questions that don't sort anyone into anything.
How Do I Create a Quiz on My Website?
If your site runs on WordPress, use a quiz plugin like the one in this tutorial, so the quiz, the opt-in form and the results all live on your own site. If it doesn't, you can build the quiz in a hosted tool like Typeform or Interact and embed it with a snippet of code. The trade-off is that your quiz and its data then live on someone else's platform.
How Many Questions Should a Quiz Have?
Fewer than you think. For a list-building quiz, I'd start with five to seven. Our 2021 quiz had 13, with branching so that nobody had to answer all of them, and the questions were still where we lost the most people. Start short, and let your report tell you whether people would happily answer more.
Start With the Results, and the Rest of the Quiz Follows
If you take one thing from this tutorial, make it the order. Decide what people can find out about themselves, write questions that lead there, and give every result somewhere useful to go next. The plugin part really is the easy part.
Then publish it, send it to your list, and let the reports tell you what to change. Our 2021 quiz went live with five results and a best guess at the right number of questions, and the reports showed us exactly where to improve it.
If you're still deciding what your quiz should be about, our guide to creating a quiz as a lead magnet is a good place to start. And if you'd like to see what other businesses have built, have a look at these quiz funnel examples.
Ready to Build Yours With Thrive Quiz Builder?
Thrive Quiz Builder gives you everything in this tutorial: the templates, the opt-in gate, answer tags, results pages you design yourself, the reports and the A/B tests, all on your own WordPress site. You can get it on its own or as part of Thrive Suite, alongside Thrive Leads for your other signup forms and Thrive Architect for the pages around your quiz.
Five questions and three useful results is all a first quiz needs, so start there.
And if you'd like to go further, there's a Thrive University course on creating a high-converting quiz funnel.


