Are you looking for a straightforward and effective way to assess your students online?
This guide is for you.
Assessments are a great way to review your learners ’ progress and ensure they’re gaining as much value from your courses as possible.
Finding the right tools to create a conducive online learning environment for your students can be challenging — but we’ve got you.
This guide includes the key steps you need to assess student learning and create a great learning experience.
Keep reading to learn more.
Here’s Why You Need to Add Assessments to Your Online Courses
One of your main goals as a course creator and educator is to help your students achieve real, sustained results.
While your course materials and expert online teaching skills are important, you also need a solid way to evaluate your students’ performance, test their critical thinking, and confirm that they’re gaining useful knowledge from your lessons.
Assessments (online testing) are an effective way to:
Measure learning outcomes and improve your student’s problem solving skills
Support your students’ learning by providing different types of assessments ( quiz questions , multiple-choice questions, essays, practical tasks, etc.)
Identify your students’ individual strengths and weaknesses, and provide instant feedback based on your findings (similar to how you would provide feedback in a face-to-face environment)
Motivate students to focus and interact with course materials in order to get a passing grade
Encourage students to conduct self assessments and evaluate their efforts based on their course results
Set a benchmark to compare overall student performance and find the parts of your course that need improvement
Build a real-time learning community through collaborative assessments (e.g. group projects, peer assessments , etc.)
…and so much more
A successful course isn’t just about the lesson material. Assessments provide a balanced structure to your courses and create a healthy, challenging online learning experience for your students.
How to Assess Students Online (Simple Guide)
With the right WordPress plugin, you can create an engaging course with interactive assessments in no time.
Before you start, make sure you have web hosting set up and you’ve installed WordPress as your content management system.
Follow these steps to learn how to set up your course platform and assess students online:
1. Download and Install Thrive Apprentice
Your first step to creating effective online assessments is making sure you use the right learning management system (LMS) to get the job done.
In simpler terms, you need an online course plugin that also comes with a solid assessment platform that accommodates a variety of question types. Preferably a tool that’s easy to set up right from your WordPress website and manage on your own — especially if you’re running your business solo.
Our top recommendation for you, to get started, is Thrive Apprentice — the best WordPress LMS plugin you can use to create an amazing e-learning experience.
Thrive Apprentice turns online course creation into a walk in the park.
In terms of building, you use a drag-and-drop front-end builder and customizable templates to create courses that are unique to your brand — no need to add shortcodes or figure out HTML and CSS.

You can easily customize the look and feel of your courses to match your brand identity. This includes options for custom colors, fonts, and layouts, so your courses offer a professional and cohesive user experience.
This user-friendly tool also supports membership-based access and content drip strategies, so you can control how and when your content is accessed. This is useful for creating a structured learning environment and can help increase student retention and engagement over time.
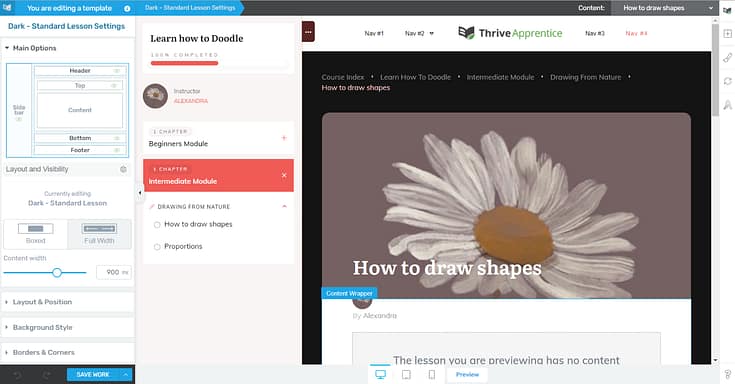
In terms of assessments, Thrive Apprentice provides in-depth quizzing and assessment features, allowing you to design various types of assessment quizzes and tests to track student progress.
This platform also includes detailed progress tracking and engagement analytics — no need to pay for an add-on to access this feature.
You can monitor how students are progressing through courses, which sections are most engaging, and where students might be struggling. With this info, you can stay on top of serving your students best, with minimal hassle.
This plugin integrates well with most WordPress themes, so you don’t have to worry about overhauling your website in order to use this tool. You can also connect your course platform to eCommerce tools like WooCommerce or use the app’s in-built Stripe integration.
After purchasing Thrive Apprentice, start by logging in to your Thrive Themes account and downloading the Thrive Product Manager plugin.
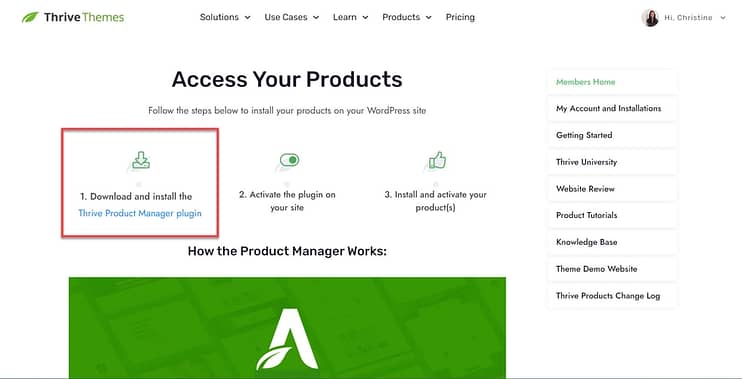
Then, navigate to the Plugin section on your WordPress dashboard and click Add New. Proceed with installing and activating the Thrive Product Manager plugin on your WordPress site.
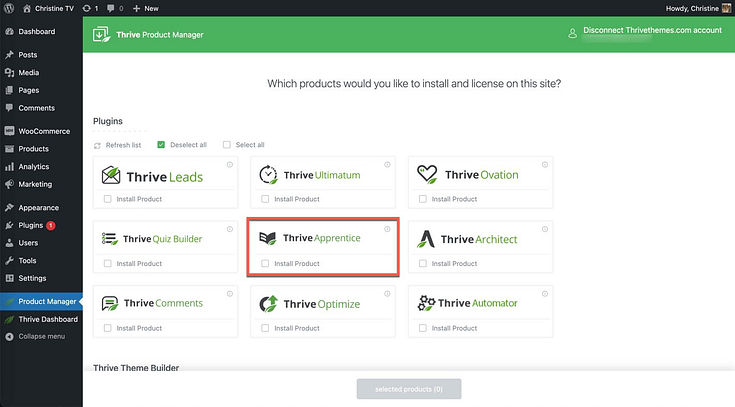
Once that's done, navigate to the Thrive Product Manager, and follow the prompts to install and activate Thrive Apprentice.
2. Create & Upload Your Online Course Content
Before you can start assessing your students, you need to plan and create your online course:
Create your online course outline: Define your learning objectives , set your learning outcomes , and then plan each module for your online course . Dedicate a day or 2 to thoroughly map out your course, because this will help you create course content much faster.
Don’t forget to create an online course checklist to make sure you don’t miss out on any important steps.
Determine the kinds of assessments you want to include in your course – online quizzes , projects or portfolios, video assessments, etc.
Create your course content : To create engaging course lessons for your students, you should use a variety of high-quality media (text, video, and audio), add real-life examples for relatability, and add interactive elements like discussions and activities.
Upload your course content in Thrive Apprentice: Once you’ve created your course material , launch Thrive Apprentice, add your content, and organize your modules and lessons.
3. Add Your WordPress Assessments to Your Online Course
In Thrive Apprentice, you have several options to create an effective assessment strategy:
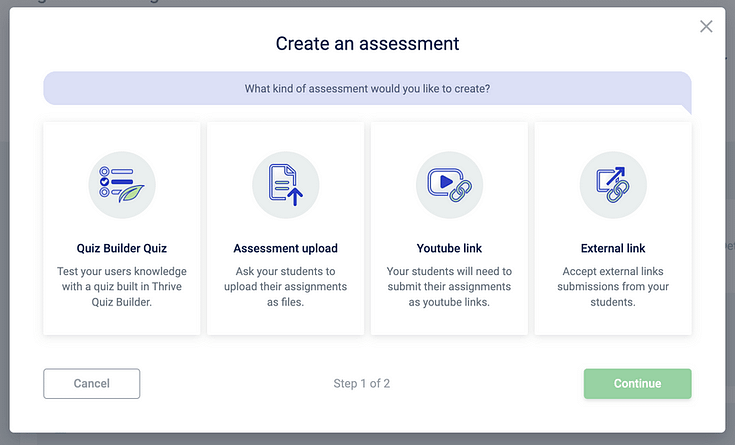
- Quiz Builder Assessment: Lets your students take a quiz you built in Thrive Quiz Builder, our premium quiz plugin
- Assessment Upload: Requires your students to upload a PDF, image, PowerPoint presentation, document where they need to answer questions elsewhere, or any other file type
- YouTube Link: Allows your students to submit a link to a YouTube video
- External Link to Assessment: Students can provide a link to anything— whether it's a file on their personal Google Drive, an image they've loaded to a cloud-based gallery, their own website, apps they’ve had to build, and other types of student work
This gives you more flexibility on how to assess your students in a way that can effectively test what they’ve learned throughout your course, so you can help them achieve their learning goals.
To add an assessment, launch Thrive Apprentice and click the “Courses” tab in your dashboard.
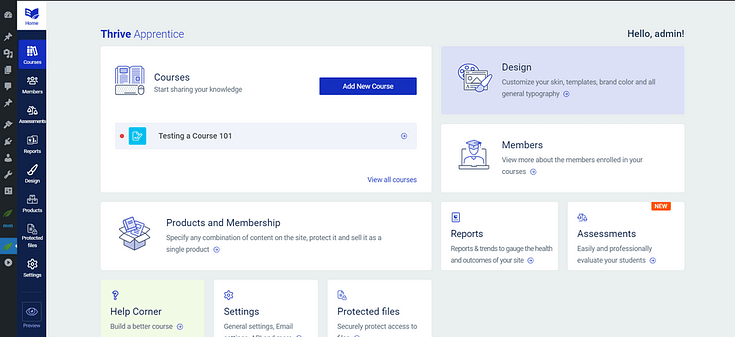
Select your course or "Create New Course" and click the “Content” tab.

Click on Assessments and follow the instructions, configure your grading and main assessment settings, and add your first assessment to your course.

If you want to create an online discussion board under an assessment or a course lesson, just “enable comments” and your students will be allowed to leave comments.

Alternatively, you can create separate forums on your website and link it as a resource in your course.

And if you want to change the order of your assessments or lessons, you can use the drag-and-drop editor to do so.
Tip: Don’t forget to include clear rubrics and instruction sheets in your assessments, so your students know what is expected of them.
4. Configure Your Drip Settings for Your Course
One of Thrive Apprentice’s star features is its drip functionality. This tool allows you to control what content your students can access and when.
You can use these settings to create a dripped content course, so your students receive course lessons at set times, instead of all at once.
This function also lets you unlock any content based on the results a student gets from an assessment.
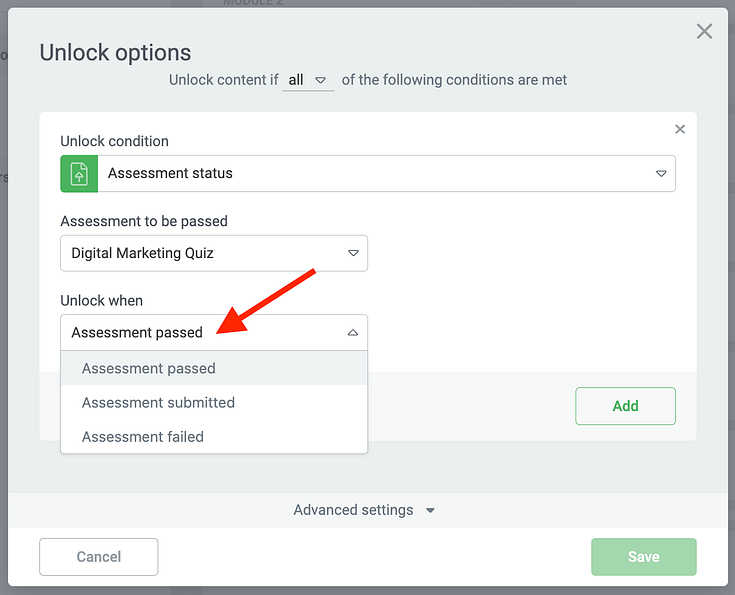
For example, let’s say you’re an art teacher running an oil painting course for beginners.
You can create an assessment that requires your students to submit a PDF of a painting project.
If they pass the assessment, according to your grading, they can continue with the lesson – or even skip a lesson.
But if they fail the assessment, a specific lesson can be unlocked to help improve their skills.
If you're unfamiliar with how our drip functionality works, you can read more about it here.
5. Finalize Your Course Completion Page + Certificates
Thrive Apprentice has other powerful features that let you create a personalized, memorable learning experience for your students – course completion page and custom certificates.
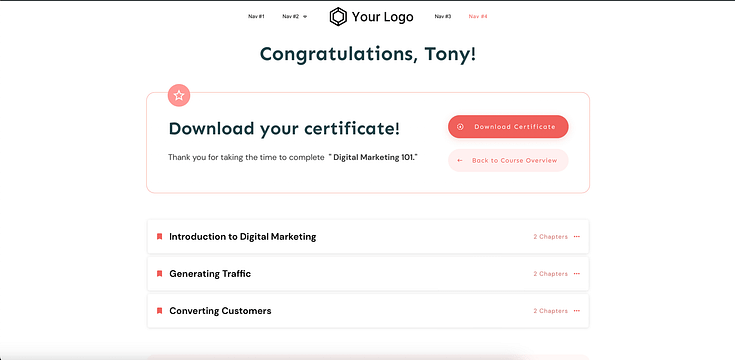
Use a WordPress course building plugin like Thrive Apprentice to design a customized course completion page for your students.
You can customize what happens after your students complete your course. Thrive Apprentice allows you to redirect your students to an external page – if you’ve designed it with a different platform.
Or, you can redirect your students to a Thrive Apprentice course completion page, customized with Thrive Architect, our landing page plugin.
But, you’ll need to purchase Thrive Architect separately, or with our plugin bundle – Thrive Suite.
Your course completion page can include:
A congratulatory message with your student’s name
A downloadable link to their personalized certificate
Links to other online courses you offer
6. Access and Grade Completed Submissions
After your students complete an assessment and submit it, you’ll need to mark them.
You’ll find all assessments in the “Assessments” tab in your Thrive Apprentice dashboard.
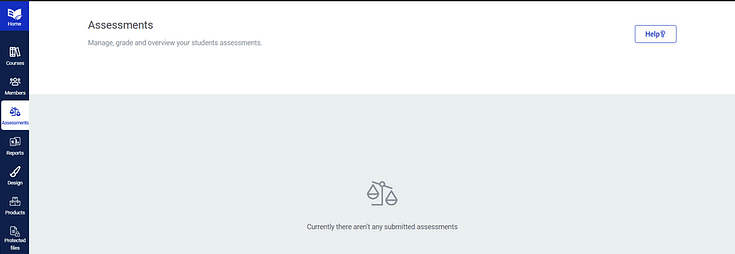
This is where you can access your students' completed quizzes, essays, videos, etc.
From here, you can download documents and run them through a plagiarism checker to ensure that it’s their original work.
This is also where you’ll provide feedback to your students. You can leave a comment on their graded assessment, or message them directly if you have their contact information (e.g. email address).
Next Steps: Create Your First Quiz for Your Course
Quizzes are an effective way to test your student’s knowledge – and they’re also one of our assessment tools.
You can use the “Quiz Builder” Assessment type to create an automated student assessment grading system.
Here’s how it works:
When you select a Thrive Quiz Builder quiz as an assessment type, the quiz results will be instantly mapped to Thrive Apprentice assessment grades, where you both set a required passing grade and automate the grading.
Take a look:
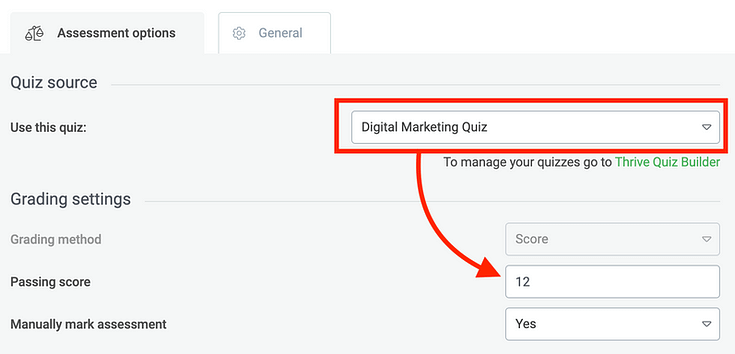
When configuring your assessments, you can enable automatic grading by:
Setting a minimum passing score
Selecting “No” next to “Manually mark assessment”
Your student’s assessment will automatically be marked based on the score they get. If they pass, they can continue with the course. If they don’t get the minimum number of correct answers, they’ll need to retake the assessment to move forward.
But, you’ll need Thrive Quiz Builder to enable this function.
You can purchase Thrive Apprentice and Thrive Quiz Builder separately, or get them both (and 8 other premium plugins) when you purchase Thrive Suite.
Promote and Grow Your Online Course Business
You now have everything you need to create successful online courses that include engaging assessments.
Here are four more resources to learn how to improve your courses and grow your online course business:
How to Create the Perfect Long Form Sales Page (+ Templates)
How to Create an Online Course Landing Page (Step-by-Step Guide)
The Ultimate Online Course Launch Checklist: Everything You Need to Know
How to Use a Free Online Course to Sell Your Premium Online Course
Your online courses are only as effective as the platform they’re hosted on. Thrive Apprentice, and Thrive Suite, don’t just let you create great courses – they help you build a successful online business.
Give Thrive Suite a try today and start creating online courses that bring in sales.


