

TL;DR: How to Teach Online Courses (And Keep the Profits)
You want to teach online courses and actually make money, right? This guide will show you how to build your own online classroom, keep most of your revenue, and create a real business asset.
Three big ideas before we start:
- Own your platform: don't build your business on someone else's land. Host your courses on your own website with a dedicated Learning Management System (LMS), and you control the pricing, the student data, and the brand.
- Sell transformation, not information: design your course to get students to a specific outcome. Structure the learning experience around that outcome and you can charge premium prices, and actually get people to finish.
- Audio is non-negotiable: you don't need a Hollywood camera, but you absolutely need a decent microphone. Bad audio is the fastest way to lose your students' attention, and your credibility with it.
If those three hit home, everything below is the detail.
If you're here to learn how to teach courses online, but you're tired of platforms that treat you like a vendor, this guide is for you.
The moment you decide to teach online, you face one strategic choice: do you want to be an employee of a platform, or do you want to own the classroom? Everything else (the tools, the pricing, the marketing) flows from that answer.
I've spent years helping course creators work through the messy middle: the tech struggles, the strategy gaps, and the small shifts that make a huge difference in completion rates and revenue. This guide pulls all of that together so you can skip the guesswork. My goal is simple: help you keep more of your revenue and build something that actually belongs to you.
If you're ready to dive deeper into the whole process, you'll definitely want to check out our comprehensive guide on How to Create an Online Course: The Pro Way.
Why You Must Own Your Online Classroom
Before we talk about microphones and modules, we have to talk about ownership.
When you decide to teach online, you'll find three main paths: course marketplaces (Udemy, Skillshare), teaching platforms that pay you hourly (tutoring services), or your own platform built on WordPress with an LMS. The first two are easier to start with. The third is the only one where you end up owning anything.
Online Teaching Platform Comparison
Feature | Course Marketplaces (Udemy) | Teaching Platforms (TutorMe) | Your Own Platform (WordPress + LMS) |
|---|---|---|---|
Pricing Control | Minimal (Marketplace dictates) | Minimal (Platform sets hourly) | 100% Control |
Revenue Share | High commission (often 50%+) | High commission/fixed rate | Keep 100% of revenue |
Student Data | None (No access to email list) | None (Platform owns relationship) | Full access to student data |
Branding/Design | Generic template | Generic template | Full customization and brand |
Marketing Control | Forced to compete on price | Platform handles marketing | You control the funnel/messaging |
But here's the line I want you to remember: if you don't collect the student email, you don't have a business, you're a vendor. An asset is something that appreciates in value and gives you options, and that means controlling the pricing, the student relationship, and the marketing funnel yourself.
How to Choose the Right LMS for Your Online Course Business
Once you've decided to own your platform, the next question is practical: how? The answer is a Learning Management System, the software that hosts your course content, manages student access, and delivers lessons from your own website.
When I look at an LMS, I'm thinking about control and flexibility, not just course delivery. Here's what I check:
The market splits into two camps.
All-in-one platforms (Teachable, Kajabi, Thinkific) bundle course delivery, a website, and some marketing tools. They're genuinely easier on day one. You pay for that ease forever: a monthly fee, often transaction fees on top of it, their templates, their rules. You're renting.
WordPress LMS plugins (Thrive Apprentice, LearnDash, Sensei) turn your own site into the course platform. Setup takes more effort upfront, and in exchange you keep 100% of your revenue (minus payment processing), own your student data, and control every pixel. That's the asset play.
Tutorial: How to Design Your Own Online Course (This Is What I Use)
Well, seeing as this is the Thrive Themes blog, and I am a Thrive Themes fanatic, you already know what I'm going to suggest you use to teach courses online: Thrive Apprentice, especially if you're on WordPress.
To me, Thrive Apprentice is one of the most complete LMS plugins in the space. You can accuse me of being completely biased, and that's absolutely fine. But, I mean, you're not coming to the Thrive Themes website expecting me to talk down about our own product, now, are you?
That said, I have used multiple LMS plugins. You can see how they compare in this breakdown article.
And rather than showing you a demo site, I'm going to show you the backend of Thrive Apprentice on the Thrive Themes website itself, because that's where all our own courses live. We don't just talk the talk. We walk the talk.
Step 1: Install Thrive Apprentice and Open Your Dashboard
You can install the plugin and get started almost immediately. Everything in the dashboard is pretty much drag-and-drop or point-and-click. Everything is clear. There are no strange hidden settings you need to hunt down, and creating a course starts with exactly the button you'd expect: "Add New Course."
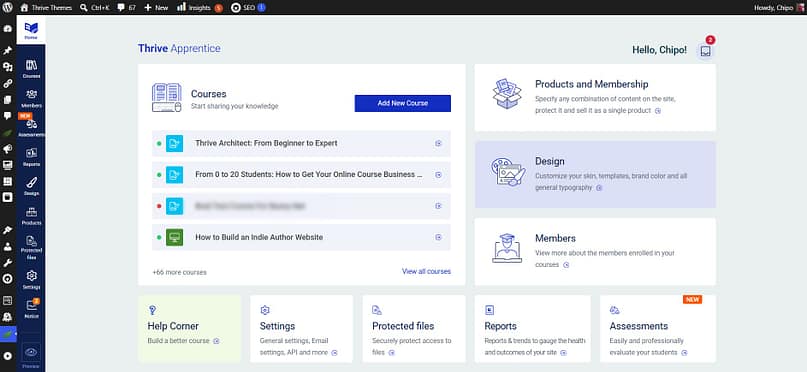
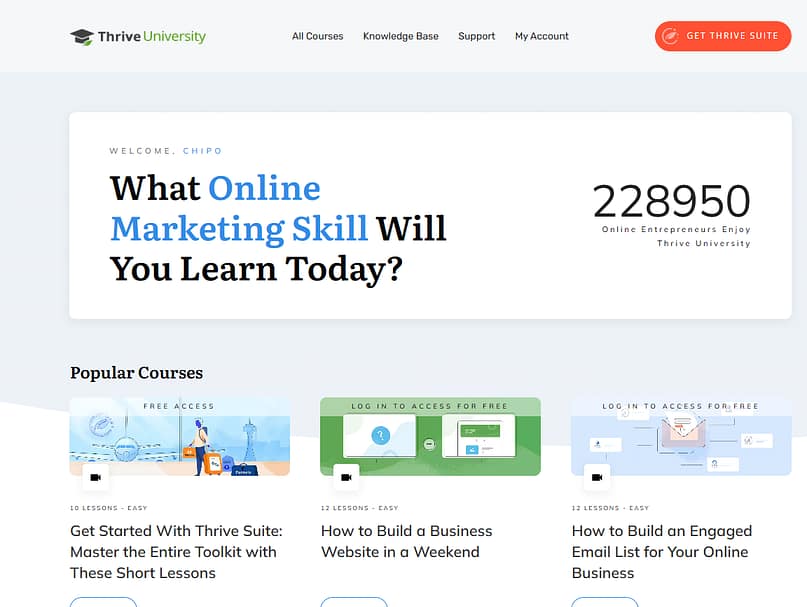
Every single course in Thrive University is hosted using Thrive Apprentice. As you can see, we have quite a few courses available.
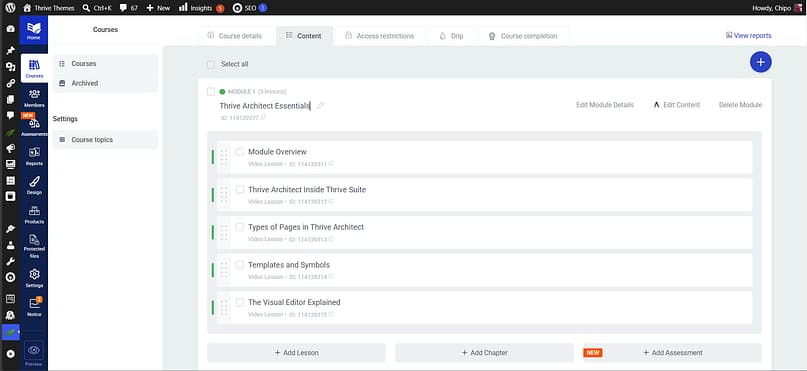
Step 2: Structure Your Course
Let's use our most recent course, Thrive Architect: From Beginner to Expert, as an example.
Thrive Apprentice lets you structure your course using modules, chapters, lessons, and assessments. This makes it very easy to see exactly how your course is laid out.
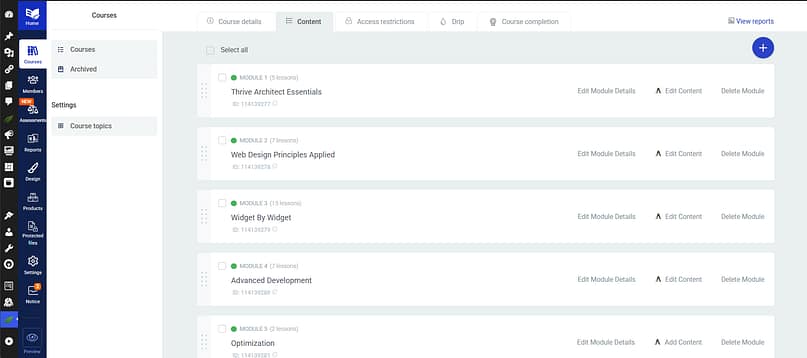
You don't need to create any complicated flow diagrams. Your course structure isn't buried inside a wall of text or scattered throughout the WordPress block editor. Everything is presented clearly, so you can point, click, and edit whichever lesson you need.
Step 3: Edit Your Lessons in the Visual Editor
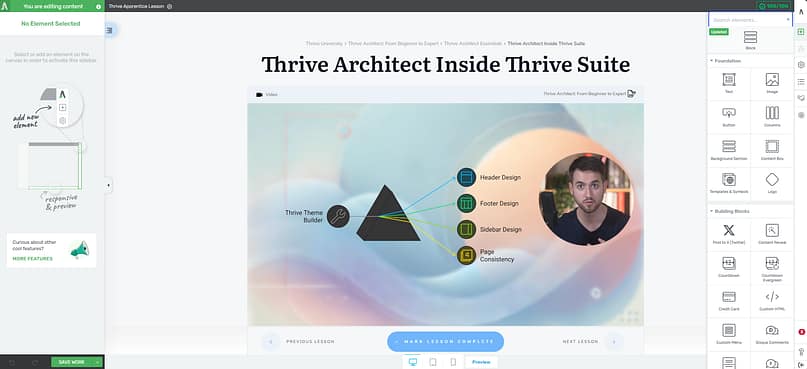
Speaking of editing a lesson, Thrive Apprentice gives you access to the Thrive Visual Editor.
From here, you can add elements to your lesson pages and customize how each lesson appears. You can add written content, images, buttons, videos, and other elements depending on what your lesson requires.
For this particular course, the lessons were video-based, so that was primarily what needed to be added.
Step 4: Add Your Videos
I will say, and some people may consider this a downside, that you'll generally need a third-party video hosting service to add your videos. You can use a platform like Bunny.net, Vimeo, or possibly YouTube. You can upload raw video files directly instead, but they take up a significant amount of space on your website, which is why platforms built specifically to store and deliver video are usually the smarter route. You keep all your videos in one place, with dedicated storage and delivery, and simply add the video link inside Thrive Apprentice.
Once you add the link, the video appears in your lesson immediately.
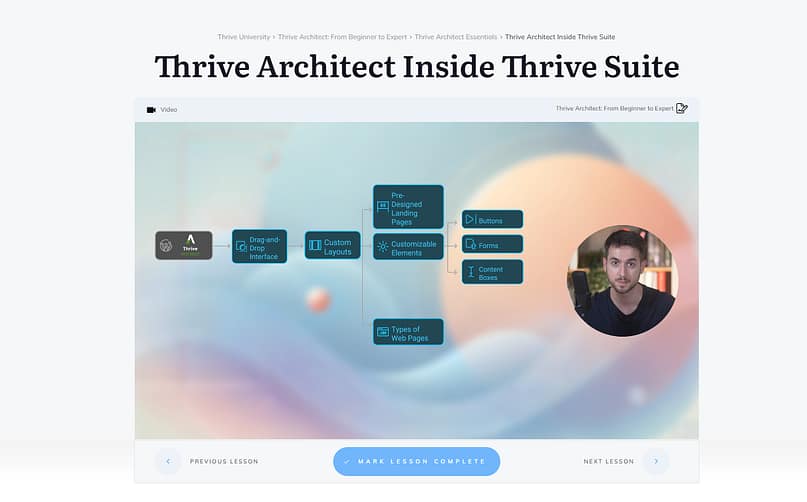
Step 5: Preview Your Lesson
And when you preview your lesson, what you see is what you get. What appears inside the lesson editor is exactly what your students will see on the finished page.
And when you're ready to pick the perfect system, we've got a detailed review of What Is the Best LMS Plugin for WordPress? My Hands-On Review to help you out.
Design Your Curriculum: Strategy First, Film Later
The biggest mistake I see new online teachers make: recording before the curriculum is solid. A great course is a planned transformation. Define the exact outcome your student will achieve, then structure the path that gets them there. We have a whole guide on how to plan an online course that walks through this step by step.
The foundational decision is how your course gets delivered.
Speaking of live sessions, if you're thinking about running bigger events, you'll want to check out our guide on How to Run an Online Event the Right Way (Complete Guide).
And you don't have to pick one. Plenty of successful creators run a blended model: core content pre-recorded, feedback handled on weekly live calls, community running in a forum or group. The recorded layer scales; the live layer earns the premium.
💡 If you're building a community around your courses, you might also be interested in our ultimate guide on How to Create a Membership Site on WordPress (Ultimate Guide).
How to Keep Students Engaged (and Finishing)
Getting students into your course is one thing; getting them to the finish line is another. Passive video-watching doesn't do it. Your students need to do things.
- Quizzes and self-checks: let students test their understanding right after a lesson, not weeks later.
- Projects over exams: for most subjects, applying the material to a real problem beats recalling it.
- Timely feedback: peer reviews in a cohort, automated quiz feedback, or your own comments; what matters is that it arrives while the lesson is still fresh.
- A place to talk: a forum, Slack group, or community space built into your LMS. Even in a self-paced course, knowing other humans are in the room boosts completion.
- Live touchpoints: regular Q&A calls give async students a reason to stay current and give you a read on where people are stuck.
How you assess students in the age of AI is its own problem, and it gets its own section below.
Essential Tech Stack: Gear, Software, and Setup
When I tell people not to overinvest in gear, I mean don't buy a $5,000 cinema camera if you haven't sold a single course yet. I don't mean use your laptop's built-in microphone. Audio is non-negotiable. Bad video is forgivable; bad audio is a mute button trigger.
Here is the minimum viable setup you need to look and sound professional when you teach online.
Microphone Recommendations
Your microphone is the single most important piece of equipment.
Microphone Recommendations
Category | Recommendation | Why it works |
|---|---|---|
Budget USB | Blue Yeti or Rode NT-USB Mini | Excellent quality, plug-and-play simplicity. Great for voiceovers. |
Mid-Range XLR | Shure MV7 (USB/XLR hybrid) | Broadcast quality sound. Requires an audio interface (like Focusrite Scarlett), but offers professional depth and clarity. |
On-Camera/Lav | Rode Wireless Go II | Perfect for talking-head videos where you need to move around. Extremely reliable wireless connection. |
Camera and Lighting Basics
You don't need 4K resolution, but you do need good lighting. Lighting is what separates an amateur recording from a professional one.
- Camera Choices: If your laptop webcam is 1080p, that’s usually fine. If you want a step up, a dedicated USB webcam (like the Logitech Brio) or using your phone’s camera via software like Camo is a massive improvement.
- Lighting Basics: The goal is to eliminate shadows and make your eyes sparkle. You could try a simple three-point lighting setup:
- Key Light: The brightest light, positioned slightly off-center, pointing at you. (A simple LED ring light works here.)
- Fill Light: Softer light on the opposite side to soften shadows created by the key light.
- Back Light: A soft light behind you to separate you from the background (this adds depth).
Essential Software for Online Course Production
Tool Category | Recommended Solutions | Purpose |
|---|---|---|
LMS/Course Platform | Thrive Apprentice (WordPress) | The core system for hosting content, managing access, and drip-scheduling. |
Video Editing | Descript or DaVinci Resolve (Free) | Descript is fantastic for editing video by editing text; DaVinci Resolve is professional-grade and free. |
Live Conferencing | Zoom, StreamYard, or Google Meet | For synchronous sessions, webinars, and live Q&A. StreamYard is excellent for professional streaming. |
Screen Recording | Loom or OBS Studio (Free) | For capturing software tutorials and presentations clearly. |
The Hidden Cost of "Easy" Platforms
If you're shopping for an LMS, you'll see plenty of platforms that promise simplicity. Look closer at the trade: steep transaction fees, limited design options, restrictive templates. That's what "easy" costs.
If you're serious about building a business asset, you need your course delivery, your marketing funnels, and your lead generation working together on your own domain. This is why I use the whole Thrive Suite rather than Apprentice alone. You've already seen the course side in the walkthrough above; the rest of the system covers everything around it: Thrive Architect for the sales pages and Thrive Quiz Builder for lead-generating quizzes (here's how a quiz funnel works). You keep 100% of your revenue and control the student journey from first click to final module.
Teaching Online in the Age of AI: Tools and Challenges
You can't ignore AI, and you can't ban it, so build it into how you teach.
On the production side, it's a genuinely useful assistant. Lesson outlines, quiz questions, alternative explanations for the concept half your students keep tripping on, instant captions and transcripts for accessibility: that's hours of work saved per module. Some tools will even flag struggling students from their progress data, so you spend your limited human attention where it's needed. 💡 AI helpers are also handy when you create how-to guides for your students.
Assessment is the harder question, because AI can write essays, solve problem sets, and generate code. If your course grades information recall, it's already compromised. Grade what AI can't fake instead:
Students paying for transformation don't want to cheat their way past it. Design the course so the work is the point, and AI becomes their study partner instead of their ghostwriter.
Monetization: What You Can Actually Charge
One of the biggest advantages of owning your platform is that you set the price. No race-to-the-bottom marketplace pricing, no platform ceiling.
While hourly rates on teaching platforms tend to hover between $20 and $50, selling your own course is where the real upside lives. A high-value, niche course that genuinely solves a painful problem can sell for $197 to $497. And here's some quick math, clearly labeled as math and not a promise: one $200 course sale per day is over $73,000 a year, before you factor in higher-ticket coaching or recurring revenue. Most creators won't hit a sale a day in month one. The point of the arithmetic is the shape of the opportunity: your income scales with your offer and your audience, not with your hourly availability.
How you structure payment matters as much as the price.
Pricing Models: Subscription vs. One-Time Fee vs. Tiered Access
How you structure payment directly impacts your revenue stability and growth.
Online Course Pricing Models
Pricing Model | Description | Pros | Cons |
|---|---|---|---|
One-Time Fee | Pay once, get lifetime access. | Highest perceived value; easy marketing. | Income is transactional; requires constant marketing effort. |
Subscription/Membership | Monthly or annual recurring fee for access. | Predictable, recurring revenue (MRR); builds community. | Requires constant content updates; higher churn risk. |
Tiered Access | Offering Basic (Self-Paced), Pro (Self-Paced + Q&A), and VIP (Live Coaching). | Captures different budget levels; maximizes average customer value. | Requires more complex delivery and management. |
I usually recommend starting with tiered access. You sell the same core content at an accessible price, and the premium tier (the one with your time in it) captures the customers who want more. I've gone deeper on course pricing strategies separately, including when to raise your price.
Frequently Asked Questions About Teaching Online
Teaching online comes with a lot of noise, and a lot of half-answers. These are the questions I hear most from creators who want to teach online profitably, answered directly so you can make decisions.
How do I teach online courses without using marketplaces like Udemy or Skillshare?
Host the course yourself: a WordPress site plus an LMS plugin like Thrive Apprentice gives you your own classroom, your own pricing, and your own student list. You market it with your content, email list, and social channels instead of a marketplace's search results. The trade is real: you do your own marketing, but you keep the revenue, the data, and the relationship.
How much money can you make teaching online courses?
Hourly teaching platforms pay roughly $20 to $50 an hour, and your income stops when the clock does. Selling your own course changes the shape: a focused course that solves a painful problem typically sells for $197 to $497, and revenue scales with your audience instead of your hours. Treat any income math as arithmetic, not a promise; the variable that matters is whether your offer solves something people already want solved.
What equipment do I actually need to teach online professionally?
A quality microphone first: bad audio loses students faster than bad video ever will. A USB mic like the Blue Yeti or Rode NT-USB Mini, your laptop's 1080p webcam, and one decent light will carry you until revenue justifies upgrades. Full recommendations are in the tech stack section above.
Is it better to use an all-in-one course platform or WordPress?
All-in-one platforms like Teachable or Kajabi are faster to start with, but you pay monthly fees plus often transaction fees, and you're renting: their templates, their rules, their platform. WordPress with an LMS plugin takes slightly more setup and gives you the asset: full ownership of design, data, and revenue. If you're building a real course business rather than testing an idea, I'd go WordPress.
What's the best LMS for teaching online with WordPress?
I use Thrive Apprentice, and you can see its actual backend in the walkthrough above: modules, chapters, lessons, and assessments, all managed visually on your own site. If you want to weigh it against other WordPress LMS plugins like LearnDash and Sensei, I've compared them in this breakdown.
Can AI replace online teachers?
It can generate content, but it can't provide what students actually pay for: accountability, feedback on their specific situation, and a structured path from where they are to where they want to be. The teachers at risk are the ones selling pure information. Sell transformation, with real interaction and assessment built in, and AI becomes your production assistant, not your replacement.
How to Teach Online: Your Next Smart Step
So, as you can see: teaching online successfully is about strategic control.
It’s about choosing the path that lets you own the relationship with your students and keep 100% of the revenue you earn.
You don't need a massive team or a huge budget to start. You need a clear plan, a commitment to quality audio, and a platform that puts you in the driver’s seat.
If you’re ready to start building that independent online course business, the next logical step is to map out your curriculum and choose the right foundation. You might want to explore the features of a dedicated LMS to see how easily you can set up access rules and drip content.
The technology is easier than ever. The strategy is the hard part, and now you have it. Go build your classroom.
Ready to Build Your Teaching Platform?
If the idea of keeping 100% of your revenue and controlling the entire student experience sounds appealing, you need the right tools. Thrive Apprentice is the dedicated Learning Management System I use and recommend because it turns your WordPress site into a powerful, fee-free course platform. It’s the smart way to sell your expertise and build a business that truly belongs to you.


Thank you for that. Could you please list a few good example sites using the system you describe? Successful language education sites in particular would be of interest. Thanks.
Hi Jeff, a great language education site using the online course business tools available in Thrive Suite (including Thrive Apprentice) is https://www.fluentinmandarin.com/
Another such example for the novel writing niche is https://danieldavidwallace.com/
There’s many more examples where those came from, but I hope that helps get you started!
Thank you.
Ready for ThriveApprentice 4.0! When’s the release?! 😉
Can’t leak any details yet Adam, but soon!
Hello,
I have Thrive Suite and Thrive Apprentice is really good.
But I have to sell my courses on another platform because Thrive does not take care of taxes and VAT.
Do you know if you are going to take care of that?
Thanks
Hi Haarin,
Your checkout tools should take care of taxes and VAT this is not something Thrive Apprentice is responsible for.
By this article I know more and new a lot of thank your helpull cooperation