Want to learn how to offer a free trial for your online course?
Keep reading.
In the online course market, it's important to set yourself apart from the competition.
Offering a free trial of your course is a clever and effective way to give your potential customers a preview of your online content.
Read this guide to learn how to create a free trial for your online course.
Benefits of Offering a Free Trial of Your Course
A free trial of your course can serve as a powerful strategy to show off your content’s value , attract the attention of potential learners, and generate conversions.
You can use a free trial to:
- Build Trust: Offering a preview of your online course demonstrates confidence in your product and helps prove the quality of your course content to potential students.
- Reduce Refunds: Students get a chance to evaluate if your content and teaching style will suit them, making them less likely to request a refund after purchase.
- Gather Feedback: Early users can sample your course content and provide feedback on the learning experience, content quality, and any technical issues they encounter. This is a clever way to identify frequently asked questions (FAQs) for your course.
- Grow Your Mailing List: A free trial can serve as an effective lead magnet, encouraging users to submit their email address in order to access your course preview
- Increase Sales: By giving potential customers a sample of the value you offer, they’re more likely to become interested in the course and purchase the full product.
- Gain Competitive Advantage: If your potential students are comparing multiple courses, a free trial can be a key differentiating factor – giving you an edge over other course creators who don’t offer free trials.
How to Create a Free Trial of Your Online Course (Step-by-Step)
In this section, we’ll guide you through the steps to easily set up a free trial for your online course:
1. Download and Install Thrive Apprentice
The purpose of a free trial is to give your potential customers a sample of the amazing learning experience you’ve created for them.
To do this, you’ll need to build an impressive online course, first -- and you need the right tools to achieve this.
Preferably a learning management system (LMS) plugin that lets you create engaging, interactive courses your learners will love and want more of.
We recommend Thrive Apprentice, the best WordPress LMS plugin in the market.
Thrive Apprentice is a user-friendly course-building plugin that helps creators craft a unique online learning experience for their students.
This tool is makes the course creation process fun and easy, with its straightforward interface and powerful advanced features.
The drag-and-drop course builder, equipped with customizable templates, focuses on helping you create high-quality courses quickly.
The beauty of the Thrive Apprentice course builder is its live editing feature. You get to see every change you make to the front-end of your online courses.
Thrive Apprentice also offers a variety of drip content settings, so you can create a release schedule for your lessons if you don’t want your students to access them all at once.
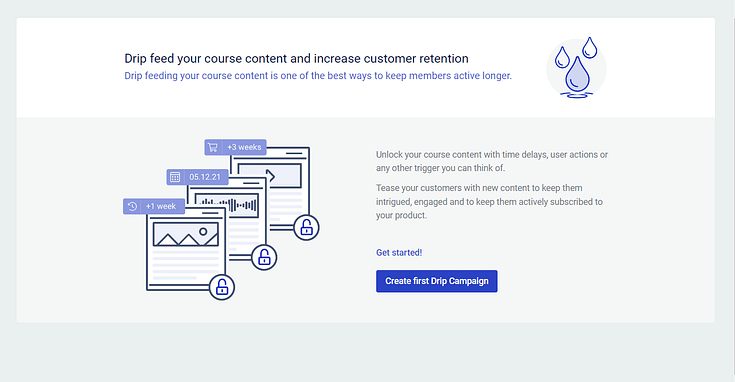
Drip Settings in Thrive Apprentice
Other game-changing features that set this LMS
plugin apart from other options include:
- Powerful reporting engine to gain deep insights into your courses’ performance metrics
- Assessments functionality to test your students and create an engaging online learning experience
- Customizable certificates to reward your students at the end of the course
- Integrations with popular checkout tools like ThriveCart, Stripe, or WooCommerce so you can easily accept credit card payments
Additionally, you can use Thrive Apprentice to sell other digital products and even turn your website into a membership platform.
This platform offers you everything you need to build a thriving community for your online course business.
Setting Up Thrive Apprentice
If you have already set up your web hosting and built your WordPress site, all you need to do is activate Thrive Apprentice. Here's how:
After purchasing Thrive Apprentice, start by logging in to your Thrive Themes account and downloading the Thrive Product Manager plugin.
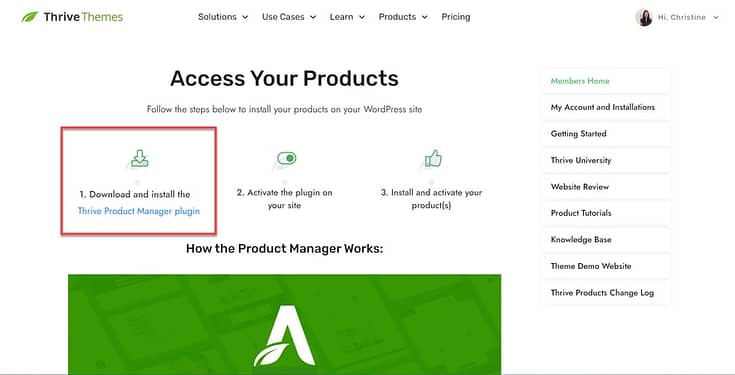
Then, navigate to the Plugin section on your WordPress dashboard and click Add New. Proceed with installing and activating the Thrive Product Manager
plugin on your WordPress site.
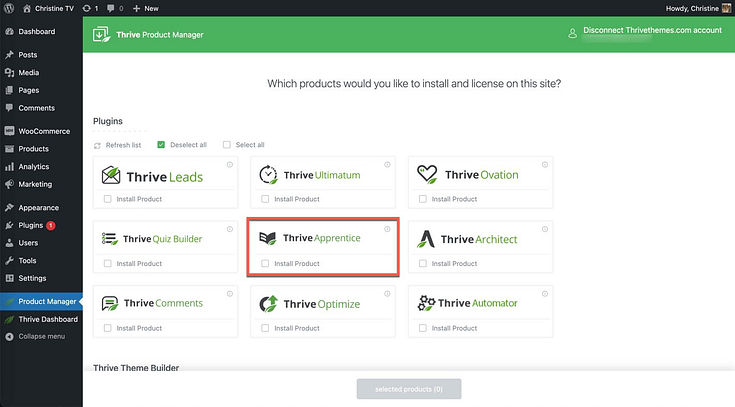
Once that's done, navigate to the Thrive Product Manager, and follow the prompts to install and activate Thrive Apprentice.
2. Create Your Course
Next, you need to plan and build your course:
Outline your online course: This is the roadmap for your course content. Use this outline to define your lesson objectives, plan every course module, and list the topics each lesson will cover.
If you plan to include assessments in your course, don’t forget to add these to your outline.
Create your course content: Use different types of media (text, video, and audio) to make your lessons engaging.
We also recommend adding real-life examples to make your content relatable and easier for your students to understand.
Think of adding interactive activities like mini-quizzes or discussion topics to make your lessons engaging.
Upload your course content in Thrive Apprentice: Once you’ve created your course material, launch Thrive Apprentice, add your content, and organize your modules and lessons.
3. Add Assessments to Your Online Course
Assessments are a great way to review your learners’ progress and ensure they’re gaining as much value from your courses as possible.
It’s quite easy to add assessments in Thrive Apprentice.
First, you need to select an assessment type – there are four to choose from.

- Quiz Builder Assessment: Lets your students take a quiz you built in Thrive Quiz Builder
- Assessment Upload: Requires your students to upload a file (PDF, PowerPoint, etc.)
- YouTube Link: Let your students submit a link to a YouTube video
- External Link to Assessment: Students can provide a link to anything— whether it's a file on their personal Google Drive, their own website, a wireframe for a mobile app, etc.
To add an assessment in Thrive Apprentice, click the “Courses” tab in your dashboard.
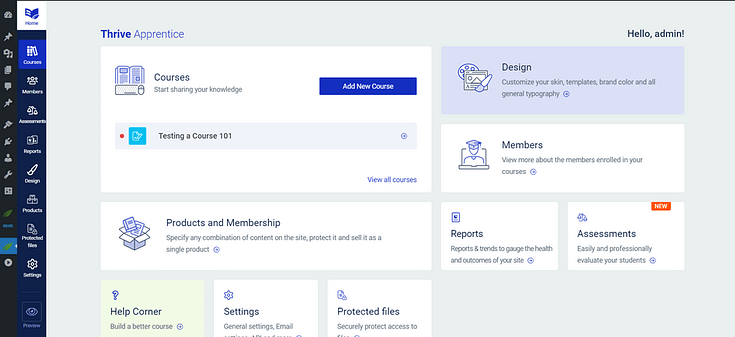
Select your course or "Create New Course" and click the “Content” tab.

Click on Assessments and follow the instructions, configure your grading and main assessment settings, and add your first assessment to your course.
If you want to change the order of your assessments or lessons, you can use the drag-and-drop editor to do so.

4. Create a "Free Trial" of Your Course
In your Thrive Apprentice dashboard, click the “Products” tab. Here, we’re going to create two products:
- A “Free Trial” product that will unlock your course for one week. Upon expiration, the course will lock and redirect visitors to a sales page prompting them to pay for unlimited access to the course.
- A “Premium Course” product that will unlock access to your course after a purchase has been made.
Set Up Your “Free Trial” Product
In the “Products” space, click “Create your first product” and give your product a name.
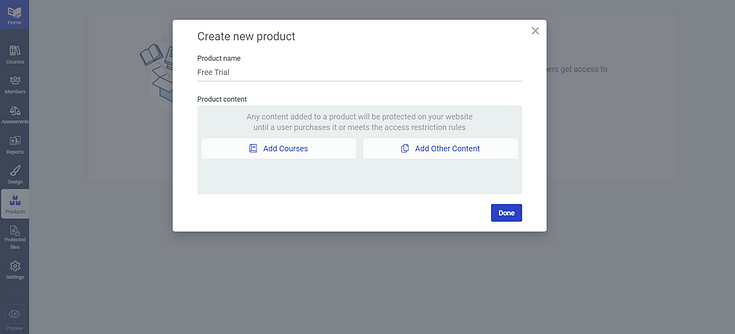
Click on the “Add Courses” button and select the course you want to promote with a free trial.
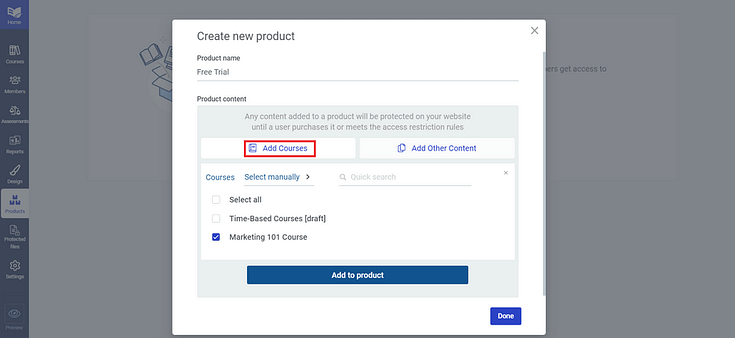
Next, click “Add to product” and close the window.
5. Configure Access Expiry Settings for Your Free Trial
To set your free trial duration, click the “Access expiry” tab and enable the “Expire access automatically option:

Set the duration for your free trial, as shown in the example below:
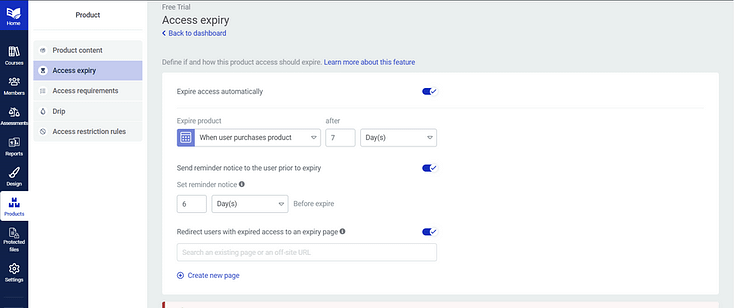
You can set a reminder notice for your users, to let them know that their free trial will expire in X number of days, hours, etc.
There is also an option to redirect your users to a specific sale page, pricing page, or an off-site URL. Just add the link and save your settings.
6. Set Access Requirements for your course
If you want a specific set of users to access your free trial, you’ll need to configure your access requirements.
Click on the “Access requirements” tab to tell Thrive Apprentice who can access your course. For your free trial, we recommend selecting WordPress Role -> Subscriber.
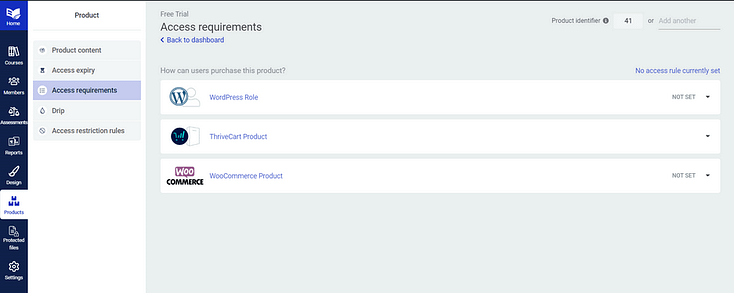
That way, a user can only access the free trial by filling in a form and signing up to your website.
This form can also send your subscribers’ email addresses and names to your chosen email marketing platform.
You can add a signup form on your homepage, online courselanding page, or webinar pages using Thrive Architect, our page-building plugin.
This could also be very useful for your course sales funnels as well.
7. Configure Drip Settings to Control What Free Trial Users See
Thrive Apprentice’s drip functionality lets you set a release schedule for your course lessons.
This comes in handy if you want to prevent subscribers from using the free trial period to complete the entire online course.
In the “Product” dashboard, click the “Drip” tab and select “Create New” next to your course if you haven’t set a drip schedule.
You’ll be redirected to the “Drip” tab in your course dashboard, where you can set when course lessons should be released.
For example, if your free trial runs for 7 days, you can set a drip schedule that releases a new lesson every week.
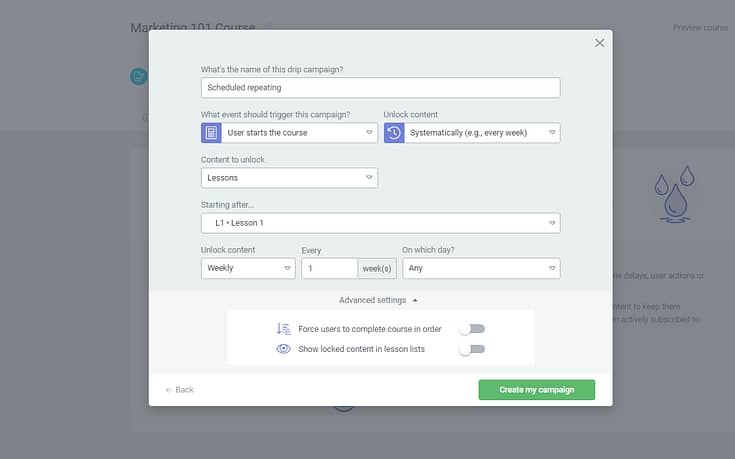
That way, your free trial users will only see one or two lessons before their free access expires.
For more tips on creating an attractive free trial for your online course, watch this video from Tony:
8. Create Your Premium Course
Don’t forget to create a “Premium Course” product that offers unrestricted access to your paid subscribers.
To do this, return to the Products tab, create a new product, and give it a name.
But you’ll have to set the access requirements for this product from your checkout tool of choice.
For example, if you use ThriveCart, you can enable it to add your paid users to your Thrive Apprentice platform and grant them access to the course.
Next Steps: Create an Opt-In Form for Your Free Trial
Think of your free trial as a lead magnet – you’re giving your audience access to a valuable product in exchange for their contact information.
To get them to do this, you’ll need an eye-catching opt-in form to encourage them to take this action.
We recommend using Thrive Leads, our lead generation plugin, to generate signups for your free trial.
When you buy Thrive Leads, you get access to 450+ professionally designed opt-form templates to build eye-catching signup forms fast.

This plugin seamlessly integrates with most popular email marketing tools, so you can send your new leads to your CRM with ease.
You can purchase a paid subscription of Thrive Leads as a standalone product, or get it with Thrive Apprentice and several other power-packed site-building tools when you buy Thrive Suite.
Promote and Grow Your Online Course Business
Selling online courses is a great way to share your knowledge, build an engaged community, and grow as an authority in your industry.
If you want to build an online course platform your students will love, you need to use the right tools – and that’s why we recommend Thrive Apprentice.
This course-building plugin gives you everything you need to create high-value courses and even build your own membership platform.
Here are four more resources to help you improve your courses and grow your online course business:
- How to Assess Students Online (Simple Guide)
- How to Get Your Business Noticed and Grow Your Audience
- The Ultimate Online Course Launch Checklist: Everything You Need to Know
- How to Choose a Domain Name for a Membership Site
When you purchase Thrive Suite, you get access to 10 powerful plugins to help you create a powerful online course website your potential customers will love.
Don’t just take our word for it.
Give Thrive Suite a try today and start generating more sales for your business.


