Do you ever wonder how people build websites so quickly?
Does it ever seem like other people can build entire websites in mere hours, while you’re sitting there taking days — or even weeks — to accomplish the exact same thing?
Here's a little secret: It’s not that other people are web design geniuses (well, most people aren’t). It's much more likely that other people are just hip to a web styling methodology that saves tons of time and makes their workflow much, much easier.
It’s called the Outside-In Principle, and this post is here to teach you how...
More...
The Outside-In Principle is an extremely useful technique that can be applied to colors, responsive design, and more. In this article, we’ll explore how you can use the Outside-In Principle to style your website’s typography.
Now, we have to warn you: At the outset, the Outside-In Principle can seem a bit complex. However, once you master it, you’ll never look at building websites the same way again.
But before we delve into it, there’s one key concept you must learn to help apply the Outside-In Principle effectively...
Theme Templates vs. Standalone Pages
In Thrive Theme Builder, every published web page on your site falls into one of two categories:
- It uses a theme template
- It does not use a theme template
Theme Templates
Theme templates are used to ensure that specific groups of pages on your site display the same header, top section, sidebar, bottom section, and footer design (or lack thereof). For example, if you want your About and Contact pages to display a page title in the exact same way, you could use a theme template to manage that:
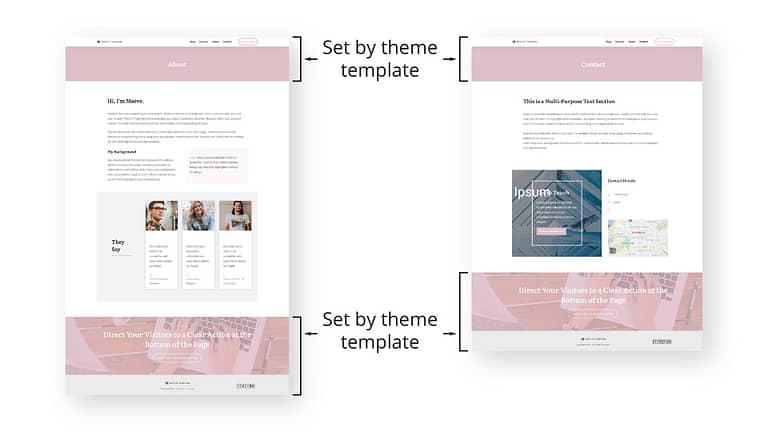
An About page and a Contact page that use the exact same theme template. Notice that the content in-between is different as the content area is not controlled by the theme template.
If you aren’t familiar with templates at this point, think of them like using a cookie cutter to make star-shaped cookies.
When you serve the cookies to your guests, all of the cookies have the same star shape, but your guests won’t see the cookie cutter you used to make them (that’s hidden away in your cupboard). By the same token, your theme templates are hidden away inside Thrive Theme Builder and are not shown to your website visitors. All they see are the gorgeous pages that all have the same structure thanks to the template.
And the icing and sprinkles you add to each star-shaped cookie are different (that's like the unique content you create that gets displayed within the structure of a theme template).
When your website visitors view a page or post that uses a theme template on your website, what they see is a marriage of two entities: a theme template + content:
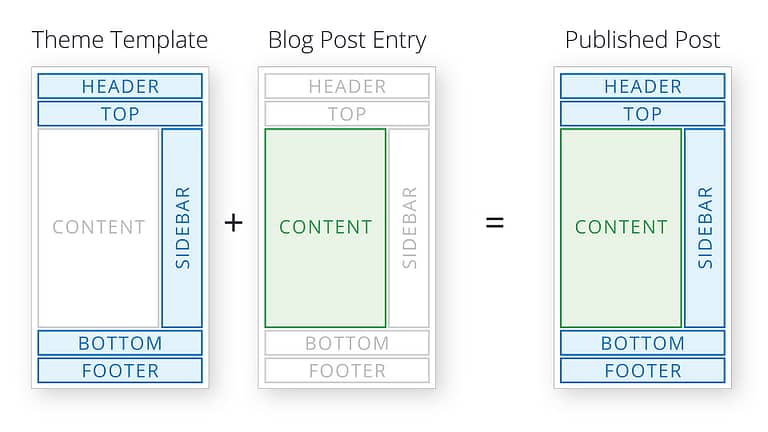
Diagram showing how a published post on a website is comprised of a theme template with blog post content.
You can edit your theme templates by going to the Templates tab in Thrive Theme Builder:
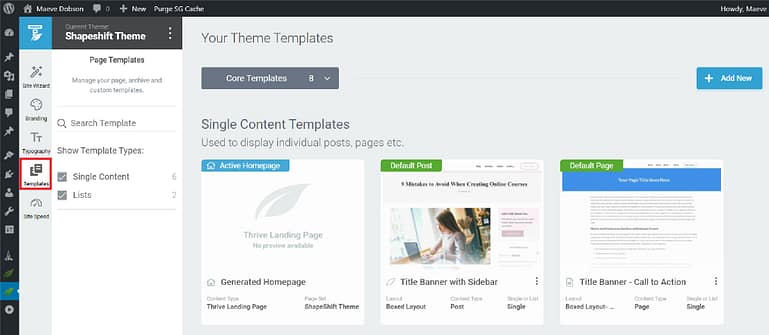
The Thrive Theme Builder dashboard with the Templates tab open.
You can create and edit content for pages by going to the WordPress Pages tab:
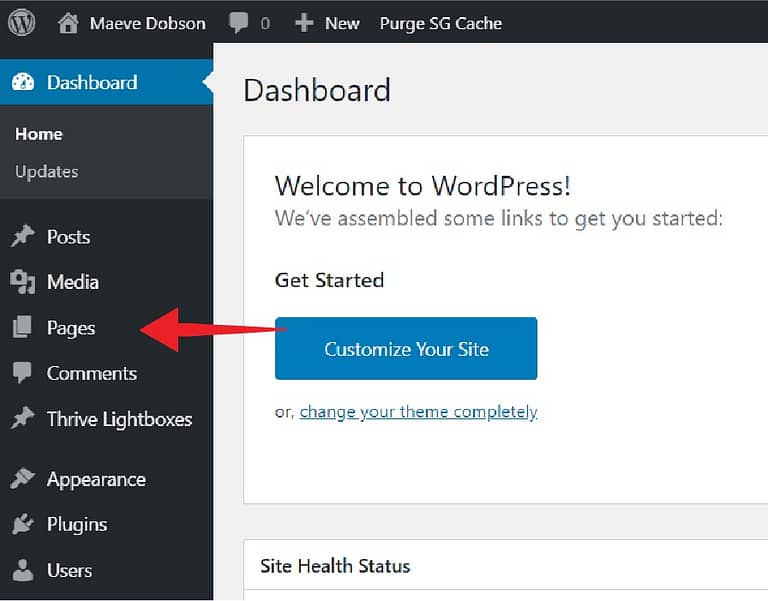
WordPress dashboard showing the location of the Pages tab.
And you can create and edit blog posts by going to the WordPress Posts tab:
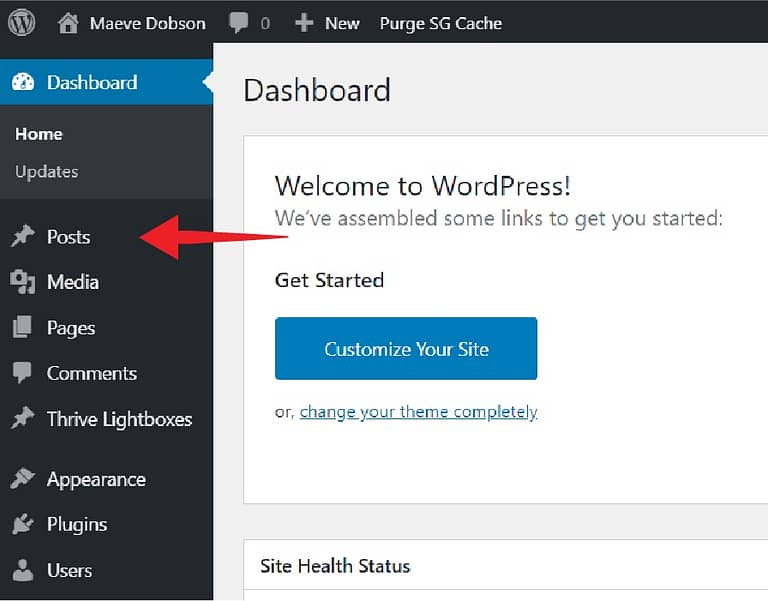
WordPress dashboard showing the location of the Posts tab.
As you build and customize your website, it may be helpful to know:
- All blog posts use a theme template.
- Pages may or may not use a theme template.
Pages that use a theme template do not have any special designation in Thrive Theme Builder; pages that do not use a theme template are called standalone pages (also called “landing pages”).
Standalone Pages (a.k.a. Landing Pages)
Standalone pages are typically one-off pages. As you create your website, you would typically use a standalone page for structurally or stylistically different pages that need to standout from the rest of your website — like a lead generation page, sales page, homepage, etc.
For example, you might create a sales page for an e-book you wrote. Standalone pages allow you to hide distracting theme controlled sections like your header and sidebar on such pages to help keep attention on your sales copy. And since this page is structurally different from any other page on your website, it makes sense to use a standalone page instead of a theme template.
Standalone pages also allow you to easily assign customize fonts and colors to really set that page apart from the rest of your website — and that’s where the Outside-In Principle comes in...
Categorizing Pages
Now that you’re familiar with the difference between theme templates and standalone pages, let’s look at a basic website setup:
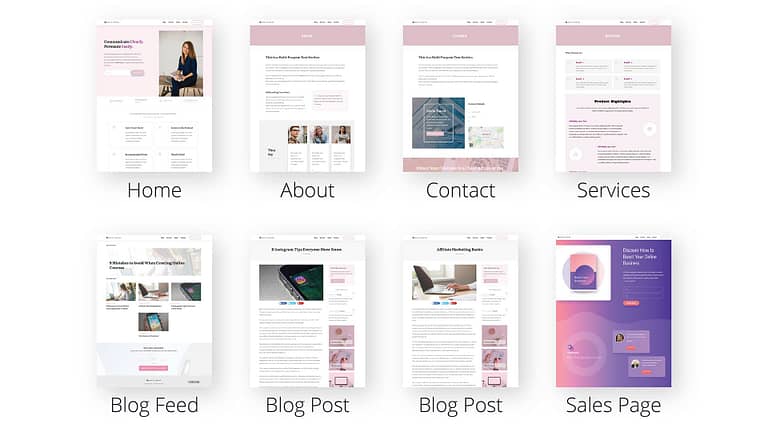
A structural example of a basic website setup.
We have a Homepage, an About page, a Contact page, a Services page, a Blog List (also known as a blog feed, blog reel or blog archive), a couple of individual blog posts, and a Sales Page. Pretty standard, right?
Understanding which pages are standalone pages and which pages were built using a theme template will help us use the Outside-In Principle to style our typography with the fewest number of required clicks.
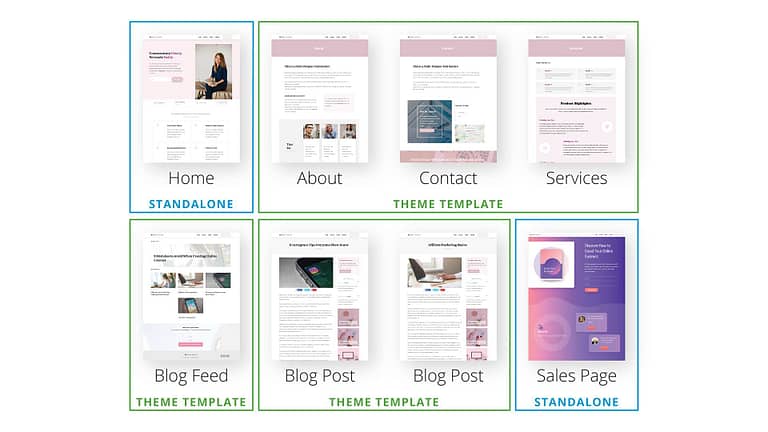
The pages of a basic pages and posts of a website categorized as either theme template controlled or standalone pages.
Homepage: In this example, the Homepage is set to be a standalone page (although you do can set your Blog List page as the homepage in Thrive Theme Builder if you prefer).
About, Contact, and Services pages: These all have the same header, top section, and footer, so it makes sense to use the same theme template for these pages.
Blog List page: A "list" or "archive" theme template that displays your blog posts in chronological order.
Blog Posts: Individual posts display the same theme template controlled design, but load unique, dynamically populated content within it.
Sales page: Since sales pages need to be structurally and stylistically different from the other pages on a website, it usually makes sense to create them as standalone pages.
A Quick Note About Templates
When you open the Templates tab in Thrive Theme Builder, you’ll see that your theme templates are divided into two categories: Single Content Templates and List Templates.
Single Content Templates are used when you want specific groups of posts or pages to have the same page structure, with each post (or page) containing unique body content. The exception to this rule is that your Homepage and Error404 page are also found in the Single Content Templates section.
List Templates are used for pages that display a dynamic list of posts. For example, your blog feed, category, and archive pages.
This is quite a lot of information to keep track of, so don’t worry if it hasn’t all sunk in yet. The important thing to remember is that every web page on your site either uses a theme template, or is a standalone page.
With that, let's learn how to use...
The Outside-In Principle
Here’s the gist:
When applying the same styling to multiple elements, apply the styling to the parent container of those elements — starting from the biggest container and working your way inwards to the smallest container.
In general, smaller containers override larger ones.
The Outside-In Principle comes from Cascading Style Sheets (CSS), so if you’re a developer, this may already be familiar to you.
For the rest of us, let’s start by defining our containers.
Again, we have our basic website:

It may be a bit difficult to see in these tiny thumbnails, but most websites use a specific set of fonts and colors throughout the entire site. Across-the-board customizations like these are typically done in your WordPress theme settings.
So, the largest “container” to which we can apply style choices is at the WordPress theme level. Let’s draw a container now to represent this theme level (you’ll see where I’m going with this in a second):
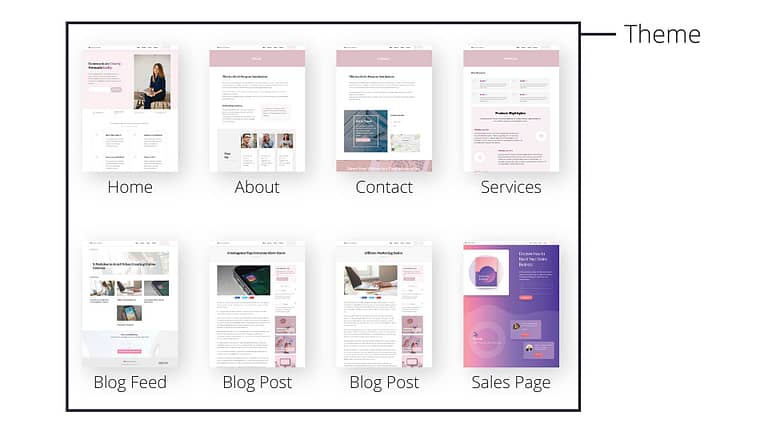
A basic website with the theme level container drawn around it.
Next, you might recall that some groups of pages use a template. You can customize templates to use specific fonts and colors, and those customizations will show up automatically on all posts or pages where the template has been assigned.
Let’s draw a container around those pages to represent the template used to create them:
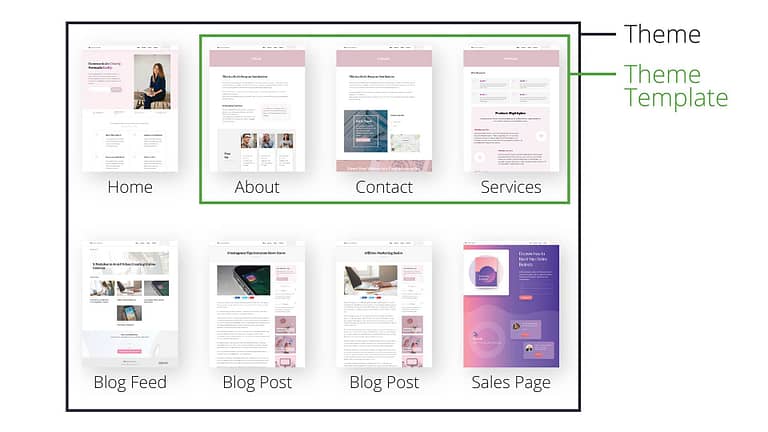
A basic website with the theme and theme template containers drawn.
Can you see the containers starting to take shape?
Every post or page that uses a template has a content section. And within that section, you can have Background Sections, Content Boxes, Columns, and more. If you want a specific section to stand out from the rest of the page it's on, you can set a different font and font color just for that section:
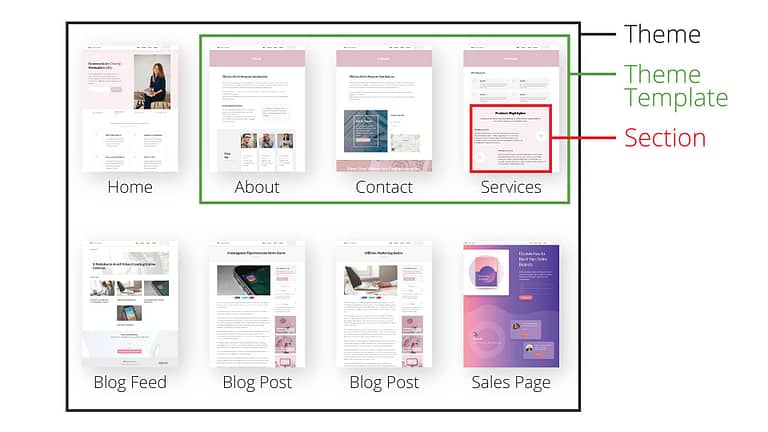
A basic website with the theme, theme template, and section containers drawn.
Finally, within a section, let’s say you want one particular text element to have its own, uniquw style. You can apply style customizations to individual elements:
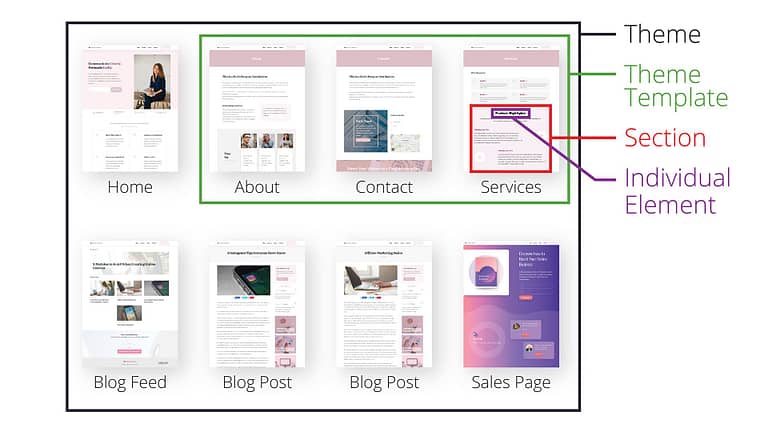
A basic website with the theme, theme template, section, and individual element containers drawn.
And there you have it! Those are the Outside-In container levels for pages and posts that use a theme template.
But what about standalone pages?
The container levels for standalone pages are virtually the same, but instead of making customizations at the theme template level, you can make customizations at the standalone page level instead:
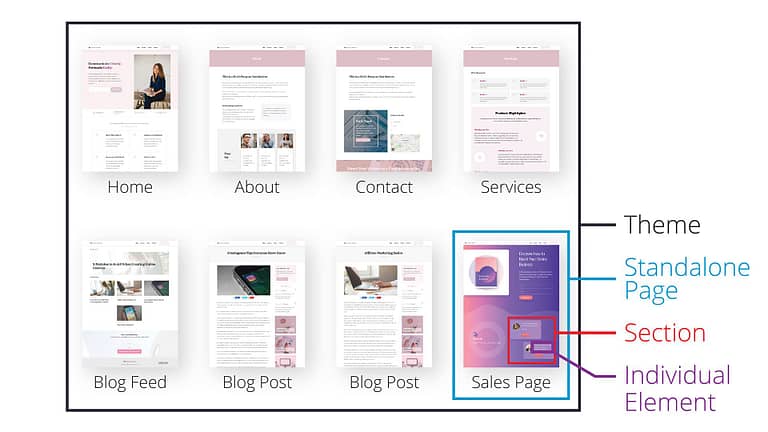
A basic website with the container structures drawn for a standalone page.
In Thrive Theme Builder, there are 4 container levels to which you can apply your style customizations:
- Theme
- Theme Template or Standalone Page
- Section
- Individual Element
The very first step in applying a customization to a page of your website — such as a font style — is asking yourself: "Which container level makes the most sense to apply this customization to?"
For example, if you want the customization to appear consistently throughout all of your website’s pages, then the theme level would be the most appropriate; if you’re designing a standalone page that you want to look stylistically different from the rest of your website, then the standalone page level would make the most sense.
Using the Outside-In Principle
Generally speaking, the most efficient way to use the Outside-In Principle is to work your way inward through all the levels — starting with the theme level.
For example, to ensure that all of the headings throughout your site use the same font, size, and color, you should establish your theme level typography settings in Thrive Theme Builder using the Typography tab:
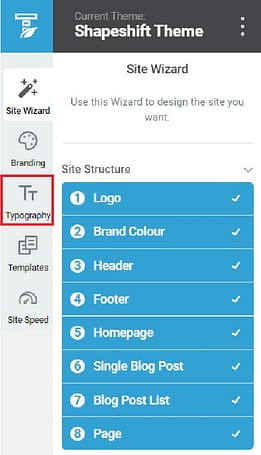
Thrive Theme Builder dashboard showing the location of the Typography tab.
Then, you would customize each of your theme templates...
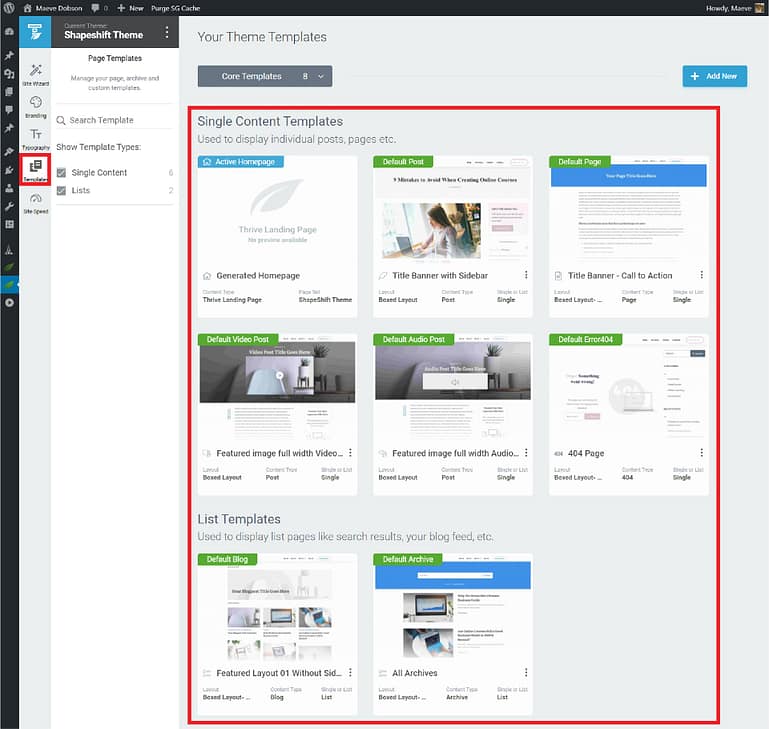
Thrive Theme Builder with the Templates tab open and the different core theme templates highlighted.
… then individual posts and pages as needed:
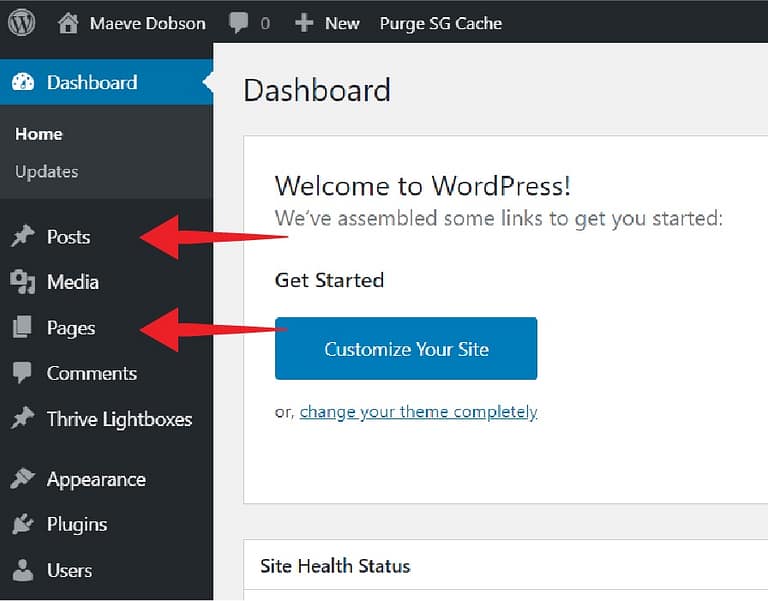
WordPress dashboard showing the location of the Posts and Pages tabs.
The benefit to establishing your font styling this way is that you can set up your typography in as few clicks as possible — saving you precious time and effort!
Now you might ask: "Must I set up fonts at the theme level before setting them up at the section level?"
Nope! With Thrive Theme Builder, you can start working at any level you wish. We simply suggest that you start with the theme level and work your way inward through the containers because it tends to be easier, less confusing and save you lots of time — especially when you need to make design changes to your site in the future.
And, there’s one more detail that might encourage you to always begin your customizations at the theme level...
Smaller Containers Override Larger Ones
Before we get into the nitty-gritty of applying the Outside-In Principle, it’s important to note that customizations made to inner containers will override customizations made to the outer containers.
For example, when you set up fonts at the standalone page level, and then set up fonts for a specific section on that page, the customizations made at the section level will override the font settings made at the standalone page level:
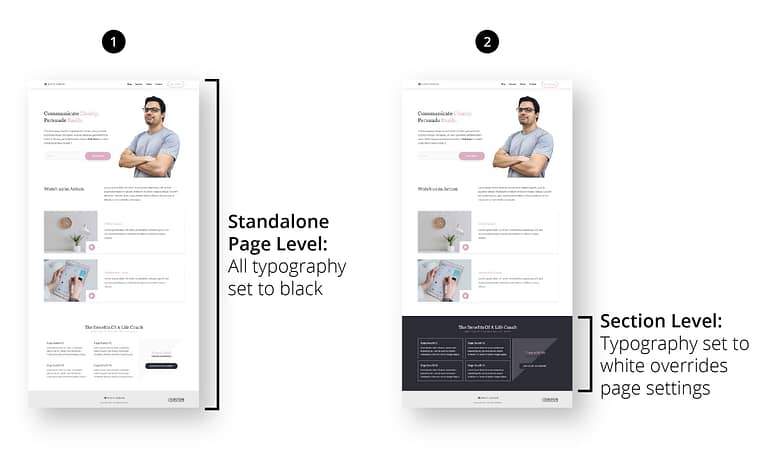
Diagram showing how section level customizations override standalone page level customizations.
"And what if I then go back and change the fonts at the standalone page level?" you're asking?
You’re all good; the customizations made at the section level will not change because they still override any standalone page level customizations.
Using the Outside-In Principle to Style Fonts on Your Website
Now that you’re familiar with the Outside-In Principle concept, let’s see exactly how to apply it across your website.
1. The Biggest Box: Setting Up Fonts at the Theme Level
To set up the global default typography for your website, you can use the Typography tab in Thrive Theme Builder dashboard. The specifications you set here will reflect throughout your website, including on:
- The Active Homepage
- Default post and page templates
- All single content templates
- All list templates
- All WooCommerce templates

Thrive Theme Builder dashboard showing the location of the Typography tab.
Using the Typography Tab
When you click on the Typography tab, you'll be greeted with the active set of fonts for your website. To edit these typography selections, start by clicking on the pencil icon in the lower right hand corner of the box to open the typography settings editor:
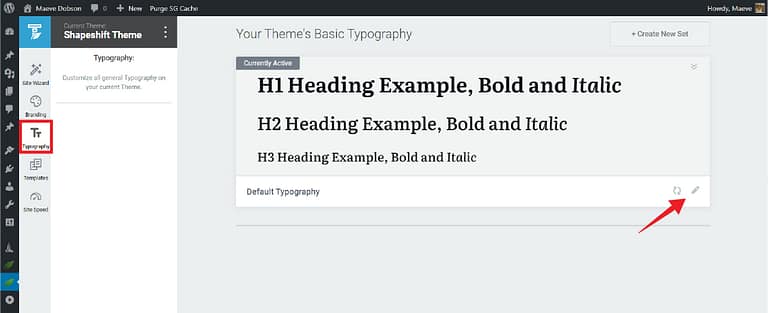
In the Thrive Theme Builder dashboard, click on the Typography tab, followed by clicking on the pencil icon to open the typography settings editor.
In the typography settings editor, notice that the elements on the page are surrounded by nested containers. You can even use the Outside-In principle here to save time as you edit your theme level default typography. How?
- Selecting the outermost container, or All Elements from the breadcrumb menu, will allow you to customize the font, color, and shadow settings for all typography elements at once (except for the pre-formatted text element at the bottom of the editor). This is handy if you want all of your headings and your paragraph text to use the same font:
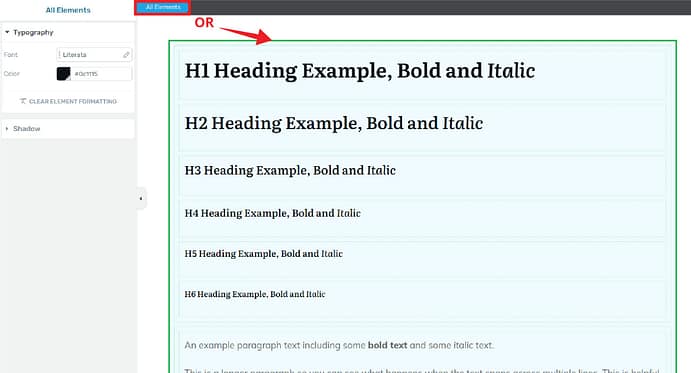
First, edit your theme level typography settings at the largest group level: All Elements
- Then, you can take one step inward to edit grouped elements such as All Headings, All Texts, or the List element. Use the breadcrumbs at the top of the page, or hover over grouped elements to select the appropriate container. The options on the left will change depending on which group is selected:
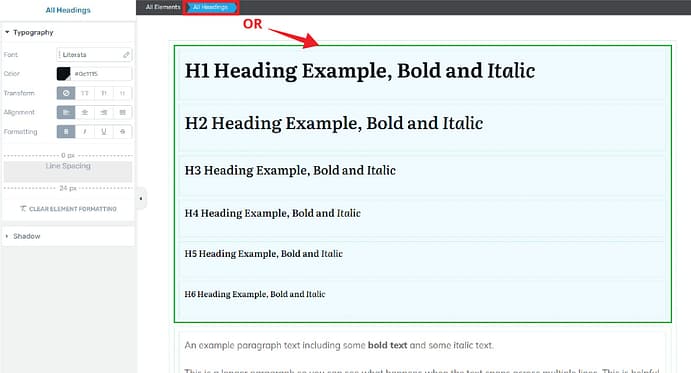
Next, edit your theme level typography settings at one of the second-largest group level: All Headings, All Texts or List Element.
- Finally, you can select individual elements by clicking anywhere inside the individual element container:
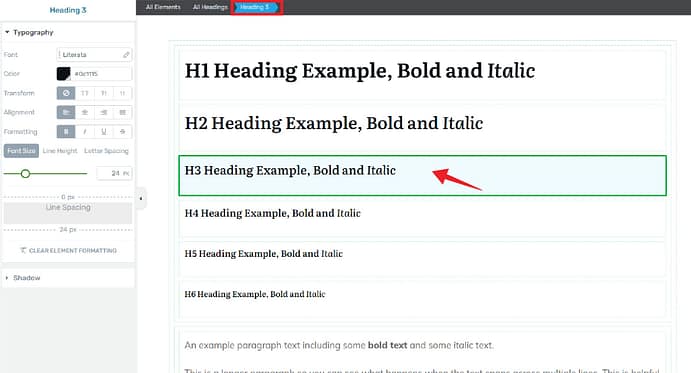
Customize individual elements by selecting them one-by-one in the theme level typography editor.
And that's it! With just a few clicks, you've set up the theme level fonts for your homepage, your page templates, and any posts or pages that have theme templates assigned.
If you’d like to make any changes to default fonts, you can simply re-visit the Typography tab in the Thrive Theme Builder dashboard to do so. Changes made here will be reflected throughout your entire site — excluding on your non-ShapeShift, pre-built landing pages and on other Thrive Themes tools that have their own settings that override your theme level settings.
Exceptions to Typography Tab Styling
There are a couple of exceptions to be aware of when specifying text styles using the Typography tab inside the Thrive Theme Builder dashboard:
Exception 1: The text styling in the Typography tab does not apply to non-ShapeShift pre-built landing pages in the Landing Page Library (we’ll go into more detail on this in a moment).
The non-ShapeShift landing pages in the Landing Page Library will not inherit the fonts you set in the Thrive Theme Builder dashboard Typography tab. Instead, they use the fonts set by our wonderful designers who custom-designed these landing page templates. However, you can easily change the fonts for the entire page of a non-ShapeShift landing page at the standalone page level.
Exception 2: Some ShapeShift sections do not honor color settings set in the Typography tab for headings.
Although this might initially sound like a let down, it’s actually very intentional for your benefit.
Let’s take a quick look why.
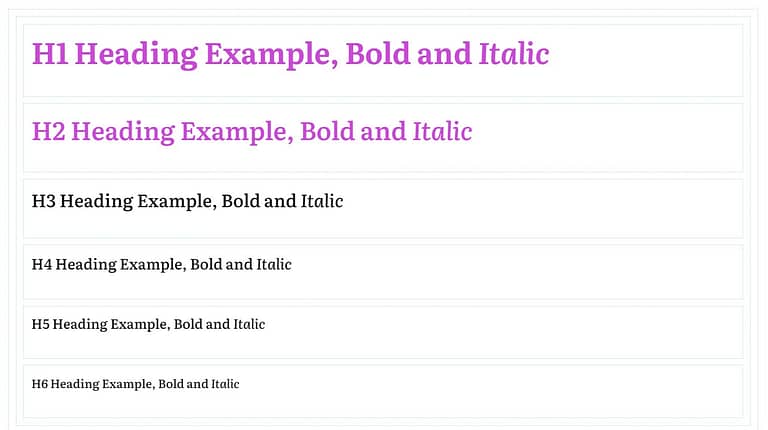
Here's a set of fonts I've specified in the Thrive Theme Builder dashboard (notice how I've made the H1 and H2 heading colors really standout):
And here's a resulting blog post using those theme level typography settings without any additional customizations applied:
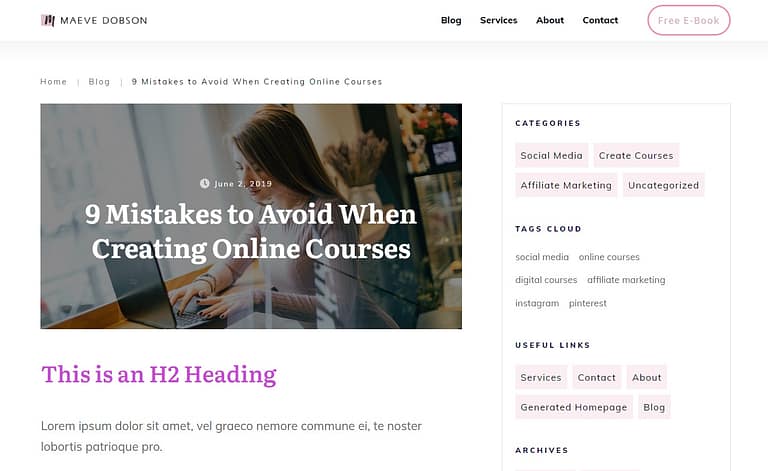
Notice that the H2 heading uses the color I specified in the Thrive Theme Builder dashboard, but the H1 heading is not — instead of pink it's white. That's because the H1 color was specified by our designers to make sure that this page would look good no matter what theme level typography settings you established.
Why? Well imagine how pink H1 text would look on that featured image background...
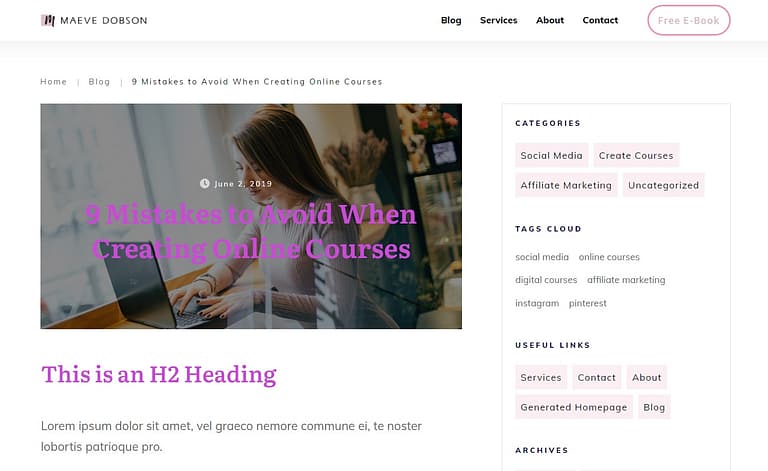
Not so great, right?
Our designers realized that theme level typography settings might end up clashing when applied to certain theme template designs, so specific colors were set (especially for H1 designs) on various theme template designs in Thrive Theme Builder.
However, you can easily change such specified settings on theme template designs by selecting individual text elements and customizing the Typography options for it in the left sidebar of the Thrive visual editor:
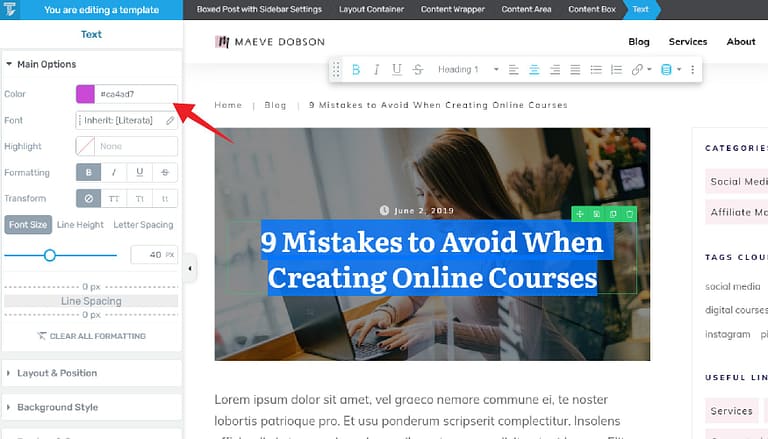
A Thrive Theme Builder theme template design being customized with the Thrive visual editor. The set H1 color established by our design team is being changed to the user's custom choice. FYI: You can tell that a theme template is being edited in Thrive Theme Builder here (and not either standalone landing page content or post specific blog content in Thrive Architect) because it's indicated in the upper left corner of the Thrive visual editor.
Using the Text Element Floating Bar
Whenever you want to customize text within the Thrive visual editor, you'll notice a handy floating bar that pops up when you select an individual Text element:
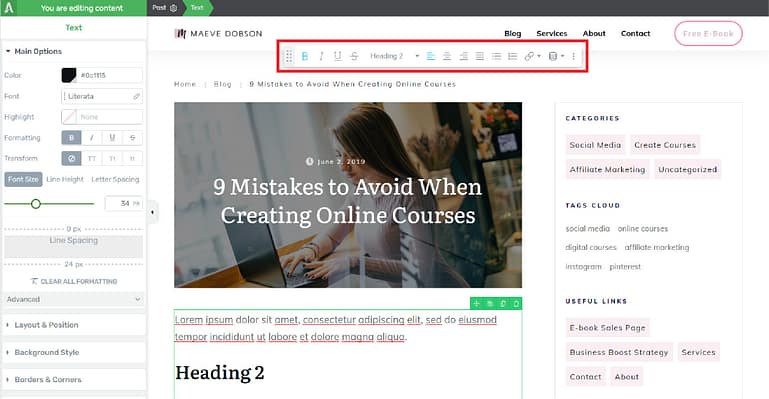
When you want to customize an individual Text element inside the Thrive visual editor, a text styling floating bar will appear. FYI: You can tell that post specific content is being created or customized within Thrive Architect here (and not a theme template in Thrive Theme Builder) because it's indicated in the upper left corner of the Thrive visual editor.
You can use this floating bar to assign a variety of attributes to your individual text elements. Within the floating bar, you'll also find a paragraph and headings dropdown menu that allows you to assign different paragraph text or heading settings to text elements on the fly.
Notice that the styles available in this dropdown list are exactly what you established back in the Typography tab of the Thrive Theme Builder dashboard:
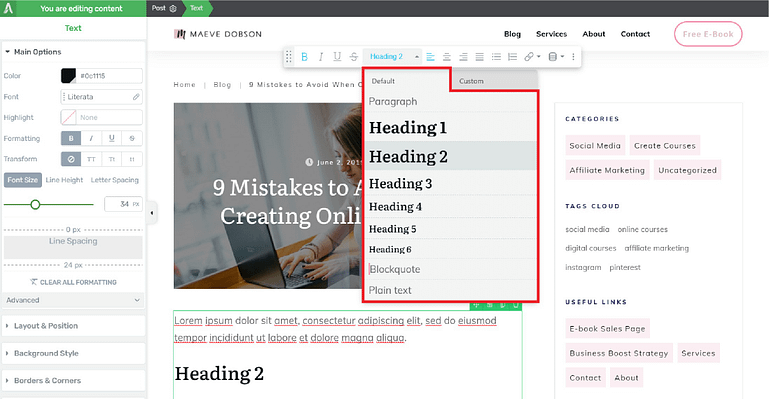
The text element floating bar with the paragraph and headings selector dropdown menu highlighted.
Changing Global Default Typography
Sometimes, it isn’t very convenient to exit the page that you’re working on and navigate to the Thrive Theme Builder dashboard to modify your global typography settings.
If you’d like to make theme level changes to your typography settings without having to bounce back to the Thrive Theme Builder dashboard, you can do that easily using the text element floating bar inside any Thrive visual editor.
For example, if you want to change the styling for all the theme level H2 headings on your website, start by styling any random H2 heading to your liking. Then, select “Heading 2” from the dropdown menu and click the option “Update Heading 2 to match”.

How to update the global H2 heading style using the paragraph and headings dropdown menu inside the text element floating bar of any Thrive visual editor window.
And here's what the result of that update looks like across your landing page:
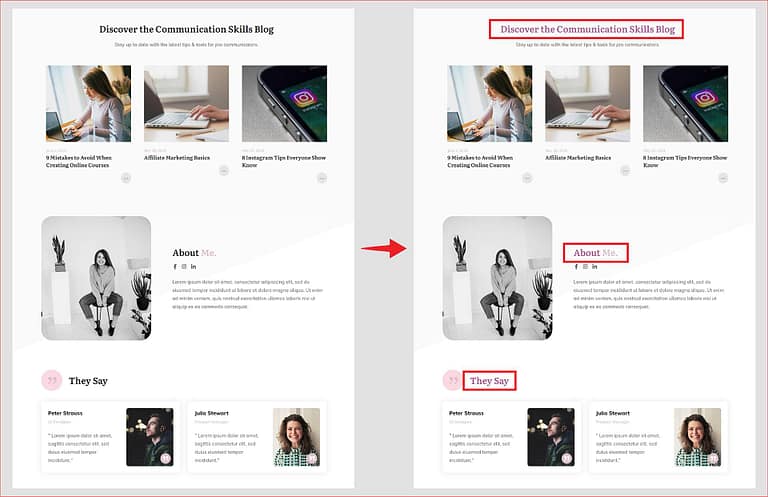
The result of updating the theme level H2 heading style using the method above. All H2 headings using the theme level settings will update! to use the new H2 setting automatically!
Voilà!
All of the H2 headings on the page (and anywhere else across your entire site that uses the theme level H2 setting!) will automatically update.
And the next time you access the Typography tab in your Thrive Theme Builder dashboard, you’ll see the default H2 heading has updated there as well.
Creating Global Custom Typography Styles
In addition to changing your global default typography, you can also use the text element floating bar to create custom typography styles.
These custom styles do not replace your theme level defaults. Instead, this feature allows you to create a list of frequently used custom styles available for quick use in your text element floating bar.
But like your theme level default styles, custom styles are global. That means they any changes you make to your saved custom styles will update automatically, anywhere they are in use on your site.
So let’s take a look at how to create a custom typography style now.
In this example, we’ll create a custom H3 heading.
Start by selecting any text element with that you would like to become a custom H3 heading. Use the paragraph and heading dropdown menu inside the text element floating bar to select and apply the default H3 heading first. From there, style the text element to your liking:

Assign and stye an H3 heading.
Next, go back to the paragraph & heading selector dropdown menu in the text element floating bar and click on the “Custom” tab. Enter a new style name when prompted and click “Save”:

Save your new H3 heading style as a custom heading.
And that’s it!
You’ll see that a new style has been added to your custom list. You can now assign this custom H3 heading to any text element on your website.
Changing Global Custom Typography
If you would like to change a custom heading, you can do so using the same set of steps that we used to change a default heading. Any text element on your site that uses the custom heading will be automatically updated as soon as you save the change.
Start by selecting an element that uses the custom heading and making your style changes. Then, click the paragraph & heading dropdown menu from the text element floating bar, click the “Custom” tab, and navigate to the custom heading that you would like to change.
Click “Update to Match”:

How to update a global custom heading.
2. The First Inner Level: Setting Up Fonts for both Theme Templates and Standalone Pages
The Theme Template Level
After setting site-wide specifications for your typography, you can move on to customizing individual theme templates so that all pages or posts that use that theme template will display those modifications.
For example, you might want your blog posts to use a different font for the H1 title. In this case, the correct place to make this customization is at the theme template level.
When editing typography at the theme template level, you should focus only on the header, top section, sidebar, bottom section, and footer. The content section will be addressed at the section level.
So if we just want to specify a new font style for the title of our blog posts, we should begin by opening our default blog post template (located in the Templates area of the Thrive Theme Builder dashboard). From here, you can proceed in one of two ways:
Method 1:
If you plan to use this new H1 style only on blog posts (and nowhere else on your website), then in the Thrive visual editor of your default blog post theme template you can simply select the post title text element, and modify its typography settings in the left sidebar:
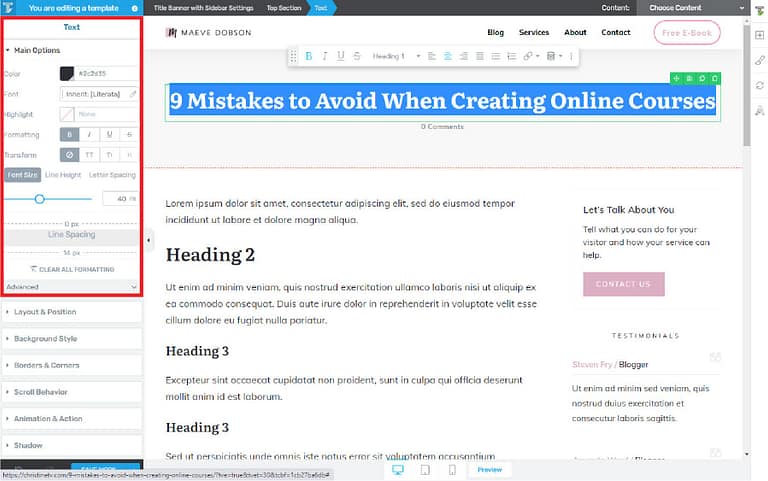
Inside the Thrive visual editor of the default blog post theme template in Thrive Theme Builder. Select the post title text element and modify the typography settings in the left sidebar.
Upon clicking the “Save Work” button, all your individual blog post pages that use this particular theme template will now reflect these changes when loaded.
Note that using this method will override the default typography that was originally applied to this element.
Method 2:
If you would like to use this style on other theme templates, posts, or pages, saving the style as a custom H1 heading will make it easier for you to apply it to elements on other pages. Use the exact same steps mentioned in the Creating Custom Styles section above.
As a reminder, custom styles are global, so if you update a custom heading, it will automatically update all other instances where it's used across your website. If you navigate to other pages and see that a text element has not updated the way you expected, it's because that text element has not been assigned the proper heading (or is being overridden by a smaller container level).
The Standalone Page Level
So what about customizing your typography settings at the Standalone page level?
Well, first you'll need to create or open a page in Thrive Architect (our landing page and content building plugin for WordPress).
And you have a few different options when it comes to creating a new standalone page using Thrive Architect:
- Creating a Blank Page that uses your default theme header & footer
- Creating a Completely Blank Page
- and loading one of our Pre-Built Landing Page template designs (100's of which have been created by our wonderful design team for every standalone page need you can think of!)
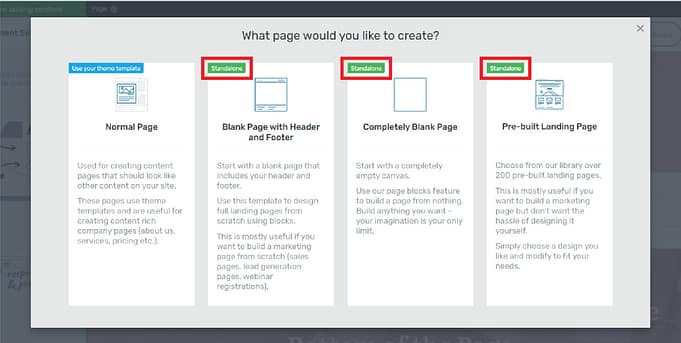
The standalone page options you can select when creating a new Page in WordPress.
Regardless of which standalone page type you choose, the customization process is the same for all of them.
Once your standalone page loads in Thrive Architect's visual editor, use the breadcrumbs to go to Page Settings, open the Typography tab options, and click “Edit Landing Page Typography”:

Once your standalone page loads in Thrive Architect's visual editor, use the breadcrumbs to go to Page Settings, open the Typography tab options, and click “Edit Landing Page Typography”. In the typography editor lightbox that appears, you can style the standalone page level typography, similar to how it's done inside the Thrive Theme Builder dashboard.
Then, use the Outside-In Principle to select all elements, groups of text elements or individual text elements so you can customize them using the Typography options in the left sidebar.
The customizations you make here are only for this particular standalone page and will apply page-wide. Note that if you make any customizations at the section level or individual element level, these smaller container changes will override the customizations made at the page level.

How to make standalone page level typography style customizations inside the landing page & typography editor lightbox.
Pre-Built Landing Pages
Before we move on to the next container level, there’s a few things you should know about how typography works with pre-built landing pages.
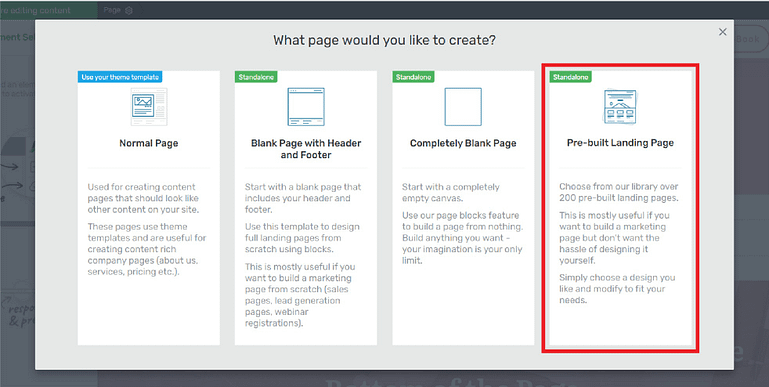
To select a pre-built landing page template to help build your standalone pages faster, choose the the "Pre-built Landing Page" option when prompted (after creating a new WordPress Page and launching Thrive Architect's visual editor).
Pre-built landing pages are a type of standalone page. They’re useful because they come in pre-designed sets, so you can choose a theme that resonates with your brand and use individual templates within that set to create various pages in a funnel (such as an lead generation page, a thank you page, a sales page, etc.)
Note that Pre-built landing page templates inside the the ShapeShift theme set will inherit the theme level typography settings you established in the Typography tab of the Thrive Theme Builder dashboard.
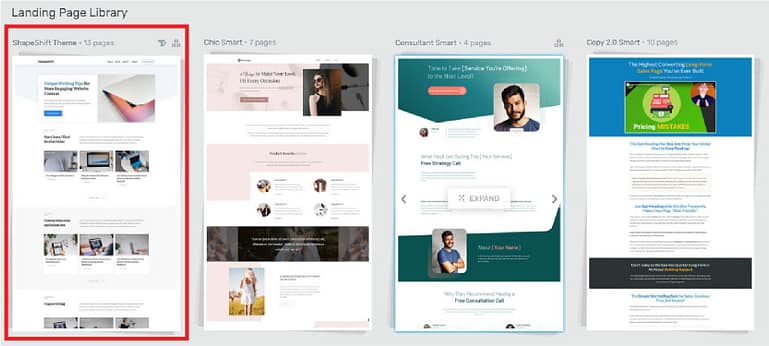
The Landing Page Library with the ShapeShift Theme template set highlighted.
However, any typography setting changes you make at the standalone page level (shown above) will be specific to the specific page they're made on. These edits will not affect other pages, posts, or theme templates.
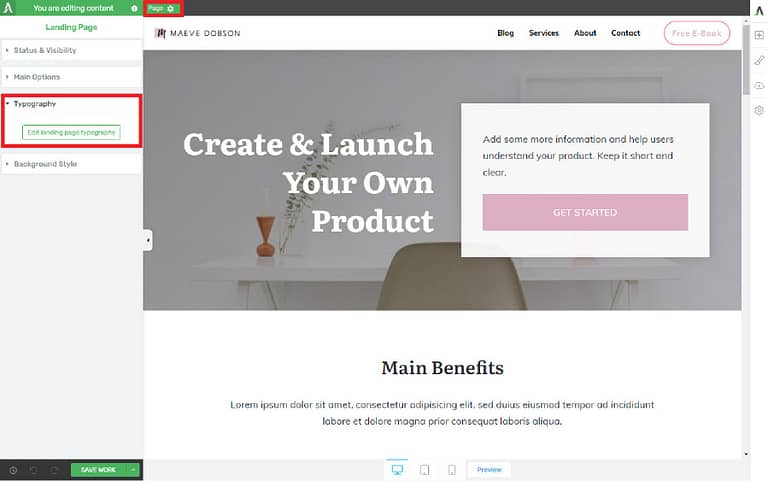
A pre-built landing page with its Typography tab highlighted.
Non-ShapeShift pre-built landing pages, such as the ones indicated below, will not inherit the typography settings you set in the Thrive Theme Builder dashboard and will instead use their own pre-set fonts that are specific to the landing page set:
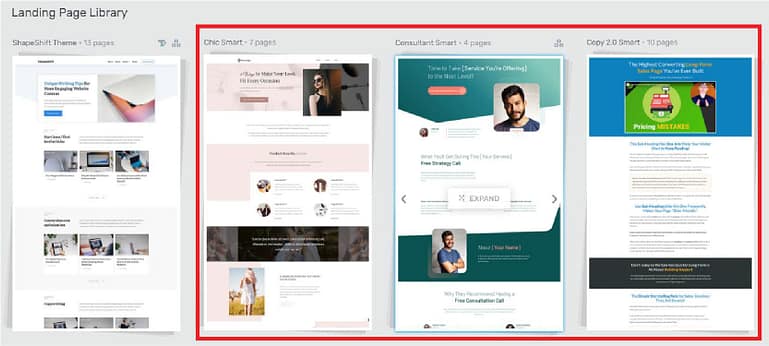
Examples of Non-ShapeShift pre-built landing page template sets. Any landing page templates used from these sets will not use your theme level typography settings established in the Thrive Theme Builder dashboard.
Like other standalone pages, typography edits can be made by opening the Page Settings and accessing its Typography tab options. Again, such edits will only affect the standalone page being edited.
3. The Section Level
Once you begin creating loads of content for your website, the section level is where the Outside-In Principle comes in extremely handy and can save you tons of time.
Let’s say there’s a section of a page or post where you’d like the majority of the text elements in that section to use a unique style different to the rest of design.
Instead of customizing each text element one-by-one, you can simply select the section level container and apply typography customizations just to it. All of the text elements inside that section level container will automatically reflect those changes — except for headings and text elements that have been styled at the individual element level.
Using the breadcrumbs, you can navigate to and apply your section level typography customizations to several different Thrive visual editor elements.
Section level elements usually include Background Sections…
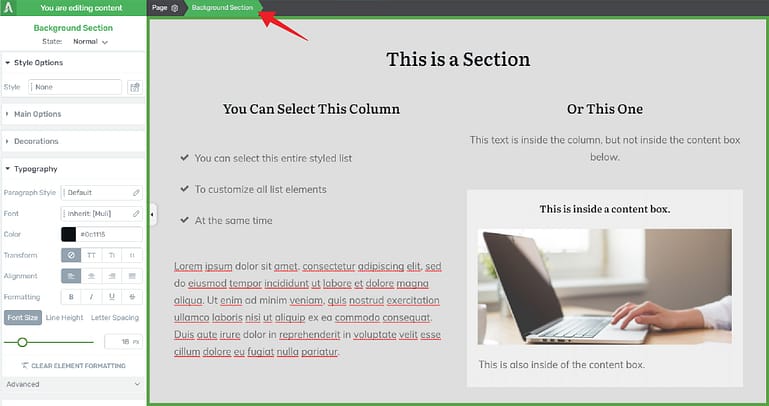
Background Section elements are the largest section level container.
Columns…
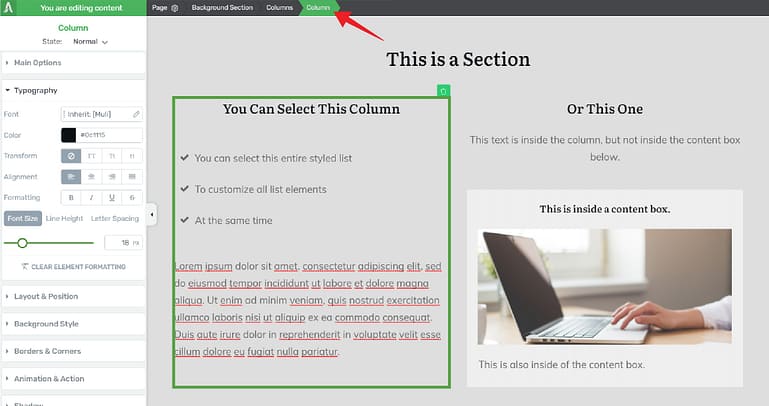
Columns elements are smaller type of section level container, usually found inside a Background Section element.
… and Content Boxes:
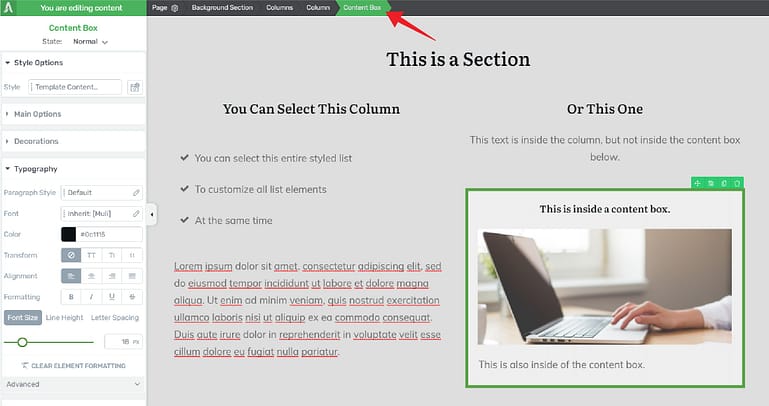
Content Box elements are a common type of section level container, usually found inside a Background Section element.
Even if there are just a few individual text elements inside a section level container you want to apply a unique style to, the Outside-In Principle stipulates you should style the section level container first. You can then style any individual element exceptions if needed after that.
Let’s look at an example of this scenario...
Here’s a standalone page where we’ve customized the typography at the page level.
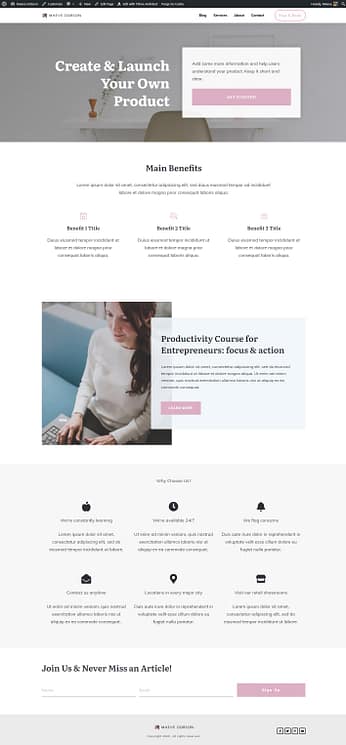
From there, if we want the "Why Choose Us" section of the page to standout, we can quickly and easily customize all of the text in that section level.
We do this by highlighting Background Section breadcrumb, opening the Typography tab in the left sidebar, and modifying the typography settings as needed:

Customize all of the text elements in section level container at once by making your typography customizations at the section level instead of the individual element level.
Using the Outside-In Principle, we're able to change the font styling for all the text inside an entire section level container in just a few clicks. If we had opted to customize each element individually, it would have taken waaay longer.
Note that if you make any customizations to individual text elements, those changes will override any customizations made at the section level!
4. Individual Elements
Finally, we’ve made it to the innermost container: individual elements.
No matter what customizations we’ve made to the theme, page, or section levels, every text element can be customized on its own and will take priority over the larger container levels it lives in.
There are two ways to style text at the individual element level:
Method 1:
Highlight an individual element, and change the Typography tab settings in the left sidebar...
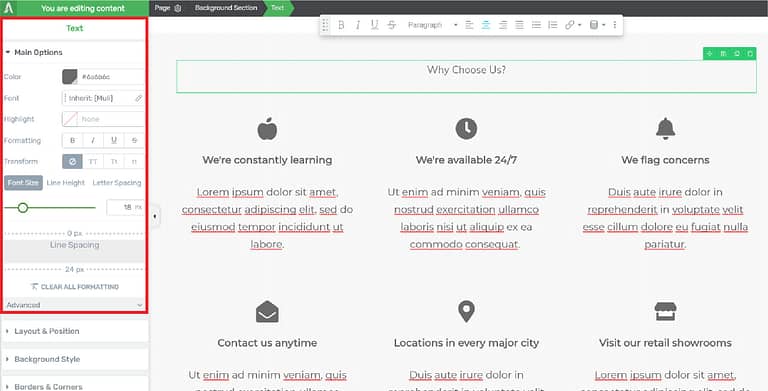
You can modify the typography settings of individual elements by highlighting the element and making changes to it in the Typography tab in the left sidebar.
When you customize an individual element using this method, it will override section level customizations. Even if you go back to the section level to make further customizations, they will not affect the individual element customizations you just saved.
Method 2:
Select an individual element and assign a heading or text style from the text element floating bar menu:

You can also modify the typography settings of individual text elements by highlighting the element and making changes in the text styling floating bar that appears.
You can also apply any custom styles that you set up and saved from previous page, post or theme template customizations:

How to assign a custom style to one of your individual text element.
And, of course you can create new custom styles here too.
Remember, styles available in the text element floating bar's paragraph & heading dropdown are global, so updates to these styles made using the “Update to Match” command will update the style everywhere that particular style is used.
And just like using Method 1, customizations made using the text element floating bar dropdown will override customizations made at the section level.
Now You’re an Outside-In Insider
You did it!
You learned how to master a fairly complex concept — but one that will definitely make your workflow much easier and help you design and make changes to webpages more efficiently.
And not only did you learn about the Outside-In Principle, you learned more about the difference between theme templates and standalone pages; how Thrive Theme Builder and Thrive Architect work together to help you design anything you need on WordPress. Speaking of which…
If you haven’t picked up Thrive Suite yet, now would be a great time to do it — while this newfound knowledge is fresh in your mind.
So, what do you think of the Outside-In Principle? Do you see yourself using it in the future? Let us know in the comments section below!


Amazingly helpful! Thanks a million!
Glad you like it, thanks for your comment!
Christine,
Wow, that’s a great tutorial on the different ways to handle typography with Thrive Theme Builder! I know it can sometimes get confusing when there are so many options available, but your explanation really made things very clear from top to bottom!
Thank you,
David Coleman
Hi David, thanks for your comment. I’m glad you like the tutorial 🙂
Thanks Chrstine! Very helpful and also a great video! It’s a joy to listen to you.
One question though:
When I want to make changes to existing pages. I want to set the typography on the most outside level (=page level). How do I make sure that this will have its effect on all elements on that already existing page?
Hi Deborah, I’m glad you liked the video! Great question. To ensure that changes made at the page level will affect elements that already exist, check that the text elements are assigned the right default headings (Heading 1, Heading 2, Heading 3, etc.). Inside of the Thrive visual editor, if you click on a text element, the current assignment will display in the text element floating bar. As a sidenote, elements that are assigned custom headings will not be affected by page level typography changes.
Tough topic, really well explained. I get it.
Seems to me that people just need to get in there and get their nose bloody with some editing of fonts to see how easy it is to change the look of the theme fonts in 5 mins work.
This approach is really very solid.
Thanks for your comment, Hendrik! Glad you like the tutorial.
I’ve created hundreds of pages with this software and I still got a few important things out of this tutorial, thank you very much.
I’d love to see more videos about general principles and best practices when using Thrive products. We all love the bells and whistles of course, but it’s the basic functions that we use 90% of the time.
Thanks for your comment, Lorenzo! More videos covering the basics are coming. 🙂