


Ever wanted to take web design inspiration from successful blogs like Neil Patel’s to create your own gorgeous theme templates — but couldn’t because you didn’t know how to code?
Well guess what?
Even non-techies like you can now “steal like an artist” after studying popular site designs by using Thrive Theme Builder’s visual editor.
Watch the video or keep reading to learn how any web design that inspires you to add on your own WordPress website is now easily in your power to build...
More...
Why Show You How to Build Neil Patel’s Blog Post Layout? (00:26)
The reason we decided to show you how to recreate Neil Patel’s blog post template for your WordPress website using Thrive Theme Builder is because it’s a good example of how to showcase multiple calls-to-action on your blog posts without them overwhelming your readers.
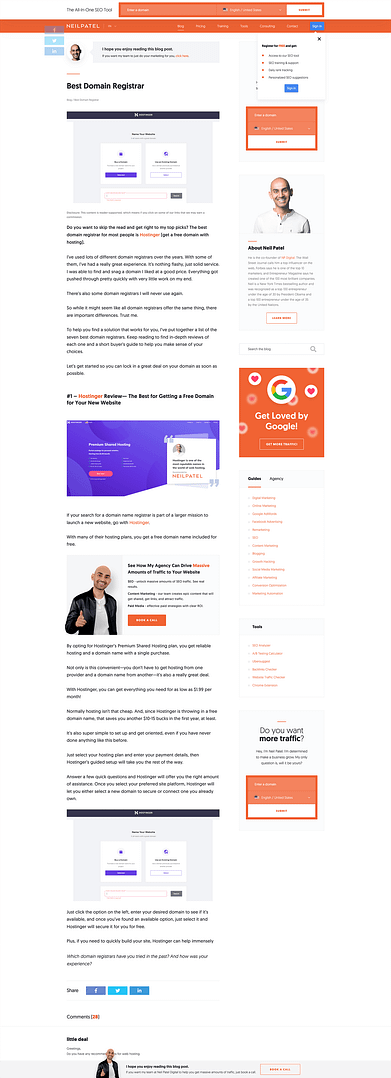
Case in point, just look at all the calls-to-action (CTAs) included in Neil Patel’s blog post template:

Neil Patel's blog post layout with several calls-to-action included within his Header, Top Section, Content Area, Sidebar and Page Bottom.
Neil displays...
An opt-in form in his Header
A sign in button in his Top Section
A personal call-to-action at the top of his Content Area
Multiple calls-to-action in his Sidebar
And a final sticky call-to-action ribbon at the Bottom of the page
DISCLAIMER
Thrive Themes is not advocating that you rip-off your favorite website design by building an exact copy of it on your own website.
In this post we are simply trying to show you how easy it is to take inspiration from other successful websites and then build your own version of great design ideas on your WordPress website using Thrive Theme Builder.
“Steal like an artist”, but make sure any design you publish on your website is uniquely your own.
Want to learn how to recreate this kind of call-to-action sophistication on your website using Thrive Theme Builder? Let’s continue…
Create a New Blog Post Template in the Thrive Theme Builder Dashboard (01:45)
First things first, if you want to build a new blog post template like Neil Patel’s, it’s probably best just to build it from scratch.
Hanne shows you how to sort this task out quickly starting at 01:45 in the featured video, but you can watch this Thrive Theme Builder tutorial if you want some additional help and information about it.
Once your new blog post template has been created, just hover your cursor over its thumbnail within the Thrive Theme Builder Dashboard’s ‘Templates’ tab and click the ‘Edit’ button that appears.
Now it’s time to get started building your new blog post template design...
Create a Sticky Call-to-Action Header (02:45)
To begin customizing your new blog post template so it resembles and behaves like Neil Patel’s blog posts, create a sticky CTA header design that will stay pinned to the top of the page as your reader scrolls.
The best way to do this is to customize an existing header design like Hanne shows you in the video starting at the 02:45 minute mark.
If you’d like to learn more about how to build sophisticated sticky headers — including designs that change when readers start to scroll — make sure to check out this video:
Create a Navigation Menu Top Section with a Call-to-Action Button (06:56)
Now that your CTA Header design is done, you’ll need to transform your blog post template top section into a navigation menu that contains a CTA button.
This task may seem a little abnormal since your Navigation Menu is getting assigned to the Top Section instead of the Header, but not to worry... doing so is pretty straightforward.
Follow along with Hanne starting at the 06:56 in the video to see how she quickly customizes a ‘Custom Menu’ element to not only provide clear navigation for readers, but also eye-catching CTA button as well.
Customize and Style Your Blog Post Template Content Area (14:28)
When customizing the content area of your blog post template, it’s important to remember that your individual blog post content will dynamically populate within the blog post template you’re now building.
Because of this, it’s important to understand the difference between Static and Dynamic content.
Static Content is fixed content. If you include static content in a Thrive Theme Builder template, it will display as is on each and every instance where that template is used on your website.
Dynamic Content by contrast, is specialized content that changes based on the display criteria set for it.
To help illustrate the difference, let’s think about how you might add a post title to your blog post template. Would you use static text or a dynamic ‘Post title’ text feature instead?
If you opted for the dynamic ‘Post title’ text, you’d be correct as you want your blog post template to display the correct title for all the different blog posts published on your site.
Follow along with Hanne at 14:28 in the video to learn how you can style your blog post template Content Area with the correct static and dynamic content — just like Neil Patel does inside his blog post layout!
If you’re keen to learn more about how to display static versus dynamic text content within your theme templates, check this help article out:
Customize Your Blog Post Template Sidebar (24:44)
If you decide to follow Neil Patel’s lead and add a call-to-action sidebar design to your blog post template, you’ll definitely want to watch this section of Hanne’s tutorial video (starting at minute mark 24:44).
In this section, you’ll learn how to add a search bar, a lead generation form, an ‘About the Author’ box and even a ‘Tabs’ element containing a ‘Post List’ element within your sidebar design — all while making the lead generation form sticky on scroll too!
Need some additional help customizing your blog post template sidebar? See if these tutorial articles have what you’re looking for:
Add Floating Social Share Icons to Your Blog Post Template (34:29)
As you scroll down a Neil Patel blog post, you’ll notice a set of sticky social share icons floating on the lefthand side of your screen.
How do recreate this social share feature on your own blog post template?
Easy!
You can either watch Hanne show you how to do it starting at 34:29 in the video or read the following help article in the Thrive Themes Knowledge Base:
Add a Floating Call-to-Action Bottom Ribbon to Your Blog Post Template (37:42)
Finally, you’ll notice on Neil Patel’s blog posts that he displays a floating call-to-action ribbon with an engaging image of himself popping out of the design at the bottom of the screen.
What’s the best way to replicate this call-to-action design on your blog posts with the tools included in Thrive Suite?
Instead of using Thrive Theme Builder to achieve this, we actually recommend you use Thrive Leads.
To learn how you can replicate this sticky bottom ribbon design using Thrive Leads, watch this video:
To learn how to create the pop out effect oin your bottom ribbon design, check out this video:
Don’t Forget to Make Sure Your Blog Post Template is Mobile Responsive (38:16)
Any time you’re building a new theme template or landing page design — especially from scratch — it’s important to double-check how your design looks on Tablet and Mobile devices too.
That’s because there may be some little tweaks you’ll need to perform to ensure your blog post template looks professional on ALL screen sizes.
Hanne shows you how to take care of this final task starting at minute mark 38:16, but here are some additional mobile optimization best practice resources if you need them:
You’re Ready. Go Forth and Create Any Blog Post Template You Desire!
After watching Hanne’s tutorial video and reading through this article, you should have all the tools and skills necessary to replicate any sophisticated blog post template you come across.
But please use this web design power responsibly!
Remember that this tutorial was created for educational purposes and NOT as a how to guide for ripping-off existing website designs exactly as they are. As the saying goes, creativity requires “stealing like an artist” — meaning you should study great examples for inspiration in order to craft unique designs of your own.
And whenever it comes to creating conversion focused theme page or blog post templates for your online business, Thrive Theme Builder is the best non-techie, visual building solution to get the job done like a web design pro.
We can’t wait to see what you build! Let us know if you have any questions in the comments below.
This was a very good blog, found it helpful but also got me thinking.
Is there any way we can create a blog article template?
I outsource most of my content writing. So it would be awesome if I had a template that told the writes how to format and write the article.
Basically the same as you have some of your landing page templates. The landing page tell you to put a header here, a paragraph here and what it should be about, a CTA here. Etc
If there was a blog article template that we could create it would be super awesome.
Then we could put where the keywords need to go
Include LSI keywords
Where the headers go
How many images and a message to include meta
Having a template that writers could follow with all SEO tips and instructions in it would be a god send for out sourcing writers.
If we can’t do this already is it something that could be integrated into architect?
Anyway keep up the amazing work.
You can set up the main features of your blog posts through Thrive Theme Builder here: https://thrivethemes.com/custom-post-templates/;
As to the content, at the present, you’re not able to do exactly what you’ve asked for just yet, but…
…You can design your own content templates following the ideas in this following post in order use it for other blog posts.
Shane gives quite a thorough explanation on how to do it with ease.
Read it here: https://thrivethemes.com/content-pattern/
Hope this can help you.
What’s the best way to embed a YouTube video so it doesn’t slow the loading of pages? Typically I just copy and paste the iframe code from YouTube.
Hi Herman,
If you’re using Thrive Architect to create your blog posts then you can use the video element and the lazy loading option to speed up the loading time.