The first time I had to create a membership site was for one of my early fitness clients, mid-pandemic, and I was nervous.
It felt like a huge leap from designing a simple website. This was a full-blown subscription-based setup with members-only content, gated videos, recurring payments — a whole new level of digital strategy.
I got through it. It wasn’t flawless, and looking back, I’d do a few things differently. But five years later, building online membership platforms is second nature — and I’ve seen how powerful they can be for coaches, creators, and small business owners looking to grow their audience and monetize their content more sustainably.
Here’s why it matters:
According to U-Screen, 45.2% of established membership businesses earn six figures annually, and 6.9% go beyond the million-dollar mark. That’s the power of turning your expertise into a passive income stream with real impact.
If you're thinking of launching a digital product or building a membership community around your work, this guide will walk you through every step — from structuring your offer to launching a high-converting, subscription-based website.
You’ll learn how to:
- Choose the right membership model for your content
- Deliver value with exclusive, gated content
- Set up payments and protect your digital products
- Launch a polished site using WordPress and Thrive Apprentice
Let’s build something that creates value for your audience — and recurring revenue for your business.
More...
Can You Grow Your Business with a Membership Site?
Yes – and it's simpler than you might think.
Instead of constantly looking for new customers, you can easily build a community of people who love what you do and support you month after month.
Think of it as having a VIP room for your biggest fans. They pay monthly or yearly to get your premium offers – maybe that's exclusive content, first dibs on your products, or 1-1 time with you. The best bit? You'll know exactly what's coming in each month, so you can plan ahead without the stress.
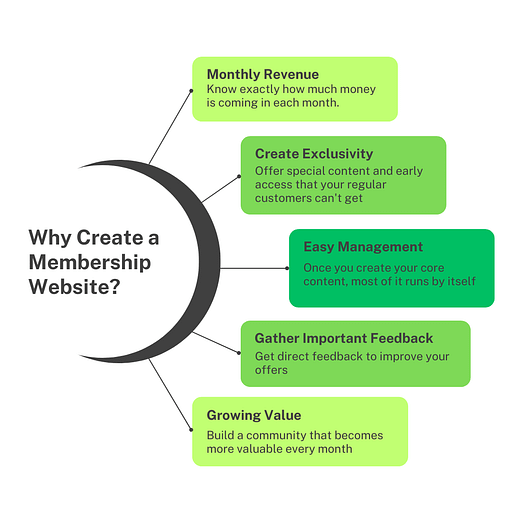
What could you offer? Think behind-the-scenes peeks, member discounts, or coaching calls - whatever makes sense for your business (Need more digital product ideas? Check out this guide).
And here's the really good part: once you set up your core content, most of it runs itself. That frees you up to focus on making things even better, especially since your members will tell you exactly what they want.
Before you know it, your membership becomes more than just reliable monthly income - it becomes the heart of a stronger, more valuable business.
The best part? It works for many business models — solo businesses, startups, nonprofits, and more.
Who is a Membership Site For?
A membership site could be perfect for you if you're:
A coach or consultant who has expertise to share and enjoys working with people over time. You can deliver regular training sessions, group coaching calls, and create resources your members can use anytime.
A content creator who makes videos, podcasts, or articles. You can give members early access to your work, bonus content, and behind-the-scenes looks at your creative process.
A service provider like a fitness trainer, nutritionist, or business advisor who wants to reach more people. You can blend one-on-one support with group programs and pre-recorded content.
An artist or maker who wants to share your creative journey. You can offer exclusive pieces, tutorials, work-in-progress updates, and first access to new collections.
A business owner with physical products who wants to deepen customer relationships. You can provide special discounts, early product releases, and member-only items.
An educator or expert with knowledge to share. You can create ongoing courses, resources, and workshops that help people develop their skills over time.
The key is having enough valuable content or services to share regularly, and enjoying the process of building relationships with your members.
Now that you know all about the benefits of adding a membership component to your business, let's start building!
How to Create a Membership Website with WordPress
Building a membership site might seem like a massive undertaking, especially when trying to choose from a plethora of membership plugins. But with WordPress and the right membership software, you can simplify the process. Below are step-by-step instructions for how to set up your membership site:
✅ TL;DR – Here’s What You’ll Set Up in This Tutorial
If you’re ready to build a membership site but don’t want to get overwhelmed by tech, this guide has you covered.
By the end, you’ll have a complete, subscription-based website built on WordPress — with gated content, recurring payments, and a polished member experience.
Here’s the full roadmap:
Install Thrive Apprentice – the WordPress plugin that powers your membership site
Create members-only content – courses, videos, downloads, and more
Build your first membership product – bundle your content into a structured offer
Set up recurring payments – using Stripe, ThriveCart, WooCommerce, or Studiocart
Create a drip schedule – release content over time to keep members engaged
Design your membership header – add login/logout buttons and navigation links
Build a content dashboard page – show members everything they have access to
Create a branded login page – make it easy for members to sign in
Set access restriction rules – protect your gated content and define who sees what
Design your sales page – turn visitors into members with a clear, benefit-focused message
Create your product in the payment platform – match pricing and access levels
Set up a smooth checkout page – embed your payment form and link everything together
It may sound like a lot, but we’ll take it step by step. And once it’s done? You’ll have a membership site that runs like clockwork — ready to support your business, build your community, and generate recurring revenue.
Step 1. Install Thrive Apprentice
The best WordPress membership plugin is Thrive Apprentice, a feature-rich solution for creating online courses and memberships.
Want to get your courses and membership site up quickly? Thrive Apprentice makes it super easy.
You can offer different membership tiers so members can choose what works best for them (and you earn more). Keep your members coming back with interactive content that they'll love.
Plus, you won't need to buy any extra plugins to protect your content - it's all built right in, saving you both time and money.
You get everything you need in one place:
- Pre-designed templates that make your site look professional from day one
- Easy-to-use tools to structure and organize your content
- Simple controls to manage all your member access settings
- Everything you need to create great content for your members
- Built-in Stripe integration to sell your products right from your website
After purchasing Thrive Apprentice, start by logging in to your Thrive Themes account and downloading the Thrive Product Manager plugin.
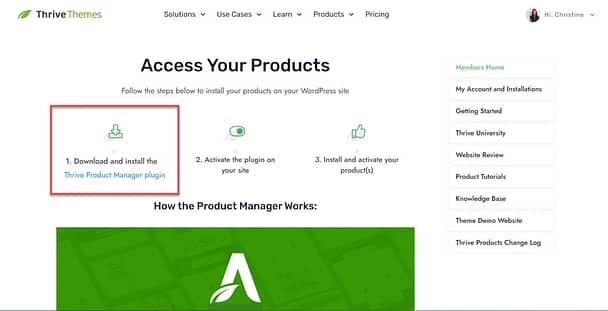
Then, navigate to the Plugin section on your WordPress dashboard and click Add New. Proceed with installing and activating the Thrive Product Manager plugin on your WordPress site.
Once that's done, navigate to the Thrive Product Manager, and follow the prompts to install and activate Thrive Apprentice.
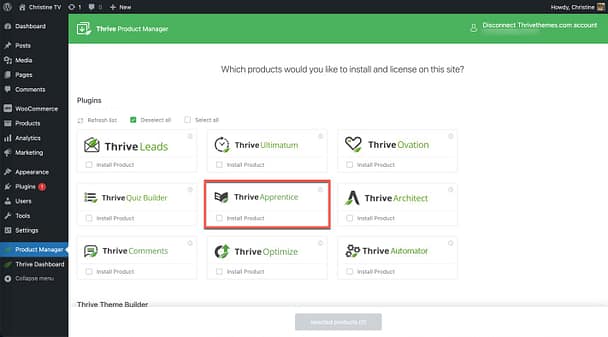
Step 2. Create Members-Only Content
Once Thrive Apprentice is installed, you can start creating your exclusive members-only content. This could be anything from online courses to premium blog posts and instructional videos. Remember, your content should be valuable, relevant, and cater to the needs and interests of your target audience.
For more info about creating members-only content, check out our video:
Step 3. Create a Thrive Apprentice Product
Navigate to Thrive Apprentice > Products, then click the button to Create Your First Product.
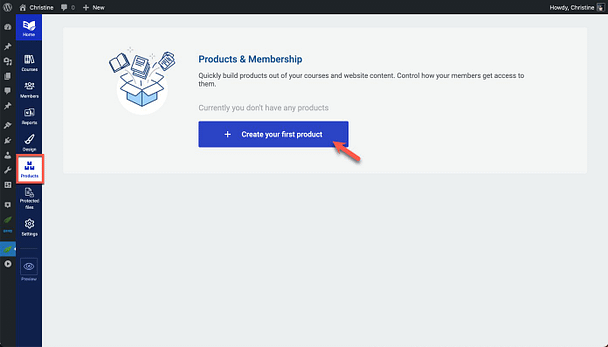
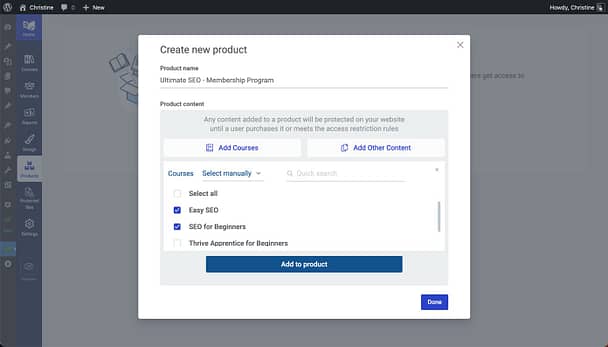
Give your product a name and add your membership content. You can add courses, posts, and pages.
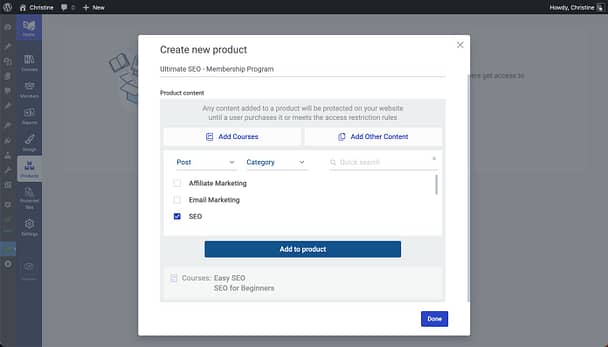
Tip: Create a blog post category just for your membership and add the category to your membership. Any new blog posts you assign to that category will be automatically included in your membership program!
Step 4. Specify a Payment System for Your Subscription Site
Now it's time to decide on a payment system and integrate it with Thrive Apprentice. If you have a Stripe account, this’ll be easy for you.
Thrive Apprentice also offers a powerful built-in Stripe integration where you can configure your payment options directly from the plugin, giving you complete control over your monetization strategy without the need for additional plugins.
You can easily set up:
- One-time payments
- Recurring subscriptions
- Limited-time access
This fits perfectly with features like course drips, hidden courses, and advanced access requirements for your members area. You can learn how to set it up here:
If you don't have a Stripe account or prefer to use a different payment processor, Thrive Apprentice also supports the following eCommerce options:
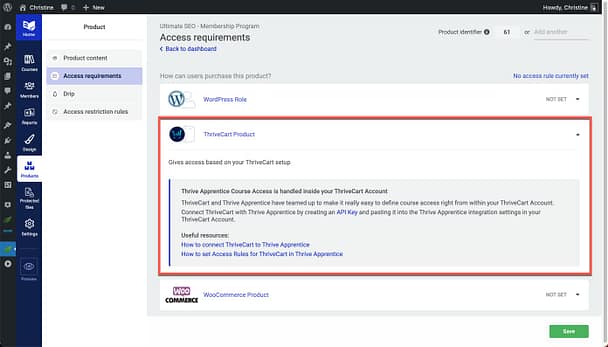
After fully integrating your payment system, depending on your chosen system you may see it appear listed in the Access Requirements tab for your product.
In this example, we are using ThriveCart. Since access to the product is handled from ThriveCart, there's nothing else we need to do here.
Step 5. Set Up a Drip Schedule
A drip schedule is a way of releasing your content over time. Instead of giving your members access to all the content at once, you can "drip" it out over days, weeks, or months. This approach not only keeps your members engaged over a longer period, but it also helps manage the pace at which they consume your content.
Drip schedules in Thrive Apprentice can be set up for online courses. If you are including an online course in your membership, this is a good time to set up a drip schedule.
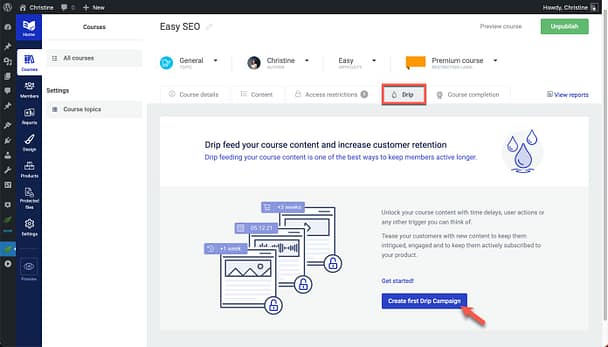
Navigate to Thrive Apprentice > Courses, then select a course. Navigate to the Drip tab for your chosen course and click the button to Create Your First Drip Campaign.
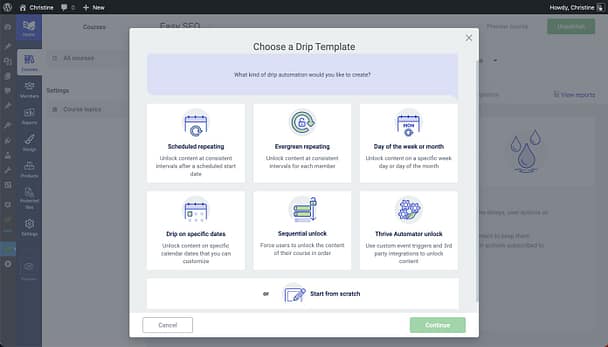
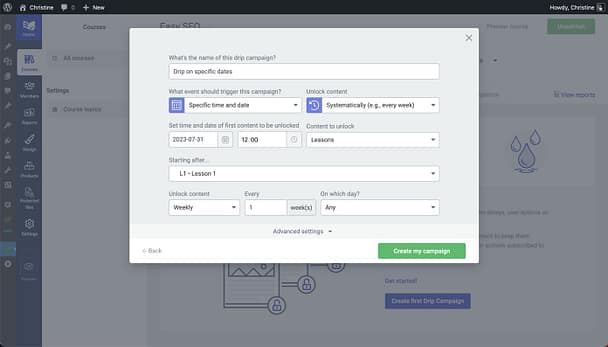
Thrive Apprentice makes setting up drip schedules easy with the provided drip templates. Choose the template that best suits your membership needs, and adjust the drip schedule settings as necessary.
Step 6. Create a Header
It's important to provide a way for your members to access your premium content and account options, so the next step is to create your membership header. This header will likely be different from the header used on your main website.
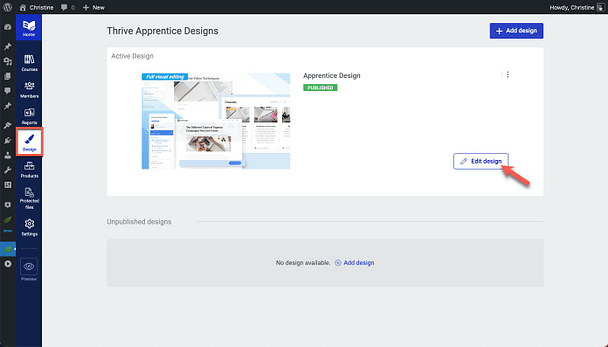
To edit the header for your membership area, navigate to Thrive Apprentice > Design, then click the Edit Design button.
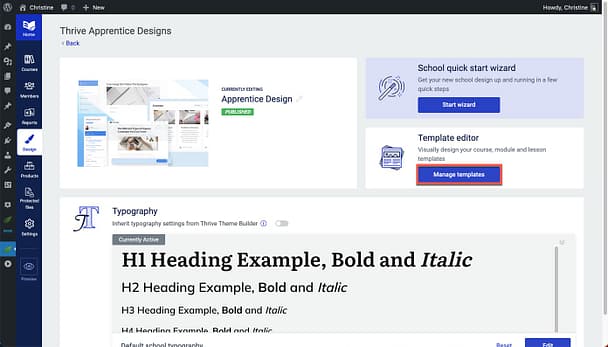
Then, to view the templates that comprise your membership site, go to the Template Editor section, and click the Manage Templates button.
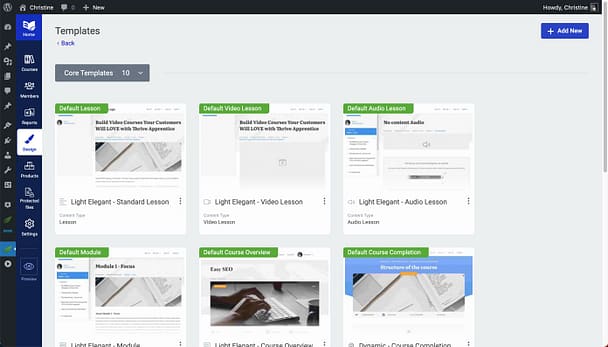
By default, the header in Thrive Apprentice is a linked section. This means that the header is used on multiple templates, and changes to the header will be reflected on all templates.
To edit your membership header, select any one of the templates on the Templates page.
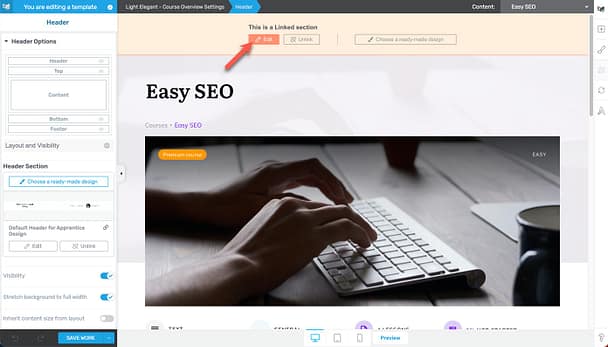
Upon clicking inside of the header section, you'll have the following options:
- Clicking the Edit button will let you edit the current header and your edits will apply across the rest of your membership templates.
- Clicking the Unlink button will let you unlink the header for this template only and your edits will only apply to your current template.
- Clicking Choose a Ready-Made Design will let you choose a completely different header design for this template only.
We recommend starting off your header customizations by clicking the Edit button, so that your customizations will be reflected across all membership templates.
Next, you'll need to create buttons and menus in your membership header, to allow members to Log In and Log Out. Watch the helpful video below for a tutorial.
Step 7. Create a Membership Content Page
This is where you'll organize and display all the exclusive content that your existing and new members can access. It could include a list of courses, downloadable resources, premium podcast episodes, or links to private online community forums. Make sure the page is easy to navigate and visually appealing.
To create a membership content page, all you need to do is create a regular WordPress page. Then, use the Post List and the Course List elements that come with Thrive Architect to easily add your membership content to the page.
In addition to membership content pages, this handy page builder will help you create sales pages, thank you pages, opt-in pages, and more. Check it out here.
Step 8. Create a Login Page
Your members will need a way to access the members-only content, so you'll need to create a page with a login form. Thrive Apprentice simplifies this process with customizable, pre-designed templates.
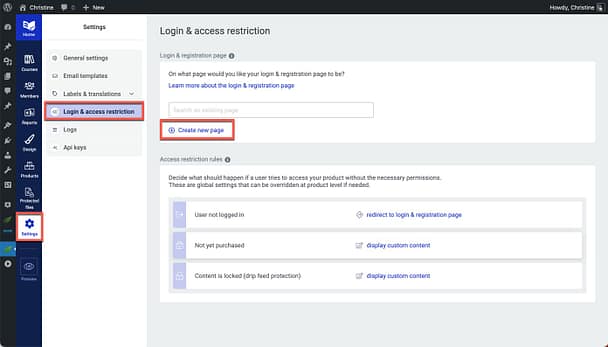
To create a Login page, navigate to Thrive Apprentice > Settings > Login & Access Restriction. Then, click the button to Create New Page.
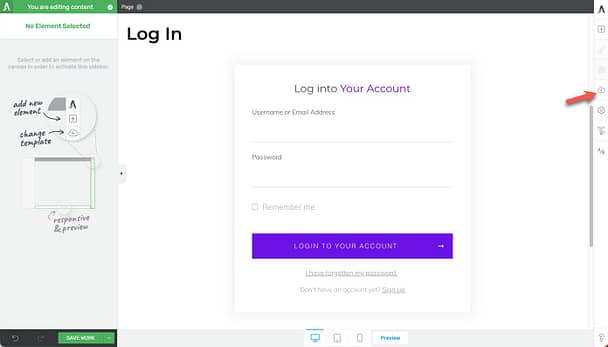
To change the default Login page template, click the Change Template button in the right sidebar...
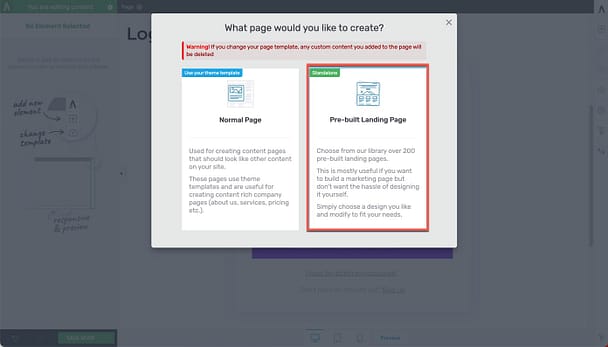
... and select the Pre-Built Landing Page option.
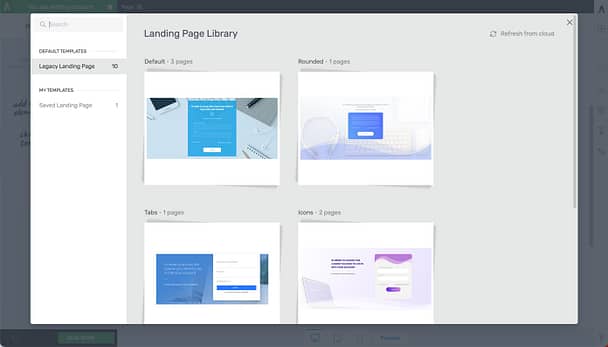
From here, you can view the available templates and select a design. Once you've chosen a design, you can customize it to match your brand by changing colors, fonts, images, and more. That way, your community can easily access their member profiles.
Step 9. Set Access Restriction Rules
With your content in place, you need to ensure that only paying members have exclusive access. Thrive Apprentice allows you to set access restriction rules for your entire online school, as well as individual products.
You'll need to set access restriction rules for the following scenarios:
- What happens when someone who is not logged it tries to access membership content
- What happens when someone who has not yet purchased your membership tries to access membership content
- What happens when someone tries to access drip content that is not yet available
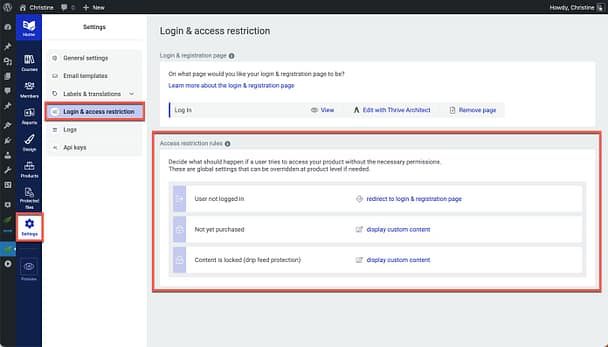
To set access restriction rules for your entire school, navigate to Thrive Apprentice > Settings > Login & Access Restriction.
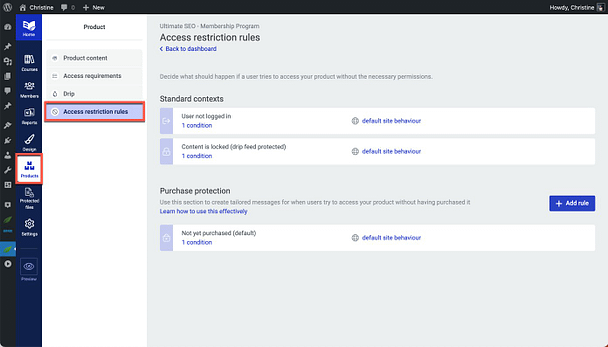
To set access restriction rules for a particular product, navigate to Thrive Apprentice > Products, and select your product. Then, go to the Access Restriction Rules tab.
Step 10. Create a Sales Page
Now that you've created the inner workings of your membership site, it's time to create a sales page so that you can start selling your membership.
To create your membership sales page, we recommend using Thrive Architect. This powerful page builder plugin comes with dozens of pre-built landing page designs so you can create gorgeous sales pages, homepages, and landing pages in a matter of minutes.
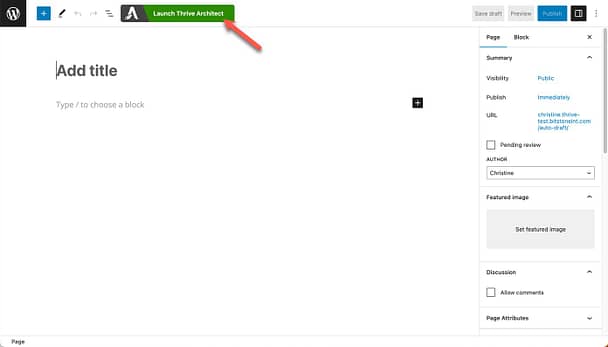
Start building your Sales page by creating a new page in WordPress, then click the button to Launch Thrive Architect.
Thrive Architect gives you the flexibility to create the exact type of you need. To start building your membership sales page from a template, click the Pre-Built Landing Page option.
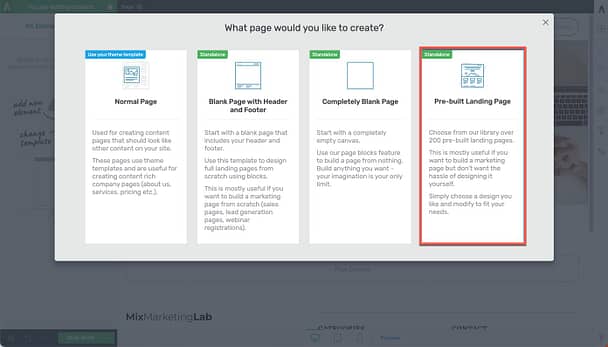
Select a landing page set, then select a Sales page template.
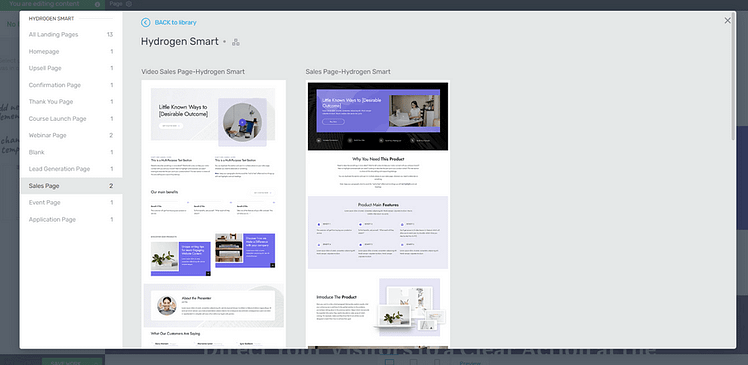
From here, use the Thrive visual editor to customize your sales page.
Sales Page Best Practices
A good sales page guides visitors from interest to action. It's not just about looking good -- it's about connecting with your audience and showing them exactly how you can solve their problems. Here are key practices that drive results:
- Focus on Benefits: Tell people how your product makes their life better, not just what features it has. (Learn how to write better copy here).
- Make it Scannable: Use clear headings, bullet points, and short paragraphs. People skim before they read, so make your key points stand out
- Show Proof: Add testimonials, case studies, or results that show your product works. Real stories from happy customers build trust better than any sales pitch
- Clear Pricing: Make your offers easy to understand. Explain what's included and use comparison tables for different options
- Strong Call-to-Action: Use buttons that stand out and tell people exactly what to do next, like "Start Your Free Trial" or "Join Now"
Want to dig deeper? Read our complete guide on 7 Elements of a Successful Sales Page
Step 11. Set Up a Product in Your Payment Processor
In your chosen payment processor, set up a product that corresponds to your membership or course. This setup includes setting the price and payment frequency (one-time or recurring). Refer to instructions provided by your payment processor for detailed information.
Step 12. Create a Checkout Page
Finally, you'll need a checkout page where members can complete their purchase through PayPal, bank transfer, credit card, etc. This page should be simple and user-friendly to encourage conversions.
For your Checkout page, create a new WordPress page, and launch Thrive Architect. Once again, you'll be presented with four different page type options; select the one that best suits your needs.
The checkout form on your Checkout page is provided by your payment processor. Since we are using ThriveCart in this example, we'll copy the embed code provided by ThriveCart.
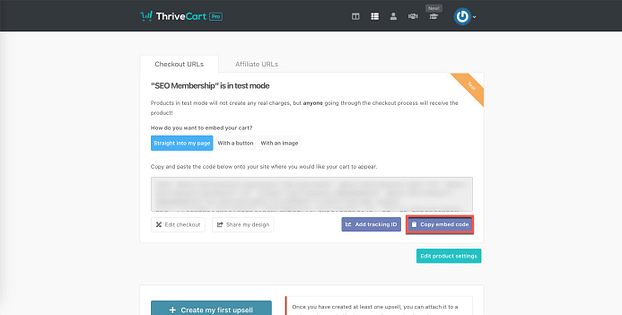
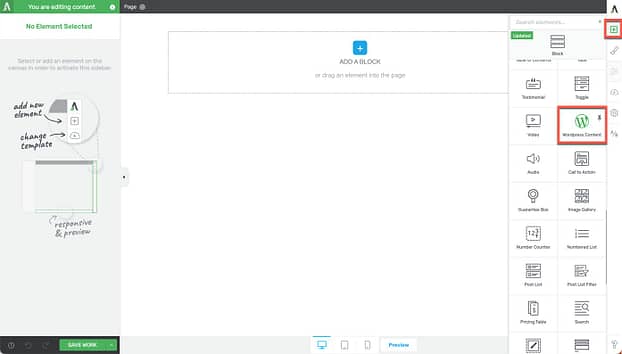
To add the embed code to your Checkout page, first add the WordPress Content element to the page.
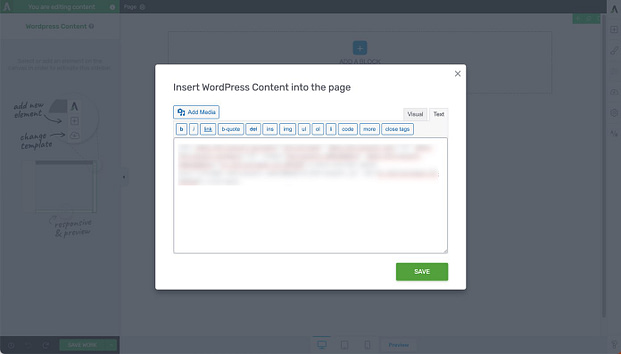
Then, ensuring that the Text tab is on active, paste in the embed code.
The very last step in creating your membership site is linking up the Join button on your sales page with your checkout page. Once you've done that, give yourself a pat on the back -- you're membership site is ready to go!
Don’t Forget to Set Up Email Marketing
Email is your direct line to your members and can really help your community thrive. Start by picking an email marketing provider that easily integrates with WordPress - there are plenty of good ones out there. Then, create an onboarding series for new members, in your email list, to help them get the most out of their new membership.
Emails can also help with member retention, as you can easily reach out to members who might be thinking of leaving. A gentle reminder about unused perks or a heads-up about an expiring membership can work wonders. And don't be shy about asking your happy members to spread the word - a simple email invitation to refer friends can help your community grow.
FAQ about Building Membership Sites
As you prepare to build your membership site, you may have some questions about the process. Here are answers to some commonly asked questions about membership sites.
❓ What exactly is a membership site?
A membership site is a gated part of your website where only registered or paying members can access exclusive content — like courses, templates, video lessons, or community forums. Unlike a regular blog or business site, it’s designed to generate recurring revenue by offering ongoing value through a subscription-based model.
❓ How do I create a membership site without getting overwhelmed?
Start simple. Here’s the basic path most creators follow:
Plan your content — what will members get access to?
Choose a platform — WordPress with a plugin like Thrive Apprentice works great
Set up your members-only content — videos, downloads, bonus articles, etc.
Add payment options — Stripe, PayPal, or tools like ThriveCart
Protect your content — set up access rules and login areas
Launch with a clear offer — include a sales page, checkout page, and onboarding flow
You don’t need to do everything at once — just take it step by step, and you’ll build something solid.
❓ Does running a membership site take a lot of work?
It depends on your setup, but it’s much more manageable than people think. Once the site is built, your main focus is:
Creating content (monthly updates, live calls, or drip content)
Engaging your members (comment replies, Q&As, check-ins)
Improving the experience (based on member feedback)
With the right tools and systems in place, you can keep things running smoothly in just a few hours per week — especially if you batch content or automate emails.
❓ Can I build a membership site without coding or a huge budget?
Yes, and that’s the beauty of today’s tools. With platforms like WordPress and plugins like Thrive Apprentice, you can:
Set up gated content and member access
Connect recurring payments
Customize the design to match your brand
No custom code. No big tech team. Just a few smart tools and a bit of guidance — exactly what this tutorial gives you.
Membership Website Examples
Need some examples to help you figure how to structure your membership site? Check out these membership site examples:
1. Copyblogger Academy

This membership site is for entrepreneurs looking to increase their sales, copywriting, SEO, content creation, and social media skills (e.g. LinkedIn marketing). Members gain access to a vast library of resources including online courses, one-on-one coaching, and expert Q&As. This membership program renews on a yearly basis.
2. Pencil Kings

This site offers an array of video courses for artists of all levels. By joining this community, members gain access to step-by-step instructions for a variety of artistic techniques, feedback from a community of artists, and challenges to help improve their skills. Pencil Kings offers monthly and yearly plans, along with a 3-day trial.
3. Full Time Filmmaker
This membership program offers courses, live Q&A sessions, and tool downloads for those looking to break into the world of video production. The content covers all aspects of filmmaking, from equipment selection to editing techniques. This membership currently offers lifetime membership for a single upfront payment.
Now that you've seen the potential that membership sites offer, get ready to bring yours to life!
It’s Time To Create Your Successful Membership Site
Building a membership site can feel intimidating — I’ve been there. You’re juggling tech decisions, trying to map out your content, and wondering if anyone will actually join. It’s a lot.
But here’s the truth: once you get through that first setup, it gets easier. And the payoff is worth it.
You’ll have a home for your best content. A way to connect with people who value your work. And a steady stream of recurring income that doesn’t rely on constant launches or chasing one-time sales.
You don’t need to have everything perfect from day one. You just need the right foundation — and the right tools to support you as you grow.
That’s why Thrive Apprentice exists. It helps you turn your WordPress site into a powerful, subscription-based platform without needing to touch a line of code. You can protect members-only content, set up your payment system, drip your material over time, and create a beautiful user experience — all in one place.
Take it step by step. Keep it simple. And give yourself permission to build something imperfect — but real.
For more on starting a membership site, check out these free resources:
- How to Price Your Membership Levels or Subscription Tiers
- How to Choose Membership Tier Names that Sell
- Membership Case Study: Tobias Rauscher
Ready to get to work? There's no time like the present. Dive in, begin your journey, and start creating your membership site today with Thrive Apprentice!


