If you offer an online course using WordPress, then you have everything you need to craft the perfect personalized menu for your students.
To help you take your course-based business to the next level, we’ve added 3 powerful features to Thrive Apprentice:
- Display different menu items for logged in and logged out users
- Dynamically display users’ profile images
- Dynamically display users’ names
Each of these features can be used on their own, or in combination, to create a professional and personalized membership-style environment for each and every customer.
Dynamic personalization offers real benefits for both course creators and students:
- It immediately communicates a professional approach to membership-focused content.
- Students and members are likely to feel reassured that they’re in the right place when they see their name and profile image.
- It improves usability with a clear sign that someone is logged in or out.
- A profile image is becoming the industry standard icon for where your users can find their account page, settings and billing details.
- It’s a bold claim but I’ll wager that people simply EXPECT to see their user profiles reflected in the online products and services they buy.
So strap in: you’re going to hear the words dynamic and personalized a lot in this post, and you’re going to LOVE it!
More...
Everyone is doing it. What’s stopping you?
Seriously, they are... see for yourself:
Amazon dynamically displaying your first name

Google’s Gmail showing your profile image

ithemes (BackupBuddy) showing both first name, image, and logged-in items
Microsoft

Zapier
Fizzle
and the list goes on and on...
Until now, dynamic website personalization for online courses was a top-shelf feature, available only to the big players rocking full-on LMS and membership plugins.
But all that has changed with the latest features we’ve added to Thrive Apprentice – giving you the power to automatically display your users’ first name and profile image in your Thrive Apprentice navigation menu, depending on whether they’re logged in or logged out..
Now YOU can add these professional personalization features to your WordPress site, using the powerful options available inside Thrive Apprentice.
Displaying different menu items for logged in and logged out users
Your visitors and students need access to different menu items, depending on whether they’re logged in or out of their Thrive Apprentice account.
After all, it would be silly to show the Log In link if they’ve already logged in!
To offer a truly professional looking online course or membership experience, your WordPress website needs to show a menu like this to your logged out users:

... and a menu like this to your logged in users:

But how can you achieve this?
Do you need to duplicate the entire menu, or is there a simpler way?
... of course there’s a simpler way – we’re Thrive Themes!
I won’t get into the step-by-step details, as Christine’s video tutorial above does (and we have a comprehensive help article here), but the main secret sauce of this Thrive Apprentice feature can be found in the link customization options of each menu item.
Make sure your Menu Source is set to ‘Custom’ however – it won’t work if you’re displaying a typical WordPress menu. Here’s how that looks in the menu options panel inside the Thrive Visual Editor:

You can customize each item of a custom menu directly within the Thrive Visual Editor.
Simply add a new menu item, or edit an existing one using the pencil icon:
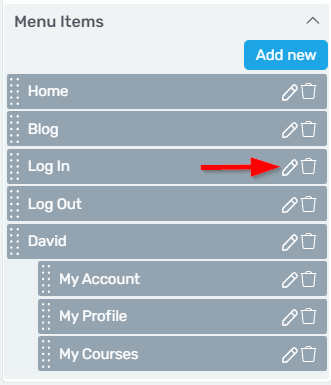
Custom menus allow you to edit each item individually.
Then use the Show when dropdown to choose the item visibility.
Any menu item can be quickly set to show:
- Always
- Logged In
- Logged Out

Menu items are visible to both logged in and logged out users by default, but you can change this in the dropdown options above.
How to configure your Log Out link to automatically log out when clicked
Unlike the Log In link that can be linked to your login page, the Log Out link needs to tell WordPress to actually log out the user when clicked.
Don’t worry, this feature is already available in Thrive Apprentice.
- Select the dynamic Button Link (the classic stacked database icon)
- Choose the Site category and the Logout action
- Show the menu item only when Logged in
It’s much easier to see in the image below:
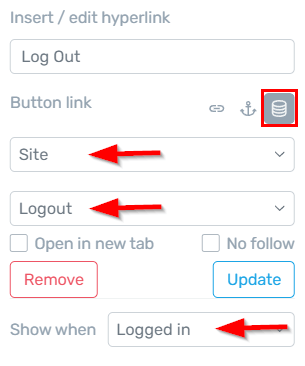
Now the Log Out button actually logs you out when clicked.
If you’d like to see how Christine achieves this in her video guide, skip to the 2:10 mark.
Don’t worry if you see both the logged in and logged out menu items in your Thrive Visual Editor. This is by design to help you customise them in one place.
Your visitors will only see the menu items that apply to their logged in status.

Is it possible to display a different header for your course environment than your main website?
It certainly is... Thrive Apprentice gives you complete control over the headers (and menus) displayed on your online school completely independently from the headers shown across your main WordPress theme.
Here’s how:
Head on over to the Thrive Apprentice Quiz Start Wizard, and choose Header under School Design:

The school Quick Start Wizard guides you through setting up your online course environment.

Choose the Header option to get started customizing your Thrive Apprentice header.
Here you can choose a starting header from our template cloud, but don’t get too hung up on that yet. It’s only a starting point.
The real magic begins when you edit a template to fully customize your online school header:

The Template Editor is where you can customized the various pages and page sections (headers, footers etc.) used throughout your online school.
It doesn’t matter which template you choose at this point, as they all feature the same header. Just hover over one and click the Edit button...

Choose any core template to begin customizing your course header.
To customize your online school header in Thrive Apprentice, click on the Header section and make sure it’s the last element selected in the breadcrumb.
Then click either the Edit button in the options pane, or the Edit button that appears over the header itself. Both buttons do the same thing.
Option 1:
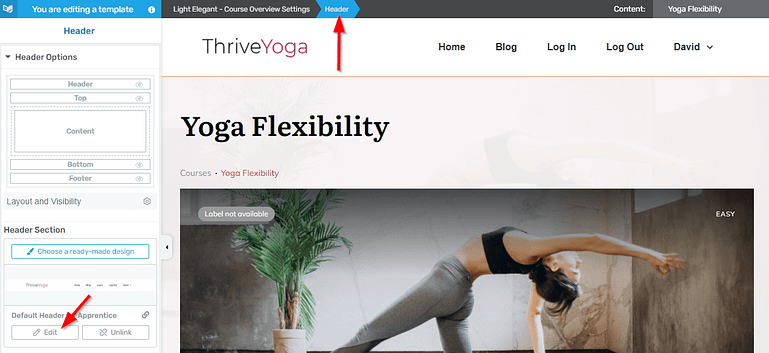
The breadcrumb shows which element or section is being edited.
Option 2:

Editing a linked section (like a header) will affect all pages and templates that use that element.
Then you’re free to customize your header to fit your needs.
Remember, this will only affect the pages of your online school – your main website will retain its original header. If you’re using Thrive Theme Builder (you should be!), then you can also fully customize your main website header in the same way.
Displaying Your Users’ First Name
Let’s take another look at that logged in menu from earlier.
Notice how it automatically displays the user’s first name?

Thrive Apprentice makes it super easy to add dynamic names to your menu to give your course students and members a touch of personalization.
- Simply add a new menu item or edit an existing one, and highlight all the text (as if you were going to write new text).
- With the text highlighted, select the Dynamic Text icon in the formatting bar.
- Select User Data
- Select WordPress User First Name
- Click Insert
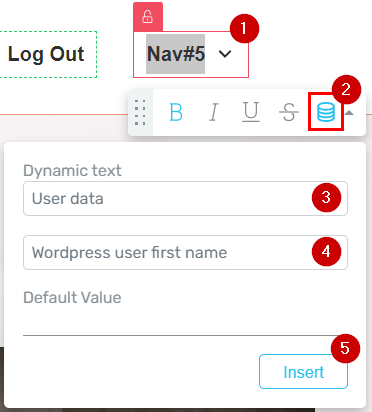
Five simple steps to adding dynamic first names to your menu.
And voilà, your menu item now automatically displays the first name of whomever is logged in to your Thrive Apprentice online school.

Displaying Your Users’ Profile Image
If you want to create a professional effect for your course students, you can display their Gravatar profile image directly in your menu.

This is a really nice touch of personalization, and helps reassure your students that they’re logged into their account.
What is Gravatar?
Gravatar is a popular service that lets users upload a profile image and link it to their email address. This allows any website to securely display their profile image based on the email address they registered with.
Gravatar is a fast and effortless way to feature your users’ profile images without asking them to upload one just for your website.
When adding a profile image to your menu, it's important to remember that your default menu items are linked. This normally allows you to make quick and easy style changes to all your menu items at the same time.
But since you only want to add a profile image to one menu item, you must first unlink it by clicking the green padlock icon. Once unlinked, it will turn red, indicating you are only customizing this one item.
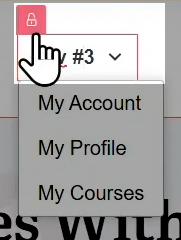
Be sure to unlink menu items to individually customise them.
If you only want to display the profile image, select ‘Image only’ from the Main Options.
If you want to display both the profile image and some text (such as your students’ first name), select ‘Image and text’ from the Main Options.
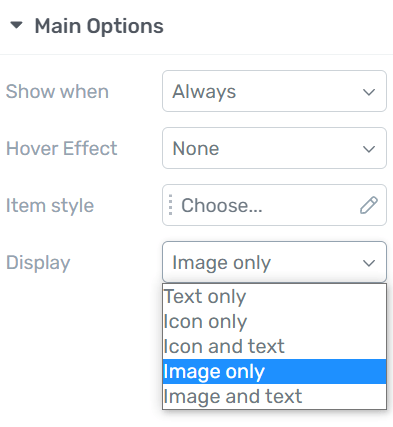
Each menu item can be set to show different elements using the dropdown options above.
This will then allow you to choose an image source. Make sure the Element type is set to ‘Dynamic’ and select ‘User image’.

Select User Image as a dynamic image source to display students’ Gravatar profile avatar.
Watch Christine’s excellent video for step-by-step instructions for more information.
Taking it Even Further: Customizing Account Pages for Your Online Course Students
Building a professional and personalized online course environment doesn’t stop with just a snazzy menu or navigation.
With Thrive Apprentice, you can also create and fully customize the following pages:
- User Profile Page - Allowing people to see and edit their picture, name, email address and website information.
- Courses Page - Allowing people to see the courses that they are enrolled in.
- Account Page - Allowing people to change their password.
Here’s Christine with a step-by-step tutorial for creating each of these helpful pages in Thrive Apprentice...
Want to Learn More About Creating Online Courses?
Well you're in the right place!
Here are Thrive Themes you'll find a huge collection of tips, tricks, guides and case studies to get you started writing, building and launching your first online course.
Here's some further reading to get you started...
- How to Create an Online Course — that Makes Money (part of the Beginners Guide to Starting an Online Business)
- How to Create Your First Thrive Apprentice Course
- 6 Original Online Course Ideas and Why We Like Them
If you're not quite ready to build an course yet, be sure to check out our free course to help you get started building and launching your business website in a weekend....
Get Your Business Website Launched in a Weekend


Hello! I am having trouble with this – I have completed all the steps and was able to do it successfully but no matter what I do it also changes the header of my entire website not just my apprentice school.
I made sure that I was not editing my global settings just the templates but they still change.
When I go back to Theme Builder to change it back then my school header changes as well.
Hi Jeanette, did you unlink the header?
This works really well and I love the personalisation effect.
It’s probably worth pointing out a small issue, which is that when a user logs out, they are sent to the default WP-admin login page, which is not the best experience, even with the custom page option.
If they then login from there (as some people are likely to do, worse if they bookmark that page), they’re sent to their backend user profile. This is clearly not the experience we’re looking for – it’s ugly as sin.
I’ve raised a support ticket and have had the usual excellent help to try to solve it but nothing worked, at least not using custom menus.
Eventually, I solved it (more by mistake than anything) by using a login redirect plugin and it all works the way I imagined. Hopefully the developers will be able to fix this so that the plugin isn’t needed anymore.
Hello! My problem is that I cannot see the header at all on the template when I want to edit it. I see the menu items on the left and I can make changes there, but it is not appearing on the template; the header remains empty, although the changes appear on my website. But not on ALL the headers of all my Thrive Apprentice headers according to what Christine is saying… So, I’m not able to unlink one menu item to insert the user’s name. What did I miss? Thank you!
Hi there, can you please contact our support team so they can investigate and help you out. https://thrivethemes.com/support