Want to learn how to build a WooCommerce store on your WordPress website? If you’re looking for a step-by-step WooCommerce tutorial that’s easy enough for beginners to follow, then you’re in the right place!
Whether you’re selling digital products, goods, or services, WooCommerce is a fantastic tool for setting up an online store. Its ease of use, customization, and integration with WordPress makes it the ideal tool for anyone looking to build an e-commerce site.
In this ultimate guide, we’ll take you through the process for building a WooCommerce store and a great user experience from scratch. Let’s dive in!
More...
The Benefits of Using WooCommerce for Building an Online Store
WooCommerce is one of the leading e-commerce plugins for WordPress.org, and it’s easy to see why. The core WooCommerce plugin is free, open-source, and fully customizable, making it a much better alternative to options like Shopify, Magento, etc.
This tool also offers an array of add-ons, allowing you to adapt your store to your evolving needs. You can add things like specific Woocommerce shipping options, support for multiple currencies, or advanced analytics.
For entrepreneurs and small business owners, a great benefit to this eCommerce platform is that you can sell physical products alongside online courses, membership subscriptions, and other digital product types.
You can even bundle physical and digital products together, presenting your customers with unique, irresistible offers. So, if you’re unsure of which direction your business might take, WooCommerce allows you to follow any path you choose.
Thrive Tip: Learn how to use upsells and cross-sells to get maximum value out of every sale.
Setting Up Your WooCommerce Store
Setting up WooCommerce is easier and less complicated than you might think. Our WooCommerce tutorial will hold your hand and walk you through it, step-by-step.
Before you proceed, make sure you choose a trusted web hosting provider that offers WooCommerce hosting if possible, set up a domain name, and install WordPress (use this tutorial to get started).
Step 1: Install Thrive Theme Builder
Setting up a WooCommerce store begins with using a WooCommerce-friendly WordPress theme. One of the very best themes for WooCommerce sites is Thrive Theme Builder.
This powerful WordPress theme builder provides you with the tools and functionalities you need to create a fully customized, visually stunning e-commerce website without touching a single line of code.
With Thrive Theme Builder, you can create a custom layout for both your website and your e-commerce store in mere minutes. Here’s why you’ll love Thrive Theme Builder.
It comes with:
- Hundreds of pre-designed page layouts, templates, and blocks will allow you to build a custom WordPress site more quickly than ever.
- A user-friendly drag-and-drop visual editor that lets you see what your page will look like as you create it.
- Beautiful, conversion-focused designs to help you get more email subscribers and make more sales.
- Search engine optimized layouts to help your product pages and other content get found.
- Fully mobile responsive templates, so your website will look great on all screen sizes.
- Native integration with dozens of marketing tools, so you can use your favorite email marketing services, webinar services, and automation tools.
Installing Thrive Theme Builder is a breeze. To get started, log in to your Thrive Themes account and download the Thrive Product Manager plugin.
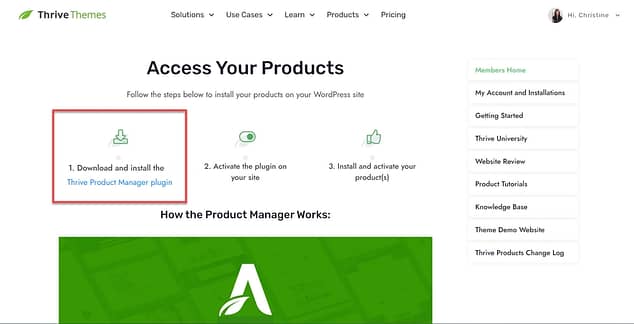
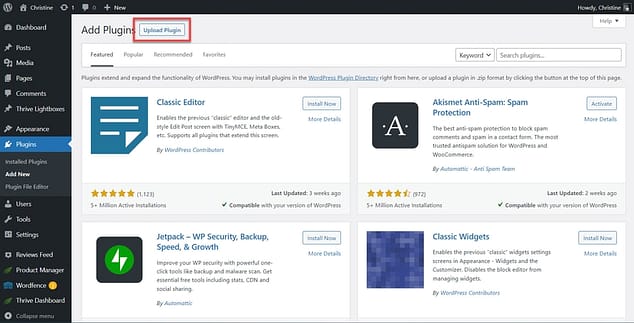
Then, visit the back end of your WordPress eCommerce site, and upload, install, and activate the Thrive Product Manager plugin.
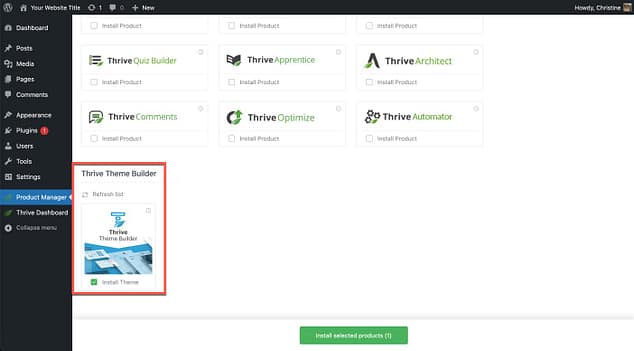
Once that’s done, navigate to Product Manager in WordPress, and install and activate Thrive Theme Builder.
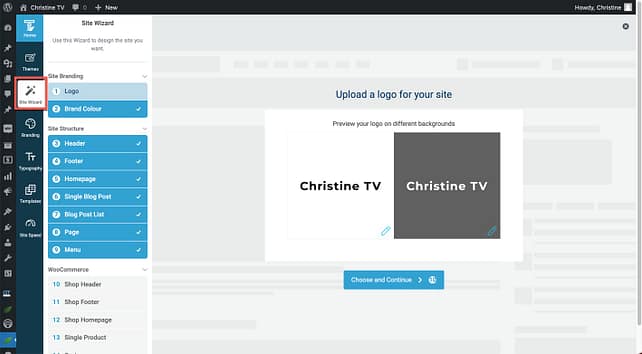
From here, finish setting up Thrive Theme Builder by going through the Thrive Theme Builder Site Wizard, where you’ll select layouts for your homepage, header, footer, blog list page, individual blog posts, and more.
Step 2: Install WooCommerce
Next, you'll need to install WooCommerce. WooCommerce is a free plugin, and it can be found in the WordPress Plugin Directory.
In the back end of your WordPress website, go to Plugins > Add New. Then, search for WooCommerce. Once you’ve found it, click the “Install Now” button and activate WooCommerce.
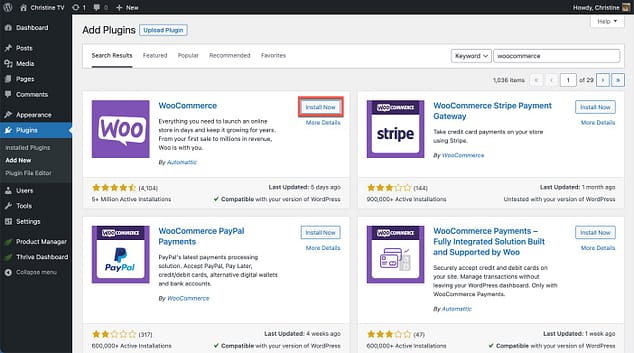
Immediately after activation, you’ll be taken to a wizard that will ask you a series of questions regarding your e-commerce storefront. You may take a few minutes to answer them now, or if you’re in a hurry, skip ahead to the next step and come back to these questions later.
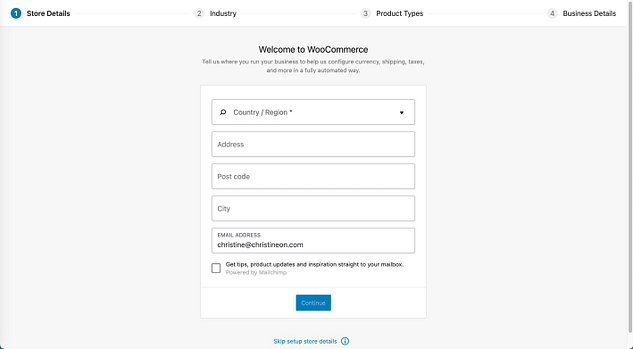
Step 3: Connect Your Pages with WooCommerce
Immediately after installing WooCommerce, four new pages should appear in your WordPress list of Pages:
- Cart
- Checkout
- My Account
- Shop
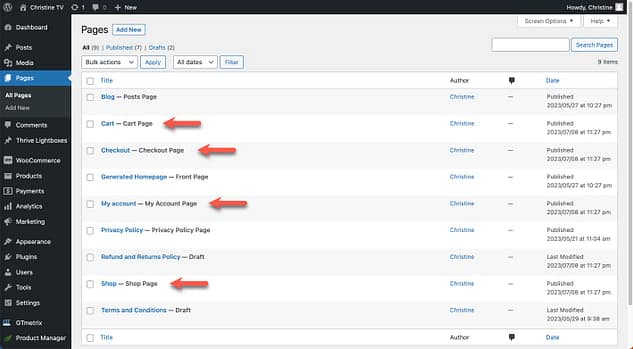
If these pages have not been created for you, you will need to create them manually before proceeding to the next step. Navigate to Pages > Add New, and create four new pages, named as listed above.
At this point you may go ahead and Publish each page. You do not need to create any content for these pages; they simply need to exist.
Next, ensure your pages are connected to WooCommerce. To connect your shop page, navigate to WooCommerce > Products > Shop Page.
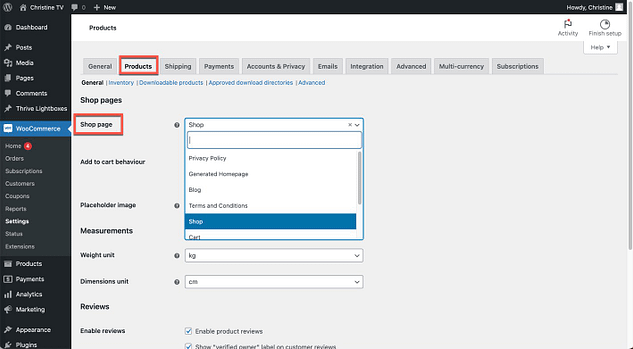
To connect your Cart, Checkout, and My Account pages, go to WooCommerce > Advanced > Page setup.
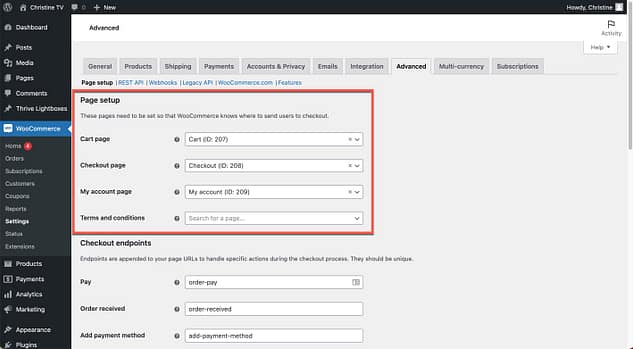
Step 4: Complete the WooCommerce Setup Wizard in Thrive Theme Builder
In this step, you’ll select the designs for your WooCommerce store pages. Thrive Theme Builder comes with pre-designed WooCommerce templates so you can start with a template, and make customizations later.
To select your WooCommerce design templates, go to Thrive Theme Builder > Site Wizard, and scroll down to the WooCommerce section. Then, select layouts for your shop header, shop footer, shop homepage, single product, cart, and checkout pages.
Use the dropdown in the upper right corner to view all available templates for a particular section or page.
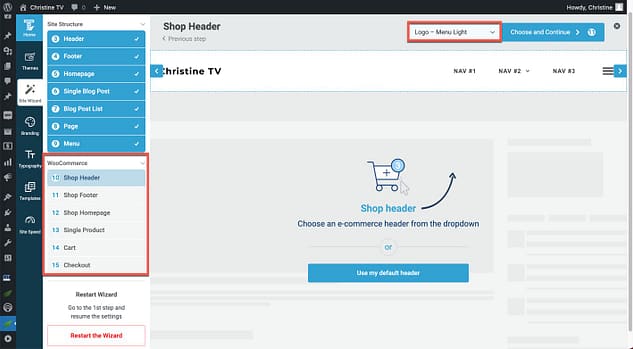
When you use Thrive Theme Builder to build your WooCommerce store, you'll be able to select from a variety of gorgeous, customizable pre-built templates like these:
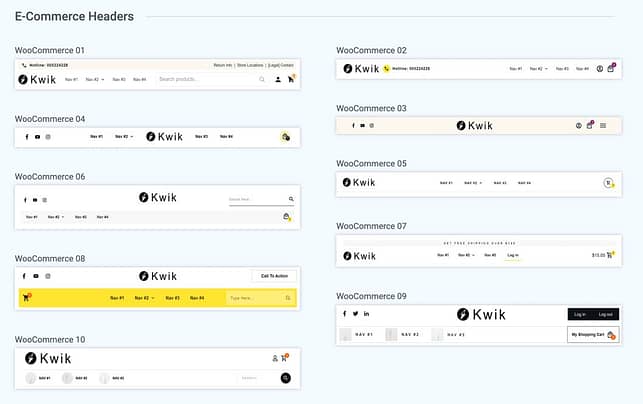
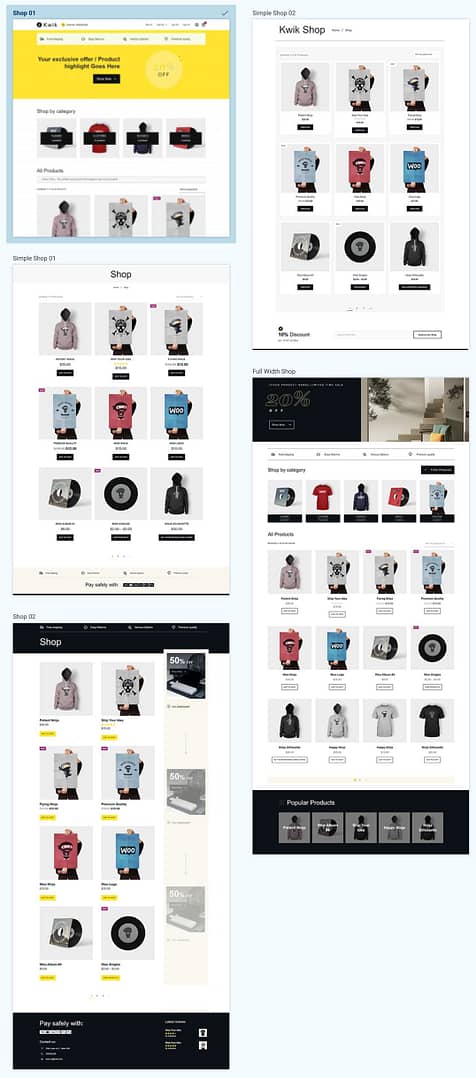
Don't worry if minor details like colors and fonts aren't exactly what you're looking for; you can adjust them in just a few minutes.
Step 5: Create Your WooCommerce Store Categories and Products
Next, you’ll need to create categories and subcategories for your products, and you’ll need to add individual products to your shop. Categories work just like blog post categories. Here’s a sample category structure:
- Apparel
- T-shirts
- Socks
- Sweatshirts
- Office
- Mousepads
- Notebooks
- Pens
To create your WooCommerce categories, go to Products > Categories, and enter the appropriate information. Utilize parent categories where necessary.
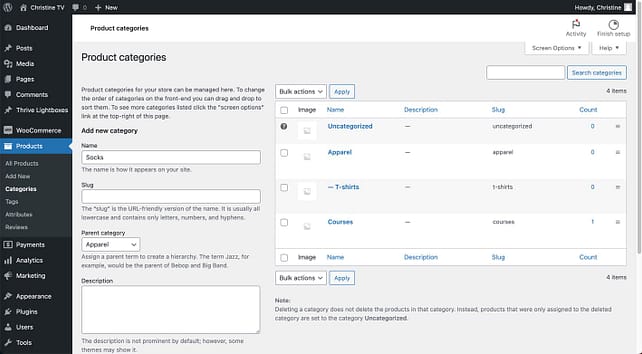
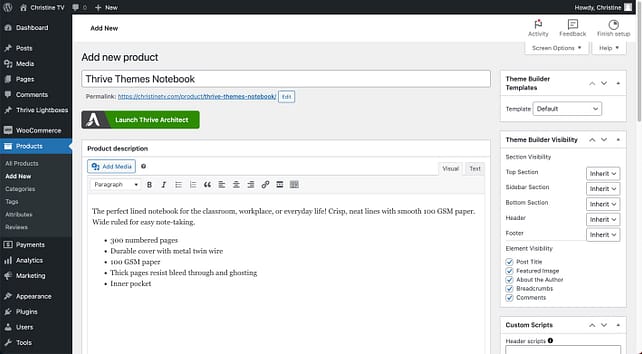
After establishing the category structure for your shop, it’s time to add your products. Navigate to Products > Add New, and fill in the necessary information for your new product.
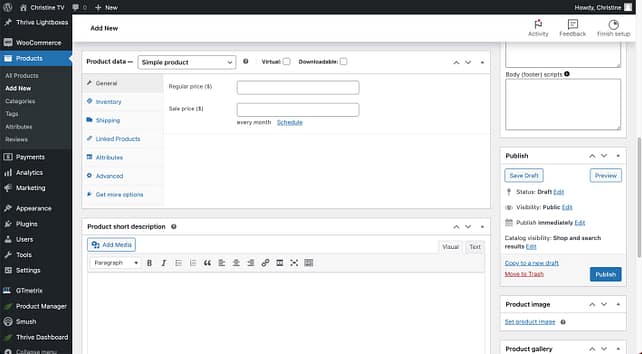
Scroll down to the Product Data section to input a product price, specify whether the product is a virtual or downloadable product, and input a short description.
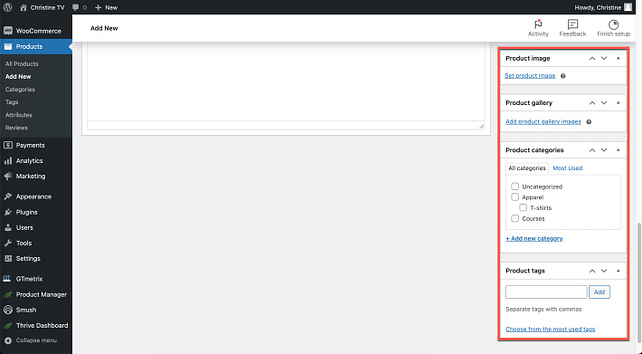
Moving to the right side of the page, select your product image, gallery images, product category, and tags.
After adding your first WooCommerce product, simply rinse and repeat to add more!
Understand the Different Product Types in WooCommerce
WooCommerce offers several product types to suit different selling needs. Each type has unique features to help you manage and sell your items effectively. The main product types in WooCommerce are:
Simple products: Single, standalone items
Variable products: Products with variations (e.g., sizes, colors)
Grouped products: A collection of related products
External/Affiliate products: Items listed on your site but sold elsewhere
Virtual products: Non-physical items that don't require shipping
Downloadable products: Digital goods customers can download
Step 6: Customize Your Online Store
Now comes the fun part – personalizing your store!
One of the biggest advantages to using Thrive Theme Builder with WooCommerce is the ability to customize your shop to your heart's content. However, if you prefer not to make any customizations, you can safely skip this step.
Customize Your Global Fonts and Colors
By default, your WooCommerce templates will use the same fonts and colors as the rest of your website. To make global changes to your fonts, visit Thrive Dashboard > Thrive Theme Builder > Typography.
Then, click the pencil icon to edit the typography for your entire website.

To make global changes to your theme color, go to Thrive Dashboard > Thrive Theme Builder > Branding > Theme Colors. Changing your theme color will change the main color for your entire website. (Learn more about website colors with this article, Everything You Need to Know About Website Color Schemes & How to Pick One Today.)
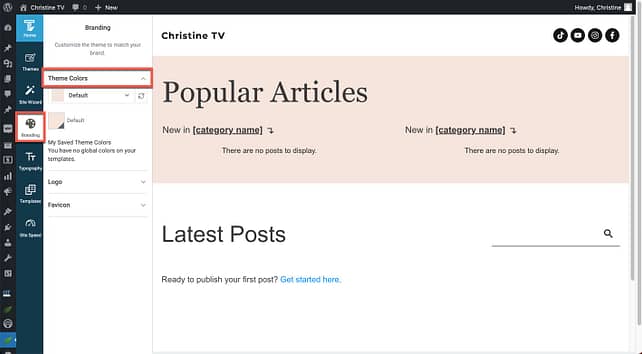
If you would like certain pages of your WooCommerce store to use a different font or color from the rest of your website, you may make that specification from the individual WooCommerce template.
Accessing WooCommerce Templates
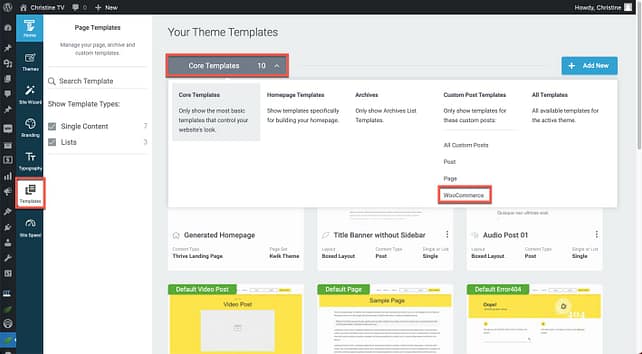
To access your WooCommerce templates, go to Thrive Dashboard > Thrive Theme Builder > Templates. Then, use the dropdown menu at the top of the page to select WooCommerce templates.
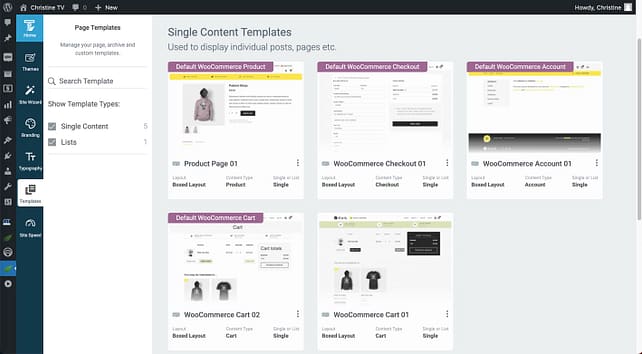
The templates with purple labels are currently in use for your online store.
Customize Your WooCommerce Header
By default, your WooCommerce header is linked across all WooCommerce templates. This means that changes to your header made from any WooCommerce template will be reflected across your entire online shop.
To customize your WooCommerce header, open any WooCommerce template, then click inside the header section.
- Clicking the Edit button will let you edit the current header and your edits will apply across the rest of your WooCommerce templates.
- Clicking the Unlink button will let you unlink the header for this template only and your edits will only apply to your current template.
- Clicking Choose a Ready-Made Design will let you choose a completely different header design for this template only.
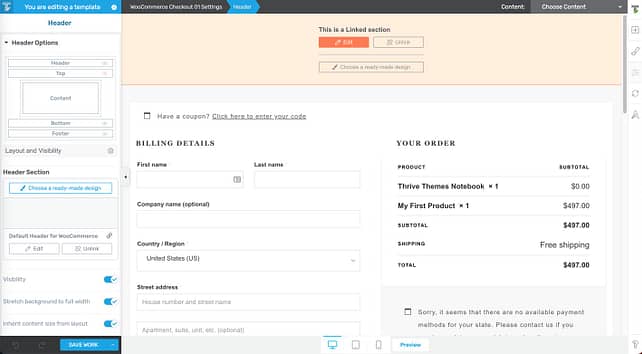
Editing the header for your WooCommerce store is very much the same as editing the header for your main website. Here are some helpful articles for designing a compelling header:
While editing your header, you'll notice an orange outline around the visual editor window. This orange outline indicates that you are restricted to making edits to a particular section. To edit another section of the template, click Done and then you may move on to a different section.
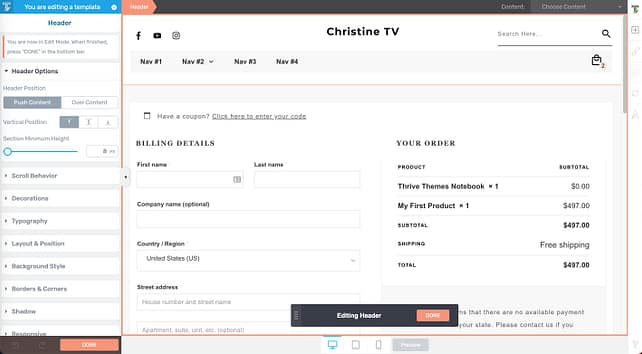
When you're finished with your header, you can move on to the footer using the same techniques.
Customize Your WooCommerce Checkout Page
Customizing your WooCommerce Checkout page is a walk in the park. For starters, you can easily re-order fields by clicking and dragging the grip dots beside each field. You can also toggle the visibility of elements by clicking the eye icon beside each field name.
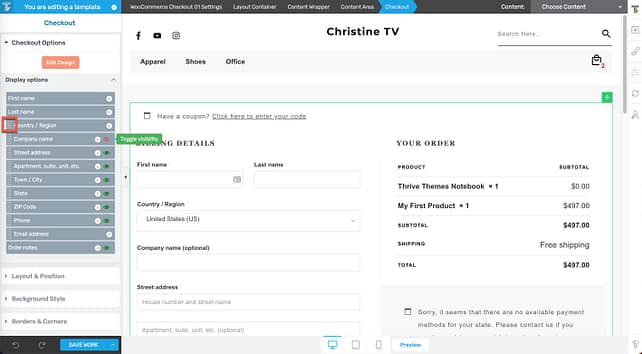
An extremely convenient feature that is built right in to the WooCommerce + Thrive Theme Builder integration is the ability to make easy customizations to the checkout form. The fields are linked such that a customization made to a particular type of field will reflect throughout the page.
For example, you can change the border thickness for all text fields at once.
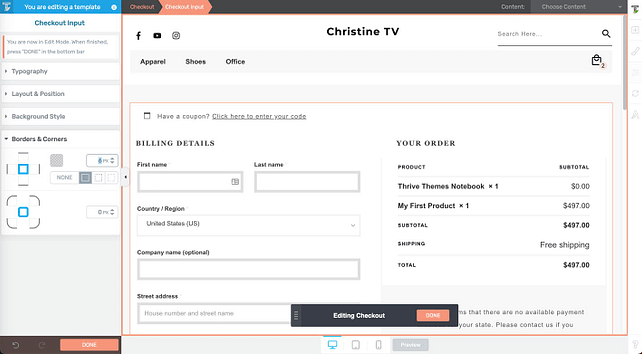
The same applies to the form labels, dropdown menus, and headings -- a change made to one will apply to others of the same type.
Customize Your WooCommerce Shop Page
Next, if you can make a number of different customizations to your WooCommerce Shop page.
To access your Shop template, go to Thrive Dashboard > Thrive Theme Builder > Templates. Then use the dropdown menu at the top of the page to view all WooCommerce templates. Select the Default WooCommerce Shop template.
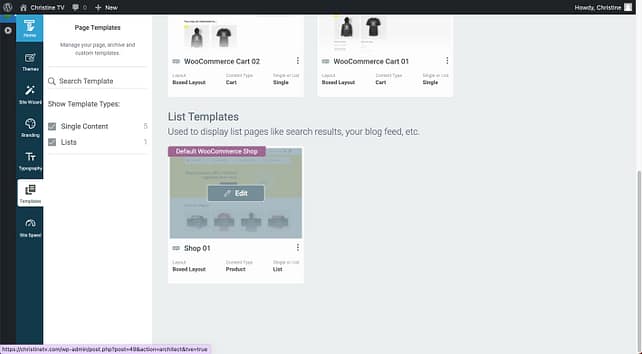
To customize the category section of the template, click the section, and make sure Product Category is highlighted in the breadcrumbs at the top of the page. Then, use the options in the Category List Options tab on the left side of the page.
You can make tweaks to the design of this section by clicking the Edit Design button.
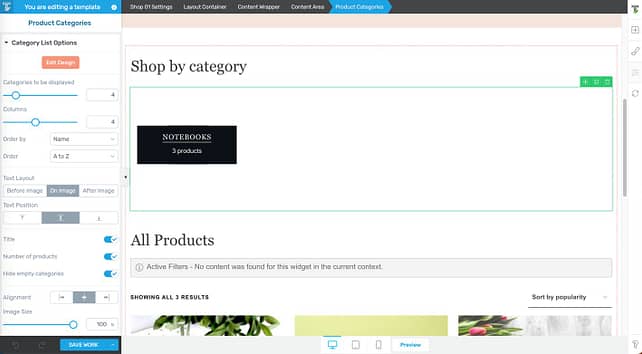
In addition, the Shop section has an array of templates to choose from. Click the Shop section, ensuring that Shop is highlighted in the breadcrumbs at the top of the page.

Then, click the template name in the upper left corner to view the rest of the template designs.
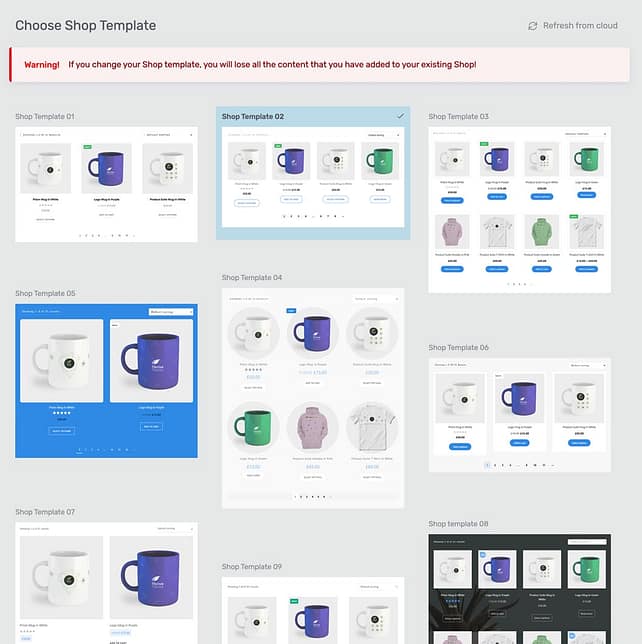
A sampling of the shop template designs
Another notable customization you can make to your Shop page is selecting a new top section design. Click the top section, and ensure Top Section is highlighted in the breadcrumbs at the top of the page. Then, click the Choose a Ready-Made Design button to select a new design.
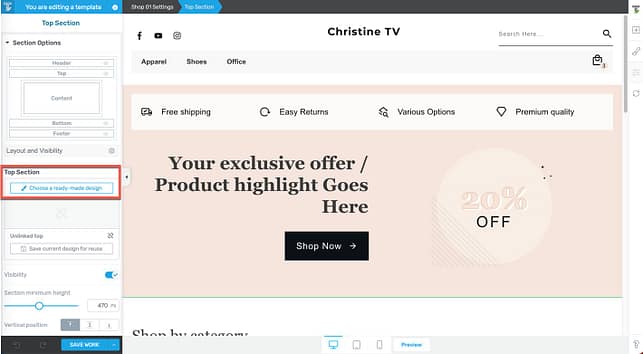
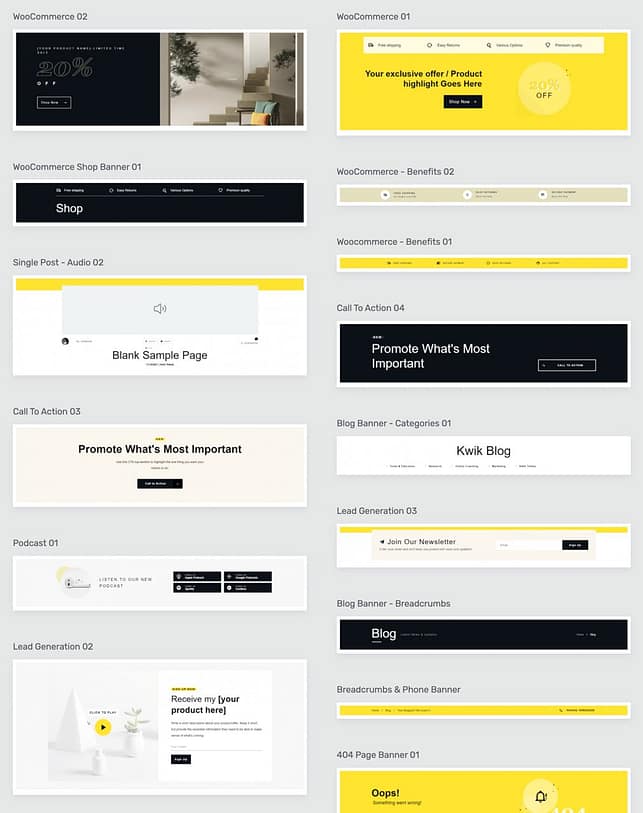
A sampling of the top section designs
These are just some of the customizations you can make to your WooCommerce shop using Thrive Theme Builder. For tips on how to make even more customizations, check out our video tutorial.
Thrive Tip: Building an online store is an in-depth process — even with the easiest tools. Make sure to install a backup plugin to protect your site content in the event of a crash or software error.
Step 7: Setting Up Payment, Tax, and Shipping
Now that you have your store looking just the way you want it, the next step is to configure your payment, tax, and shipping settings. Getting these elements right is essential for a smooth customer experience. Let's briefly go over each one:
Setting up Payment Information
WooCommerce supports numerous payment gateways, including PayPal, Stripe, direct bank transfers, debit/credit card transctions, among others. To set up your preferred payment options:
- Navigate to your WordPress dashboard and select WooCommerce > Settings > Payments.
- You'll see a list of payment methods. Enable the ones you wish to use by toggling the Enable switch.
- Click Finish Setup to configure each payment method's specific settings.
Setting up Tax Information
Taxes can be tricky, but WooCommerce simplifies the process:
- Go to WooCommerce > Settings > General in your WordPress dashboard. Tick the checkbox to Enable tax rates and calculations. Save your changes.
- Go to WooCommerce > Tax in your WordPress dashboard.
- WooCommerce provides multiple ways to calculate tax rates. You can enter them manually or use the automated tax calculation feature.
- Configure your tax settings based on your business location and tax obligations. Remember to save your settings.
Setting up Shipping Information
WooCommerce allows you to set up various shipping zones, methods, and rates:
- In your WordPress dashboard, go to WooCommerce > Settings > Shipping.
- You can add shipping zones and within those zones, add shipping methods (like free shipping, flat rate shipping, or local pickup).
- Assign a shipping rate for each method and zone.
Take the time to go through each option carefully. When you're finished setting everything up, make a couple of test purchases to ensure your entire system is working like clockwork.
Ready to Build Your Online Store?
Now that you know the steps, it's time to take action and build your online shop. After all, the sooner your finish setting everything up, the sooner those sales will start rolling in!
Next, Attract a Bigger Audience
Building your store is just the first step. The next big challenge is driving traffic to it. But not just any traffic – the key to making sales is attracting the right kind of traffic. This is where SEO Sprint comes in.
SEO Sprint is a comprehensive SEO training program designed specifically for entrepreneurs, coaches, and info product-based businesses, who want to get their products seen and drive more sales. With the techniques you’ll learn inside of SEO Sprint, you’ll learn proven ways to attract an audience clamoring to buy your products.
So, once you’ve built your online store using WooCommerce and Thrive Theme Builder, and you’re ready to skyrocket your sales, be sure to sign up for SEO Sprint.
Check out Thrive Theme Builder and SEO Sprint today!


