If you’re looking for a detailed guide on how to install WordPress and set up your website, you’ve come to the right place.
No matter what niche your business or brand is in this guide provides you with the steps you need to install WordPress with ease.
You’ll also discover the best no code tools to use to build your website, without worrying about compatibility issues or going way beyond your budget.
Ready? Let’s go.
Why You Should Build Your Website with WordPress
WordPress is a content management system (CMS) that powers over 40% of all the websites on the internet.
You can use WordPress to build:
Whether you’re a beginner who wants to build a simple website to launch your online presence, or an experienced marketer, consultant, or small business looking to build a clean website from scratch to elevate your brand… WordPress can help you achieve your goals.
And this tutorial will show you how to install this software and build your own WordPress website.
WordPress vs WordPress
WordPress comes in two versions: WordPress.com which offers a fully hosted but limited version, and WordPress.org which offers a self-hosted but fully featured version.
In this article, we’re only focusing on the self-hosted version.
If you want to learn more about the difference between the two, you can read about it here.
How to Install WordPress and Setup Your Website
There are two ways to install WordPress — manually or automatically, through a hosting provider.
Option 1: Manual Install
These steps are for WordPress users who have experience with coding and technical setups. If this isn’t you, skip to the next section.
This installation is the same for any device operating system — Linux, Windows, and Mac.
1. Download WordPress
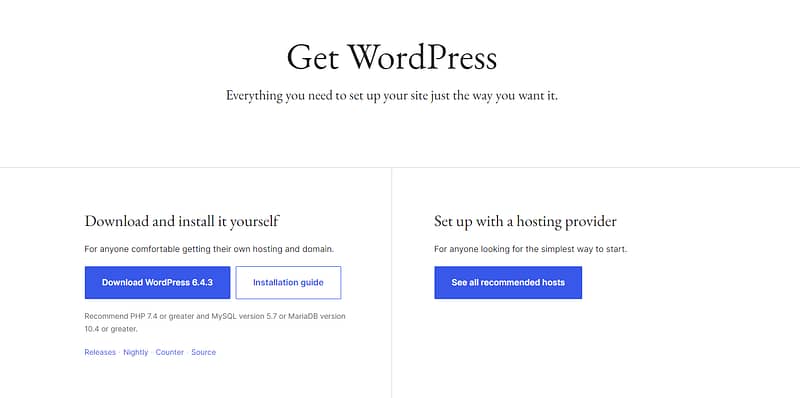
First, go to the WordPress.org website and download the latest version of WordPress.
2. Upload WordPress to Your Hosting Account
There are three ways you can upload WordPress to your hosting account:
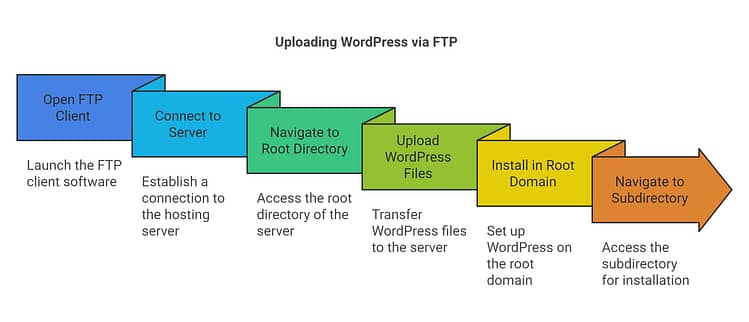
Via FTP: Use an FTP client (like FileZilla) to upload the WordPress files to your server. If you want to install WordPress on your root domain name (like example.com), then you need to upload WordPress files to your website’s root directory. Usually this directory is called /public_html/.
On the other hand, If you want to install WordPress in a subdirectory (like example.com/blog), then upload it in a WordPress folder /public_html/blog/.
- Via File Manager: Use the file manager provided in your hosting control panel (cpanel) to upload and extract the WordPress .zip file.
- Via SSH: If you're comfortable with the command line, you can use SSH to upload and extract WordPress.
3. Create a MySQL Database and User
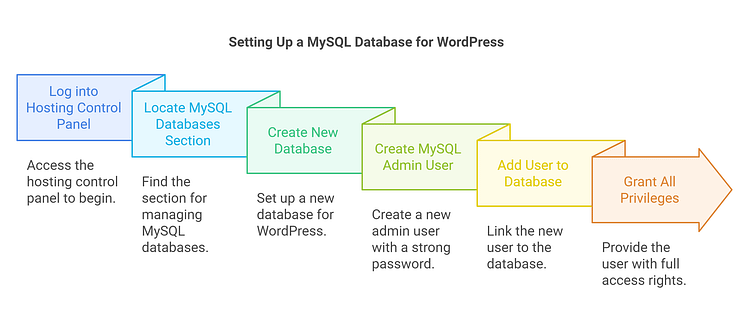
WordPress uses a MySQL database to store all its data. Follow these steps:
- Log into your hosting control panel.
- Look for the MySQL databases section and create a new database.
- Create a new MySQL admin username (with a strong password).
- Add this user to the database and grant all privileges.
4. Configure wp-config.php
- Find the
wp-config-sample.phpfile in the WordPress package you've uploaded. - Rename it to
wp-config.php. - Open
wp-config.phpin a text editor. - Fill in your database details in the following sections:
DB_NAME– The database name you created for WordPress.DB_USER– The username you created for WordPress in MySQL.DB_PASSWORD– The password you chose for the WordPress username in MySQL.DB_HOST– The hostname of your database web server. Often this islocalhost, but it can differ depending on your host.
5. Run the Installation
- Navigate to your website URL in a web browser.
- If everything is set up correctly, you should be taken to the WordPress installation page.
- If you uploaded WordPress to the domain's root folder, you should be redirected to:
https://example.com/wp-admin/install.php
If you uploaded WordPress to a subfolder of your domain's directory, then the URL will be this format:https://example.com/yoursubfolder/wp-admin/install.php - Select your language and click “Continue”.
- Fill in the "Site Title", "Username", "Password", and "Email Address" fields.
- Click “Install WordPress”.
6. Complete the Installation
After the installation is successful, you will get a success message. You can then log in to your new WordPress site using the login credentials you chose during the installation.
Troubleshooting
If you encounter errors during installation:
- Database connection errors: Double-check your
wp-config.phpfile for correct database information. - Permission Issues: Ensure your files and directories have the correct permissions. WordPress recommends setting files to
644and directories to755. - PHP Version: Make sure your hosting is running a PHP version compatible with the WordPress version you're installing.
There are other ways to install WordPress — with tools like Softaculous or through open-source platforms like XAMPP.
Option 2: Automatic Installation (the Easier and Recommended Way
This is the ideal way to start WordPress installation process — without getting lost in complex code and technical settings.
This method is fast, simple, and helps you start building your online platform without hassle.
1. Select a Reliable WordPress Hosting Provider
When choosing a web hosting solution, we recommend choosing one that offers:
A free domain name
99% guaranteed uptime
A free SSL certificate
24/7 customer support
Ample disk space
One-click WordPress installation
The hosting provider you choose is responsible for your website’s uptime and also plays a big part in your site’s speed and security.
This is where your WordPress files and other important parts of your website will be stored. You need to make sure that you select the best hosting plan that meets your needs and helps you set up a reliable WordPress site.
2. Install WordPress
Most hosting providers provide automatic or one-click installation, so you won’t need to download WordPress yourself.
Once you’ve set up your hosting account, chosen a site title, and installed WordPress, you’ll need to familiarize yourself with the WordPress dashboard. This area is also known as WP Admin or your admin panel, and serves as the control panel for your website.
Navigating the WordPress dashboard is quite straightforward, as every section is clearly labeled.

WordPress Admin Dashboard.
Left Sidebar
The left sidebar in the WordPress Dashboard is where most navigation takes place.
Here, you can update your plugins and WordPress software.

WordPress Updates page.
Use the “Posts” and “Pages” sections to add, edit or review blog posts and pages. Under the “Posts” tab, you can also add or change the categories and tags used for your posts.

Posts section in WordPress Dashboard.
Through the “Comments” tab, you can moderate comments left by visitors on your posts and pages. And if you want more advanced content moderation options to boost engagement with your audience, you can use a plugin.

Comments section in WordPress Dashboard.
Want to customize your site’s appearance? You can do that through the “Appearance” tab.

Appearance tab in WordPress Dashboard.
If more than one person is managing your website, you can quickly add them as a user and assign them a specific role. Here's how:
From the WordPress Dashboard go to Users -> Add New.
Here, you can add new users and assign a role to them -- as you can see in the image below.

Assigning roles in WordPress.
If you want to make changes to the more technical parts of your site, you’ll find them in the Settings menu in the left sidebar.
There, you can make basic changes like selecting a new timezone, changing how the date appears in your dashboard, or choosing a different site language, or how you want your URLs to appear.
How to Build and Customize Your WordPress Website
Now, if you want to build a very basic WordPress website and don’t intend on doing much with it, you can use a free WordPress theme and the native WordPress editor to create your website.
But if you want to build a professional business website that stands out from the crowd, catches your target audience’s attention and gains their trust…
You’ll need to invest in a set of reliable website building tools to do the job. Which takes us to the next step…Step 1: Install Thrive Theme Builder & Thrive Architect
The fate of your site’s appearance, performance, and overall success depend on the theme and WordPress plugins you choose to build with.
If you’re serious about building a website that generates consistent conversions, you should use tools that give you control over your site’s design.
That’s why we recommend using Thrive Theme Builder and Thrive Architect, the ultimate website-building duo.
You can dramatically elevate the flexibility and uniqueness of your website if you use a WordPress theme builder and page builder.
And these particular tools complement each other, helping you create an impressive website that makes your business stand out.
Think of this combo as “web development made easy”.
Thrive Theme Builder helps you build and customize every aspect of your website design without typing a single line of code.
Once you’ve created your website’s structure, you’ll hop in and customize your web pages with Thrive Architect.
Creating custom webpages is 100 times easier in the Thrive Architect editor thanks to its drag-and-drop functionality and library of professionally-designed, customizable landing page templates.
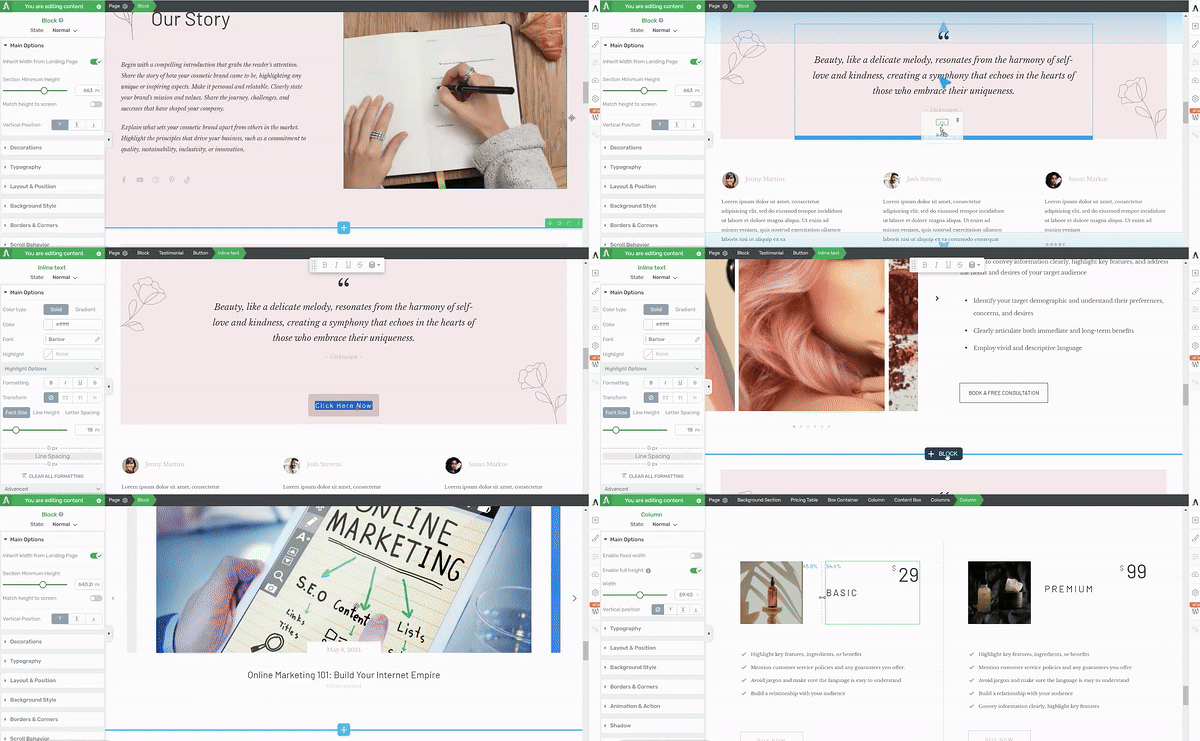
Thrive Architect in action
With these tools, creating compelling calls-to-action (CTAs), conducting insightful A/B tests, and generating conversions will become seamless.
Step 2: Create a Custom Theme for Your Website
Thrive Theme Builder comes with several themes you can choose from.
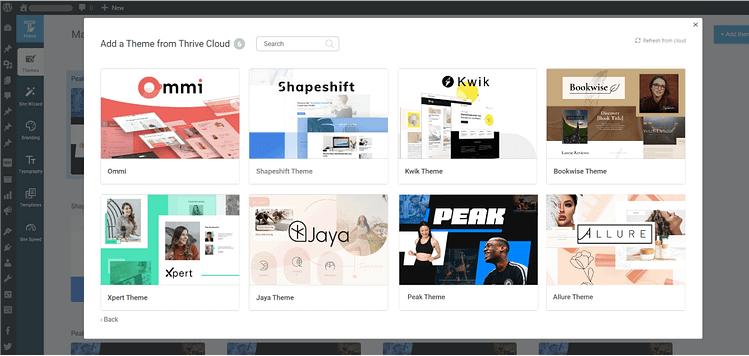
Available theme template sets in Thrive Theme Builder
All of our themes come with a set of fully-customizable, professionally-designed templates that are perfect for your brand – no matter what niche you’re in.
This is a major advantage for you because you don’t need to worry about purchasing a WordPress theme from another platform and wonder if it will work the way the developers say it will – or if it’s compatible with the rest of your plugins.
Once you’ve selected a theme, you’ll be directed to the Thrive Theme Builder Setup Wizard.
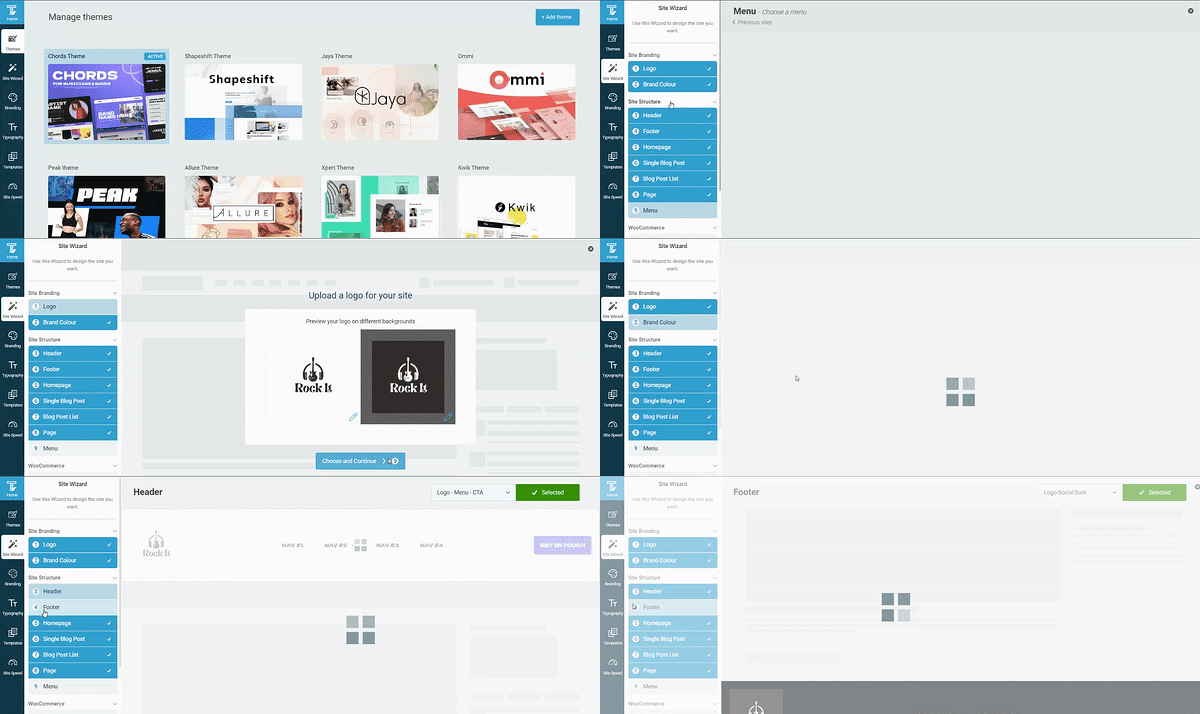
Thrive Theme Builder in Action
By the time you’ve completed the Wizard, you’ll have set up the following:
By the end of the Setup Wizard, you'll have created a clean website layout that you can now go in and customize using Thrive Architect.
Step 3: Create and Customize Your Site’s Inner Pages
If you followed step 1 and purchased Thrive Architect, you’ll use this tool to customize your site pages.
The following pages are must-haves for any type of business website:
- A clean, conversion-focused homepage that creates a great first impression & communicates who you are and what you do.
- An about page to provide more detail on who you are, your expertise, and your values.
- An engaging blog to share business updates and valuable insights
- A products/services page to provide more detail on what you offer
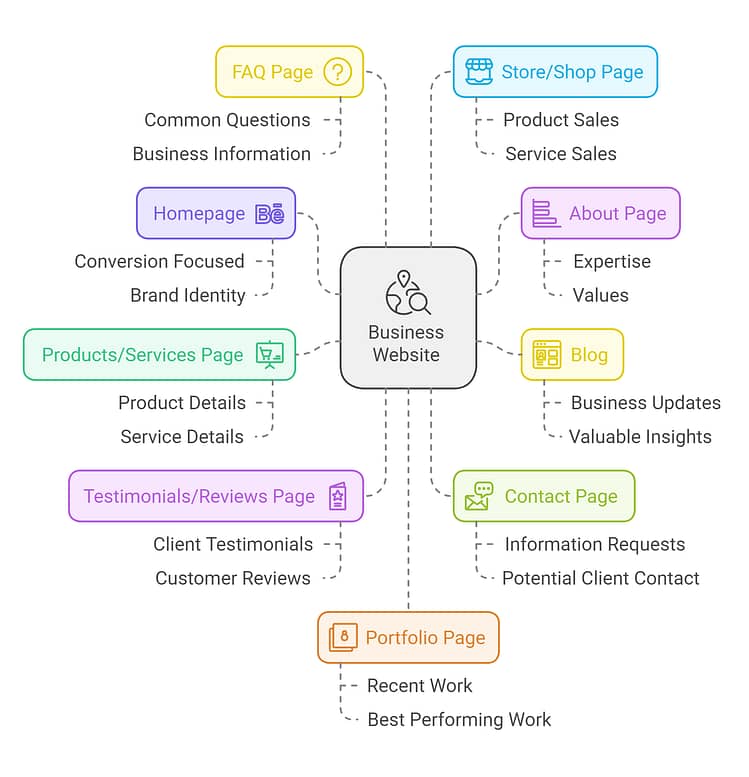
A testimonials/reviews page to showcase the glowing testimonials you've received from your clients and customers
A contact page to make it super easy for interested potential clients or customers to request additional information.
An FAQ page with answers to the most common questions customers ask about your business.
A Store/Shop page if you have an ecommerce business, this should take your visitors to where you sell all your products
A Portfolio page if you’re a freelancer, creator, or service-based business, then this page should showcase your recent or best-performing work
Creating a new page for your WordPress website is super straightforward.
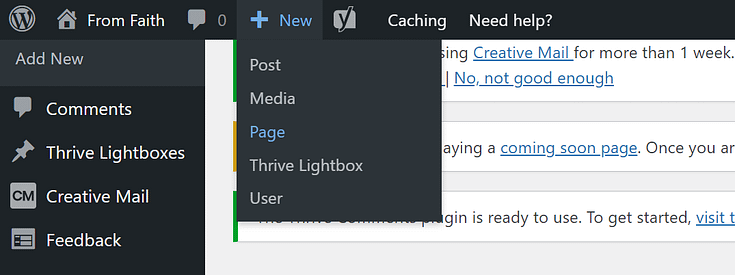
In the WordPress Dashboard, select the "+ New" button at the top of the page and select "Page".
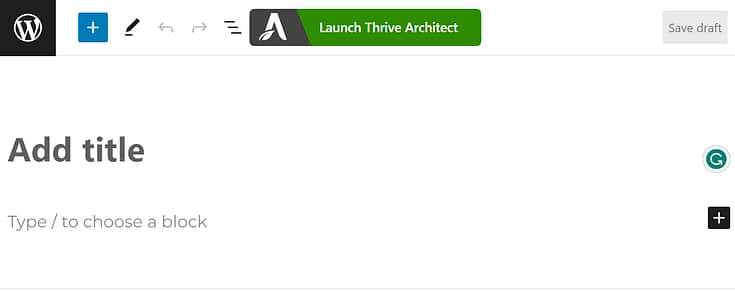
When taken to the next screen, name your page and select the bright green "Launch Thrive Architect" button.
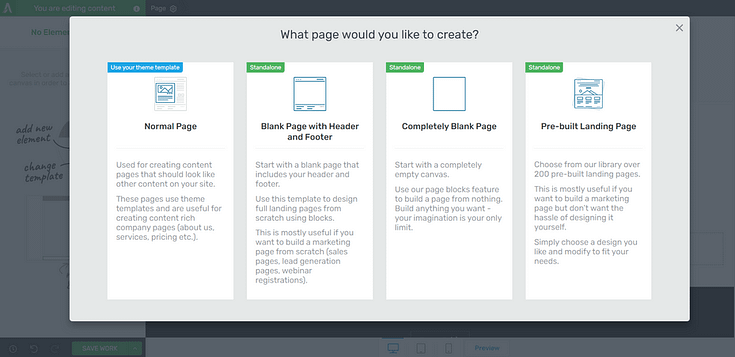
A popup will appear with four options:
1. Normal Page
2. Blank Page with Header and Footer
3. Completely Blank Page
4. Pre-built Landing Pages
To create clean, conversion-focused pages that are aligned with the website structure you built in Thrive Theme Builder, we recommend the "Pre-built Landing Page" option.
In the Landing Page Library, you can select a Smart Landing Page from any of our companion themes.
Our Smart Landing Page sets are designed to help you create stunning, conversion-focused pages in minutes.
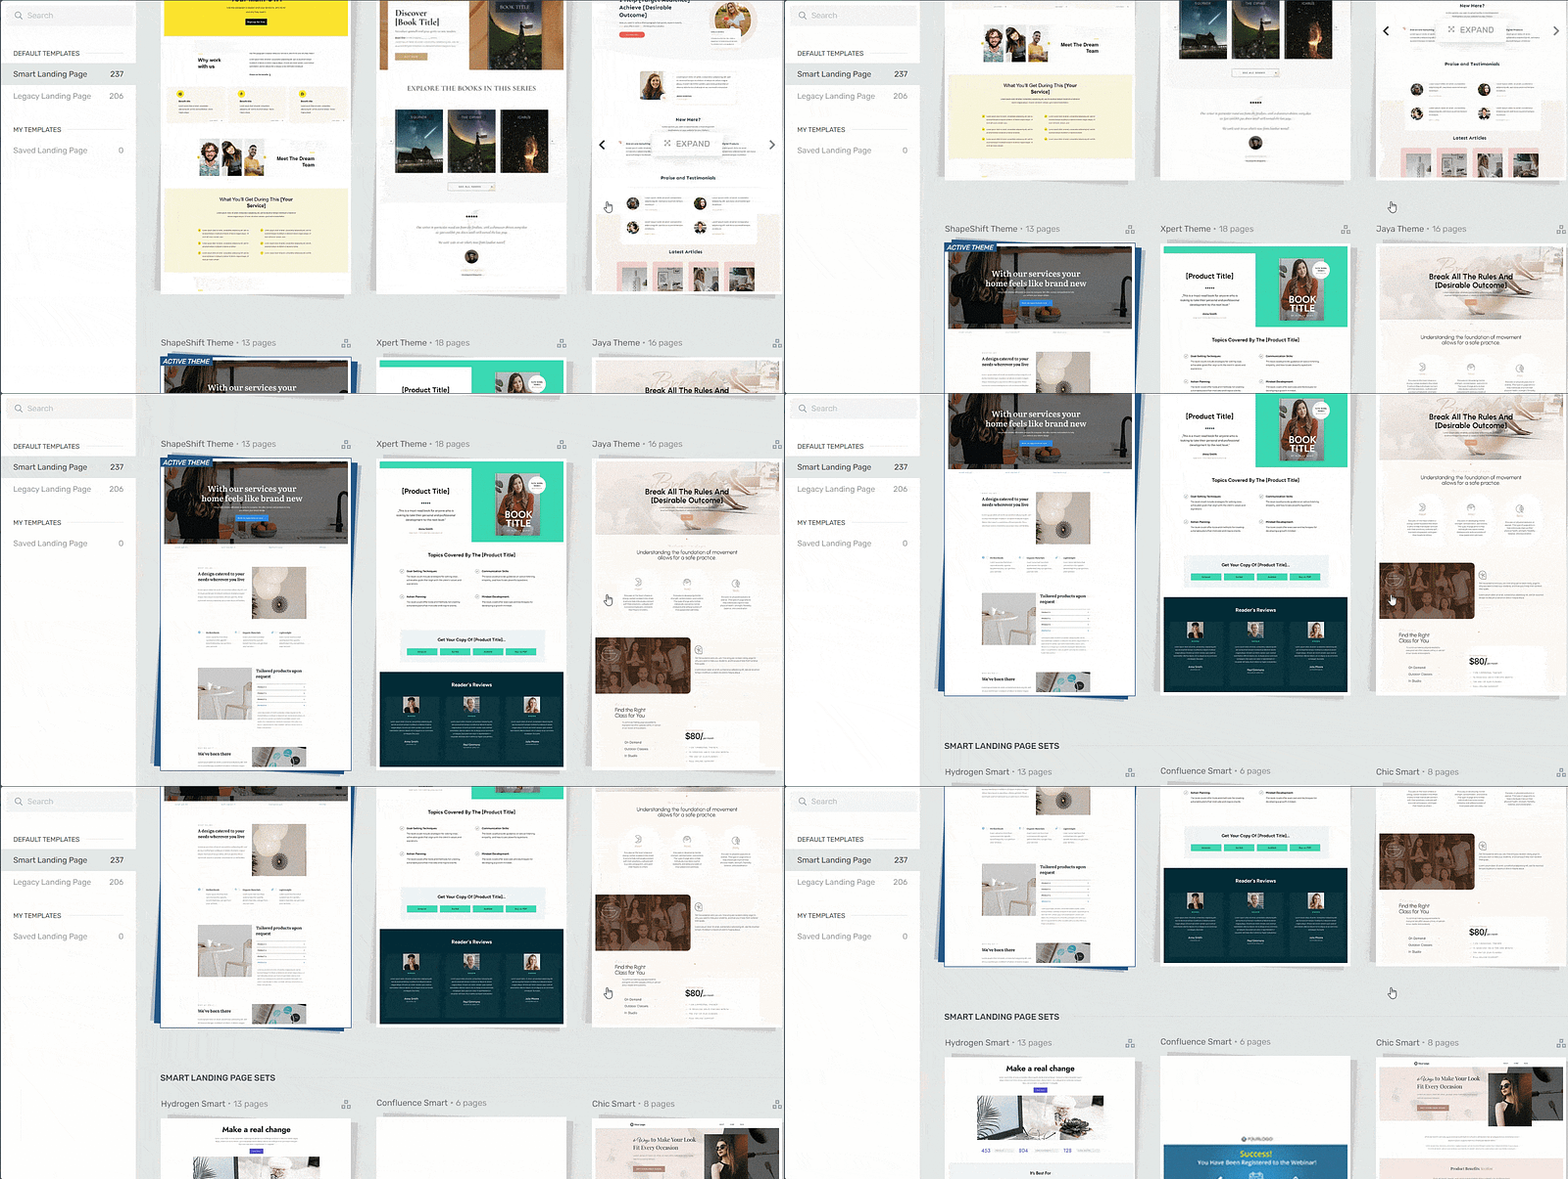
Landing page template sets in Thrive Architect
It's as simple as perusing the Landing Page Library, finding a landing page template you like, selecting it, and customizing its design to fit your branding.
Step 4: Customize & Finalize Your Homepage
When you were working through the Thrive Theme Builder Setup Wizard, you got started creating your Homepage template…
A homepage is automatically generated for you, and you'll find it in the "Pages" section in the WordPress Dashboard.
Search for the page titled "Generated Homepage".
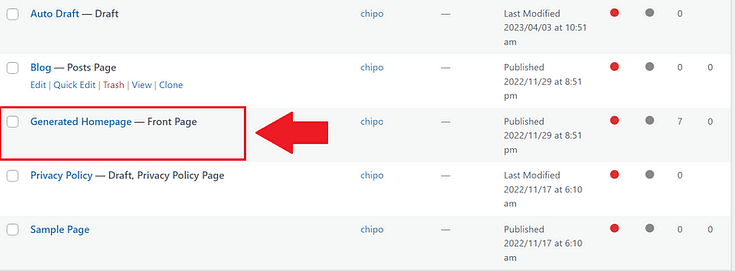
In the Editor, click “Launch Thrive Architect”.
As you work on your page design, you may need to add new sections (e.g., a drop-down menu, widgets area, social proof block, or FAQ section) or remove a few. You can go right ahead and use the block templates and design elements to customize your homepage’s look.
Pro tip
Want to learn how to create an engaging, high-quality homepage that will grab your audience’s attention, build trust, and push them to convert? Check out this handy guide.
Step 5: Install an Analytics Tool
If you’re serious about building an audience and a remarkable online business, you need a reliable WordPress analytics plugin.
An analytics tool helps you understand how your site visitors interact with your website, so you can make data-driven marketing decisions to grow your business.
We recommend using MonsterInsights to track your site’s analytics.
MonsterInsights makes it super easy for you to understand your Google Analytics reports, so you can see what's working and what needs to be improved in your marketing strategies.
This plugin also has a user-friendly dashboard that helps you track your site data (e.g. pageviews, conversions, sessions) with ease.
Step 6: Install an SEO Tool
You’ll also need a reliable SEO tool to help you optimize your on-page SEO settings, and also handle the technical part for you.
If you’re building a website on WordPress, we recommend All in One SEO (AIOSEO) – one of the best SEO plugins for WordPress.
Next Steps: Create Your First Lead Generation Funnel
Now that you've got your WordPress site up and running, let's talk about something exciting – turning your website into a relationship-building machine! After all, what's better than connecting with people who are genuinely interested in what you have to offer?
- Choose Your Lead Magnet: Create something valuable your visitors would love to have – maybe a quick-start guide, helpful checklist, or mini-course. Keep it simple but useful!
- Set Up Email Marketing: Pick a user-friendly platform like Drip or ConvertKit and create your welcome email. This is where the relationship begins, so make it count.
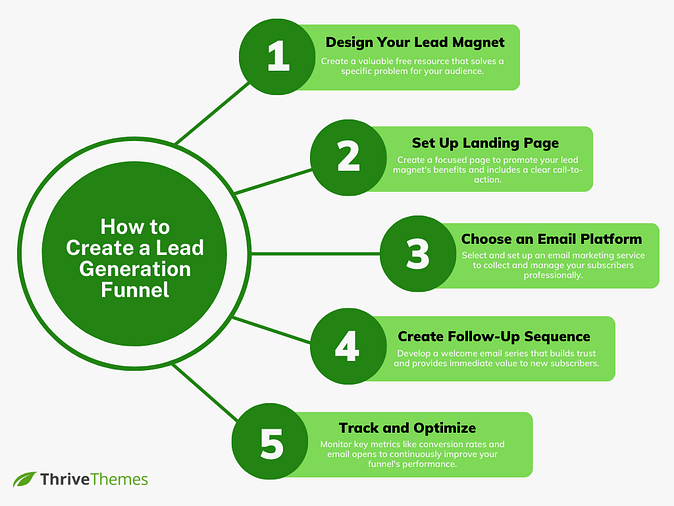
- Add Your Opt-in Form: Place a simple form on your site where it makes sense – maybe at the end of your posts or in your sidebar. Don't overthink it; just make it easy to spot.
- Create Follow-Up Sequence: Develop a welcome email series that builds trust and provides immediate value to new subscribers.
- Track and Optimize: Monitor key metrics like conversion rates and email opens to continuously improve your funnel's performance.
NOTE:
For more tips on how to create an engaging lead generation funnel to build your mailing list (and business), check out this guide.
How to Install WordPress: It's Your Turn Now
…and there you have it!
With this guide, you can easily install WordPress and build a stunning website.
If you need a few more WordPress tutorials to help you build your WordPress website, check out these free guides:
You can build a professional-looking website that will impress your potential customers and turn them into paying customers – all by yourself! And if you’re building a website on WordPress, you have thousands of plugins to choose from.
Thrive Theme Builder & Thrive Architect are the best tools for building your dream business website.
Whether you’re a blogger, solopreneur, course creator, or startup owner, you can use our tools to build any type of website with ease.
As you get more comfortable with the tools, you'll find it easy to create sales pages for your offers, and other types of pages to get more leads and customers.
So what are you waiting for?




Great information! Thanks so much
texto bem explicativo. parabéns.
Woah i remember trying to do this with webnode before but this is so easy
This blog is helpful. A step-by-step guide to familiarize WordPress. Thanm you for sharing specific tool on SEO.
Great guide!
The step-by-step instructions made setting up WordPress feel so simple, even for beginners.
I especially appreciate the screenshots and clear explanations. It’s easy to get lost in the technical jargon, but this post breaks it down really well.
Also, the extra tips on optimizing performance and security right after installation are super helpful for avoiding potential issues later on.
Thanks for putting this together!
The best suite of WP products for online entrepreneurship.
Do not mess with less! I use thrive suit for several years now and love it!
Great article, very well explained. In the users section, it would probably be helpful to let people know that it’s worth adding a second user, even if that user is also themselves, so that if there are any issues with their primary email they can still get in.
This is a great overview about how to set up a WordPress site and present a compelling impression with it!
Though I know how to do this … some of the nuances here were a great refresher and also a couple of doodads that helped!
Honestly, I’m not sure that this article speaks to me. It’s a little too generic for my needs.
Going from nothing to a functioning online course was pretty straightforward using Thrive Apprentice in Thrive Themes. We host on Hostinger and are happy with this tech stack.
Great article. Nicely detailed and a good explanation of the difference between wordpress.com and .org.
I wish this tutorial had been around na l when I started my site!
WordPress is basically the easiest CMS to use out there. Installing it is easy, the only thing I’d be concerned about is being able to set the salt keys manually on a fresh install, but I was a developer so I like to make sure everything is extra secure from the start.
Thrive has been the best WP theme when I have used WP.
Thrive themes have been teaching me about how to publish, present and sell my training online for years now!
More fantastic advice for someone who was where I was a few years ago.
With thrive themes you have picked the right partner for the journey!
A pretty comprehensive article. Adds the element of affiliate marketing within the article itself. Good lesson overall
Thanks for this! I’ll be setting up my new website soon and I’m sure this guide will be useful.
Thanks for your awesome Theme. I used it in all my WordPress Sites.
I would like to know more about the forums you mentioned at the top.
Hey Niki! We have a dedicated blog post for WordPress forums and you can find it here: https://thrivethemes.com/how-to-create-a-forum-on-wordpress/
Really nice!
I love Thrivethemes!!!
I am with Thrive Themes for my websites from 2016 and used three different templates. They all where perfectly build for WordPress. I never has to use code, that’s a huge relief. An the few times I had an issue the helpdesk always solved it within hours. And what I appreciate very much is the connection and collaboration with WPX hosting. Thanks TT for all the help, the endless knowledgeable and inspiring blogs and tutorials.
Thrive’s advice is always worth taking.
I am a thrive-themes-client for a decade and this is just ALL YOU NEED for your website and landing pages. Step by step they take you by the hand and if you have questions, they are always there for you! Thank you!
As you posted on the site I would also recommend Option 2 to install a WP site since Option 1 will just turn beginners away from using WP.
I always like the control you have over your site by using WP and since I started using Thrive Themes it has been a easier to maintain.
I prefer Rankmath for the SEO plugin but AIO is good too
great easy to follow tutorial thanks!
I already built a few websites but I still found some new useful info in this post. Very helpful and complete! Thanks!
I have thrive suit and found the whole process easy
I build my website on WordPress just so I can use Thrive products
You make getting a nice-looking website up and running so easy and affordable. Thank you!
Great to get the overview and fill some gaps in my know-how!
I’ve made multiple sites with Thrive now and love it. They have lots of good documentation but when I’ve needed a little extra help, their customer support really came through for me.
This is very helpful, thank you!
I used thrive for my blog post and it was way easier than WP builder blocks.
The most concise steps I have seen upto now.
Super detailed. Thank you
I’ve been using WordPress with ThriveThemes for years. There’s a reason I’ve stayed a customer: its user friendly, no fluff and the university and forum they have for their Thrive Suite members provide top notch help when you need it. Can’t recommend it enough.
Great
This is very useful, I have used Thrive on my WP site for 8 years and still enjoy regular new updates and an easy way to build my site.
Love the ease of this step by step process. Simple. Clear. And it works, lol. I’ve been using Thrive Themes for YEARS, and wouldn’t use anything else now! Ever!
That is a very detailed and informative post thanks
Having built and managed more than 50 websites using just about every theme base and builder available, for me there isn’t any other way. The Thrive suite of tools is everything you need in one subscription. Look no further, if you want to thrive just get Thrive.
Thank you very much for this detailed guide.
I am very familiar with WordPress.org and have built numerous websites over the years. What I like best is using Thrive to customize the entire site using their plugins and themes. It gives you versatility not only for the look of your website but also functionality.
This is the best explanation on how to build a website I’ve seen online.
I have used WordPress with Thrive Themes since 2018. I especially love the elegant, pre-designed theme templates and the simple way to post and collect testimonials on your website (you can choose the reviews that go with the products and even allow reviews to alternate – LOVE this tool!)
The Thrive plugins are really convenient!
This is a very helpful step-by-step article. Thanks so much. I am really enjoying using Thrive Themes for all my websites. I have about five!
Very easy to use. I have it on 5 sites & love it.
Very interesting
Great advice, thanks so much!
Thanks a lot! This article has been laid out very clearly! Thrive Themes has helped me tremendously throughout the years since 2011 (support, features etc). Can’t thank them enough!
its so important to build websites that speak to us and goals
I have rebuilt my main website and built my membership site. There are many great features for those who need a front end- easy to use – software!
I am using Thrive Themes almost 10 years now and it still surprises me how easy and fast I can design and implement a WordPress website!
Nice and concise step by step guide without a lot of buzzwords! So many pages think you know half of it before you start and leave you in the weeds two paragraphs in!
Once upon a time, many years ago, setting up Thrive Themes on wordpress was not necessarily hard, but it wasn’t straight-forward either. Now it’s an absolute breeze. From the beginning when downloading the product manager right through to using the Theme wizard to set up a site, I haven’t found another system that can compare to the ease of Thrive Themes.
Very helpful. Thanks
Great
I’ve been a huge fan of Shane and Thrive Themes since the day I interviewed Shane on The My Future Business Show!
Keep up the amazing work!
Thanks for the opportunity to support Thrive Themes. Amazing software!
Hi Shane, thank you for the opportunity to join the campaign and support Thrive Themes.
Super helpful article, really descriptive. Thanks!
Thrive themes is the easiest classic for building world class websites.
Great article! It might be worth highlighting security features, too, since we’ve had our share of attacks on our agency’s WordPress sites.
Bueno, a mí me gustó mucho la plantilla que adquirí para mi página web. Le dio un aspecto profesional que me gusta mucho y que atrae clientes.
Excellent checklist for budding WordPress enthusiasts.
This is a detailed blog post with instructions and images on installing WordPress! thank you. Instead of showing people how to do it I will now just send this blog post! what a time saver!
Glad you found it helpful, jodi 🙂
Best WordPress website builder by far
Word
I love how simple and straightforward this guide is. Lots of posts on installing WordPress overcomplicate it and make it seem super-stressful!
This is super helpful. Thanks!
Thank you, Emily!
Great article!
WordPress seems dedicated and helpful to people wanting to set up a website. I would use them if I had a small business.
Love all the tutorials!
I’m impressed with how detailed, yet simple these instructions are to set up a WP site with Thrive. This and all of the videos that they provide are a great help when setting up and making updates.
Thanks for a detailed step by step guide for wordpress! Will be helpful for our website, fast and easy to follow!
Thanks for the chance!
I had to get to the end to find ” How to build an Artist website ” Show me more !!
Used Thrive’s Divi Theme on mine. Works and looks great and is so easy to use.
Thank you for the detailed guide! I especially appreciate how the steps are clearly structured and easy to follow, even for beginners. The section on choosing a hosting provider was particularly valuable, as it highlights important factors like speed and support. Perhaps you could add a note on common installation errors and how to fix them to further assist newcomers. Overall, a fantastic resource for anyone looking to set up their WordPress site independently!
I find thrive themes easy to use and still overwhelmed by the features. Will learn and apply more features as I work on various websites.
Thrive Themes has made my life so much easier! I’ve been with Thrive Themes since 2018 and have you on all 4 of my business WordPress Blogs. Before I found you, trying to customize my blog and capture my leads was very difficult and time consuming. But now making updates, adding new content and evaluating my growth is a piece of cake! Please don’t ever go away because I don’t know how I could manage without you! I mean it!!
I’ve used Wix, Godaddy, Sparkle, and I don’t know how many other web builders in my time. WordPress is the best! I use SiteGround as my hosting because WP is super fast and secure with them and I use Thrive Themes to make my WP pages look fantastic, load fast, and be super effective in getting my words and pictures out there.
This is so straightforward! Thank you!
Great ideas here! I’m thinking of starting a small business, and WordPress would make it a snap!
Seems simple enough, however, I’d love someone else to do all of this for me. It’s a lot running a small business and figuring out direction, style, and content to put into a website.
Hey! That’s totally fair and we get that at Thrive. We offer done-for-you services where an expert handles all the setup for you! You can check out more info here: https://thrivethemes.com/services/done-for-you-website-design/
Very informative and easy to follow
Thanks this was helpful.
Great step by step guide
Very thorough article! Good job. Though I think RankMath SEO is one of the best SEO plugins, even its free version.
A very detailed intsaltion guide.
A good overview of the whole process of setting up a WordPress website. Thank you!
I’ve been working with Thrive Themes for many years now, and I don’t regret I was abandoning Kajabi, Leadpages, Clickfunnels etc. They are great tools, but for my clients far too complicated. My coaching clients understand the Thrive system easily and become enthusiastic marketeers on their own website. It looks great, but more important, they really convert… and keep the owner on the ball.
Really glad to hear you’ve had a positive experience with Thrive!
Nice overview. An important addition to keep in mind: For websites targeting european users it is vital to know about GDPR laws and to install a GDPR compliant Cookie Banner – in order to avoid legal consequences of tracking without consent. This information should be added in any beginner´s guide featuring Google Analytics!
This is a really useful tip, Marita! Thank you
Great guide and I’m glad you included the last step, I would however vote for rankmath over AIO but it’s ofc a more advanced option. Just the schema and indexing features make it worth it though.
So much information and easy to follow step-by-step guides!
Thanks for such a comprehensive resource!
You’re welcome, Charyl!
this looks like a great tool
I have been working with Thrive exclusively for my WordPress sites for several years now as it is the most intuitive and least technical system I have found. I am also impressed with the frequency and the way that new features are introduced that are commercial and practical – and they arrive as if Thrive have been reading my mind as to what I need!
Thank your this, Lewis! We’re glad to have you as a part of the Thrive fam!
Thrive makes setting up a WordPress site easy and intuitive! I refer to this guide every time I stand up a new website as a reference.
Thank you for the opportunity to win and for all the awesome services you provide!
Thank you for this, it’s a great list to have so to not forget any steps in setting up a new site.
Thanks for reading and commenting, Debi!
Thank you, interesting article for those like me who are not tech-savvy.
Thanks, Anna! Glad you found this helpful!
Thanks for taking the time to outline how to maximize the Thrive Theme clearly! The breakdown makes it super simple to understand and implement.
Thank you for reading and commenting, Josh 🙂
Use it to set up my website..easy program to use.any issue was solve in a short period of time after a call to customer care..would definitely recommend..
Thank you Patrick! I’m glad to hear you’ve had a positive experience with Thrive 🙂
This looks look like a handy thing for website design, creation, etc. Thanks for sharing!
You’re welcome, Alana!
WordPress has improved so dramatically since I first started using it years ago. Thrive themes are feature rich and capitalize on WordPress’s framework, making them the perfect match, particularly for marketers.
WordPress can confuse me sometimes, so thanks for this tutorial!
This looks like very useful and something that is easy to follow
Very detailed. Thank you!
I’ve been using WordPress for years, and I was genuinely impressed by how comprehensive this guide is.
Thanks, Robert 🙂
Great guide! Super helpful for WordPress newbies like me. Thanks for making it easy to follow. Keep up the awesome work!
Thanks for reading, Art 🙂
Thank you for providing great tutorials!
A straight-forward and easy guide to using Word Press!