

TL;DR: How to Start a WordPress Blog, From Someone Who's Built Two
You need four things: a domain, hosting, WordPress itself, and a way to design the thing. The first three take about an hour and cost somewhere between $3 and $11 a month depending on how far ahead you're willing to pay. The fourth is where people lose weeks.
Put together, the whole process looks like this:
- Buy a domain: about $15 a year
- Pick a host and install WordPress: from about $3 a month, and most hosts do the install in one click
- Fix your permalinks: two minutes, before anything else
- Pick a starter theme
- Run through the setup: header, footer, homepage
- Choose how your posts look: the basics are all you need
- Set up your blog page
- Write your essential pages and publish your first post: about, contact, privacy
And that's really all there is to it. Everything else you'll read about, like the 40-plugin checklists and the 15-step launch sequences, can wait until you've actually published something.
Most guides like this one are written by people who get paid when you click the hosting link.
That's why step one is always "buy this specific host," why the hosting section runs 2,000 words with a screenshot of every checkout page, and why the part where you actually build the blog is four sentences and a stock photo. The money is in step two, so step two is where the article lives.
I'm not selling you hosting. So I'm going to move through that part quickly and honestly, and spend the real time on what comes after: when WordPress is installed, you log in for the first time, and you're looking at a blank site with a default theme wondering why it doesn't look like anything you had in your head.
That part I do know, because I do it constantly. This blog runs on WordPress. So does my personal site, chipofaith.com, and both are built with Thrive Theme Builder and Thrive Architect, all the way through. And I don't mean I installed the plugin once. I mean every template and every layout, on both sites.
My own site is the more useful example, honestly, because it's messier. I run three different kinds of content on one blog: my more professional-sounding articles, what I call my emotion pieces in The Vault, and a newsletter. Each section has its own look (land on The Vault and it doesn't look like my Articles page), and underneath, it's just WordPress categories and a couple of templates. That sounds like a big technical problem, and it isn't. But no tutorial I've ever read tells you how to do it, because they all stop at "now pick a theme."
And one more thing: I'm also going to tell you what you don't need yet.
Every guide in this category pads itself to fifteen steps to look thorough, and a handful of those steps genuinely do not matter on the day you launch. I'll flag them as we go, because the fastest way to never start a blog is to treat a launch checklist as homework.
What It Cost Me to Start a WordPress Blog (And What It'll Cost You)
It'll cost you somewhere between about $50 and $180 for your first year, and the spread is almost entirely about how far in advance you're willing to pay.
But here's the truth about pricing pages.
Every host advertises a headline number. Hostinger says $2.99 a month, Bluehost says about $2.95, and both of those are real prices you genuinely can pay. But you pay them by buying years at a time. That Hostinger $2.99 means $143.52 charged today, for 48 months. When those four years are up, it renews at $10.99 a month. Bluehost's $2.95 is a three-year prepay that renews around $9.99.
Neither of those is a scam. It's just that "from $2.99/month" and "$143.52 today" are very different sentences, and only one of them shows up in the ads.
So when you add it all up, the real numbers look like this:
What you're buying | If you prepay years | If you'd rather not |
|---|---|---|
Domain | ~$15/year, and most hosts throw in year one free | Same |
Hosting | ~$3/month, paid as a lump sum up front | ~$10-11/month |
WordPress | Free. Actually free, forever | Free |
A theme | Free ones are genuinely fine to start | Free |
Year one, all in | ~$50-60 (plus the years you've prepaid) | ~$130-150 |
The prepay discount is real money, and if you're sure about this, take it. But if you're not sure yet (if this is a "let's see if I keep it up past March" blog), paying monthly and spending an extra $7 is a perfectly sane way to buy yourself an exit.
Which Host? I'm on Hostinger, But Don't Just Copy Me
I'm on Hostinger. I started on Bluehost, felt I'd outgrown it, and moved over a couple of years ago.
But I want to be careful here, because this is the exact spot where these articles usually start selling. I don't think my host is the right answer for you. Honestly, any of the top hosts will do the job. They all install WordPress in one click, they all have support, and the differences between them matter far less than the internet insists. It comes down to what you prefer.
If you want an actual comparison, WPBeginner keeps a solid one and updates it properly. Pick from there, pick whichever name you already trust, or pick the one with the checkout page that annoys you least. Then move on, because the hosting decision is not the one that determines whether your blog is any good.
Steps 1-3: Domain, Hosting and WordPress (The Part I Promised to Keep Short)
Three things stand between you and a working WordPress install, and together they're about an hour of clicking, so I'll walk you through all of it.
Step 1: Buy Your Domain (Don't Agonize Over This One)
Your domain is your address. Mine is chipofaith.com, which is just my name, which is the entire thought I gave it.
I know people who have spent three weeks on this. Don't. But this is what actually works: .com still carries the most trust, shorter is easier to say out loud, and hyphens and numbers cause confusion every single time you tell someone your website. Beyond that, nobody is judging your domain as hard as you are.
If you're stuck, use your own name. It's the one name you'll never outgrow, it works if your topic shifts in two years, and it takes the decision off the table today.
Most hosts include the first year free when you buy hosting, so you can usually just buy it in the same checkout. Otherwise it's around $15 a year.
Step 2: Buy Hosting, Then Let It Install WordPress For You
Hosting is the rented space your blog lives in. You buy it, and almost every host worth using will install WordPress for you in one click. They all have a button for it somewhere in the dashboard.
But the most useful thing I can tell you here is to follow your host's own setup guide, not mine.
Every host's checkout and dashboard looks slightly different, and they change them. Their documentation matches what's on your screen right now; a screenshot in a blog post from eighteen months ago doesn't. This is the one part of this process where the official docs really are the best source, and the only reason most guides don't say so is that sending you to the host's help center doesn't pay.
So buy the plan, find the WordPress install button, and click it. If you want the long version with screenshots, we have a full walkthrough of installing WordPress.
And if you're reading this still unsure whether WordPress is even the right call, that's a fair question, and I've answered it properly in my breakdown of the best blog platforms, where I go through all five I've actually used.
Step 3: Log In and Fix Your Permalinks Before You Do Anything Else
You'll log in for the first time and find a blank site with a default theme on it. That's completely normal. It's meant to look like that, and it is not a sign you've done something wrong.
Before you touch the design, do one two-minute job: Settings → Permalinks → Post name.
Permalinks are the structure of your URLs. The default gives you something like yoursite.com/?p=123; what you want is yoursite.com/your-post-title. It matters now rather than later because changing it after you've published breaks every link anyone has ever shared to your posts.
Most guides bury this at step twelve, somewhere after "design your logo." It's two minutes and it's the single cheapest thing you will ever do for your blog. Do it while the site is empty and it costs you nothing.
And now for the part that actually takes time.
Steps 4-8: The Part Every Other Guide Waves At
This is where most guides run out of steam. WordPress is installed, you're looking at a blank default theme, and the advice turns into "customize your design" and "make it your own," next to a screenshot of somebody else's finished site.
So let me show you what it actually looks like. But before I do, I should be honest: you can do everything in this section with a free WordPress theme, and plenty of good blogs do. What I'm showing you is how I do it, because it's how both of my sites are built. This blog and chipofaith.com both run on Thrive Theme Builder for the overall design and Thrive Architect for individual pages.
And since every headline in this space promises you a blog "in 15 minutes": the first version of chipofaith took me months, not because the tools were hard, but because I didn't really know what I wanted. When I rebuilt it on Thrive, it took six weeks, and that was on purpose. I took my time.
So the slow part of this is never the software. It's the deciding.
Step 4: Pick a Starter Theme (Don't Spend a Week on This)
The first time you open Thrive Theme Builder, it hands you a picker with about a dozen starter themes.
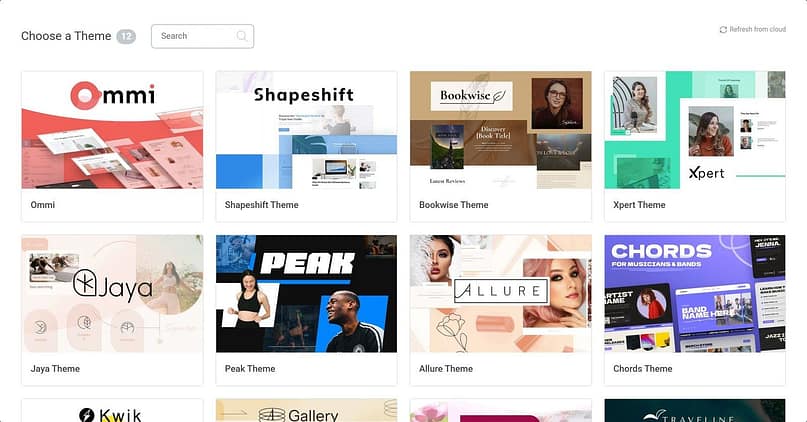
Pick the one closest to the feel you're after and move on, because it's only a starting point. You'll change the colors, the fonts and the layouts as you go. My personal site started from Ommi.
Step 5: Let the Site Wizard Do the Boring Setup
Once you've picked a theme, Thrive Theme Builder walks you through a Site Wizard: nine steps covering your logo, brand color, header, footer, homepage, blog posts, blog page, pages and menu.
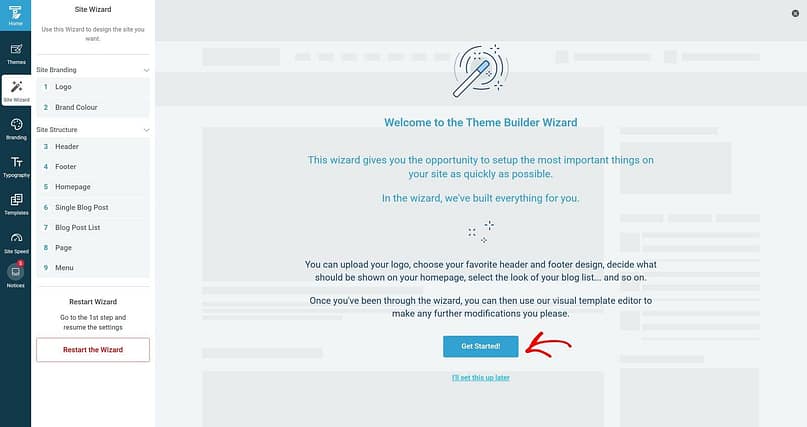
You click through the steps, choose from ready-made options, and watch a live preview update as you go. For a brand-new blog, that's honestly most of the design work.
Notice what step one is, though? Your logo. You don't need one yet. I'll get into why further down, but the short version is that your blog's name in plain text at the top of the page is completely fine on launch day.
Step 6: Choose How Your Posts Look (The Basics Are All You Need)
In the wizard, you pick a template for your blog posts, arrow through the options, and see each one previewed on a real post. On a brand-new site, that post is WordPress's own "Hello world!"
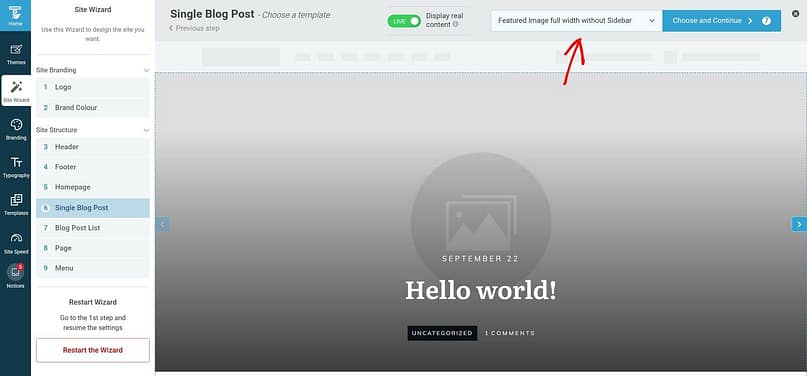
Pick something clean and easy to read. Thrive Theme Builder gives you all the basics here, and a standard blog post page is genuinely all most blogs need.
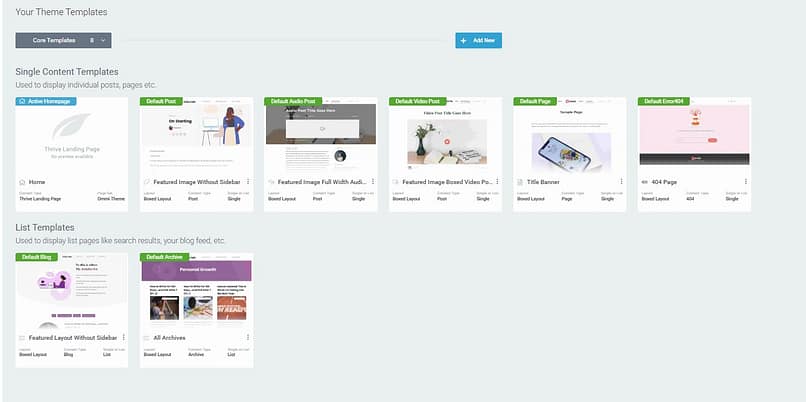
My own site runs on the templates the theme came with. I customized them; I didn't build any of them from scratch. This is my actual template list:
Step 7: Set Up Your Blog Page (And You're Done Designing)
Next, the wizard asks how your list of posts should look. That's your blog page, the one that shows your latest posts.

And that's it. A post template and a blog page make a complete blog. The goal is to get your site set up easily and simply, so don't feel pressured to go all artistically crazy or do something different just because you can.
Three Real Blogs Built With Thrive (From Simple to Custom)
If you want to see what that looks like in real life, here's what three Thrive customers did with theirs.
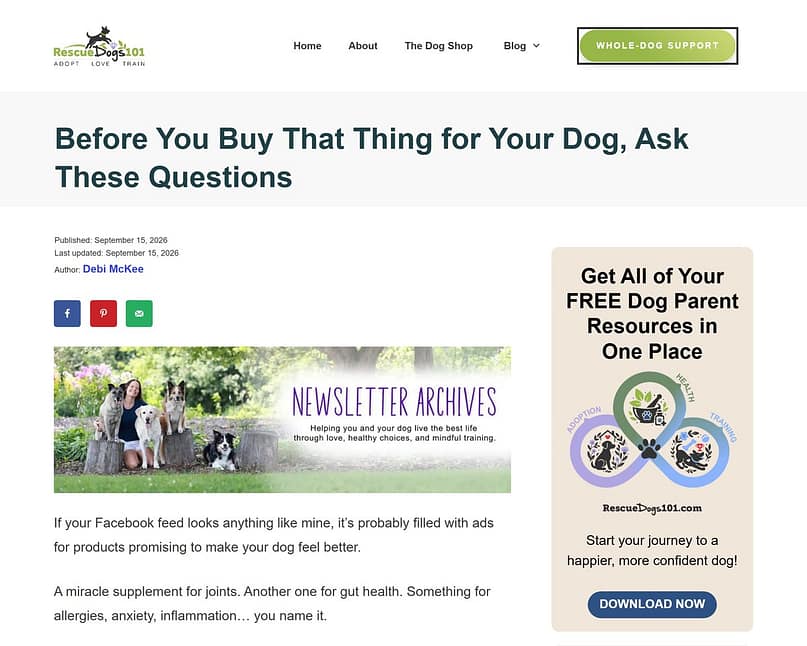
Debi McKee, Rescue Dogs 101. Debi keeps it simple, and it works. Her posts run on a standard Thrive Theme Builder post template: a clear title, the date and author, her writing, and a sidebar offering readers a free bundle of dog parent resources. She's still publishing on it today. (Debi's story)
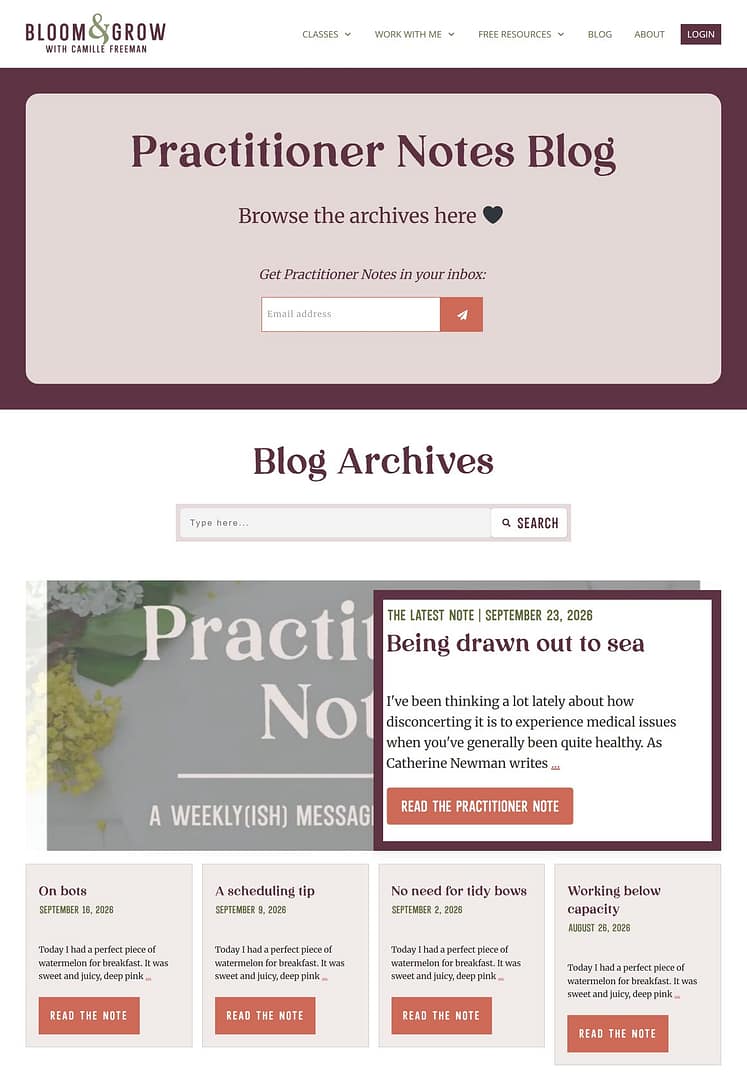
Camille Freeman, Practitioner Notes. Camille gave her blog a name. Her Practitioner Notes page opens with a sign-up so readers can get new notes by email, features her latest note up top, and lists the rest in a grid underneath. (Camille's story)
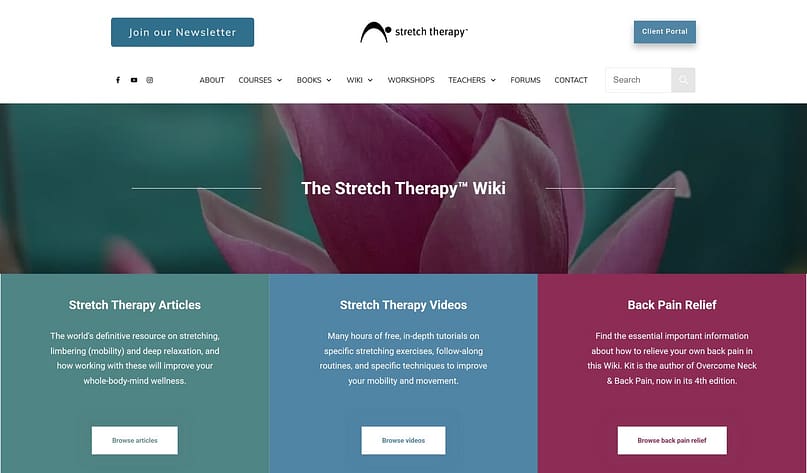
Stretch Therapy. Stretch Therapy went a different direction entirely and organized their blog as a wiki. Instead of a list of the latest posts, readers land on topic tiles like Stretch Therapy Articles, Videos and Back Pain Relief, and browse by what they need. (Stretch Therapy's story)
That's three very different blogs, all built with Thrive, and Debi's is proof that the simple version is plenty.
If You're Curious: How I Built My Articles and Vault Sections (Totally Optional)
You don't have to design your blog like this. But if you're curious how I did it on my own site, here's what I did.
I have my more professional-sounding articles, which live under Articles, and what I call my emotion pieces, which live in The Vault. I wanted the two to feel separate, so The Vault is a regular page with post lists on it. Each section, like my #RemoteThoughts column, has its own list.

Click the post list, hit Filter Posts, and tell it which category to show. Mine says: display anything filed under Remote Thoughts, newest first.

Every Vault piece gets filed under one of The Vault's sub-categories, like Love, Life or Remote Thoughts, and it shows up in the right section without me touching the page.
So categories decide where a post shows up, and the page decides how that section looks. I built it bit by bit: drag in a post list, point it at a category, repeat. I went the custom route because I can, but you don't need any of it. You can have a great blog with just the templates your theme gives you. Thrive's tools meet you where you're at.
Step 8: Write Your Essential Pages, Then Publish Something Imperfect
There are three pages every blog should have before you tell anyone about it:
Then delete "Hello world!" and publish your first real post.
It won't be your best one, and it doesn't need to be. My very first blog was, honestly, extremely immature writing, and it still reached 11,000 views in a year.
So publish it, and then write the next one.
You Don't Need These to Start a WordPress Blog (Come Back to Them Later)
A lot of people get caught up in the little things, not realizing that you can build your blog first, get it set up, and then come back to them.
And the guides don't help. Most of them run to fifteen steps, but not because starting a blog takes fifteen steps. It's because a longer list looks more thorough. One popular guide has "create a logo" at step seven and fixing your permalinks all the way down at step twelve, which is completely backwards.
None of these has to happen before you launch. All of them can wait until you've published something.
1. A Logo (You Can Make One Anywhere, Later)
Remember the Site Wizard opening on your logo? You don't need one yet.
Your blog's name, in a nice font, at the top of the page is completely fine for launch. You can make a logo anywhere, whenever you're ready, and nobody decides whether to read your blog based on it. They decide based on your writing. "I just need to sort out the logo first" is one of the most reliable ways I know to never launch at all.
Come back to it once you actually know what your blog is.
2. A Sidebar (You Might Not Want One at All)
Older guides treat setting up your sidebar as its own step, complete with widgets for your archives, categories, recent posts and a tag cloud.
You don't need to do any of that on day one. Your theme will give you a sensible default, and plenty of good blogs today don't have a sidebar at all. My posts don't.
3. Social Media Accounts (Set Them Up Once the Blog Exists)
These show up in a lot of launch checklists, but creating an Instagram account doesn't make your blog exist any faster.
Get the blog up first. Then decide where you want to share it, because once you've launched, promoting it is non-negotiable.
4. Speed Optimization (There's Nothing to Speed Up Yet)
Caching plugins, image compression and performance scores all matter eventually, but they don't matter on a site with three posts and no traffic.
So optimize when there's actually something to optimize.
5. A Long List of Plugins (A Handful Will Do)
You'll find lists of twenty or more plugins that every new blog supposedly needs, but you really only need a handful. An SEO plugin and a backup plugin will cover you on day one. Add the rest when you hit a problem they actually solve, not before.
The One Thing You Shouldn't Put Off
That one is permalinks, which is why it's step three here and not step twelve.
It's two minutes on an empty site, versus broken links on every post you've ever shared if you change it later. Everything else in this section can come later, but that one can't.
Frequently Asked Questions About Starting a WordPress Blog
These are the questions people search for most when they're starting a WordPress blog, so here are direct answers. Most are covered in more depth earlier in the guide, but a few, like whether you can still earn from blogging, are my own take.
Can I start a WordPress blog for free?
Mostly, but not completely. The WordPress software is free forever. What you pay for is hosting (from about $3 a month if you prepay, closer to $11 if you don't) and a domain (around $15 a year, often free for the first year). If you truly want to spend nothing, WordPress.com has a free plan, with limits and a wordpress.com address. I compare the two properly in my breakdown of the best blog platforms.
How long does it take to start a WordPress blog?
The technical setup takes about an hour: domain, hosting and WordPress installed. The design takes as long as you let it. My first site took months because I didn't know what I wanted, and my rebuild on Thrive took six weeks, on purpose. If you want to launch fast, pick a starter theme, run the setup wizard and publish. You can refine it later.
Do I need to know how to code to start a WordPress blog?
No. Everything in this guide is point-and-click, and the design side is drag and drop. My whole Vault section was built by dragging in post lists and pointing them at categories, with no code at all.
Is WordPress still worth it in 2026?
Yes, if your blog is meant to become something: a business, an audience or a body of work you own. I've blogged on five different platforms, and WordPress is the one I stayed with. The trade-off is that you make decisions other platforms make for you, like hosting, themes and updates. If you just want to write this weekend with zero setup, a hosted platform is a fine place to start, and WordPress will still be there when you're ready.
Can I earn $1,000 from blogging?
Yes, but it's probably not as straightforward as it used to be. You're not just competing with other regular bloggers anymore. You're competing with companies and with AI, so it's going to look a little different.
But you can. Blogging is how I got familiar with SEO in the first place, and that started the long journey to becoming the marketer I am today. I've earned a lot more than $1,000 from that journey, just not from the blog directly. Had I never started blogging, none of it would have happened.
So start the blog, share meaningful content, and watch for traction. What matters is: are you getting traction? Are you getting clicks? Do people want to take action off of what you do? That's what brings in revenue, whether it's through digital products, ads or something else.
What is replacing blogging?
I don't think anything will. You can see it happening right now: more and more people are returning to platforms like Substack and Medium, or creating their own blog spaces again. No matter what trends come along, blogging just shows up in different shapes and forms.
Do some people use AI for it? Yes. Do some people prefer YouTube? Also yes. But there's an audience for everyone. People still read blogs. People still go on websites.
What it does mean is that if you want people to consume your content, you'll probably have to use different forms of media too. You may have to get on social media, record mini videos, or make carousels and other visual content. That's just the way it is now, in my opinion.
What is the 80/20 rule for blogging?
It usually means spending 20% of your time writing and 80% promoting what you write, though some people use it to mean 80% valuable content and 20% selling. Personally, I don't follow an 80/20 rule.
My main rule, and I think a lot of people in the content creation space would agree, is that your content needs to be valuable. To build an audience, you need to give them valuable content consistently. Write from a niche you're experienced in, where you have expertise and strong opinions you can share over and over again, because conviction is what connects you with your audience.
And then you need to promote it. That part is non-negotiable. How else are people in your network, and beyond it, going to learn about your work? People aren't just going to stumble upon your blog. You're competing with thousands of other sites, if not millions.
When you're starting out, promotion is more aggressive, and you might be posting every day. When I started, every time I published a post I shared it on Facebook and tagged people I thought would be interested, and if someone engaged with the content, I'd tag them too. Eventually people started sharing it on their own. Now I share new posts on social media and send them to the email list that subscribes to my blog, and other people share them too.
Start Your WordPress Blog Now (Perfect It Later)
If you take one thing from this guide, let it be that the setup is the easy part. The technical steps take about an hour, and the part that takes time is deciding what you want. So don't wait until you've figured everything out. Buy the domain, get the hosting, fix your permalinks, pick a starter theme and publish your first post, and then come back to everything else once your blog actually exists.
And you don't have to go custom like I did with The Vault. A standard template is enough to start, and you can build out from there whenever you're ready.
Ready to Build Yours With Thrive?
Both of my sites are built with Thrive Theme Builder and Thrive Architect, and so are all three of the customer blogs above. Thrive Theme Builder takes care of your blog's overall design, like your post template and your blog page, and Thrive Architect is what I use for custom pages like The Vault. Both come with Thrive Suite, along with the rest of the Thrive tools, if you'd rather have everything in one place.
So go start that blog. You can come back to the rest later.


