


So, you’re getting ready to launch your website? Exciting, but maybe a little nerve-wracking, right? I’ve been there.
I remember launching my first site, double-checking everything, only to realize too late that my contact form wasn’t working. A simple fix, but it could have cost me leads.
That’s why this WordPress website launch checklist is so important. After working on multiple site launches, I’ve seen how easy it is to overlook small but critical details—broken links, slow loading times, SEO mishaps. These things add up fast and can make or break those first impressions.
Let’s make sure you start strong. Here’s what you need to double-check before your site goes live.
More...
Website Launch Checklist: Goal-Setting & Planning
The first step in creating your new website is considering your goals:
While you don’t need to have every single detail of your website figured out, understanding your future goals will help you make better decisions now. Think about the strategy for achieving your goals:
Jot down your thoughts so you can stay organized while you build your new website.
Choose a Website Platform
Now it’s time to choose the platform where you’ll build your website. If you’ve looked into options like Wix or Squarespace, they might seem like the easiest route—but if you want flexibility, long-term control, and room to grow, WordPress is the way to go.

Here’s why so many website owners (myself included) swear by WordPress:
One of the biggest advantages to using WordPress – and one that distinguishes WordPress from platforms such as Wix – is that if you decide to change web hosts, it’s relatively easy to migrate your website from one host to another. That’s something you simply can’t do with all-in-one solutions.
Now speaking of web hosts…
Pick a Website Host
Your hosting provider plays a big role in your website’s performance, so it’s important to choose the right one. There are several types of hosting, each with its own advantages:

- Shared hosting is the most budget-friendly option, where multiple sites share the same server. It’s a great starting point for new websites with little to no traffic.
- Managed hosting takes care of server maintenance, security, and updates for you—perfect if you’d rather focus on your site than tech headaches. Some web hosts such as Siteground and WPX offer packages that are both shared and managed.
- VPS hosting gives you a private section of a server with dedicated resources, offering more control and customization than shared hosting.
- Dedicated hosting is the top-tier option, giving you full control over an entire server, ideal for high-traffic sites that need maximum performance and security.
If you're just getting started, shared hosting is more than enough. As your website grows, you can upgrade to a more powerful plan. Not sure which option is best for you? Check out this guide on the best website hosting services to find the right fit.
Configure Your SSL Certificate
An SSL certificate protects your website and visitors by encrypting data as it travels between their browser and your server. Without one, sensitive information—like passwords or payment details—can be intercepted by hackers, putting both your users and your business at risk.
Without an SSL certificate in place, hackers can easily intercept and exploit customer information such as personal and financial details, leading to legal trouble for you, the website owner.
Even if you’re not selling anything, SSL is still a must. Google flags non-secure websites, which can hurt your rankings and scare off visitors. The good news? Most reputable web hosts include a free SSL certificate, or you can get one for a small fee.
Once you configure your SSL certificate, the URL for your website will change from HTTP to HTTPS, and a lock icon will appear in the browser bar. Read our knowledge base article for more detailed information.
Once you enable SSL for your new website, you will see a lock icon and the URL will use HTTPS.
Choose Your Website Building Tools
Before you start designing your site, take a moment to plan the tools you’ll use. Trust me, this will save you so much time and frustration down the road.
WordPress has thousands of themes and plugins, and if you start searching without a clear idea, you could easily lose hours—or even days—just trying to decide. (I know, because I’ve been there.)
At first, I thought I could just pick a theme, grab a few plugins, and be good to go. Instead, I spent way too long testing different combinations, dealing with compatibility issues, and fixing things that broke. It was a pain, and I don’t want you to go through the same struggle.
That’s why we’re keeping things simple and effective with two tools designed to work together seamlessly:
Thrive Theme Builder + Thrive Architect = Website Building Made Easy
With these two, you’ll have everything you need to design a professional, high-performing website.

Why These Tools?
A lot of people end up installing multiple plugins, hoping they’ll all work together. That usually leads to slow loading times, design inconsistencies, and endless troubleshooting. Instead of taking that risk, we’re using a matched set of tools built to function as one system.
- Thrive Theme Builder gives you complete control over your site’s structure—headers, footers, blog layouts, and more—all in one place.
- Thrive Architect is your drag-and-drop page builder, allowing you to design beautiful pages without touching a single line of code.
What Makes This Combo Special?
Because both tools come from the same team, you don’t have to worry about compatibility issues, bloated code, or frustrating design limitations. That means:
✔ Faster loading times – No unnecessary bulk slowing your site down.
✔ Consistent design – No jumping between different systems to adjust layouts.
✔ No tech headaches – Everything just works, so you can focus on building your website instead of fixing it.
I remember how frustrating it was to piece everything together on my own, and I don’t want that for you. You should be excited about your website, not stuck troubleshooting.
Develop a Consistent Branding Strategy
Your brand should be instantly recognizable, whether someone visits your website, sees an ad, or comes across your social media. That means sticking to the same logo, fonts, colors, and imagery across all platforms.
This consistency builds familiarity – which can help establish trust and credibility with potential customers.
So as you build your website, be sure to use the same accent colors and fonts from page to page. If you opt to use Thrive Theme Builder as your WordPress theme (more on that below!) the included smart color technology will assist you in using the same color scheme throughout your website, and you can quickly set the typography for your entire website in one convenient place.

With Smart Color Technology, you can change the color of your theme with one click.
Set Your Permalinks
Permalinks are the permanent URLs of your content, such as blog posts and pages. Setting them correctly will ensure that visitors can easily find their way around your website and that search engines can index them properly.
The most important thing to keep in mind when setting up permalinks is SEO (Search Engine Optimization). An SEO-friendly URL should include keywords relevant to the page and be easy for both users and search engine crawlers to understand. Generally speaking, short and simple works best.
To set the permalinks for your WordPress website, go to Settings > Permalinks. We recommend selecting the Post Name option.

Install Your Theme
One of the first big design decisions you’ll make when building your website is choosing a theme. Your theme determines the overall look and structure of your site, including:
- The layout of your homepage
- Whether or not your site has a sidebar
- The design of your headers and footers
- The layout of your blogroll page
- What your individual blog posts look like
Choosing the right theme is important, but it doesn’t have to be overwhelming—especially when you use Thrive Theme Builder.
")
Why Thrive Theme Builder?
Unlike traditional WordPress themes that lock you into a fixed design, Thrive Theme Builder gives you complete control over every part of your site. Instead of buying a theme and hoping it works with your other tools, you get a fully customizable, conversion-focused design that integrates seamlessly with Thrive Architect and other Thrive tools.

All themes from Thrive Themes are built with lean, clean code and are optimized for speed
Even better? Thrive Theme Builder includes a selection of professionally designed companion themes, which comes with pre-designed templates for your homepage, blog page, individual blog posts, and more. You don’t need to start from scratch—just choose a theme that fits your brand and start customizing it to match your vision.
The Thrive Theme Builder Setup Wizard
Setting up your theme has never been easier. The Setup Wizard walks you through selecting all the key components of your site—headers, footers, homepage, blog layout, and more—in just a few minutes.

Thrive Theme Builder in Action
By the time you’re done, your website will have a clean, professional structure that you can tweak further using Thrive Architect’s drag-and-drop editor.
Want to see how easy it is to create a custom WordPress theme? Check out this step-by-step tutorial and start building a website that truly fits your brand.
Create the Necessary Pages
Before you begin building the pages of your website, gather the images you’ll need to create amazing visual content and draft the copy for them. Consider the type of content each page will include, and optimize for search engines by including relevant search words and phrases, as well as giving them an accurate meta description.
The meta description is what appears in search engine results and encourages visitors to click through and read your content. So it’s well worth taking an extra minute or two to write a fantastic meta description that draws readers in.

The meta description for a page will appear in search results.
A super easy way to create stunning pages – no coding required – is to use Thrive Architect. Thrive Architect comes with hundreds of pre-designed yet fully customizable blocks that will make creating the necessary pages for your website a breeze.

A peek at some of the pages you can create using Thrive Architect.
Here are the key pages every website should have:
- Homepage: Your website’s first impression. Place your most important call-to-action above the fold to drive conversions.
- Contact Page: A simple way for visitors to reach you, adding credibility and trust.
- About Page: Tell your story, share testimonials, and build a connection with your audience.
- Blog Page: A great way to showcase your expertise, improve SEO, and engage visitors.
- Privacy Policy Page: Outlines how you collect, store, and use visitor data—important for legal compliance.
- Other Pages: Depending on your needs, consider adding an FAQ page, services page, or testimonials page. Also, take a moment to optimize your 404 page for a better user experience.
Check Your Content
After creating the necessary pages for your website, take some time to comb through your content and check for anything that might detract from a stellar user experience.
Spelling, Grammar, and Factual Errors
Check spelling and grammar to ensure the copy on your website is error-free. Not so great at spelling and grammar? Use a tool such as Grammarly or Hemingway.
Also keep an eye out for factual errors or information that could potentially be misconstrued, as these can sow seeds of mistrust among your visitors.
Consistent Formatting
One of the more subtle — yet important — trust signals on your website is having consistent formatting across all pages. Here’s a few tips:
Images, Video, and Audio Files
Creating high-quality media is an important part of creating an engaging website experience for visitors, so watch out for these “gotchas”:
Add Alternative (Alt) Text To Your Images
Alt text is a descriptive phrase that helps search engines understand the content of an image (which also helps boost SEO!) and makes it easier for people with visual impairments to access information on the web. If an image on a website does not load for some reason, the alt text will be displayed instead.
Adding Alt text to images in WordPress is super easy and we recommend taking a few extra moments to add them for every image on your website.

Add Alt text to images in your WordPress Media Library using the Alternative Text field.
Make Sure You Have Clear Calls-To-Action
Calls-to-action (CTAs) guide visitors toward the next step—whether it’s signing up for your email list, booking a consultation, or making a purchase. Without them, you could be missing out on leads and sales.
For example, if you're a real estate agent, a key action might be scheduling a call. Instead of leaving visitors to figure it out on their own, place a clear CTA button or form that says something like: “Get in touch today!”
Tips for Effective CTAs:
- Be clear and direct: Tell visitors exactly what to do.
- Make them easy to spot: Use contrasting colors and place them in high-visibility areas.
- Use action-driven language: Words like “Start,” “Get,” or “Claim” encourage engagement.
Place calls-to-action in strategic locations across your website, where they can be easily spotted, and will be convenient for your visitors to act on.
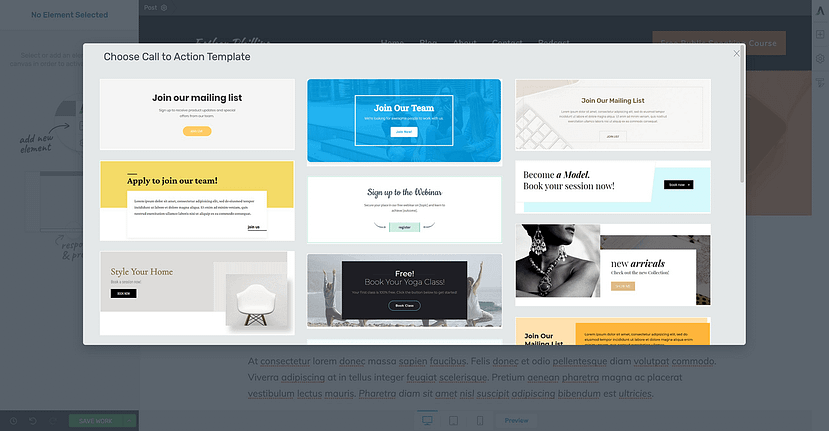
A peek at some of the call-to-action blocks that come with Thrive Architect.
Struggling to get visitors to click on your CTAs? Learn how to write persuasive, well-placed calls-to-action that drive more conversions in this in-depth guide.
Set Up Google Analytics
Google Analytics gives you insight into how people interact with your website—tracking visitors, bounce rates, session duration, and more.
With this data, you can:
The easiest way to set up Google Analytics on WordPress? Use MonsterInsights.

MonsterInsights
I highly recommend it because it lets you connect Google Analytics to your site in minutes—no coding required. Plus, it brings your website data right into your WordPress dashboard, so you can see key metrics without logging into Google Analytics separately.
💡 Not sure where to start? Follow our guide on How to Set Up Analytics on WordPress for a quick and easy setup.
Optimize Your Site for Search Engines
If you want people to find your website through Google and other search engines, you need to make sure your site is visible and properly optimized. Otherwise, all the content you’ve worked hard to create could go unnoticed.
✅ Allow Search Engines to Index Your Website
WordPress has a setting that can block search engines from indexing your site—if this is turned on, your website won’t appear in search results. Before launching, take a moment to check this setting.
Head to Settings > Reading > Site Visibility in your WordPress dashboard. If the option “Discourage search engines from indexing this site” is checked, uncheck it. That’s it! Now, search engines will be able to crawl and rank your site.

Enable Search engine visibility by going to your WordPress back end, then go to Settings > Reading.
🔁 Set Up 301 Redirects (If Needed)
If you're moving pages or switching domains, it's important to set up 301 redirects so visitors and search engines are sent to the right place. Without redirects, anyone clicking an old link will land on a 404 error page, which can hurt your SEO and user experience.
A 301 redirect signals that a page has permanently moved, allowing you to keep your search rankings and guide users to the correct content. This is especially useful if you've redesigned your site and changed your URL structure.
🚀 Use AIOSEO to Simplify SEO Setup
Optimizing your website manually can take a lot of time, but AIOSEO (All in One SEO) makes the process much easier. Instead of handling sitemaps, redirects, and meta tags separately, AIOSEO puts everything in one place. You can:
- Automatically generate an XML sitemap so search engines can find your pages faster.
- Set up redirects without needing extra plugins.
- Optimize your meta titles and descriptions to improve rankings.
AIOSEO helps you get everything in place from the start, so your site is ready to attract organic traffic.
Review Browser Compatibility
For any website launch, it’s important to consider the various browsers your audience will be using to view your site. You may find that your website looks spectacular on one browser, but abysmal on another… causing the user experience to suffer so much that you lose potential subscribers and customers.
The most popular web browsers today are Chrome and Safari, so be sure to view your website in both of those browsers to check for browser-induced design anomalies. It’s also worth considering checking your website on older versions of browsers as there are still many users who haven’t upgraded their web browser yet.
Check for Mobile-Friendliness
Have you ever visited a website on a mobile phone and thought, “Hmm… this doesn’t look right.”
Approximately half of total web visits are made using mobile devices, which is why it’s super important to make sure your website looks great on multiple devices and screen sizes.
So in addition to testing your website on different browsers on a desktop computer, be sure to also test it on different browsers across tablets and mobile phones that use iOS and Android operating systems.
If you're using any of the Thrive tools such as Thrive Theme Builder, Thrive Architect, or Thrive Leads, the buttons at the bottom of the Thrive visual editor will help you easily view and edit your work on desktop, tablet, and mobile screen sizes.
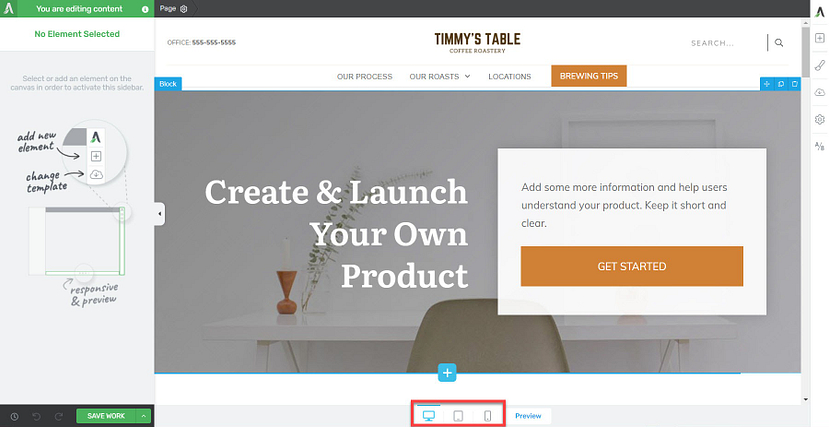
Use the buttons at the bottom of the Thrive visual editor to check for mobile responsiveness.
Test the User Experience
Finally, take some time to make sure everything is working as it should, and that your audience is getting the best experience possible.
Test all the links, click all the buttons, and put yourself in the mindset of a new website visitor. Ask yourself the following questions:
As they say, you never get a second chance to make a first impression, so as you test buttons and links, watch out for things that might detract from a stellar experience, like:
After giving your website a thorough once-over, you’ll be ready to…
Set a Launch Date
Setting a launch date isn’t quite as simple as picking a day on the calendar…
Once you decide on a day to launch, you’ll need to map out a pre-launch strategy and create your pre-launch materials.
A great pre-launch strategy will help build buzz about your new website so when you make your website launch announcement, you’ll be launching to an eager audience. For example, if you already have an email list, you can send buzz-building campaigns 2-3 weeks prior to launch. If you’re just getting your email list started, build buzz by posting on social media instead.
Once you’ve created and sent out your pre-launch materials, you can sit back and enjoy the fruits of your labor.
Enjoy Your Launch!
You did it!
You’re all set to have a successful website launch, and if you follow this website launch checklist, we’re confident you’ll be successful.
After your website goes live, remember to keep tabs on any feedback you receive. You may get feedback about areas to improve, requests for pages that your audience would find helpful, and of course, praise for your hard work.
Give yourself a pat on the back, and get ready to work on your next business or website goal.
Ready to learn more?
Learn how to use Thrive Architect
to export and import website content in record time!
One of the BEST pieces of info I’ve seen to date. Clear, simple and practical. Thanks so much.
You’re welcome. Glad you like it, Geoff!
Great post Christine! Your content is always so interesting and informative.
Thanks, Nick! Glad you like it. 🙂