💅 TL;DR — My Go-To Process for Building a Beauty & Cosmetics Website
If you want the short version — here it is.
- Start with strategy, not software. Define your brand voice, visuals, and value before you open WordPress.
- Know your audience. Every design choice should speak directly to their desires, insecurities, and purchase habits.
- Cover your compliance bases. FDA rules, product info files, and clear refund policies aren’t optional — they’re your credibility backbone.
- Build smart. I use WordPress with Thrive Theme Builder and Thrive Architect because they balance beauty and performance. Everything looks intentional, loads fast, and is conversion-ready.
- Design to sell. Use professional product photos, testimonials, and clear CTAs to move visitors from curiosity to checkout.
- Integrate early. Connect your email marketing and payment tools from day one — it saves you from a messy rebuild later.
This guide walks through how I actually build beauty websites that work — the kind that look stunning, load fast, and convert browsers into customers.
Looking for guidance on how to build a beauty and cosmetics website on WordPress?
And not just any website — one that stands out from the competition?
Well, you’ve come to the right guide 🙂.
We understand. You don’t want to spend hours (or even days) sifting through tools, trying to learn code, and reviewing your budget to see if you can outsource building your website…
You want to be able to build a stunning, high-quality website on your own — and that’s where we come in.
We’ve created a simple, step-by-step guide to get your site up and running, ready to start sharing content and selling your products.
You’ll also discover the best tools to build your website without breaking the bank or compromising on quality.
So, grab a cup of coffee and get ready to learn!
What You’ll Need to Build Your Website
This is our recommended list of items you’ll need to build a website. Some of these tools are optional (e.g. using a page builder, or choosing WordPress as your CMS), but we strongly recommend them if you want to create a site that will perform well:
Domain name for your website (e.g. www.beautybrandexample.com)
Reliable web hosting to “house” your site (start here if you’re still searching for a host)
WordPress as your content management system (where you’ll manage all your site content)
WordPress theme for your site’s structure, look, and feel.
Reliable WordPress page builder to create and customize your webpages (without coding)
WordPress plugins to expand your website’s functionality (e.g. adding a Google Reviews feed to your site)
Email marketing service to capture leads and turn them into clients
Checkout tool to safely and securely process payments made through your site
We’ll help you get the right plugins to build your beauty (or cosmetics) website. Just keep reading to follow.
How to Build a Stunning Website for Your Beauty Business
After you’ve purchased or set up a free domain name, chosen a WordPress web hosting provider, and completed the WordPress installation process -- it’s time to start working on your actual website.
This step-by-step tutorial will show you how to do this:
Step 1: Define Your Brand Identity & Value Proposition
Every successful beauty website starts with one thing — clarity.
Before touching a single design tool, I always pause and ask a few grounding questions:
- Who am I building this for?
- What do I want them to feel when they land here?
- What promise does my brand make that no one else can?
If your answer feels fuzzy, don’t rush past this part. The strongest online brands know exactly what they stand for — and that clarity shows up everywhere: in the tone of your copy, the way your products are photographed, and even how you name your collections.
Want an example? If your skincare line is all about clean, minimalist routines, your design should breathe. White space, muted colors, sharp imagery. If your makeup brand thrives on self-expression, lean into bold typography and dynamic visuals.
Once you’ve nailed your vibe, use those brand colors and fonts as your visual anchors. Thrive Theme Builder makes it easy to apply your palette across every page automatically — no design degree required.
Step 2: Understand Your Audience (Like, Really Understand Them)
Every brand says they know their audience. Few actually do.
Before I write a single line of copy, I imagine my ideal customer scrolling through my site — what’s running through her mind? What’s she frustrated with? What’s she hoping this product changes for her?
Then I turn that empathy into structure.
Here’s what I map out:
Demographics: age, lifestyle, budget, location
Beauty mindset: is she experimental or minimalist? brand loyal or discovery-driven?
Decision triggers: does she buy based on reviews, scarcity, or trust in ingredients?
When you understand this, your site stops being “pretty” and starts becoming persuasive.
If your audience is discovery-driven, add product comparison blocks and highlight what’s new.
If they live on Instagram, feature your social feed prominently.
If they care about sustainability, make your sourcing story impossible to miss.
The beauty industry runs on emotion — your job is to show people how your brand fits the version of themselves they want to be.
When you truly understand who you’re talking to, your message becomes magnetic. Learn how to write a value proposition that instantly connects and makes your beauty brand unforgettable.
Step 3: Cover Your Legal & Compliance Bases Early
This part isn’t glamorous, but it’s non-negotiable — especially if you’re selling skincare, cosmetics, or supplements.
Before you launch anything, tick these boxes:
- Stay clear of medical claims. Don’t say your product “heals,” “treats,” or “cures” anything unless it’s backed by regulation.
- Keep a Product Information File (PIF) if you plan to sell in the EU or UK. It’s your compliance safety net — basically proof your product is safe and properly documented.
- Create your essential pages: Privacy Policy, Terms of Use, and Returns & Refunds. Thrive Theme Builder can generate these in a few clicks.
- List every ingredient clearly. Transparency builds trust faster than any ad campaign.
- Moderate your reviews. Protect your reputation by keeping your review section honest and spam-free.
I know — this isn’t the fun part of branding. But it’s what separates businesses that last from those that get taken offline for skipping the basics.
Get these out of the way early, and you’ll thank yourself later.
And while you’re covering the essentials, don’t forget accessibility. Our guide on designing for web accessibility shows you how to make your site usable for everyone — and compliant, too.
Step 4: Choose the Right Tools for the Job
Once the brand strategy is in place, it’s time to translate that vision into something tangible. This is where your platform choice either empowers you or boxes you in.
I’ve experimented with enough website builders to know what slows you down — clunky design controls, rigid templates, and endless plugin patch-jobs. What I wanted was a setup that felt as intentional as the brands I build: clean, flexible, and conversion-ready straight out of the gate.
That’s what stood out to me about WordPress paired with Thrive Theme Builder and Thrive Architect. Together, they strike that rare balance between creative freedom and performance.
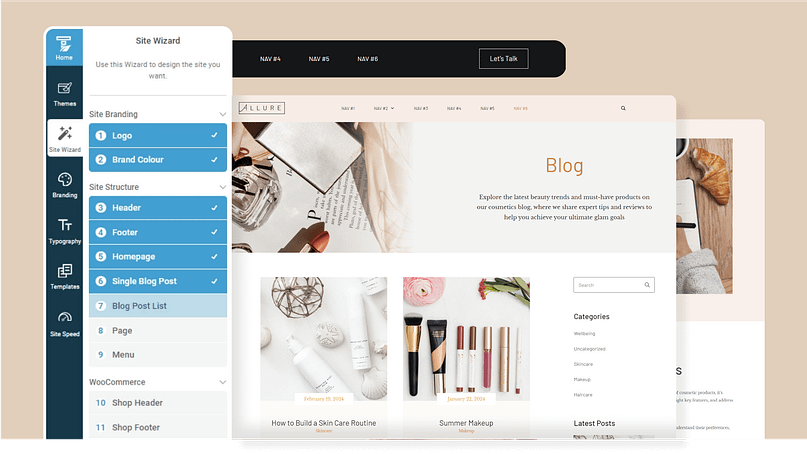
- Design flexibility: I can shape every section of a page — header to footer — without wrestling with code.
- Speed and stability: The sites load fast, which matters when beauty shoppers bounce the moment a page stutters.
- Marketing integration: Opt-ins, testimonials, countdown timers — all baked in, not bolted on.
- Visual polish: The templates feel modern and editorial, which makes them perfect for beauty, skincare, and wellness brands.
If you’re serious about creating a site that feels high-end but still works hard behind the scenes, this stack delivers. It’s not the cheapest option, but it’s the one that actually holds up when you start layering on real-world marketing needs.
Next, I’ll walk you through exactly how I set everything up — from theme selection to homepage customization — so you can see what it’s like in practice.
Step 5: Setting Up the Framework — Thrive Theme Builder
After installing Thrive Theme Builder, you’ll launch straight into its Setup Wizard — and honestly, it’s one of the smoother onboarding experiences I’ve seen.
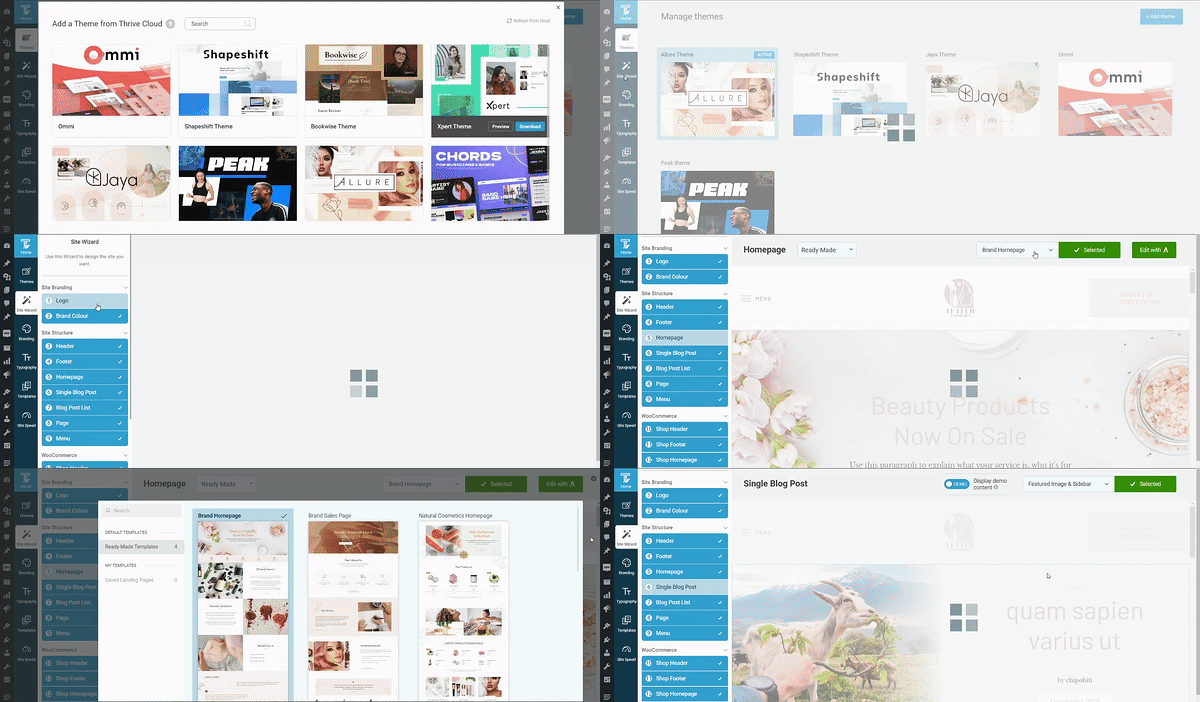
Thrive Theme Builder in Action
The wizard doesn’t drown you in technical jargon. It walks you through essentials that actually matter for a brand site: uploading your logo, setting your color palette, and choosing fonts that match your identity.
Every decision updates across your entire site in real time. No more bouncing between templates to make sure your pink looks the same on every page.
This is the point where your brand starts feeling real. You’ll see your colors, your typography, your logo — all working together on a site that’s already mobile-optimized and structured for conversion.
It’s quick, intuitive, and built for people who’d rather spend their time perfecting product photos than debugging CSS.
Step 6: Picking the Right Theme — Allure Beauty Theme
Thrive’s Allure Beauty Theme feels like it was designed by someone who’s actually studied the beauty industry.
The layouts are elegant without being fussy. The typography has that editorial polish you’d expect from a magazine site, and the use of white space lets product imagery breathe.

What I appreciate most is that Allure doesn’t try to be everything to everyone. It’s purpose-built for beauty salons, skincare lines, cosmetic retailers, and wellness brands. If your business sits anywhere in that universe, this theme gives you a professional foundation that still feels customizable.
You’ll get pre-designed templates for all the key pages — homepage, about, blog, shop, and even 404s — plus dedicated WooCommerce templates if you plan to sell online.
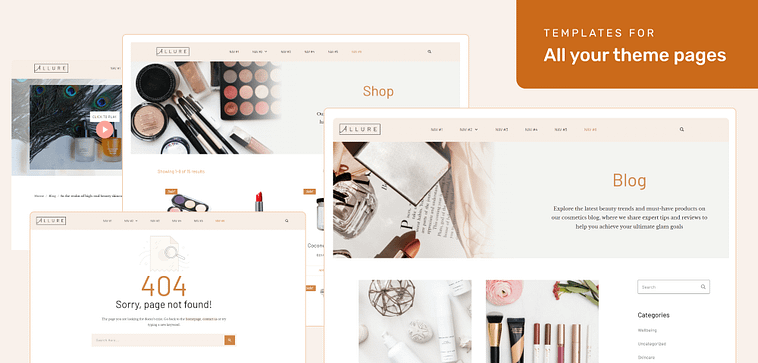
There’s also a library of block templates: pre-built sections like testimonials, feature grids, and pricing tables you can drop into any page. These save hours of design time and keep everything visually consistent.
What is a Block Template?
Thrive Architect's block templates are pre-designed sections you can easily add to your pages with just a click. These templates are made up of various elements like text boxes, images, contact forms, and buttons, all arranged in visually appealing layouts.
You can quickly customize these templates to match your brand, saving you time and effort in designing your website pages from scratch.
When I reviewed Allure, the biggest takeaway was how cohesive everything felt. No mismatched colors, no Frankenstein layouts. Just a polished, unified brand presence.
Step 7: Customizing Pages with Thrive Architect
Once the theme is active, it’s time to shape your actual pages — and this is where Thrive Architect earns its reputation.
Most page builders fall into two categories: powerful but intimidating, or simple but limited. Thrive Architect somehow hits the sweet spot between the two.
The drag-and-drop editor feels fluid and immediate. I can click on any section — a headline, a button, a product block — and tweak it right there. No digging through side panels to find hidden settings.
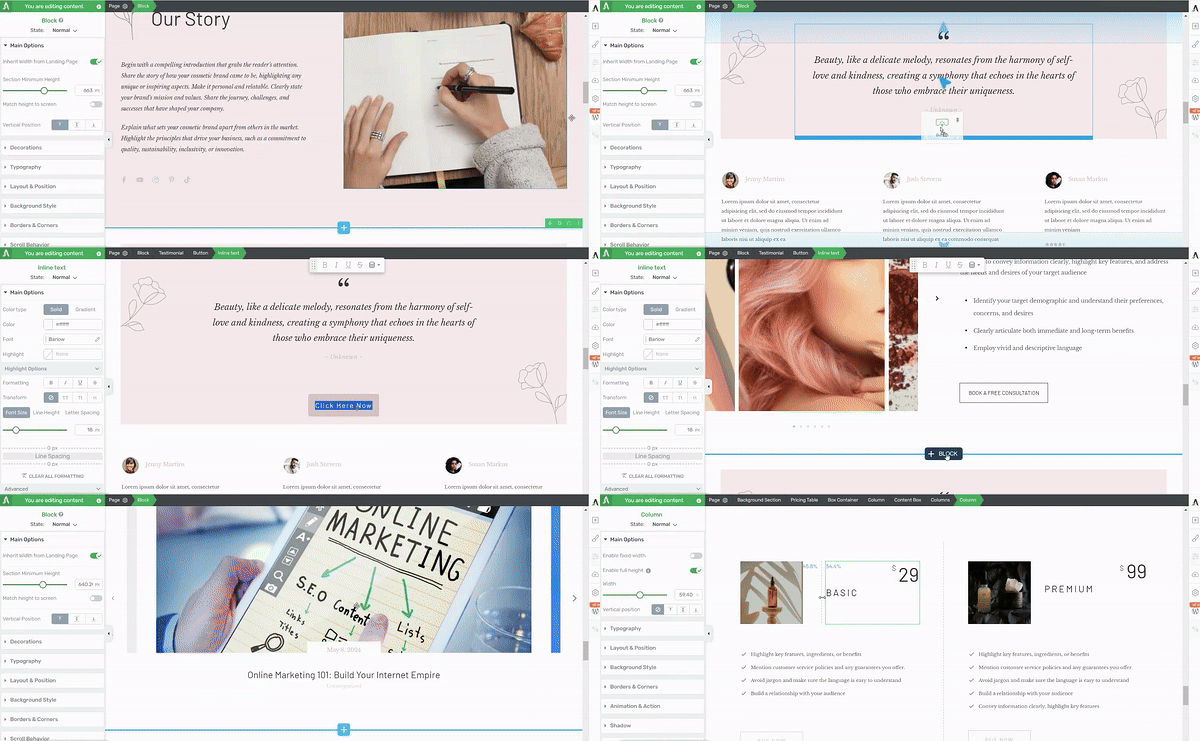
Thrive Architect in action
Every template element is customizable: text size, spacing, shadows, hover effects, even responsive visibility. And when you want to build something from scratch, the block library has you covered.
For beauty brands, I particularly like how easy it is to showcase visuals. Image grids, before-and-after sliders, testimonial carousels — all possible without extra plugins.
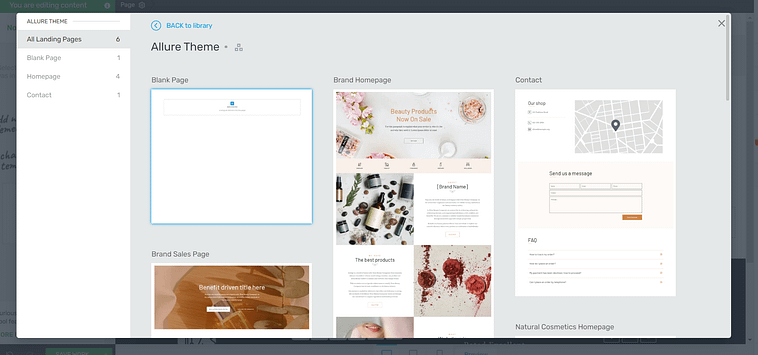
It’s also surprisingly conversion-focused for a design tool. You can add opt-in forms, countdown timers, or dynamic content blocks without breaking your creative flow.
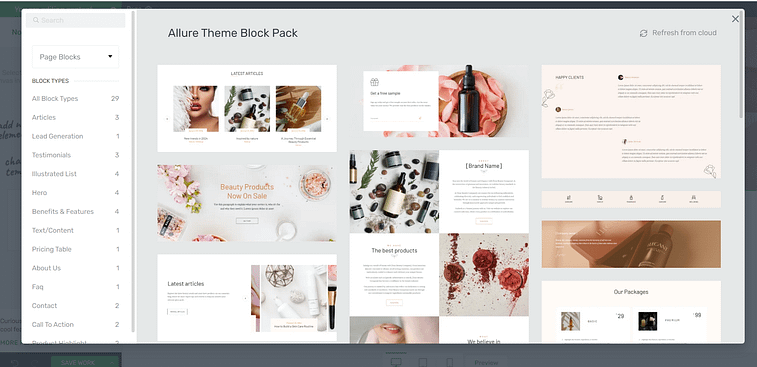
If your brand is your business, Thrive Architect gives you the tools to present it like one.
Want a closer look before committing? Here’s our honest Thrive Architect review that breaks down its strengths, quirks, and best use cases.
Step 8: Connecting the Essentials — Email & Checkout
A beautiful site is useless if it doesn’t capture leads or process payments smoothly. This is the part of setup where most people stall, but Thrive makes it relatively painless.
Email Integration
Connecting your email platform happens through the Thrive API Manager. Once connected, your opt-in forms sync automatically — no messy HTML embeds. You can set what happens after a subscriber signs up (redirect, thank-you page, download, etc.) and decide which fields you actually need.
If you’re new to list-building, this is where things get exciting. Your website turns into a living part of your marketing system instead of a static brochure.
Checkout Setup
There are a lot of WordPress checkout tools to choose from, including:
Each one has its own setup flow, but Thrive’s templates accommodate them all — product pages, carts, and checkout screens are already styled to match your design.
🚀 You’ve got the tools — now let’s make them work harder. Follow our guide on how to start an ecommerce store that actually sells to turn your site into a sales engine.
Once you’re live, focus on conversions — here’s how to reduce cart abandonment and keep more of those checkout-ready customers.
Within an hour or two, you can go from “just launched” to “open for business.”
Growth Tools to Help Expand Your Business
With this tutorial, you’ll set up a conversion-focused website to start your brand on the right note. But if you’re serious about growth, we recommend installing the following tools:
- All in One SEO: Get your website in front of more potential customers by ranking higher in search results.
- MonsterInsights: Make smart decisions based on real data to improve your website and grow your business.
- Smash Balloon: Build trust and engage your audience by showcasing your social media presence on your website.
And if you're ready to go beyond “just live”? Use our Ultimate Website Optimization Checklist to make your beauty brand’s website faster, smoother, and built to convert.
Next Steps: Set Up Your First Funnel
After your website is up and running, it's time to focus on funnels.
Think of funnels as a secret weapon for your online business. They take people who are interested in what you offer and turn them into paying customers. They guide people through the buying process, step by step, so they don't just look around and leave. Instead, they take action and buy from you.
Creating a funnel is all about making it easy for people to go from finding out about your business to becoming a loyal customer who buys from you again and again.
Check out these four free WordPress tutorials to learn how to build a funnel that brings in more sales and helps your business grow:
How to Grow Your Business with Cross-Selling, Upselling, and Down-Selling Techniques
How to Create an Upsell/Cross-Sell Funnel for an Online Course
If you already have your brand identity, product images, and content ready, you can get a basic, conversion-ready site up in a few hours to a day. Custom tweaks, integrations, and testing will add extra time, of course.
Yes — content (pages, posts, images) stays intact when you switch themes. But your layout (how blocks are arranged, styling, header/footer) may require re-adjustment. That’s why I always test theme changes on a staging site first.
Use high-resolution JPG or PNG files (at least 1200×1200 px) with optimized compression. Keep file sizes under 200 KB if possible. Always include descriptive alt text (e.g., “rose-infused facial serum bottle”) — it boosts SEO and accessibility.
Use an opt-in landing page or welcome gate (built via Thrive Architect) with a simple lead magnet (e.g., “Get exclusive early access” or “Free skin-care tips PDF”). Connect it to your email provider via Thrive’s API manager so data flows automatically.
At minimum, have Privacy Policy, Terms of Use, and Returns & Refunds pages. If you sell in regulated markets (EU, US), also include ingredient disclosure, allergen info, and disclaimers about health claims.
For a smooth user experience, aim for:
Largest Contentful Paint (LCP) under 2.5 seconds
Cumulative Layout Shift (CLS) < 0.1
Time to Interactive under 3 seconds
These metrics help reduce bounce rates and improve rankings.
Start by researching cosmetics regulations in your target markets. For the EU, maintain Product Information Files (PIFs) for each product. Use localized currency, clear shipping and VAT policies, and translate key content like ingredient labels and disclaimers.
Absolutely. Launch with 1–5 hero products, optimize those sales systems, then expand. That lets you test messaging, images, pricing, and logistics before committing to a full catalog.
Think of your business model first:
Use WooCommerce with subscriptions if you’ll offer recurring shipments.
Use Easy Digital Downloads or Thrive-compatible checkout forms if your products are digital (ebooks, courses, guides).
Use standard product/checkout flows for physical goods.
Thrive’s design system supports all of these paths without breaking your visual consistency.
Ready to Build a Website for Your Beauty Brand?
Now you’ve seen how easy it is to go from zero to a clean, conversion-focused beauty and cosmetics website using Thrive Architect and Thrive Theme Builder.
As you get more comfortable with our user-friendly tools, you'll start refining every detail to turn your simple design into an impressive website that offers your visitors an amazing experience — and also gets them to convert.
But most of all, make sure to have fun and we can’t wait to see what you build!


